


Home > MacX MediaTrans > User Guide

This is a detailed MacX MediaTrans user guide. MacX MediaTrans is the fastest all-in-one iPhone manager for Mac (macOS Sierra incl.). It helps to transfer photos, videos, music, playlists, books, voice, ringtones, podcast, iTunes U, voice memos between iPhone, iPad and iPod and Mac by simply drag and drop. And it even allows users to export iTunes purchases from iPhone iPad iPod to computer, including iTunes purchased movies, music, video, TV shows, audio books, etc. Thus, users can play iTunes DRM-ed files on any device out of Apple ecosystem. Follow the iPhone transfer tutorial below to manage data on iPhone freely.


MacX MediaTrans Overview
MacX MediaTrans is a professional iPhone file manager especially designed for MacBook Air/Pro/iMac 4K/5K etc. This iPhone transfer software makes it easy to transfer music, videos, movies, TV shows, photos, pictures, books, voice memos etc between iPhone, iPad, iPod and Mac computers. The plug-and-transfer solution keeps a stable and fastest iPhone transfer for data in batches and large size. It supports the latest Mac OS (macOS High Sierra, Sierra, El Capitan or earlier) and iOS (iOS 11, 10, 9 or earlier).
![]()
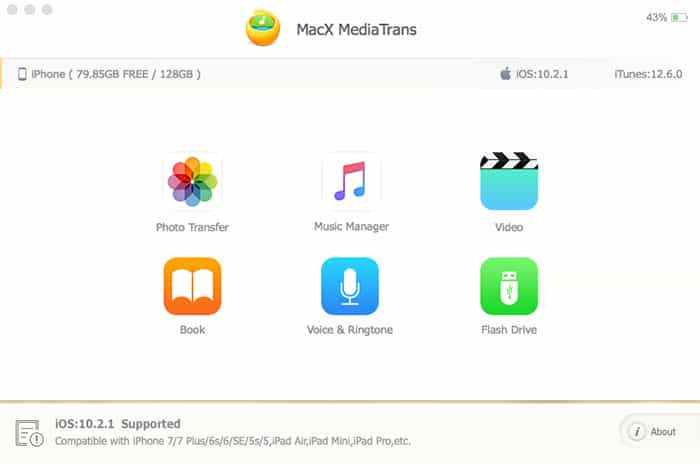
MacX MediaTrans Main Interface
Photo Transfer: Transfer live photos, 4K pictures, 12MP/HD images bewteen iPhone and Mac.
Music Manager: Sync music between iOS iPhone iPad iPod and computer, make ringtone for iDevices and create/delete/edit music songs.
Video Transfer: Import video from iPhone to Mac and add UHD/HD movies in any format from Mac to iPhone.
Book: Import EPUB, PDF and audio books to iPhone, iPad, iPod, export and convert EPUB to PDF, HTML, TXT eBooks.
iTunes DRM Removal: Automatically remove iTunes DRM protection from iTunes purchased movies, music, TV shows, audio books, etc. and convert iTunes M4V video to MP4, M4P music to MP3 for non-Apple devices usage.
Voice & Ringtone: Add/export/delete/ auto convert iPhone iPad iPod ringtone, voice memo, iTunes U, Podcast.
Flash Drive: Use iPhone as flash drive to save files on iPhone, iPad and iPod, including pdf, word, excel, documents, apps, music, videos, pictures and whatever files.
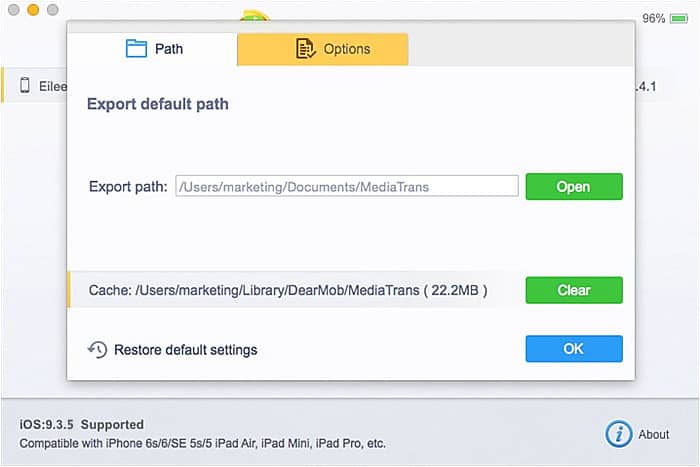
Settings:
Path: Set the folder on Mac where you'd like to transfer iPhone data to.
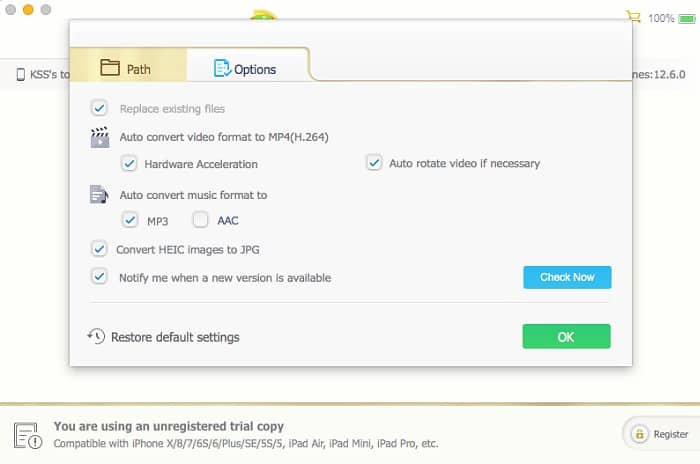
Options: Simple iPhone transferring settings.
* Replace existing files: check this box, and the existing file will be replaced with a new version. Otherwise, it will not overwrite the existing file but keep two duplicate files.
* Auto convert video format to MP4(H.264):
check this box, it will automatically detect the video formats and convert incompatible formats to iPhone supported formats when you transfer videos from Mac to iPhone. Check the Hardware Acceleration box, the iPhone manager will ensure the No.1 fast video transferring process by taking use of Intel' Quick Sync Video tech. And the Auto rotate feature will automatically rotate videos shot at different angles to fit iPhone's display.
* Auto convert music format to "MP3" or "AAC": this option invovles the DRM removal function. When you export iTunes purchased content, the iPhone manager is able to remove the DRM and convert music format to MP3 or AAC.
* Convert HEIC image to JPG: check this box, and all the HEIC photos shot with iOS 11 powered devices will be exported into JPG.
Learn how to transfer iPhone photos to Mac with MacX MediaTrans easily. First download this iPhone manager and follow the tutorial below.
Step 1: Turn off iTunes Auto Sync
Launch iTunes and click "iTunes"> "Preferences…". Then click "Deivces" and tick the option " Prevent iPods, iPhones, and iPads from syncing automatically." The step is to avoid any data loss.
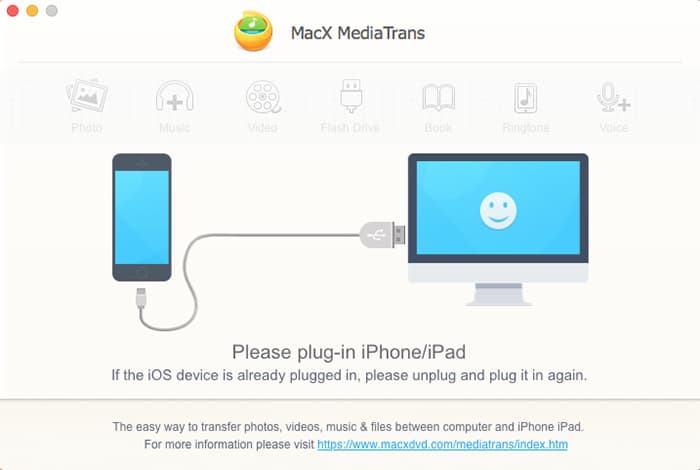
Step 2: Connect iPhone to Mac computer
Connect your iPhone to Mac via USB cable and launch the iPhone photo manager. You can copy photos from iPhone X/8/8 Plus/7/6S/SE/6/5S/5, iPad Pro 9.7/12.9, iPad mini 4/Air 2, iPod etc.
Step 3: Transfer Photos from iPhone to Mac
Click "Photo Transfer" and you can see the whole iPhone album immediately. Select photos you want to transfer from iPhone to Mac or click "Select All" on the top right corner to transfer the whole album. Then click "Export" and it will copy iPhone photos to Mac computers in the folder you first set in the Settings.
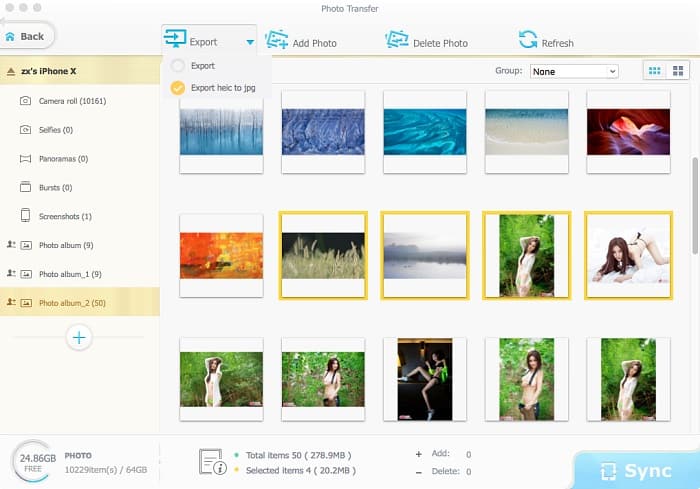
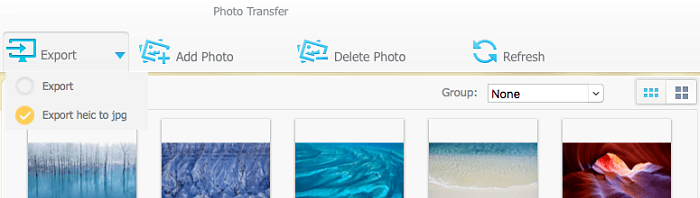
Convert HEIC to JPG: Since iOS 11, Apple introduced HEIC/HEIF instead of JPG for its camera. While the new picture format can save half the size, it's not as compatible as JPG. HEIC won't open on Windows & Ubuntu platforms,Windows Photos app, Adobe Photoshop, Lightroom, other photo editors or apps, and not even on Macs before High Sierra and older iOS devices like iPhone 6, 6 Plus, iPhone 5S, 5 etc. To convert HEIC into JPG: you can either preset in the setting section above and the iPhone manager will automatically export all the HEIC into JPG photos without further adjustment. Or if you haven't set in the Settings, click the down triangle icon to the right of Export and click "Export heic to jpg".
Step 4: Transfer Photos from Mac to iPhone
Click "Add Photo" and then select the images saved on your Mac computer. After the photos are selected, click OK and then the photos will be added to the manager. You can add as many photos as you like at one time, including wallpapers, images or photos. Last, click Sync to import all the photos to your iDevices.
Tips:
1. You can also bulk delete photos from iPhone. MacX MediaTrans is the only iPhone manager that can delete photos from camera roll on Mac.
2. Batch iPhone transfer is supported to allow you to select as many photos as you want to transfer.
3. iPhone photos will be transferred instantaneously. Specifically, 100 4K photos can be transferred from iPhone to Mac in 8 seconds only, compared with 30 seconds required by other tools.
4. This neat and lightweight iPhone manager occupies less CPU to allow multi-tasking.
First, turn off iTunes Auto Sync and connect iPhone to Mac via USB cable.
* How to export music from iPhone to Mac
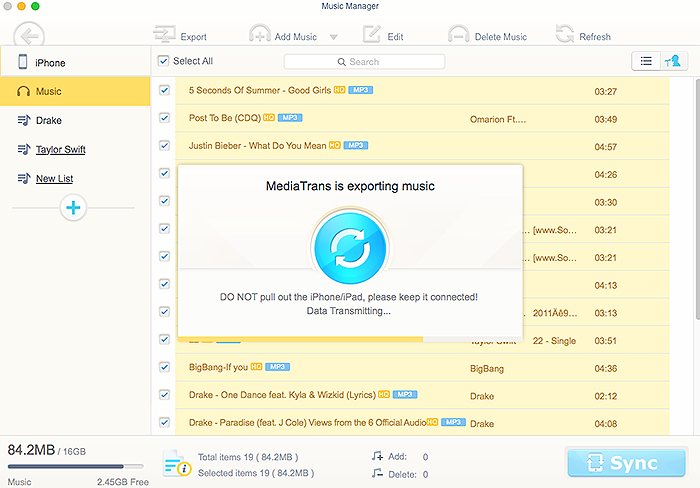
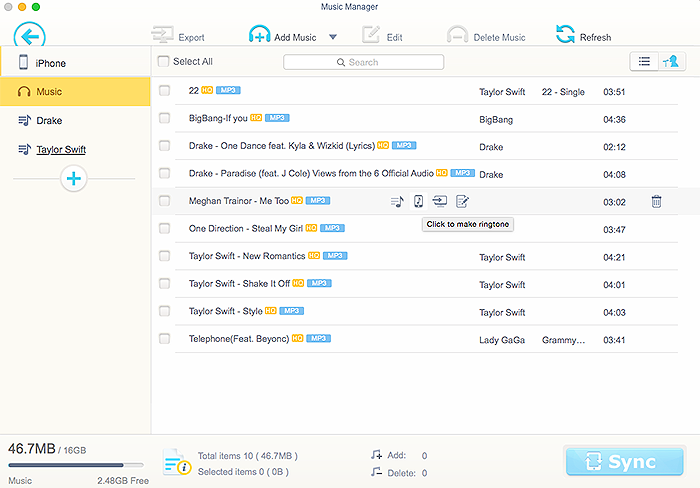
Step 1: Click "Music Transfer" on the main interface, then music purchased from iTunes Store, and songs downloaded via apps or shared by friends will all be shown.
Step 2: Select the music you'd like to transfer from iPhone to Mac.
Step 3: Click "Export" then the iPhone manager will automatically copy the selected music from iPhone to Mac.
* How to transfer purchased Apple Music from iPhone to Mac
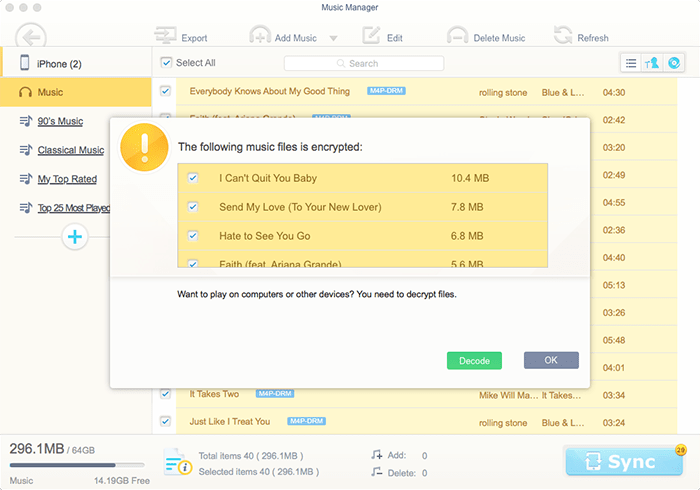
Step 1: Choose the purchased Apple Music songs you wanna transfer from iPhone to Mac.
Step 2: Select "Decode" if you want to decode the iTunes encrypted music files; or click "OK" if you don't plan to decode iTunes DRM-ed music for playback on other non-Apple devices. (in case you choose not encoding music files, you can directly click "Export" button to transfer iPhone encrypted music to Mac.)
Step 3: Sign in to the iTunes Store on your Mac with your Apple ID; afterwards, hit "Next" button to continue.
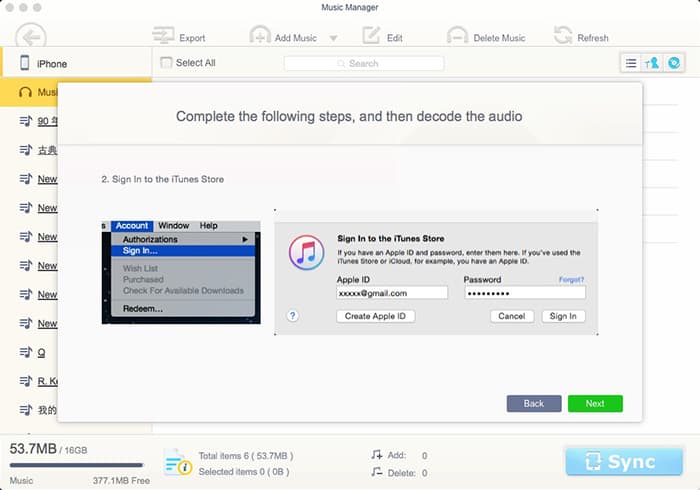
Note:
To copy iPhone Apple Music to Mac computer, you need to ensure that your iPhone songs keep synchronization with iTunes. If not, there will pop up a window to let your sync iPhone music files with iTunes.
* Open iCloud Music Library on your iPhone.
* Sign in to the iTunes Store.
* Set iCloud Music Library.
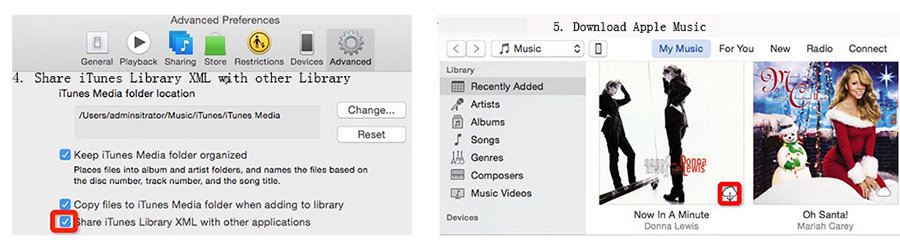
* Share iTunes Library XML with other library on Mac's iTunes.
* Download Apple Music on iTunes.
Step 4: Click "OK" after this music manager automatically decodes the iTunes DRM protection from Apple Muisc.
Step 5: Tap "Export" button now to export iPhone decrypted Apple Music to Mac. You can see your once DRM-ed M4P music now is auto converted to unprotected MP3 audio format. Hence, you can transfer iPhone Apple Music to Android, MP3 player, game consoles for enjoyment.
* How to import music from Mac to iPhone
Step 1: To transfer music from Mac to iPhone, click "Music Manager" on the main interface.
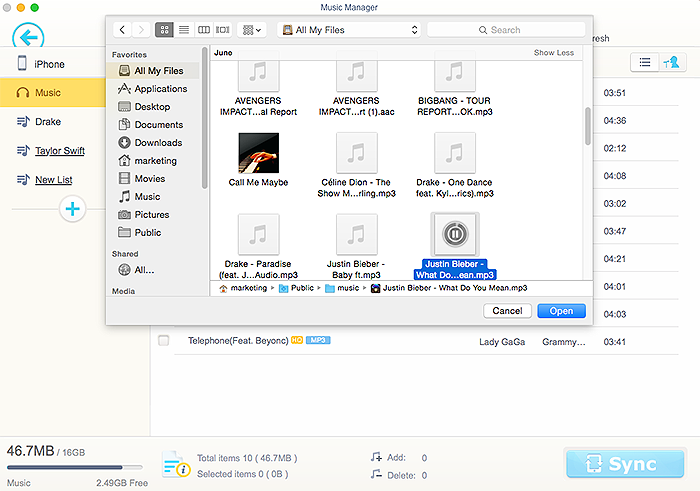
Step 2: Click "Add Music" and a window will popup to select the songs you want to add to iPhone.
Step 3: Select the songs on local Mac computer and then click "Open".
Step 4: The songs are now appeared in the iPhone manager, click "Sync" and the new added songs will be synced to iPhone.
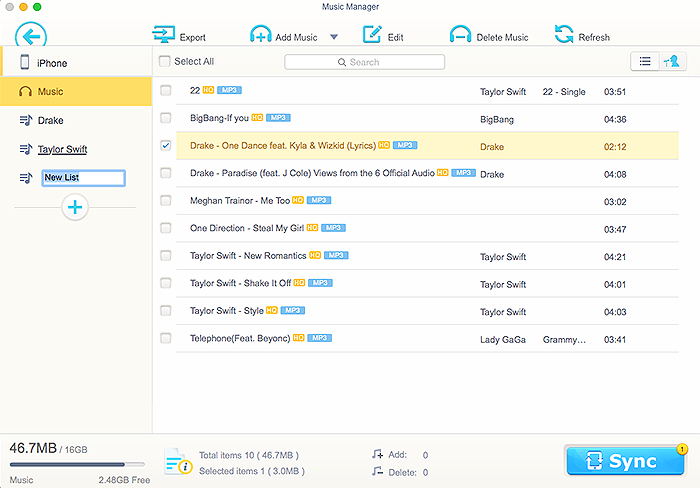
* How to manage playlists
You can create playlists, edit music information, delete songs, quick search and filtering iPhone music etc. You can check the box before each song to edit songs in batches.
1. Click "+" on the left column to add new playlists and rename the playlist. You can create as many playlists as you want.
2. Click "Edit" to edit the information of each song, including title, artist, album, composer etc.
3. Click "Delete Music" and you can delete songs on iPhone from computer.
4. Click "Refresh" to restore to the original iPhone data.
5. Click "Sync" to sync all the changes to iPhone library.
Tips: you can choose those buttons either on the top of the interface, or the options following each song
* How to make ringtone
The feature-rich music manager also gives easy access to make personalized ringtone for iPhone.
1. Click "iPhone Ringtone" icon to begin with. Music from iPhone or exported from Mac can all be edited to ringtone.
2. From the ringtone editing interface, you are free to trim the ringtone to the length you prefer. Click "OK" and back to the music manager interface.
3. Click "Sync" icon and all the ringtone will be added to iPhone. The original music quality won't be decreased.
First, turn off iTunes Auto Sync and connect iPhone to Mac via USB cable.
* How to transfer videos from iPhone to Mac
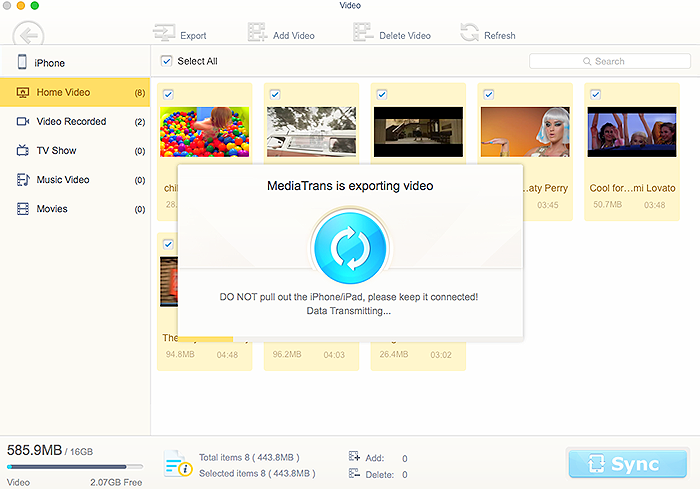
Step 1: Click "Video" on the main interface.
Step 2: Select the videos you'd like to move from iPhone to Mac.
Step 3: Click "Export" then the iOS file manager will automatically transfer the selected videos from iPhone to Mac.
* How to export iPhone purchased DRM protected M4V movies TV shows to Mac
Step 1: Choose the iTunes DRM-ed M4V movies or TV shows.
Step 2: Sign in to your iTunes Store using your Apple ID.
Step 3: Select "Decode" when the DRM files decoding window pops up.
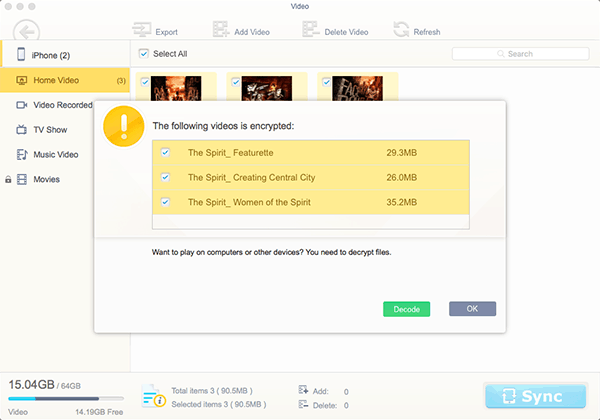
Step 4: Hit "OK" and then this iTunes DRM removaltool will automatically decrypt the iTunes FairPlay DRM from purchased movies, TV shows and videos.
Step 5: Click "Export" button to begin transferring iPhone DRM protected M4V movies, TV shows to Mac after the decryption is finished. When the whole iTunes M4V movie transfer is over, you can see your iTunes DRM files have changed file extension to .mp4, which means they're not copyright protected any more. You can play them anywhere anytime.
Note: The decrypted iTunes movies or TV shows should be used under your legal yet personal use. Do Not use the decrypted files for piracy or any illegal activity. Please abide by your country or local law of copyright protection.
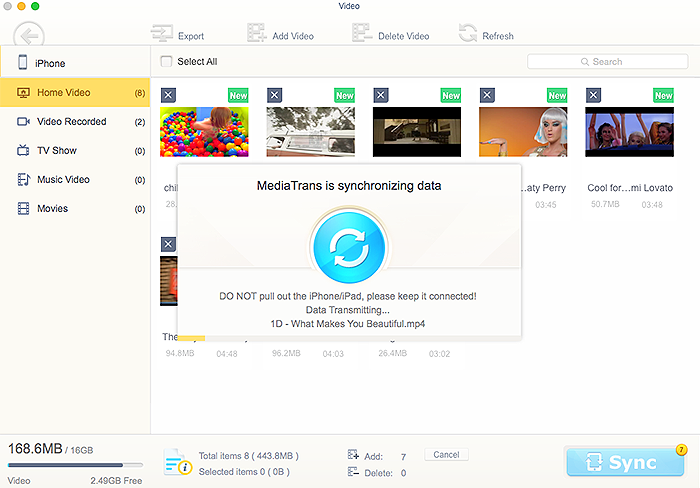
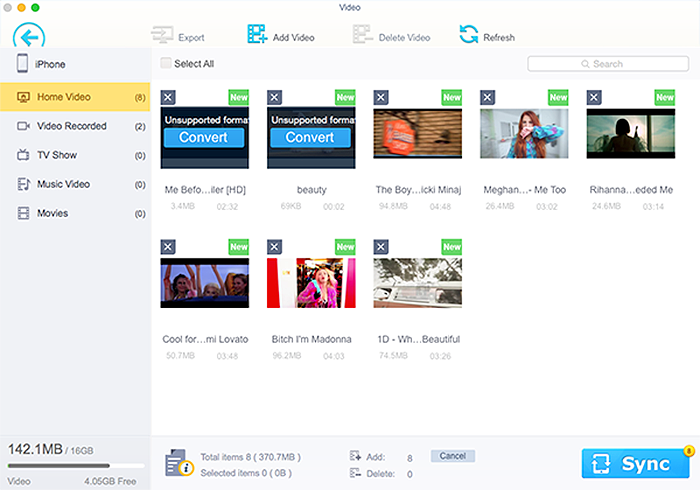
* How to import videos from Mac to iPhone
Step 1: To transfer videos from Mac to iPhone, click "Video" on the main interface.
Step 2: Click "Add Video" and a window will popup to select the videos you want to add to iPhone.
Step 3: Select the videos on local Mac computer and then click "Open".
Step 4: The videos are now appeared in the iPhone manager, click "Sync" and the new added videos will be synced to iPhone.
Tips:
1. The iPhone transfer software has a unique auto rotate feature, with which videos in sideways will be automatically rotated to fit iPhone's display.
2. You can transfer videos from Mac to iPhone in 4K, HD 1080P/720P resolutions with fast speed and untouched quality.
3. Feel free to transfer videos to iPhone in whatever formats, including MKV, MTS, FLV, 3GP, WMV etc.
* How to convert videos to an iPhone supported format
When you transfer an iPhone incompatible video from Mac, the iPhone manager will remind you that the video is in unsupported format with the thumbnail being black. You can click "Convert" on the thumbnail before you sync to iPhone to convert the video file to iPhone supported format. Tips: The whole conversion is speeded up by the hardware acceleration tech.
Before you go, turn off iTunes Auto Sync in case of data loss, connect iPhone to Mac with iDevice USB cable.
* How to export books from iPhone to Mac
Step 1: Click "Book" on the main interface, and all the iBooks, including EPUB , PDFs and Audiobooks , will be displayed on the left.
Step 2: Select eBooks to transfer from iPhone to Mac computer.
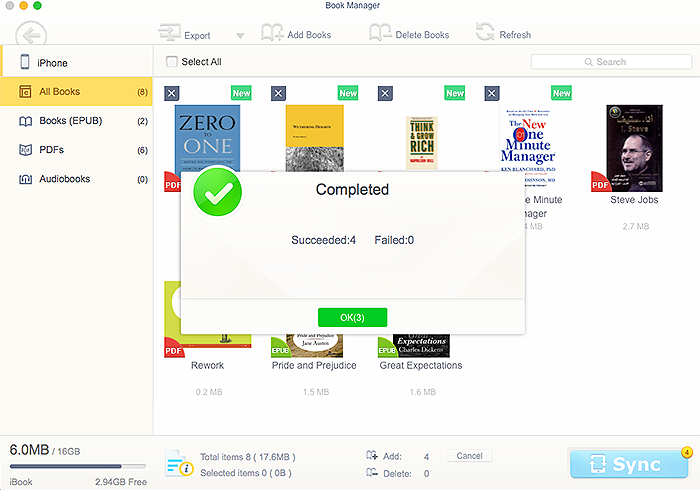
Step 3: Click "Export" button, and all the eBooks will be copied quickly.
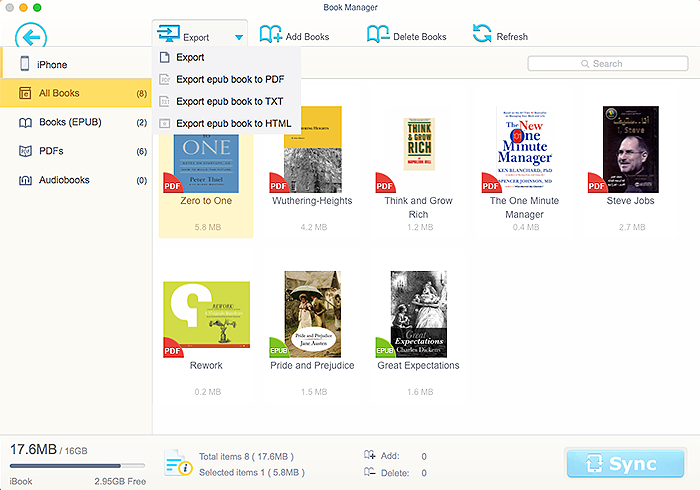
Tips:
1. the iBook manager tool can auto convert EPUB books to PDF, TXT or HTML. In the last exporting step, you are given four options, "Export", "Export epub book to PDF", "Export epub book to TXT", "Export epub book to HTML".
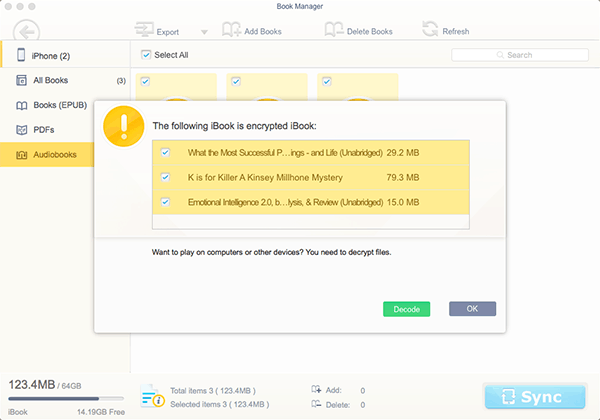
2. "The Delete iBook" feature allows users to simply delete iBook one by one or in batch.
3. The latest version of this iBook manager supports you to remove DRM protection from audio books. After iTunes DRM protection removal, you can get your unprotected audio books in MP3 format.
* How to move eBooks from Mac to iPhone
Step 1: Click "Books" on the main interface to get a start.
Step 2: Click "Add iBook" next to Export and select eBooks from Mac to add to iPhone. You can check "Select All" and all the books displayed will be synced.
Step 3: Click "Sync", and the selected books will be imported to iPhone immediately.
First, turn off iTunes Auto Sync and connect iPhone to Mac via USB cable.
* How to Transfer iPhone Voice or Ringtone to Mac
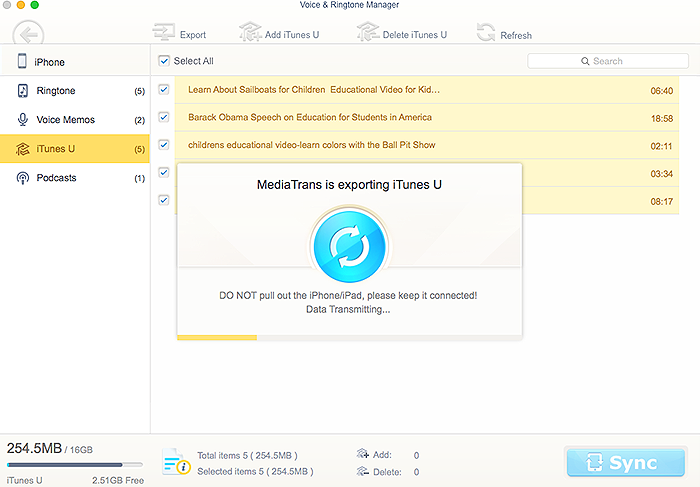
Step 1: Click "Voice & Ringtone" on the main interface.
Step 2: Select the voice you'd like to transfer from iPhone to Mac, no matter the ringtone, voicememo, iTunes U or podcast.
Step 3: Click "Export", then the iPhone manager will automatically copy the selected voice from iPhone to Mac.
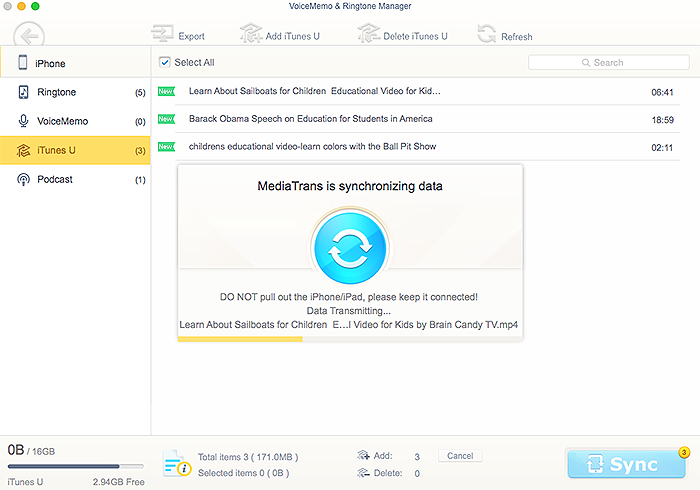
* How to Import Voice & Ringtone from Mac to iPhone
Step 1: To transfer voice from Mac to iPhone, click "Voice & Ringtone" on the main interface.
Step 2: Add different kinds of voice based on categories: "Add Ringtone" for ringtones, "Add iTunes U" for audio lessons or "Add Podcast" for podcasts. Then a window of corresponding voice will pop up.
Step 3: Select the target voice on local Mac computer and then click "Open".
Step 4: The voices are now shown on the iPhone manager. Click "Sync", the new added voice will be synced to iPhone.
Tips:
1. The iPhone transfer software empowers to import any audio like FLAC, WMA, WAV, RAW etc. to MP3 or AAC, thanks to the auto audio converting feature.
2. You can transfer Ringtone, iTunes U and Podcast from Mac to iPhone at fast speed with lossless voice-quality.
3. Besides transferring ringtones from Mac computer, you can also make ringtones below "Music Manager". The trimmed music will automatically appear to Ringtone interface with a green icon.
4. All the voices, regardless of ringtone, iTunes U, voicememo, or podcast can be deleted singly or in batch.
This iPhone transfer software features unique ability to turn iPhone iPad iPod as flash drive to allow users save data with the extra storage. Follow the user guide below to mount iPhone as flash drive with MacX MediaTrans.
First, turn off iTunes Auto Sync and connect iPhone to Mac via USB cable.
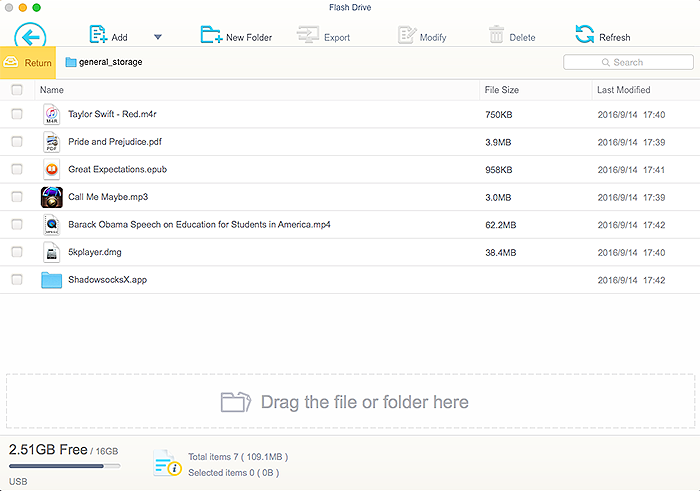
* How to save files on iPhone
Step 1: To mount iPhone as drive, click "Flash Drive" on the main interface.
Step 2: Click "Add" on the top of the interface.
Step 3: Select the files you'd like from local Mac computer to save on iPhone and click "Open", or simply drag and drop the files.
Tips: You can save word, excel, ppt, pdf, apps, documents, music, videos, pictures and files in whatever formats on iPhone.
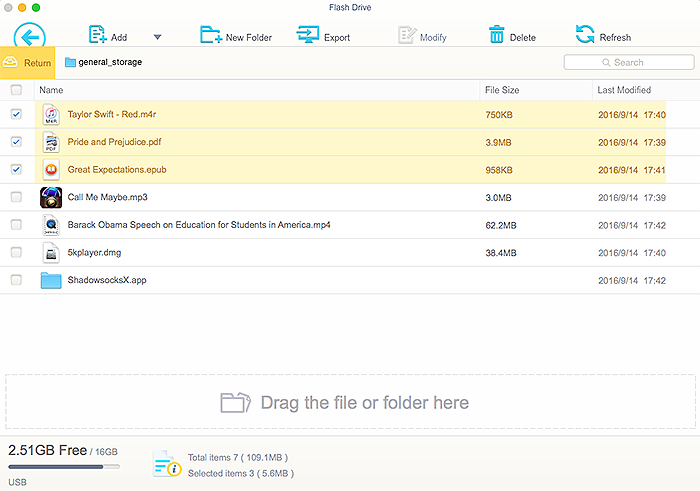
* How to export files to computer
Step 1: To export the saved files from iPhone to Mac, click "Flash Drive" on the main interface.
Step 2: select the files you'd like to export from iPhone to computer.
Step 3: click "Export" and the selected files will be transferred to Mac computer.
Tips:
1. Click "New Folder" to create new folders on iPhone.
2. Click "Modify" to rename the files, folders, music and other files saved on iPhone.
3. Click "Delete" to delete the files on iPhone.
4. Click "Refresh" to restore to the original iPhone data. Like a normal USB flash drive, the files saved through "Flash Drive" can't be viewed or accessed on iPhone.
Hope this iPhone manager may serve you well. But sometimes, you may want to uninstall MacX MediaTrans for certain reasons. To do this, follow the guide below:
Step 1: Find the folder containing MacX MediaTrans.
Step 2: Drag the software to the Trash icon in the Dock. You'll need administrative rights if it's installed in your Applications folder.
Step 3: Remove MacX MediTrans software from your Dock, simply drag it out of Dock with your mouse.
I had the problem of converting some format. E-mail:support@macxdvd.com
Home | About | Site Map | Privacy Policy | Terms and Conditions | License Agreement | Affiliate | News | Contact Us
Copyright © 2024 Digiarty Software, Inc (MacXDVD). All rights reserved
Apple, the Apple logo, Mac, iPhone, iPad, iPod and iTunes are trademarks of Apple Inc, registered in the U.S. and other countries.
Digiarty Software is not developed by or affiliated with Apple Inc.