

YouTube, the most popular online video-sharing website, covers almost all the sorts of video types, like music video, self-shot funny video, TV shows and Hollywood movies, from which you can find out any video you care a hang and enjoy it online. But accidents always tend to happen. What if don't have time at the moment and just want to save the YouTube video to watch later offline? The idea of capturing YouTube videos to Mac may come up to your mind. Yes, why not? If you have the right YouTube vdieo recorder for Mac, it will be just as easy as a pie.
Best Mac Screen Recorder to Record YouTube Video with Audio
Capture a non-downloadable YouTube video the world-renowned MacX Video Converter Pro. It enables you to record any live streaming video on YouTube from your Mac screen with terrific audio and image quality.
- Record YouTube videos (partial/full screen), live streaming YouTube on Mac with original audio and video quality;
- Capture any web video from Dailymotion, Metacafe, Vimeo, Facebook, Instagram, etc. with unaffected quality;
- Edit recorded YouTube clip: trim, crop, split, merge, rotate, add subtitle/watermark, adjust resolution/frame rate...
- Free download YouTube videos (1080p/4K/8K from YouTube or other 1000+ sites) at fast speed;
- Save the captured YouTube videos to MP4, MOV, MKV, 3GP, AVI, WMV, H264, HEVC, etc. for iPhone iPad, Android.
Part 1. How to Record YouTube Live Streaming Video on Mac with Audio
This intuitive YouTube recorder for Mac OS will lead you to accomplish the YouTube video recording task easy as A-B-C and meanwhile reserving 1:1 original video and audio quality.
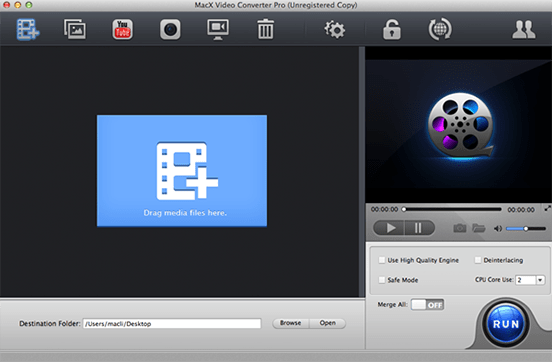
Step 1. Click "Screen Recorder" Button.
After free downloading and running YouTube video recorder for Mac, press the "Screen Recorder" button on the main interface.
Step 2. Adjust Capture Settings.
In this area, you are allowed to customize the screen recording area by choosing "Keep Full Screen" or "Crop Region". Moreover, before you capture YouTube video on macOS, you have the choice to select the quality of video to be recorded, tweak the video frame rate, add sound effect to your video, and alike.
Tips: for smoothly recording the audio, you're suggested not to adjust the audio settings lest the unexpected heightened volume would hurt your hearing. You can capture streaming videos on Mac from not only YouTube, but also any other sites.
Step 3. Select the Destination Folder.
Click "Target Folder" button to select a destination folder and save your recorded YouTube video.
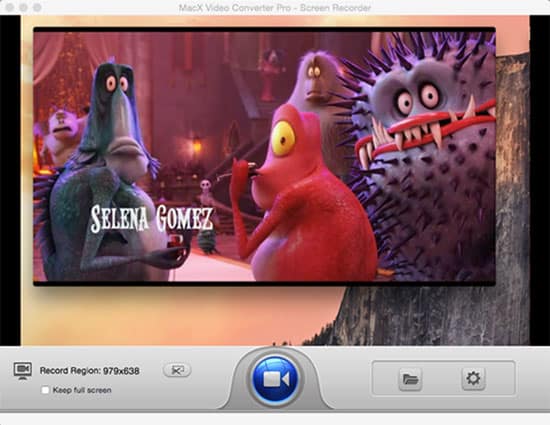
Step 4. Start Record.
Hit "Start Record" button, the program will start capturing YouTube screen video within a fraction of seconds.

Part 2. How to Capture YouTube Videos for Mac via YTB Videos Download
As mentioned above, the Mac YouTube video recorder offers another way to capture YouTube streaming videos: free download. Using this way, you can skip the video playback process while recording, and capture YouTube videos for Mac computer right away.
Step 1. Free download YouTube video capturing software Mac version for Macbook Pro/Air, iMac etc. (Windows version is also available for 11/10/8/7) and launch it. Then click "YouTube" icon and "Paste & Analyze" button to detect YouTube streaming videos.
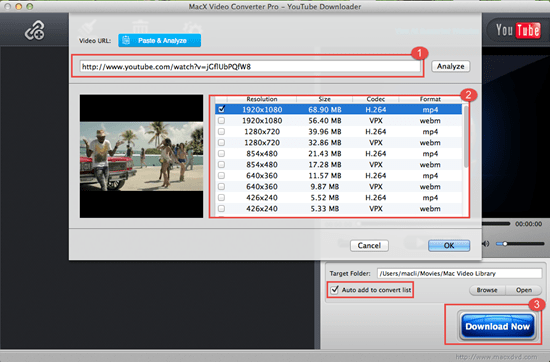
Step 2. Choose the output video format, resolution, video size as you need.
Step 3. Click the "Browse" button and choose the location where you would like to save your captured YouTube videos.
Step 4. Press "Download Now" to save the YouTube videos offline. It takes half-a-minute to get a 4-minute HD music video. You can also capture YouTube audio on Mac only by converting the video into MP3 or other audio formats.
Part 3. How to Record Live Streaming YouTube on Mac with QuickTime Player
Some Mac users may think about QuickTime player. Yes, QuickTime player has the native ability to screen record video for MacBook or iMac without any 3rd party app help. QuickTime Player allows you to capture YouTube on Mac along with audio, which is useful if you want to narrate or include sound from the system or external sources. After recording, QuickTime Player offers basic editing capabilities, such as trimming the video or adding annotations.
QuickTime Player's recording features are minimal compared to dedicated YouTube recording software for Mac. It lacks advanced options like webcam overlay, custom hotkeys, and various output formats. While recording, QuickTime Player may consume system resources, which could affect the performance of resource-intensive tasks. For those who don't mind this point, follow the steps below to achieve your goal:
Step 1. Go to Finder > Applications > tap QuickTime Player from the list.
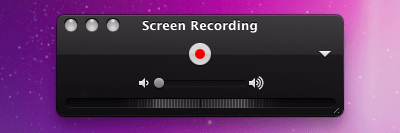
Step 2. Move your mouse to the top menu of the screen once QuickTime player is launched. Click File > Choose "New Screen Recording".

Note: click the arrow icon (nearby Record button) and opt for "Show Mouse Clicks" in recording option from the drop-down menu. After that, your mouse clicks appear in sight.

Step 3. Head to YouTube webpage and find your desired YouTube videos or live streaming video. Tap Record button.
Warm Prompt:
- Record the full screen: click anywhere on the screen.
- Record partial screen: hold the touchpad and drag it to select the screen section size you need for recording.
Step 4. Click Start Recording.
Step 5. Right-click on the QuickTime Player icon in the Dock and select Stop Recording if you wanna draw to a close on this Mac YouTube screen recording. Or simultaneously press Command + Control + Esc shortcuts to end screen recording.
Step 6. The captured YouTube file will be opened automatically once it's accomplished. Load it to iMovie or Premiere for further editing if needed. Or just save it to your MacBook or iMac for latter offline viewing.
Part 4. How to Record YouTube Screen with Photo Booth App
Photo Booth app is prone to be neglected with its screen recording feature. Actually, you can use your Mac built-in iSight camera or an external camera (latest iPhone models would be fine) to screen record YouTube video on Mac under the assistance of Photo Booth app. And the whole procedure is damn simple:
Preparation: supposing you screen capture YouTube footage with an external camera, opt for it as your input device in Camera settings in the menu on top of the screen when you fire this app up. Moreover, For iPhone users who take advantage of it as the input device, you're supposed to connect it with your Mac via a USB cable and run EpocCam on both iPhone and Mac. This step is vital, making transmission from the iPhone onto the Mac screen possible. When everything is ready, go ahead:
Step 1. Launch Photo Booth app on Mac > choose "Camera" > select the input camera device you want.
Step 2. Click "Record Video" icon at the lower left corner of this app.

Step 3. Tap Stop button to stop recording YouTube screen on Mac.
Part 5. How to Capture YouTube Screen Video with Camtasia
It's essentially meaningless if your YouTube screen recording software can't produce the resulting recording file with your desired quality. Camtasia knows your concern and provides you with the options to let your customize your output YouTube recording file with your preferred quality.
Meanwhile, similar to MacX Video Converter Pro, this program also supports you to record YouTube with partial screen or full screen and save the resulting file in MP4 or MOV format at your disposal. And this YouTube recording software has a 30-day free trial to let you record and edit YouTube screen video for free within 30 days. Give it a shot if you have installed it on your MacBook, iMac or Mac Pro.
Step 1. Run Camtasio on Mac > click "Tools" under the Apple menu on your desktop > tap "Record the Screen".

Step 2. Open the YouTube video that you wanna record. Turn back to Camtasia and adjust the recording marquee to decide the recording zone.

Step 3. Move your mouse to the "Dimensior" section, where you can select the recording aspect ratio like widescreen 16:9, standard 4:3 or other dimensions.

Step 4. Hit the red "Record" button to begin recording YouTube screen video on Mac. Tap "F10" on your keyboard to end the recording. Afterwards, it will pop up a window to ask you for saving and editing.
When it saved to the Camtasia program, its built-in video editing window will show up, as well. You can further edit your YouTube recording file like splitting, cutting, cropping, adding special effects, or just simply hit the Produce button to produce your final screen recording file with MP4 or MOV format.
One thing to be noted is that the recorded and exported YouTube video will attach with watermark if you are on trail. To remove the watermark from recording video, upgrade to its Pro version please.
Part 6. How to Capture YouTube on Mac with Screenshot Toolbar
The "Screenshot toolbar" feature on macOS Catalina and later allows users to take screenshots and screen recordings easily. It can be accessed by pressing Shift + Command + 5 on your keyboard. However, the steps below are specifically for taking screen recordings using the Screenshot toolbar.
It is an excellent option when you don't require system audio, as it does not have the capability to capture sound directly from YouTube. As a result, the recorded YouTube videos will include audio from your Mac's microphone, along with any surrounding ambient noise.
Step 1. To begin, open the YouTube video you wish to record. Press Shift + Command + 5 to bring up the Screenshot Toolbar, which includes screen capture and recording controls. For recording purposes, you have the option to choose "Record Entire Screen" or "Record Selected Portion."

Step 2. If you want to include audio from your Mac's microphone and capture surrounding sounds, go to the Options menu and select your Mac's microphone. Additionally, you can enable "Show Mouse Clicks" to display mouse clicks during the recording.
Step 3. Once you've made the necessary selections, start playing the YouTube video, and click on the "Record" button to initiate the recording process on your Mac. To stop the recording, click the "Record" button again, which can be found in the menu bar.
Part 7. FAQs about How to Record YouTube on Mac
How do I record YouTube videos on my Mac for free?
To record YouTube videos on your Mac for free, you can use the built-in screen recording feature provided by macOS. Press Shift + Command + 5 to activate the Screenshot Toolbar, which includes screen capture and recording options. Choose "Record Entire Screen" or "Record Selected Portion" as needed. You can enable your Mac's microphone from the Options menu to record your voice and ambient sounds. Start playing the YouTube video, and click the "Record" button to initiate the recording. Once finished, click the "Stop" button in the menu bar to end the recording.
How do I record audio from YouTube on my Mac?
To record audio from YouTube on your Mac, you can use several methods, both free and paid, such as QuickTime Player, Soundflower, Browser Extensions, etc. You can also use MacX YouTube Downloader to download audio from YouTube on MacBook Air/Pro/iMac.
What do YouTubers use to record YouTube videos free?
Many YouTubers opt for free screen recording software to record their YouTube videos. Some popular choices include OBS Studio, an open-source tool with robust features and multi-platform support. Flashback Express offers user-friendly screen recording with basic editing capabilities. ShareX, another open-source option, boasts flexibility and numerous capture options.


Candice's particularly skilled in writing and sharing video-related contents. Her guides cover from deep-seated video/audio parameters, to media entertainment on different platforms. She also enjoys shooting and processing videos by herself for a more reliable basis of informative info with her articles, which are never at the expense of eliminating an entertaining read.


