

With the popularity of HD and 4K videos and the arrival of 8K videos, the demand for reducing video file size is growing rapidly. To share large videos on Whatsapp, TikTok, YouTube, Instagram, webs, and emails, and save storage space on computers or phones, we need to shrink video size. Here we list 2024 best Mac video compression software to compress MP4 HD/4K/8K without losing quality.
Compress Videos from GBs to MBs on Mac without Losing Quality
MacX Video Converter Pro - Compress HD 720P, 1080P, 4K, 5K, or even 8K videos by 40%-90% smaller without quality loss. Easily shrink videos from GBs to MBs for YouTube, TikTok, Instagram, Whatsapp, FaceBook, webs, emails, etc.
1. MacX Video Converter Pro [90% smaller]
Sum: Best video compression software for Mac to compress videos by 90% & no quality loss.
Compress Video by: 40%-90% | | Performance: 98%
MacX Video Converter Pro - 100% safe & professional. It is specially designed for Mac users to reduce videos with large sizes, for example, HD 720P, 1080P, 4K, 5K, or even 8K videos.
- Compress videos to advanced codecs like HEVC, H.264, MP4, FLV, VP9, WebM, etc. for smaller file size.
- Change encoding format, resolution, bit rate, trim off unwanted footage, crop black bars, etc.
- 40%-90% compression ratio. Reduce video file size on Mac without noticeable quality loss.
- Ready compression options to shrink videos for YouTube, Apple iPhone, FaceBook, webs, mobiles, TVs, etc.
- GPU-accelerated video compression on Mac with 5X faster than similar Mac video compressors.
- Convert video. Edit video. Download videos online. Record screen/webcam.
We once compressed an MKV video (1920x1080), 2h23min to MP4 from 8GB to 2.72GB. This Mac compression software reduces the MKV video size by 56% off. The whole video shrinking process costs 23min53s on a MacBook Pro (13-inch, 2018) running Big Sur, 2.3GHz Quad-Core Intel Core i5, 6 GB 2133 MHz LPDDR3, Intel Iris Plus Graphics 655 1536 MB.
How to compress a video on Mac with MacX Video Converter Pro
Step 1. Free download the video compressor to your Mac (Monterey incl.) and run it. Click the + video button to load the video files you want to downsize.
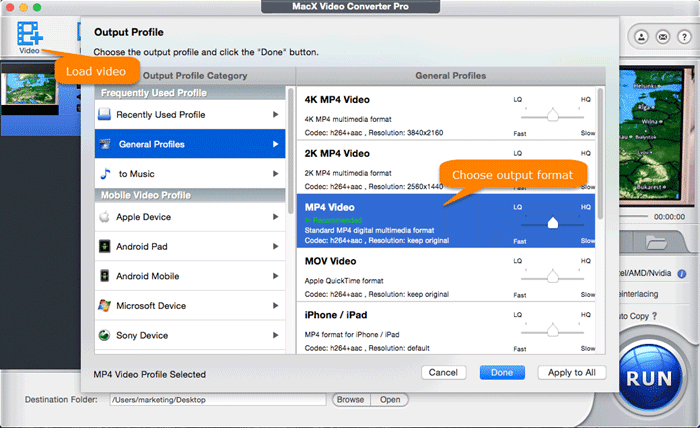
Step 2. Choose an output format from the pop-up window:
- To compress 4K or HD videos on Mac, choose HEVC which format provides a high compression rate.
- To compress a large video file to mobiles, here are 420+ readymade profiles for mobiles, which means you can compress video to iPhone iPad Android with small file size and high quality in one click.
- To shrink video for YouTube, Facebook, Instagram, WhatsApp, Vimeo, and other websites, or reduce video for e-mail, go to the Web Video Profile column and select a streaming video format like FLV, 3GP, WMV, etc. These formats are specially set for uploading videos to websites barely with the smallest size yet the highest possible quality.
Tips: You can adjust the slidebar of LQ-HQ or click "Use High Quality Engine" in the advanced setting area to improve your compressed video quality.
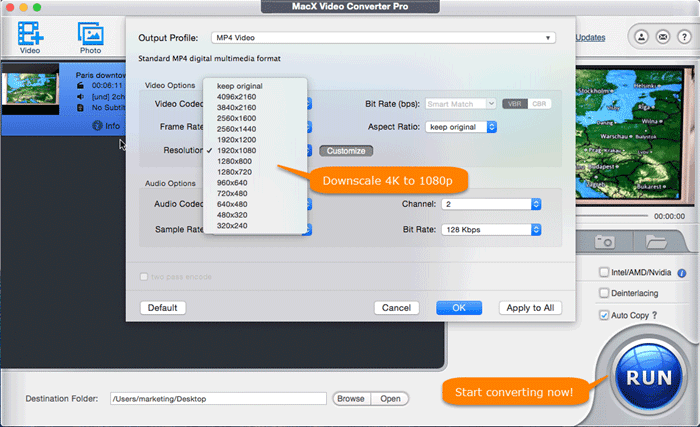
Step 3. Click the ![]() icon to adjust the video parameters, like Resolution and Bit Rate to make your file smaller. Generally, frame rate and frame size don't much affect the file size.
icon to adjust the video parameters, like Resolution and Bit Rate to make your file smaller. Generally, frame rate and frame size don't much affect the file size.
You can adjust or lower the video resolution (such as downscale 4K to 1080P, 1080P to 720P), and lower the video/audio bit rate by 20-50% compared with its default one. Normally, the smaller video you want, the lower bit rate.
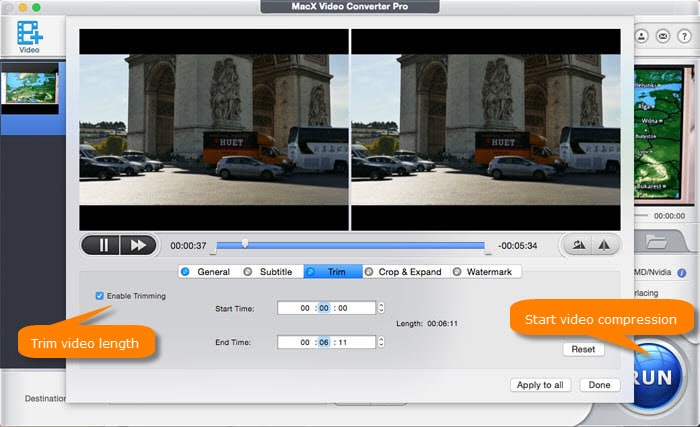
Step 4. Click the  icon to edit the video where it is allowed to crop the black bars, remove commercials from video/movie, and freely set up the Start Time/End time to get favorite clips, in such a way the video file will be downsized with nary a quality loss (no video conversion involved).
Step 5. Click the "Browse" button to choose the destination folder and click the "RUN" button to start to compress video files without losing quality.
2. Handbrake [Powerful for MP4/MKV]
Sum: Best free video compressor for Mac with flexible options
Compress Video by: 50% | | Performance: 98%
HandBrake is a free and open-source compressor running on Mac, Windows, and Linux. It can rip DVDs, Blu-ray, convert video, and compress videos. It has a wide range of features to help you easily compress a video to different sizes for Instagram, TikTok, WhatsApp, email, etc.
- Support compressing videos in any video format & resolution.
- Downsize video by changing the codec, lowering video resolution, bit rate, cropping, trimming, etc.
- Provide a lot of advanced features. It's great for tech-savvy users, but can be overwhelming for novices.
- Output formats are MP4 and MKV.
How to compress video on Mac with HandBrake
Step 1. Launch the free compression software on Mac and click the Open Source button to import the video you want to shrink.
Step 2. Under Preset, you can select an output with different qualities. The faster and slower preset will result in a smaller video size but lower quality. So you need to balance it.
Step 3. Under the section below, there is a slew of settings to change to compress the video on Mac. Under Summary, select MP4 for wider compatibility and Webm for web usage.
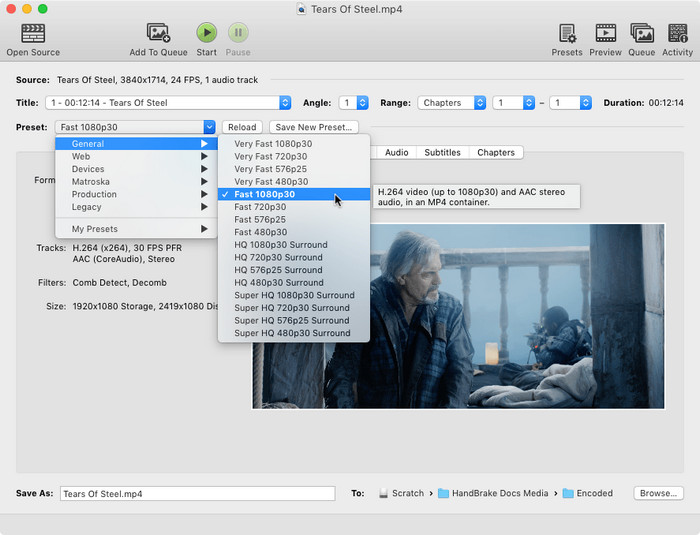
Step 4: Under the Video tab, you can change the video codec to H.265 or VP9 to get better compression. Lower the Quality by 1-2 RF to get a smaller video without noticeable quality loss.
Step 5. Under the Dimensions tab, resize the video to a lower resolution and crop the image if necessary. After all the settings, hit the Start button to begin reducing video file size. Learn detailed steps to compress video using Handbrake >>
3. VLC [Free and easy]
Sum: An easy and fast video compressor alternative to Mac QuickTime
Compress Video by: 40% | | Performance: 95%
VLC is another popular video player among Mac users. But it is quite an unknown fact that even the VLC media player can be used as a free video compression software for Mac. In fact, you can find more compression options in VLC than in QuickTime Player. With VLC, you can select a smaller-size format like MP4, WebM, FLV, others in H.265, H.264, MPEG4, etc., adjust the audio and video bitrate, and resize the video with one click.
How do I reduce the size of a video in Mac VLC?
Step 1. Open VLC, click File > select Converter/Stream. Then use Open Media to load your video.
Step 2. Next, in the Choose Profile section, click Customise. First, click the Encapsulation button from the popping-up window. Select a smaller format like WebM, MP4, or FLV based on your need.
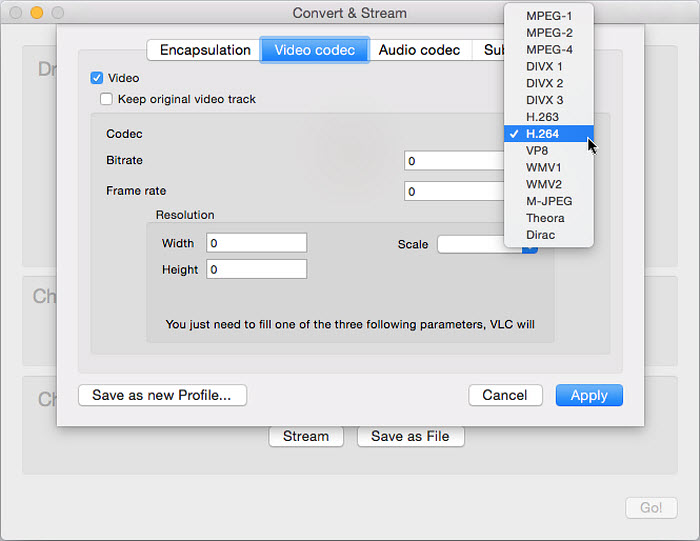
Step 3. Then click on the Video Codec button. Here you can select a more advanced codec for the video like H.265 for smaller output results. Lower the bitrate and resolution a little bit if necessary. You can also open the dropdown menu of Scale and select a value below 1 to downscale the video.
Step 4. Click Apply and back to the main interface. Click Save as File to set an output folder and click Go to start.
4. Final Cut Pro X Compressor[Advanced]
Sum: Apple's Compressor for Mac that can export Final Cut Pro videos to a smaller size.
Compress Video by: 50% | | Performance: 98%
The Compressor is designed to work with Final Cut Pro to provide more power and flexibility to the output. It provides high support to compress 4K videos, HDR, and 360° videos. Users can compress videos on Mac by encoding the output to HEVC, H.264, MPEG-4, etc., and adjusting parameters and choosing from a variety of frame rates and resolutions. It offers a one-click solution to compress and upload videos for popular video websites, including YouTube, Vimeo, and Facebook.
How do you use Mac Compressor to compress videos?
Step 1. Apple Compressor is not free. You need to install and purchase FCP first. Open Compressor and add media files from your computer or a connected storage device. Each media source file in Compressor is called a job.
Step 2. Under the Settings, select to compress your video to Apple Devices in 4K HEVC, HD, SD, YouTube & Facebook, or others. Then set a save location from the pop-up menu.
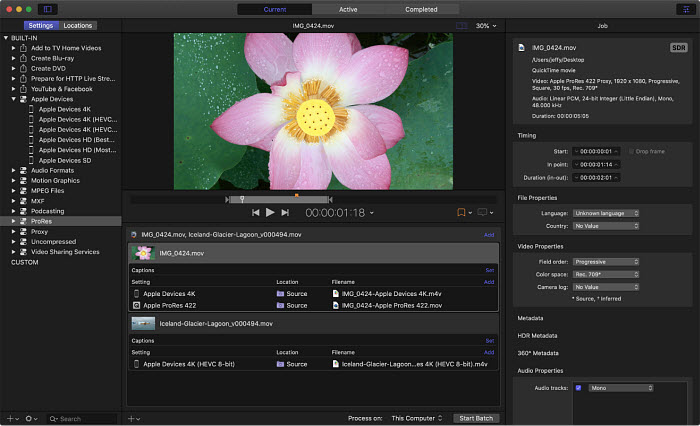
Step 3. If necessary, adjust the video properties such as resolutions, bitrate, etc. Customize the final cropping, sizing, and aspect ratio using the Cropping & Padding properties in Compressor. Set the encoder type to faster for a faster codec, standard quality, and smaller size.
5. Clipchamp [Free Online]
Sum: A convenient online tool if you don't want to install a video compressor on Mac.
Compress Video by: 30% | | Performance: 90%
If you don't want to download desktop-based video compression software on Mac, you can simply use free online video compressors, just like Clipchamp. When an internet connection is available, simply open a browser on your Mac, get access to the Clipchamp utility, and then you can import a video for compressing.
- Reduce MP4, AVI, MOV, WebM, and more video formats.
- Support batch processing.
- Provide presets for web (Facebook, YouTube, Vimeo), Windows, and Mobile.
- Allow you to downsize videos to a desired resolution (240p, 360p, 480p, 720p, 1080p, 1440p, and 4K) and quality.
- Available output formats include MP4, WebM, and FLV.
How to compress video with Clipchamp on Mac?
Step 1. Open a web browser on your Mac computer, and access the Clipchamp online video compressor.
Step 2. Drag the target video into the dotted box.

Step 3. Choose what you want to optimize for, web, Windows, Mobile, or Animation. You can also hit Customize settings to specify resolution, format, and quality.
Step 4. Hit Start to begin processing your video.
6. Finder [Compress any file]
Sum: An easy way to free compress a bunch of video files in a folder.
Compress Video by: 30% | | Performance: 95%
Before you try third-party video compression software on Mac, you should know that some of Mac's built-in free compressor apps have some basic video compression features for different purposes. The first we would like to recommend to you is Finder. It offers video compression and decompression on Mac in the ZIP format. That means videos can be compressed without losing quality on Mac during the compression.
However, in other words, the output file size of the compressed video won't be too much smaller than that of the original video, though the actual amount of compression will depend on the type of your file.
How do I compress video files in Mac Finder?
Step 1. Open Finder and select the video or video folder in the Finder. Right-click on it and select "Compress file name".
Step 2. The Mac will begin to compress the video. Once finished, a .zip file with the same name will be displayed next to the file you selected.
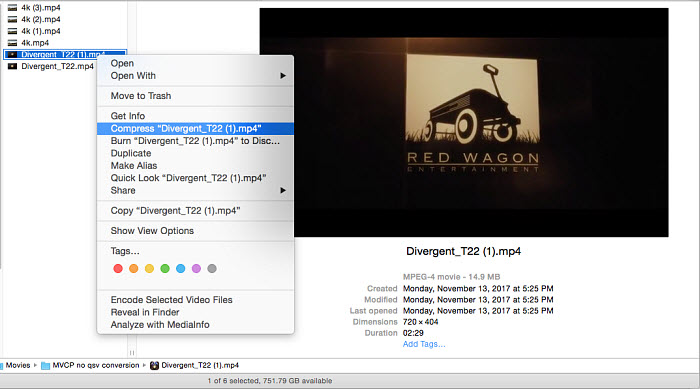
Step 3. The zip file contains the compressed video and your original video is untouched. Double-click on it to decompress the zip file and the Mac will extract the files right next to it. For information on Finder compressing video on Mac here.
7. QuickTime Player [Reduce MOV file size]
Sum: Suitable for very simple and quick video compression on Mac
Compress Video by: 40% | | Performance: 95%
Apple's default media player actually can help free compress videos on Mac. There are options to adjust the video resolution to 4K, 1080P, 720P, and 480P to make your videos smaller. The drawback to it is that it offers only a few options to reduce the file size on Mac, but it gets the results done. Another thing to note is the compressed output video will be encoded in MOV format, regardless of the import format.
How do I compress video on Mac with QuickTime Player?
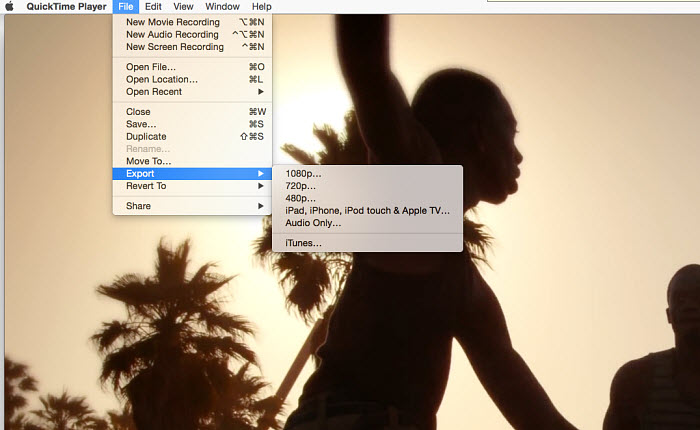
Step 1. To make a video smaller for free, open the app from your Applications folder. Click File > Open File to navigate to the video that you want to compress and open it.
Step 2. Next, click File > and select Export. Then you can see 4k (if applicable), 1080p, 720p, 480p, or exporting audio-only options. To downsize your video on Mac without noticeable quality loss, you're suggested to compress videos to a resolution slightly lower than the original quality. For example, you can compress 4K to 1080P to get a relatively good result.
Step 3. Then set the file name and output folder. Click Save to start to compress.
8. iMovie [Easy & high quality]
Sum: Best free Mac video compression software with editing features
Compress Video by: 50% | | Performance: 98%
If you want a more versatile free video compressor for Mac, don't miss iMovie. Like Finder and QuickTime, iMovie is pre-installed on Mac computers. It has more editing features to make videos smaller on Mac. To be specific, it lets you split a long video into shorter clips, cut off extra parts from the video, change the video dimensions, and adjust the output resolutions. All the features can shrink a video to your desired size.
How do I reduce the size of a video in iMovie?
Step 1. Open the iMovie app on Mac. Select the Create New icon to create a new project and click Import Media to load your video into the app. Then drag the video to the timeline.
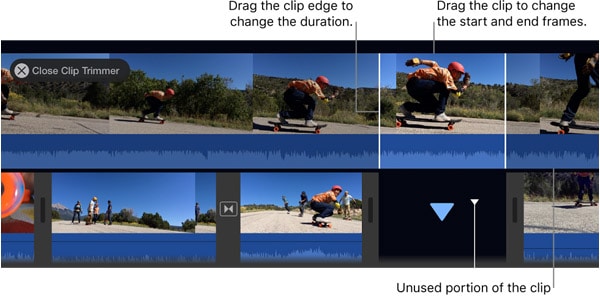
Step 2. On the timeline, right-click on the video and click Split Clip so as to split it into shorter clips. This is suitable for compressing a very long and large video without losing quality. You can also select Show Clip Trimmer to trim the unwanted length by dragging the edge toward the clip's center.
Step 3. To further downsize a video on Mac, click the Crop button on the menu bar above the video window. Then you can remove portions like the black bar from the video image. This will also result in smaller file size.
Step 4. If you don't want to make any changes to your video, you can skip Steps 2 and 3. Simply drag your video to the timeline, and click the Share button in the upper right-hand corner. Select File and lower the resolution & quality of the video to make it smaller.
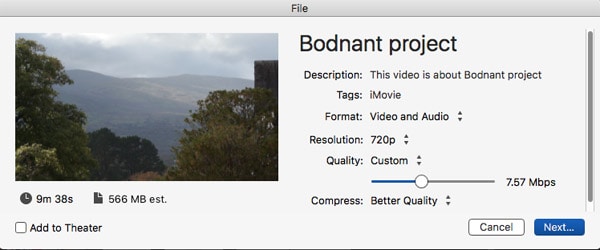
Step 5. Check the final sizes of different settings on the left hand below the video preview window. If it's OK for you, simply click Next.
9. Avidemux [Compress to target size]
Sum: An open-source editor for Mac to compress a video to a specific size.
Compress Video by: 70% | | Performance: 95%
Avidemux is a free non-linear video editor for Mac to compress, cut, edit, filter and encode easily. It allows Mac users to compress the video to a smaller size for Instagram, TikTok, Whatsapp, YouTube, etc. in different ways. Users can downsize the video to a smaller video format like HEVC, VP9, x264, FLV, etc., adjust the bit rate & resolution, crop and resize to make the video smaller, and split a long and large video. The best part of the free Mac compression software is that users are allowed to set the desired output size.
How to compress video on Mac with Avidemux?
Step 1. Download Avidemux and open it. Click the Open Video button to load the video you want to compress.
Step 2. Under the Video Decoder, select Video Output to HEVC x265, Mpeg4 AVC (x264), or VP9 for a smaller output size. Set the Audio output to AAC (FDK) to ensure the best results. And then select an output muxer like MP4, MOV, WebM, etc.
Step 3. Next, click Configure in Video Output. Under the General tab, navigate to Encoding Mode -> select Two-Pass – Video Size in the list. Then you can enter the video size you want to shrink the video into the box Target Video Size (in MB).
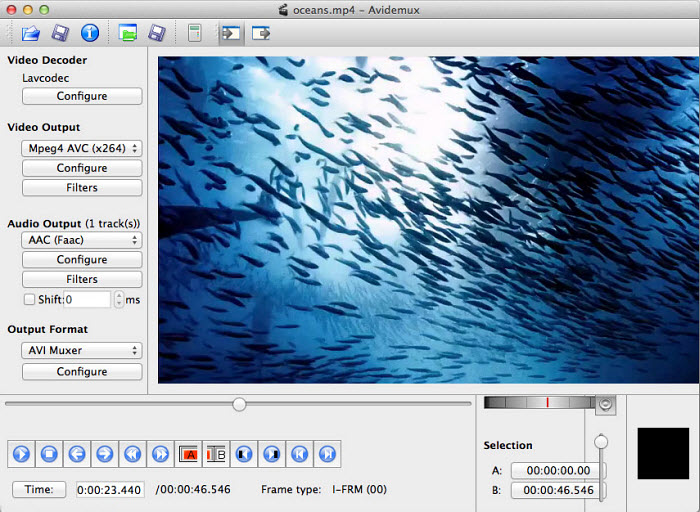
Step 4. If you want to further compress the video on Mac, click Video on the top menu of the main interface > Filters > click swsResize or Crop to adjust the resolutions and crop off unwanted parts from the video.
Step 5. Back on the main interface, you can use the buttons marked A and B under the timeline to split a long video into smaller clips.
10. FFmpeg [Powerful & complicated]
Sum: A powerful Mac video compressor for advanced users.
Compress Video by: 80% | | Performance: 98%
FFmpeg is a collection of free libraries and tools to process multimedia content such as audio, video, and subtitles on Mac and other platforms. It's a very advanced and powerful compression software free for Mac that can easily reduce the file size of a video, like a 720p video from 1.7 GB to 67 MB without changing resolution or any quality loss! The only drawback is that it requires a steep learning curve.
How do I compress videos using FFmpeg on Mac?
Step 1. Install FFmpeg on Mac using Homebrew: in Terminal, type the command "brew install ffmpeg" and hit Return.
Step 2. First, put the video you want to compress on your Desktop, Movies folder, or somewhere FFmpeg can get at it.
Step 3. Open a new Terminal window and you may see something like "yourname@yourcomputer ~ %", change the ~ to the folder containing your video file, and hit Return. You should now be in the folder that contains your original video file.
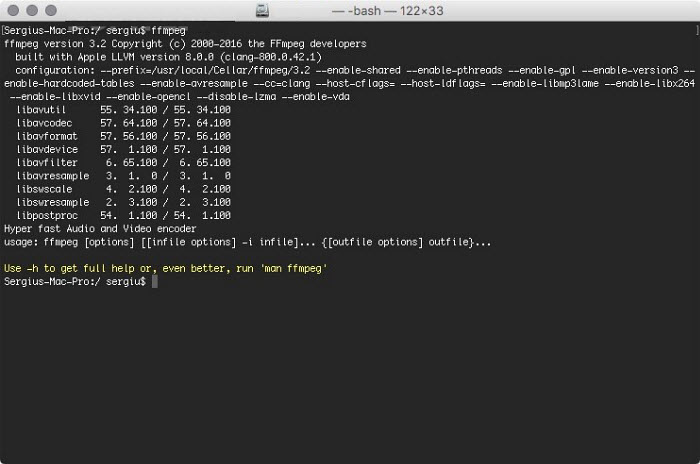
Step 4. Now you can use the commands and flags to compress videos on Mac. For example, -c:v specifies the video codec; -b:v specifies video bitrate; -c:a specifies audio codec; -b:a audio bitrate; ; -filter:v specifies a filter... There are many command lines on FFmpeg official site and various forums, below are some simple measures to shrink videos on Mac:
- Compress videos to smaller formats: ffmpeg -i input -c:v libx265 -crf 26 -preset fast -c:a aac -b:a 128k output.mp4
- Change the bitrate: ffmpeg -i input -c:a copy -c:v libx265 -b:v 1M output.mp4
- Compress 4K video to 720P: ffmpeg -i input -c:a copy -s 1280x720 output.mp4


Candice's particularly skilled in writing and sharing video-related contents. Her guides cover from deep-seated video/audio parameters, to media entertainment on different platforms. She also enjoys shooting and processing videos by herself for a more reliable basis of informative info with her articles, which are never at the expense of eliminating an entertaining read.


