Insufficient space on iPhone for more photos storage? Try the below smart approach to transfer and copy pictures from iPhone to a USB flash drive to free up iPhone space.
 By Rico Rodriguez to iPhone Photos | Last Updated on Dec 18, 2023
 I'm running on an iPhone with 64GB storage space and the OS consumes 6.36GB. Thus, the rest of available space is 57.64GB. Most photos taken by iPhone are 2576x1932 (main camera) and 1280x980 (selfie camera), with roughly 5.38MB and 278KB respectively in file size. Therefore, only 3122 photos take up 19.18GB on my iPhone. Of course, your photo storage consumption will be much smaller if you're using a newer iPhones since they supports you to shoot pictures in HEIC codec with almost 50% smaller in size.
Anyway, no matter which iPhone model you possess, the photos would be ranked at the first or the second place of the top space consumption list. So to free up iPhone space, you can consider to move and transfer iPhone photos to a USB flash drive for backup. Yet, what size USB drive do you need for photos? We list out the common used USB drive with maximum photos number for your reference.
| Size of USB Drive | Still Photos | HDR Still Photos | Live Photos | HDR Live Photos |
|---|---|---|---|---|
| 16GB | 3092 - 60350 (based on different resolution) |
16384 | 6580 | 6159 |
| 64GB | 12368 - 0.241 million | 65536 | 26320 | 24636 |
| 128GB | 24736 - 0.482 million | 0.131 million | 52640 | 49272 |
The above table is the estimation photo number for your reference. If you use iPhone 7 or later iPhone to shoot photos in HEIC, the output image file would become 50% larger than it is on iPhone after you transfer it from iPhone to computer. Cuz the HEIC photos would automatically be converted to JPG during sync.
After you prepare a USB drive grounded on the above table, you can move to the next step - transfer iPhone pictures to your USB drive. To do so, an iPhone file transfer application is a must have. MacX MediaTrans can be your best mate. With advanced GPU hardware acceleration tech supports, this iPhone manager makes batch photo transfer up to 5X faster than any other competitors. More strengthes sets it apart from others:
1. Photos Transfer: 2-way solution to move iPhone photos (live photos, still images, HDR pictures) to Mac/PC, and import photos to iPhone, as well.
2. Auto HEIC to JPG conversion: auto change HEIC to JPG during iPhone image to desktop transferring so as to playback on more platform without trouble.
3. Batch backup: move iPhone photos with the whole camera roll or select pictures via Week/Month/Year or photo albums (selfie, panorama, bursts...).
4. Delete & Manage images: bulk delete iPhone photos, music/video/ringtones, the industry first to delete camera roll.


Free download this iPhone manager on Mac and then fire it up. Afterwards, connect your iPhone or old iPhone to Macbook Pro/Air, iMac, Mac Mini or iMac Pro via USB cable. If the connection failed, unplug your iPhone and try it again via another USB port.
Note: 1. there will pop up a window to advise you to properly set iTunes lest your file data gets lost. So please follow the prompts to set iTunes first.
2. This software needs iTunes to activate your iPhone at the first place. But when it comes to transfer iPhone photos to Mac, there's nothing to do with iTunes.
Tap Photos icon at the main home > opt for the pictures you plan to transfer. Firstly, choose photo album at the left side. As you can see, all your photos are well organized by photo style and source, including camera roll selfies, panoramas, bursts, third party apps. Secondly, click the drop-down list at Group to select photo management mode: By Day, By Week, By Month or By Year. Thirdly, manually select certain iPhone images or directly tick "Select All".
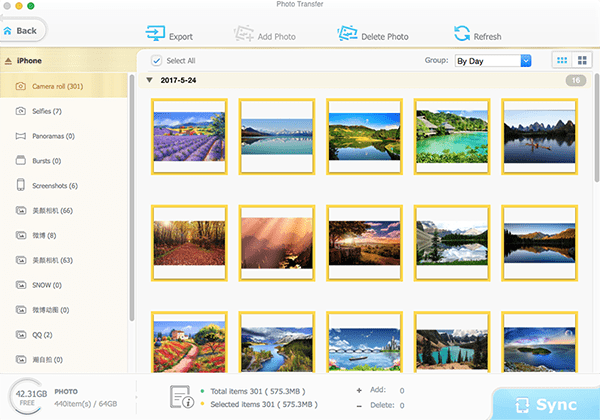
Hit "Export" button after everything is ready. And you just leave everything to this tool and wait for a second. You're allowed to transfer as many hi-res photos as you want without any limitations on quality and quantity.
In terms of the newly HEIC photos, this iPhone photo manager provides you with two solutions for you to choose from: 1. auto convert HEIC to JPG during image syncing. 2. keep HEIC format without any conversion. Make your decision based on the final photo usage.
Insert your USB flash drive to your computer and then import photos from MBP/MacBook/iMac Pro to your USB drive. After the transfer completes, create some new folders to organize your photos on your USB drive if necessary.
On top of iPhone photos transfer feature, MacX MediaTrans also has the power to transfer videos, music, ringtones, eBooks, iTunes purchases, iTunes U, etc. between iPhone and MBP/Macbook/iMac Pro (two-way solution). What's special to me is that it allows you to encrypt your iPhone files via password for highest level of security (AES and RSA techs). Thus, even though your Mac computer is under others' control, your personal data are still secure with only you.


Digiarty Software, Inc. (MacXDVD) is a leader in delivering stable multimedia software applications for worldwide users since its establishment in 2006.
Home | About | Site Map | Privacy Policy | Terms and Conditions | License Agreement | Resource | News | Contact Us
Copyright © 2024 Digiarty Software, Inc (MacXDVD). All rights reserved
Apple, the Apple logo, Mac, iPhone, iPad, iPod and iTunes are trademarks of Apple Inc, registered in the U.S. and other countries.
Digiarty Software is not developed by or affiliated with Apple Inc.


