


VideoProc
Process (4K UHD/8K) videos like never before! Edit, convert, compress, download videos, record footages, copy and backup DVDs, you name it.
All-in-one Video Processing Software!
The fastest way to backup & rip your DVD collections to virtually any format for watching on Mac iPhone iPad and Android, 100% lossless quality.

All-in-one video solution - enhance video and image with next-gen AI, convert, compress, record and edit at lightning speed with full GPU acceleration.

The ultimate solution to manage, backup and transfer photos, videos, music, books, etc between iPhone iPad and Mac. No data loss or space woes.
Top solution to liberate movies from DVD disc and convert DVDs (new/99-title DVDs, damaged DVDs) to MP4, MOV, H.264, etc for a wealth of devices. 1:1 output quality & ultrafast speed.
All-in-one video solution—enhance video and image with next-gen AI, convert, compress, record and edit at lightning speed with full GPU acceleration.
Complete iPhone iPad and iPod management solution to easily backup & transfer music, videos, photos, ringtones, books, etc between iPhone iPad and Mac. 100% safe and risk-free.

Process (4K UHD/8K) videos like never before! Edit, convert, compress, download videos, record footages, copy and backup DVDs, you name it.


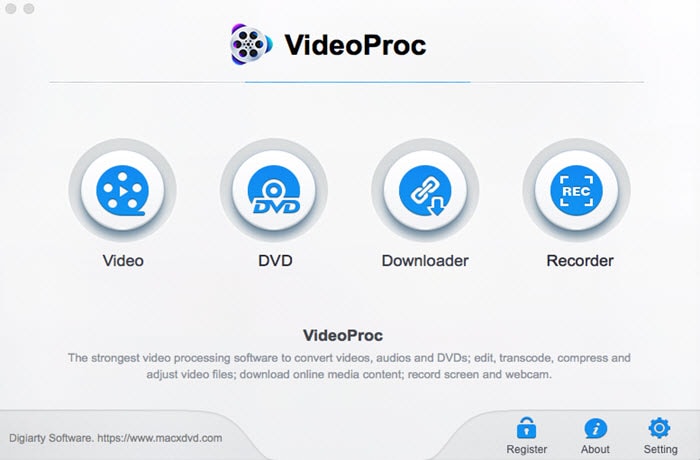
 1. Get Started
Download and install VideoProc
Before you get started, go to the VideoProc official site or click the download button to get the program and install it on your computer.
Register
Click the Register icon at the bottom and the Register window will appear. Buy the full version and you'll receive the registration information. Enter your email address and the license code to activate following the on-screen instruction.
Settings
Click the Settings icon to get more options to change settings like default save folder, language, resolution, format, and others.
User Interface
Video: Click the Video button to import videos, a video folder or music and process video and song files (convert, edit, compress, name and tag, etc.). Hardware accelerated 4K UHD video processing is supported as well.
DVD: Hit the DVD icon to deal with your DVD collections. You can decrypt, copy and backup DVDs.
Downloader: Click the Downloader button to download videos and music from 1000+ sites covering YouTube, Dailymotion, Vimeo, Facebook and more.
Recorder: Click the Recorder icon to enable recording. You can create a screen recording and capture activities with sound on your iPhone.
 2. Convert & Process Videos
2.1 Transcode Videos to Any Format
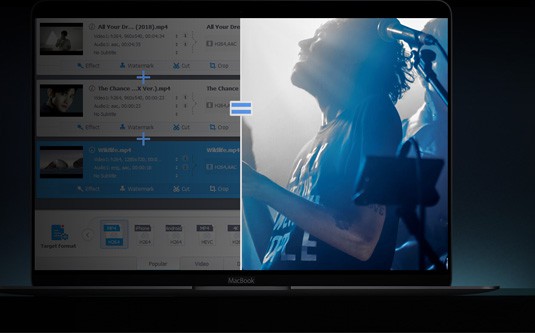
Step 1: Import video files. You can directly drag video files or click the add video icon at the top of the Video Window. Or click the Video Folder icon to load a video folder. VideoProc is able to process videos and video folders in bulk, including 4K UHD/8K clips.
Step 2: Select an output format. The source video files should be loaded quickly, then pick an output format.
* Transcode video format from one to another. Click the Video button and there's a list of video formats for you to choose. Click the Popular button to check commonly used media formats.
* Convert video to devices. Click the Device tab to see more devices preset profiles for iPhone, Android, iPad, Samsung, Huawei, PS4, Xbox, OPPO, to name a few.
Step 3: Click the RUN button at the bottom right corner to begin processing videos.

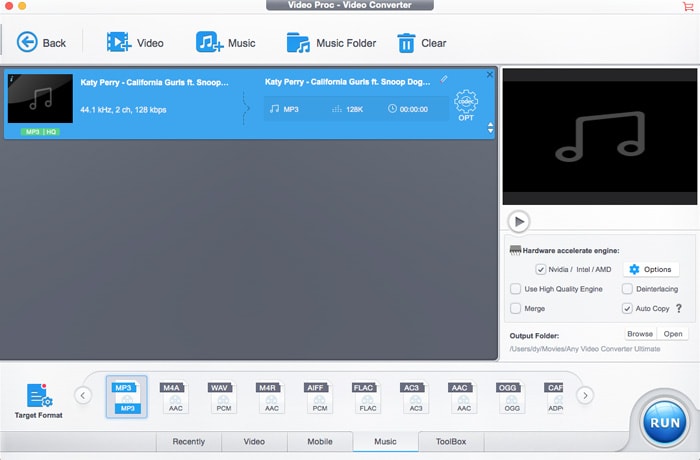
2.2 Switch Music Format
Step 1: Click the Video icon on the main interface, then hit the Music button at the top toolbar and select music files you'd like to process. Or direly drag the source song files. You can add more than one track at a time. Note that you can't import audio and video files at the same time.
Step 2: Select the format you want from the list of Target Format under Music tab.
Optional step
Adjust audio parameters: Hit the codec OPT button, under Format tab, you can adjust song quality, audio codec, channel, sample rate and bit rate.
Edit metadata: Click on Name & Tag tab to add and edit a set of information about the track, such as song name, artist name, album, genre, lyrics, and so on. Then Click the Done button to apply the editing and close the window.
Step 3: Click RUN button to process audio music transcoding.
2.3 Edit Videos
Click the Video button at the main interface and import the video you wish to edit. The guide below will walk you through the editing process.
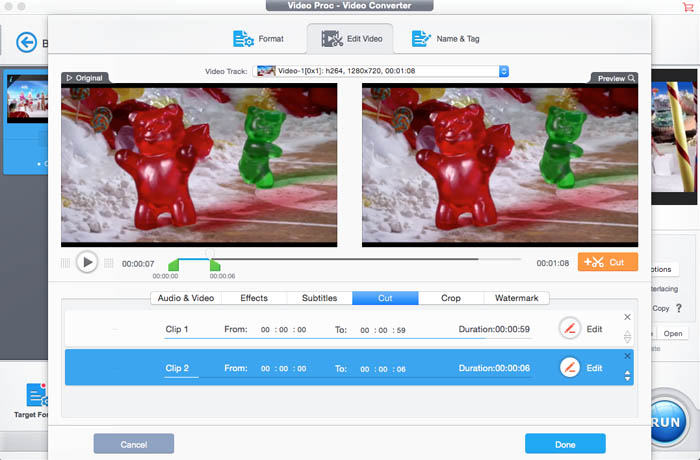
* How to Cut Videos
Step 1: Click the Cut icon below the video information and a new window will appear.
Step 2: Drag the edge of the clip towards the center to get the segment you want. Click the orange Cut button on the right, and click the Edit icon next to the clip trimmer, then fine-tune when your clip starts and ends. You can cut a video to several segments you wish to save as a new clip with unwanted parts being removed.
Step 3: Click the Done button to apply the change to your clips.
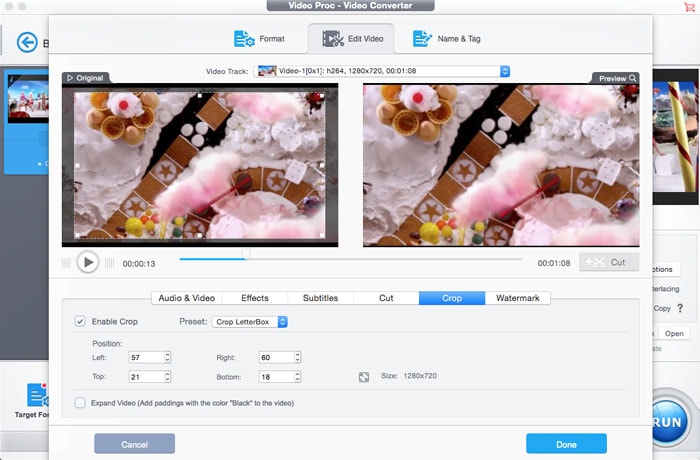
* How to Crop Videos
Step 1: Click the Crop button to show the cropping options.
Step 2: Check the Enable Crop box, and you should see an adjustable frame. Simply move the frame to crop the clip. Click the Preset drop-down icon to get a list of aspect ratio, select the ratio you wish to get and the clip will be automatically cropped. You can also head to the Position area and fine-tune the video size.
Step 3: Click Done to save the change and close the window.
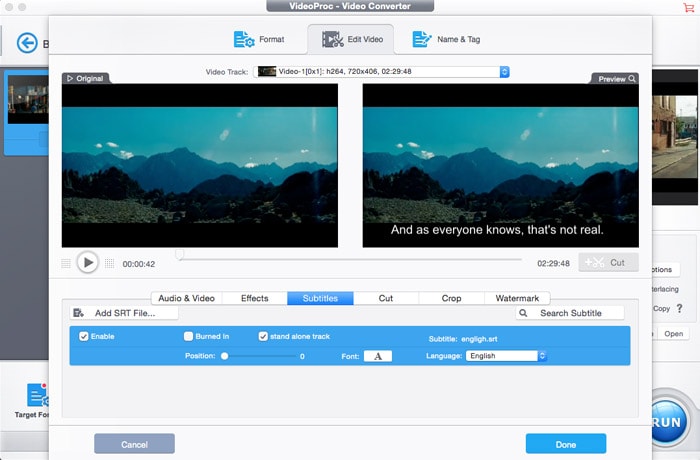
* How to Add Subtitles to Videos
Step 1: Click the Subtitles button to open the subtitles window.
Step 2: Click Add SRT File… and select a subtitle file from your computer.
Step 3: Click Enable and Burned In box, choose the subtitle position, language and font.
Step 4: Click the Done button to begin putting subtitles to the clip.
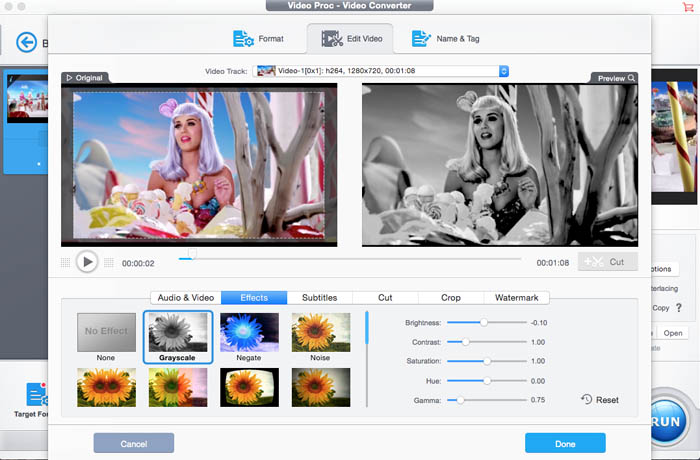
* Apply Effects to Videos
Step 1: Click the Effects button to show the video effects controls.
Step 2: Click the video effect and filter you want to add to the clip.
Step 3: On the right side, you can adjust video brightness, contrast, saturation, hue, and gamma. Click Reset to remove the adjustment.
Step 4: Click the Done button to apply the video effect to the clip.
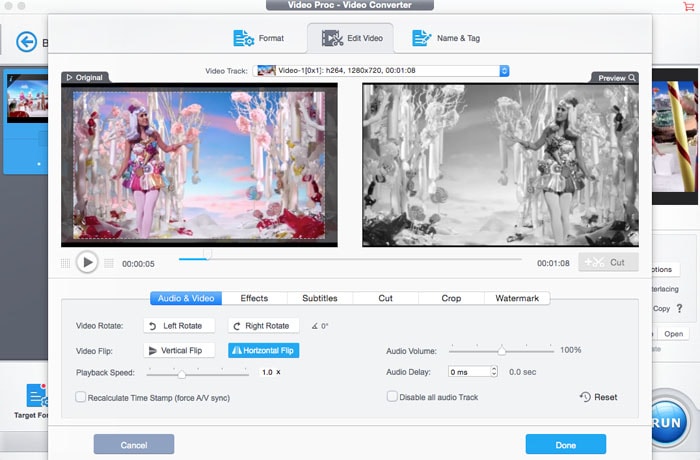
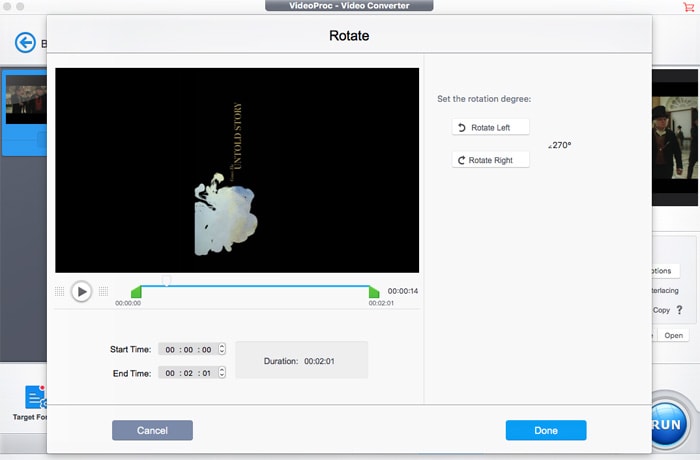
* How to Rotate Videos
Step 1: Click the Rotate button to show the Rotate options.
Step 2: You can click Left Rotate, Right Rotate, Vertical Flip or Horizontal Flip. Click the Reset to reset the rotation.
Step 3: Click the Done button to apply the change.
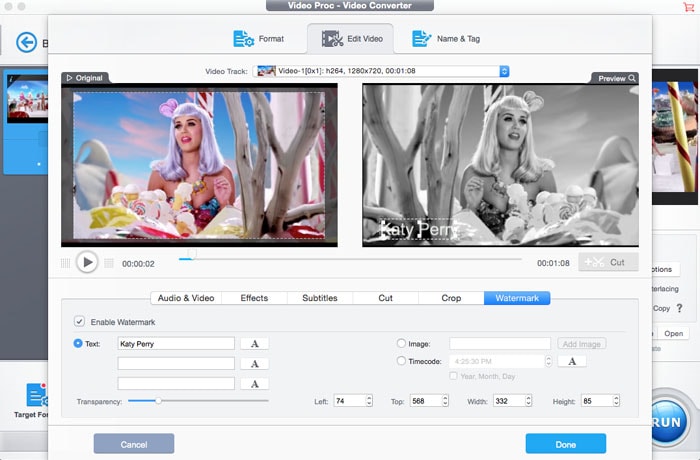
* How to Watermark A Video
Step 1: Click the Watermark icon and check the Enable Watermark box to get access to watermark controls.
Step 2: Enter the text watermark you wish to place. You can drag and put it to the size and position you like. Click the Image tab and choose an image and place the image watermark.
Step 3: If the watermark is fitting, click the Done button to add watermark to the clip.
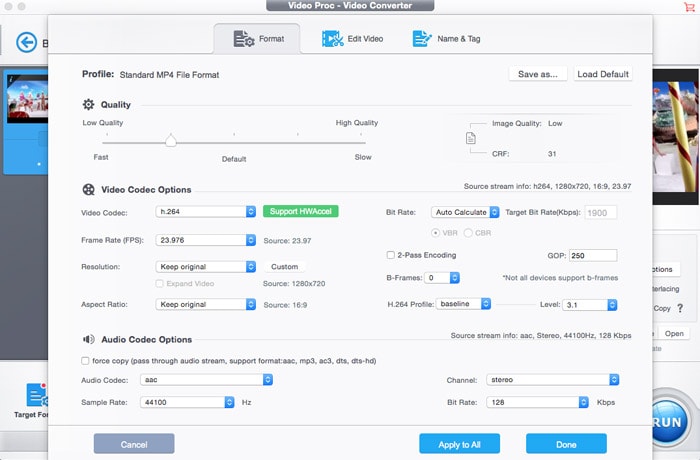
2.4 How to Compress Videos
4K and 8K videos are always large in file size. VideoProc can reduce video file size by up to 90% with good quality reserved for space saving, faster sharing, and uploading.
Step 1: Import the video file you'd like to shrink.
Step 2: Do the following to make your video file size smaller.
* Click the Cut button to trim an unwanted section from the video.
* Click the codec OPT button to get more video settings. Drag the Quality Slider to the left side to lower down quality.
* Under Video Codec Options, change video codec to cut down the size, for example, HEVC is the most efficient codec for 4K Ultra HD videos.
* Decrease video bit rate by 30% to compress videos without noticeable quality loss. Lower down the resolution by clicking the Resolution drop-down icon. Bitrate changes when you adjust the resolution.
Step 3: Click the Done button to apply the compression settings.
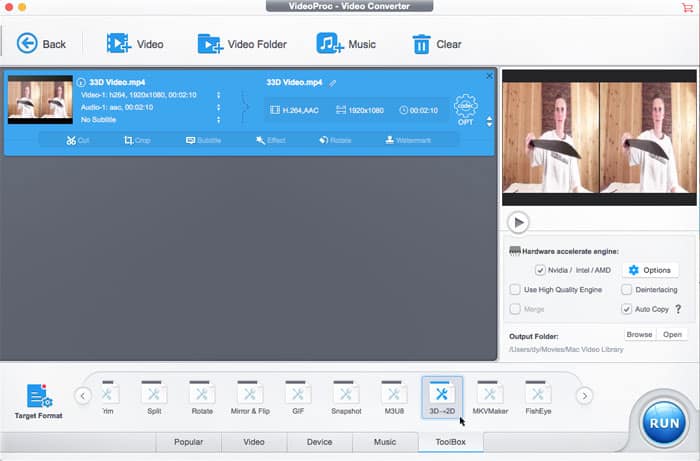
 3. Video Toolbox
Toolbox offers easy access to process videos. With a few clicks, you can stabilize, denoise, merge, trim, split videos and more.
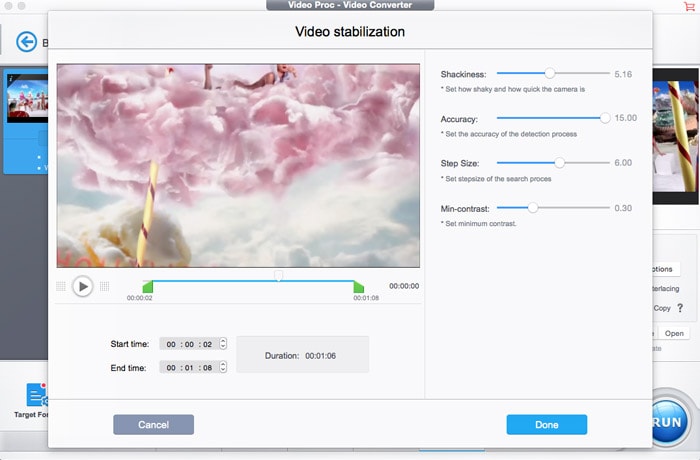
3.1 How to Stabilize Video
Step 1: Import the shaky footage you need to stabilize.
Step 2: Click the ToolBox button, hit the Deshake tab and then click the codec OPT icon to get stability controls.
Step 3: Drag sliders to adjust shakiness, accuracy, step size and min-contrast. Fine-tune the results to make the clip look better.
Step 4: Click the Done button to start to deshake your footage.
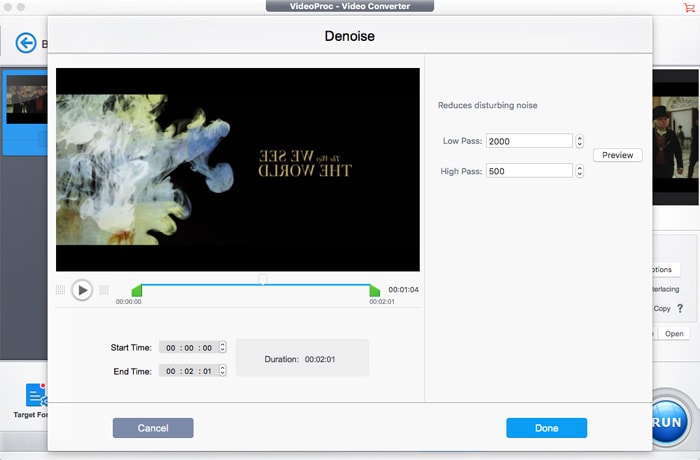
3.2 Remove background noise from a video
Step 1: Import the clip by drag-n-drop or clicking the Video button on the main interface.
Step 2: Click ToolBox > Denoise > codec OPT button to show the noise removal controls.
Step 3: Click the Low pass and High pass drop-down icon to get rid of noise from your footage.
Step 4: Click Preview to check the adjustment. Then click the Done button to reduce noise.
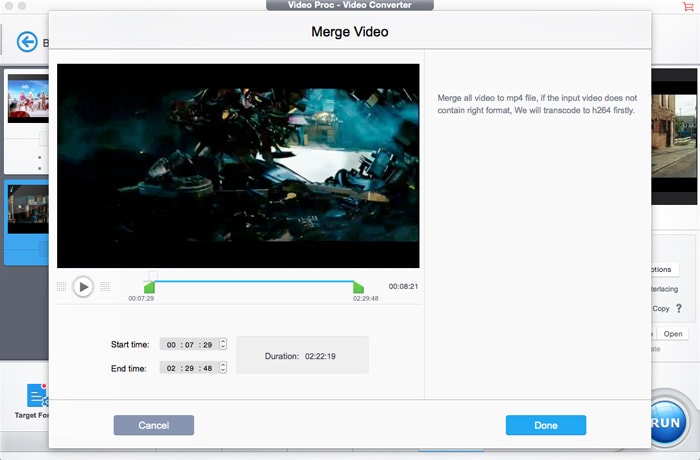
3.3 How to Merge Clips
Step 1: Load clips you want to join together from your computer.
Step 2: Click the ToolBox > Merge and then the codec OPT icon, and the merging options appear.
Step 3: Set the start time and end time, and click the Done button make the settings valid.
Step 4: Click the RUN button to begin combining separate clips into one.
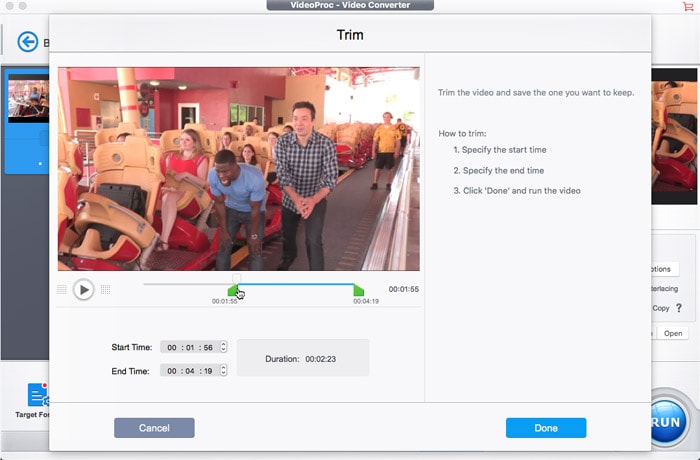
3.4 How to Trim Videos
Step 1: Import the footage you'd like to trim.
Step 2: Head to ToolBox > Trim, and click the codec OPT, then the trimming window pops up.
Step 3: Drag the slider to set the video start and end time. Click the Start time and End Time icon to fine-tune the time.
Step 4: Click the Done button to save the changes.
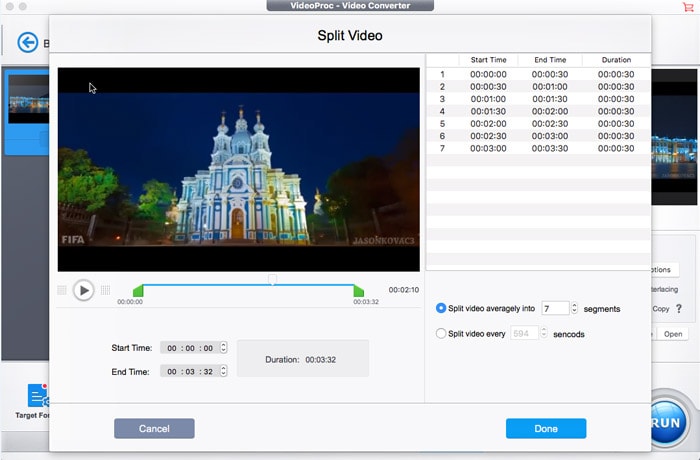
3.5 How to Split Clips
Step 1: Pick the clip you want to split into several parts.
Step 2: Click Toolbox > Split and hit the codec OPT button to activate the splitting function.
Step 3: Set the segments and time you want and click the Done button.
3.6 How to Rotate Videos
Step 1: Add the video from your computer.
Step 2: Click ToolBox > Split and click the codec OPT button, and the rotate window appears.
Step 3: Click Rotate Left or Rotate Right on the right side.
Step 4: Click the Done button to save the rotating.
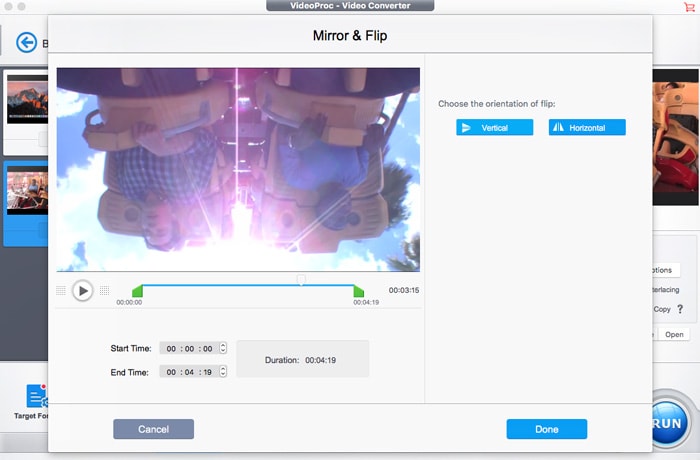
3.7 How to Mirror & Flip Videos
Step 1: Open the clip you want to process in VideoProc.
Step 2: Click ToolBox > Mirror & Flip, then hit above codec OPT button.
Step 3: On the Mirror & Flip window, choose Vertical Flip or Horizontal Flip. You can preview what it will look like on the window.
Step 4: Click on the Done button at the lower right corner to finish.
3.8 How to Create GIFs from Videos
Step 1: Import the video you wish to turn to animated GIFs.
Step 2: Click ToolBox > GIF and click on the codec OPT icon to show the GIF window.
Step 3: Set the loop time, image size, duration, and frame delay. Frame delay depends upon the frame rate and is determined by the formula: 1/fps*1000,where fps = frame rate per second.
Step 4: Click Done to save the GIF settings.
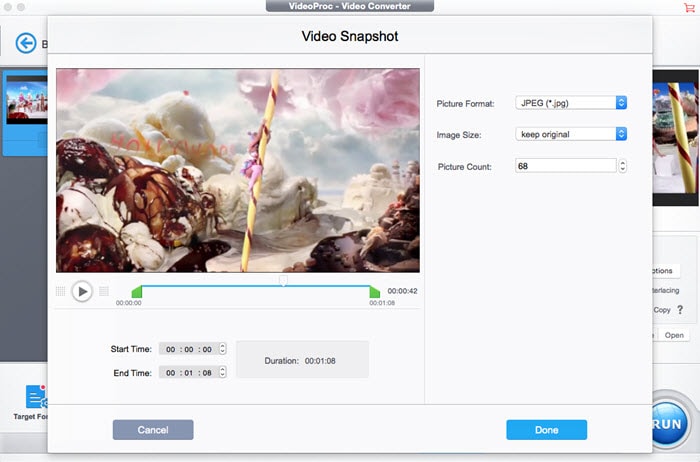
3.9 How to Take Snapshot from A Video
Step 1: Open the video from which you want to take pictures.
Step 2: To show the video snapshot window, click ToolBox > Snapshot and hit the codec OPT.
Step 3: Set the picture format (JPG or PNG), image size and picture number.
Step 4: Click Done to save the settings for taking pictures from a video.

3.10 How to Convert Video to M3U8
Step 1: Load the video you are going to process.
Step 2: Head to ToolBox > M3U8, and click the codec OPT button to show the M3U8 controls.
Step 3: Set the duration. You can enable the "Store all segments in a single MPEG-TS file".
Step 4: Click the Done button to apply the change.

3.11 How to Turn 3D to 2D
Step 1: Import the source 3D video you wish to process.
Step 2: click the ToolBox > 3D-2D icon and hit the codec OPT button, and the transcoding window appears.
Step 3: Choose input format and output format by clicking the format drop-down icon.
Step 4: Click Done to save the 3D to 2D transcoding setting.
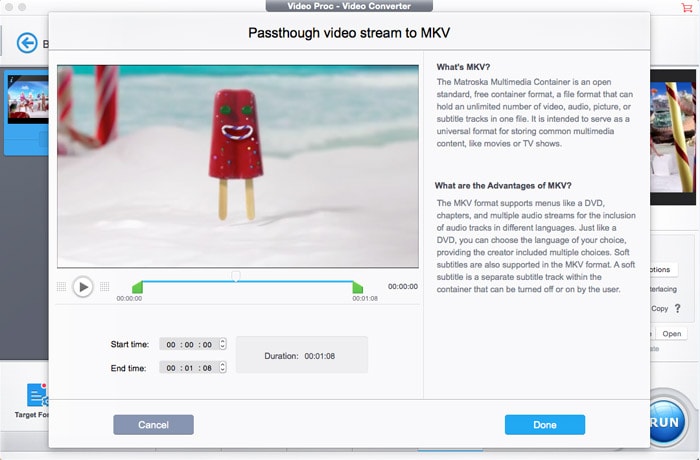
3.12 How to Remux Video to MKV
Step 1: Import the video you'll turn to MKV container format.
Step 2: Click the Toolbox > MKVMaker icon and click on the codec OPT button.
Step 3: On the MKV window, click Done. After you've all set and click the RUN button at the bottom, the video will be remuxed to MKV without re-encoding.
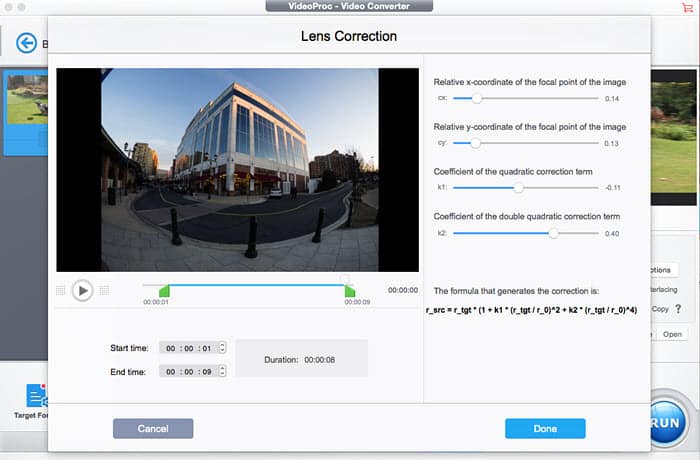
3.13 How to Use FishEye
Step 1: Add videos you want to apply the fish-eye effect to.
Step 2: Click the ToolBox > FishEye > codec OPT button to show the fisheye correction options.
Step 3: Adjust parameters for the output fisheye video.
Step 4: Click the Done button to apply the change.
3.14 Export the Subtitle File from A Video
Step 1: Load the source videos to the tool.
Step 2: Click on ToolBox > Export and hit the codec OPT icon to show the subtitles window.
Step 3: Select the subtitle file format you want. SRT and ASS format are provided.
Step 4: Click the Done button to save the settings and close the window.
4. Process DVDsVideoProc also works as a DVD copy tool, enabling users to rip, convert and backup home DVDs and commercial DVDs speedily. It is even able to handle 99-title DVDs, workout DVDs, Japanese DVDs, Disney movies on DVDs, and more. Follow the guide below to digitize and backup your DVD collections.
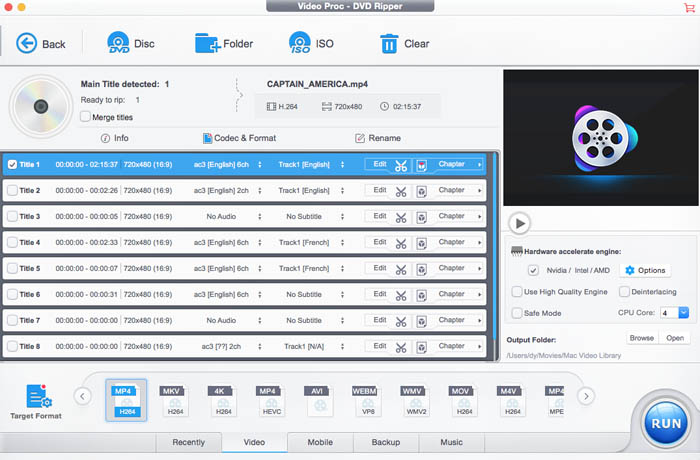
4.1 How to Digitize DVDs
Step 1: Load DVD disc, DVD folder or ISO image. Click the DVD button and the DVD conversion window appears. Insert your DVD disc, click the Disc icon at the top, and select the DVD to load. Click the Folder or ISO image icon to load DVD Folder or ISO image.
Step 2: Select a target format. The DVD file can be loaded quickly. You'll see all the movie titles, DVD Info, and metadata editing options. VideoProc will automatically pick the right title for users even if the DVD contains up to 99 titles. Click the Video tab at the bottom to select an output format you want, such as MP4, MOV, AVI, WMV, to name a few.
* Click the Edit icon to get access to edit movies on DVDs before ripping. VideoProc is able to rotate, flip, cut and, crop movies, add effects, subtitles, and watermark to movies with a few clicks.
* Click the Info icon, you'll get the information of the DVDs, including DVD type, aspect ratio, frame rate, resolution, language, codec and more. You can also export the info.
* If you want to edit the movie tag, click the Rename icon to show tag controls. You are allowed to edit movie name, title, artist, movie genre, etc.
Step 3: Click the RUN button to start processing DVD digitization.
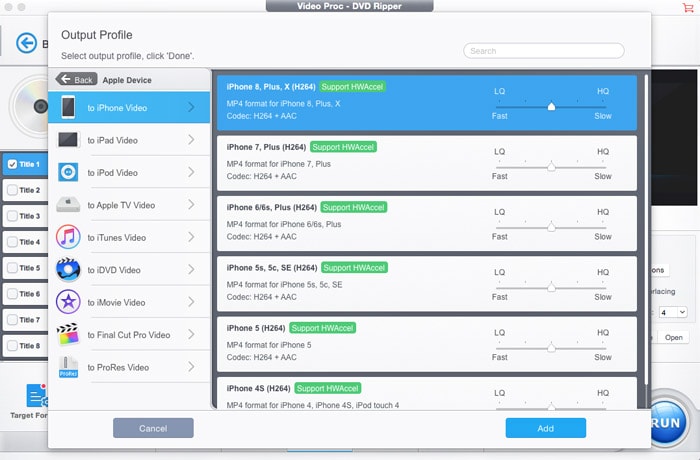
4.2 How to Convert DVDs to Any Device
Step 1: Import DVD disc, load DVD folder or ISO image to process.
Step 2: Click on the Device tab at the bottom, and select the device you want to put DVD on. It offers a wide range of mobile devices presets, including Apple iPhone iPad, Android, Microsoft etc. phones, tablets and game consoles.
Step 3: Edit and rename movies on DVDs as you wish.
Step 4: Click the RUN button to start to transcode DVDs to mobiles.
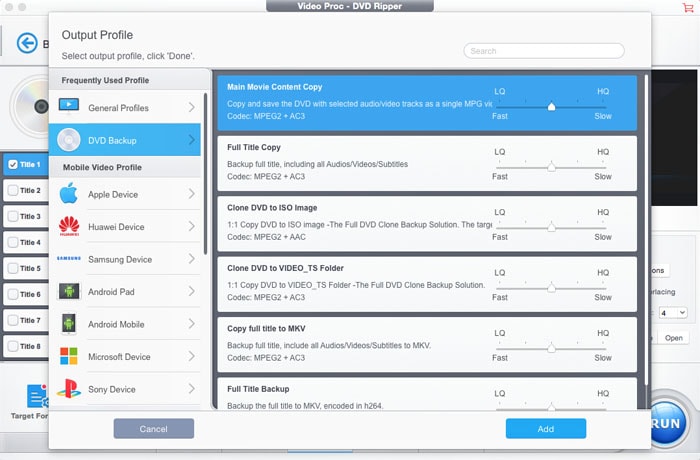
4.3 How to Backup DVDs
Step 1: Insert your DVD disc and load your DVD by clicking on the DVD button and the Disc icon.
Step 2: Click the Backup tab to show the DVD backup options.
Step 3: Select a backup type you prefer. Six modes are available, including Main Movie Content Copy, Full Title Copy, Clone DVD to ISO Image, Clone DVD to VIDEO_TS Folder, Copy full title to MKV, and Full Title Backup.
Step 4: Click the RUN button at the bottom to begin to make a copy of your DVD movies.
 5. Download Videos and Music
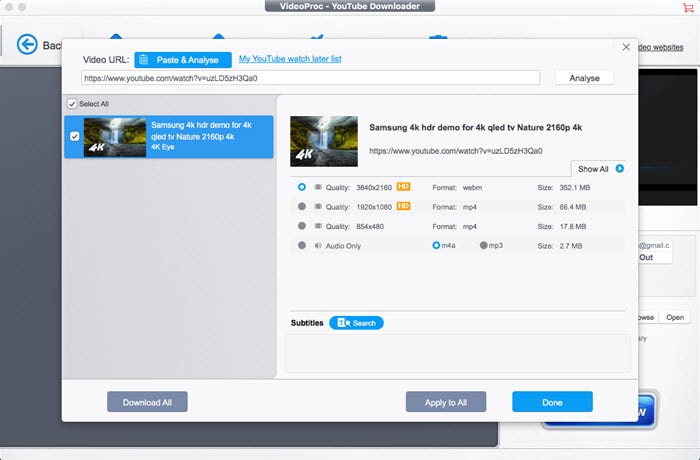
5.1 How to Download Videos
Step 1: Click the Downloader button on the main interface and the downloader window appears.
Step 2: Click Add Videos icon at the top toolbar, copy the URL of the video you want to save offline, and click on the Paste URL & Analyze button to load the video. After the video is loaded, pick the video format and resolution you want and click Done to make it valid and close the screen.
Step 3: Click the Download Now button at the bottom right corner to start downloading videos.
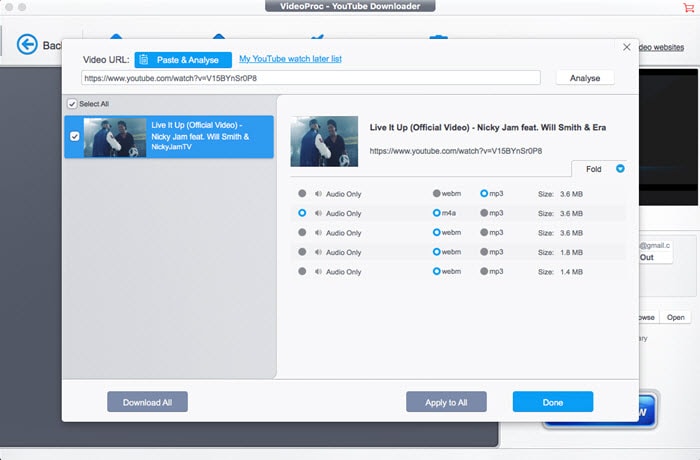
5.2 How to Save Songs
Step 1: Click the Downloader button to open the downloader window.
Step 2: Find out and open the song you want to save on your browser, copy the song URL to the Video URL box and click Paste URL & Analyze to load the track. Choose the audio format, bit rate etc., then click the Done button to save it.
Step 3: Click the Download Now to start to grab songs.
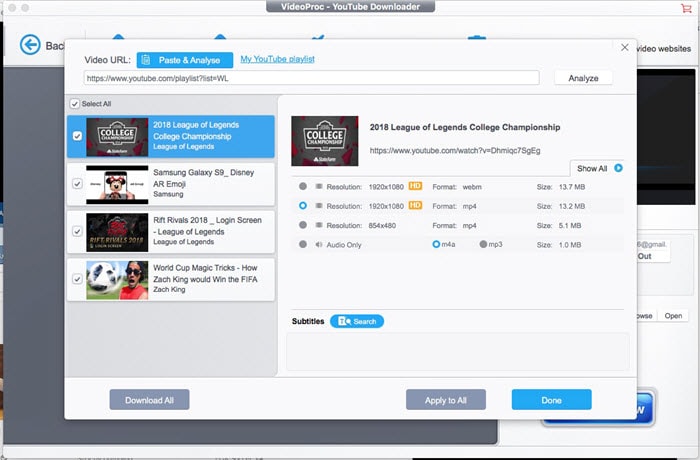
5.3 Download YouTube Watch Later Playlist
Step 1: Click the Downloader button to show the downloading options.
Step 2: Click the Sign in button and log in with your YouTube account.
Step 3: Click the Download my water later list, and VideoProc will automatically analyze it and gives a screen with format, file size, res etc. Pick the one you want and click the Done button.
Step 4: Click the Download Now button to save your YouTube Water Later playlist content.
 6. Record Footages
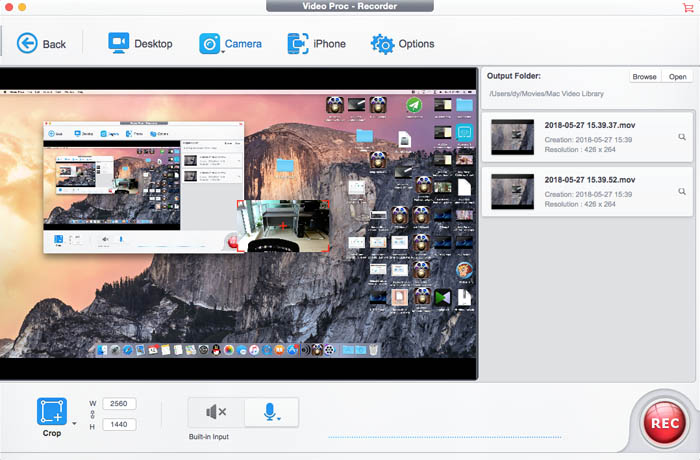
6.1 How to Capture Desktop Screen
Step 1: Click the Recorder button and the record screen pops up.
Step 2: Choose a recording type you want.
* Click the Crop icon and drag the frame to select a portion of the screen to record.
* Pick No audio to record the screen with no sound or select a system sound recorder.
* Click the Browse button to select a destination folder you want.
Step 3: Click the red REC button to start recording your computer's screen activity with or without sound.

6.2 Make A Record of Webcam Video
Step 1: Click the Recorder button and then click the Camera icon at the top.
Step 2: Adjust your camera to make it looks good.
Step 3: Change recording settings as you wish.
Step 4: Click the REC button to begin recording webcam video on your computer.
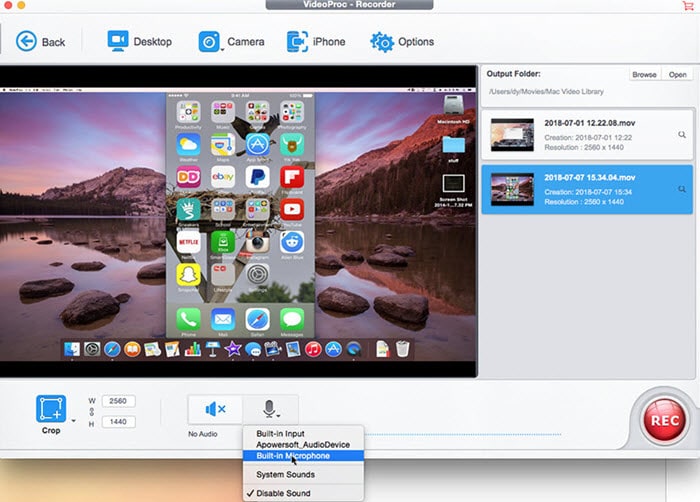
6.3 Record iPhone's Screen and Audio on Mac
Step 1: Connect your iPhone with your computer using an iDevice USB cable.
Step 2: Click the Recorder button, and click the iPhone icon on the top toolbar.
Step 3: Now you'll see your iPhone's screen, unlock your device to get ready to record, and select audio system.
Step 4: Click on the red REC button when you want to get started.
 7. Uninstall VideoProc
Use these steps to uninstall VideoProc and remove its caches.
Step 1: Go to the Application folder, find VideoProc and directly movie it to the Trash.
Step 2: Open the Library folder, find all the VideoProc caches and delete them.
Home | About | Site Map | Privacy Policy | Terms and Conditions | License Agreement | Resource | News | Contact Us
Copyright © 2025 Digiarty Software, Inc (MacXDVD). All rights reserved
Apple, the Apple logo, Mac, iPhone, iPad, iPod and iTunes are trademarks of Apple Inc, registered in the U.S. and other countries.
Digiarty Software is not developed by or affiliated with Apple Inc.


 1. Get Started