


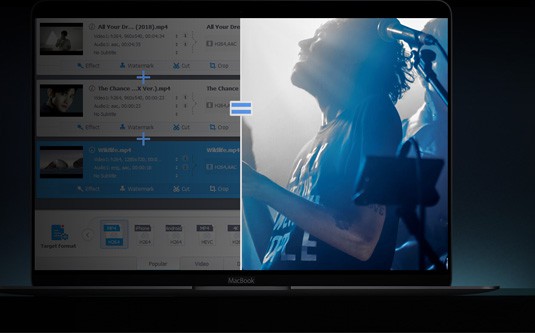
VideoProc
Process (4K UHD/8K) videos like never before! Enhance, edit, convert, compress, download videos, record footages, copy and backup DVDs, you name it.
All-in-one Video Processing Software!
The fastest, most powerful DVD ripper yet to backup & rip all sorts of DVD (UDF/ISO9660) to virtually any format for watching on Mac iPhone iPad and Android, 100% lossless quality.

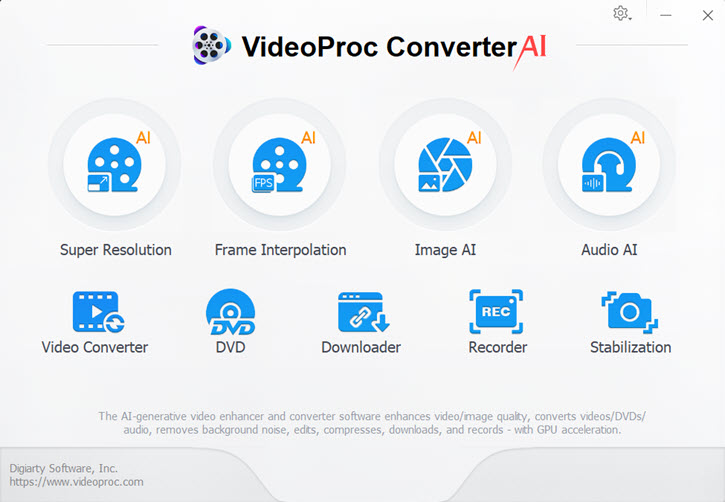
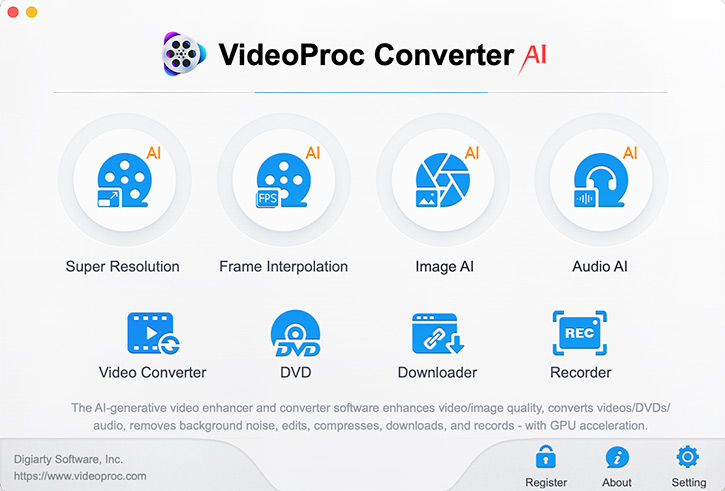
All-in-one video solution - enhance video and image with next-gen AI, convert, compress, record and edit at lightning speed with full GPU acceleration.

The ultimate solution to manage, backup and transfer photos, videos, music, books, etc between iPhone iPad and Mac. Also export iTunes purchases to non-Apple devices.
Top solution to liberate movies from DVD disc and convert DVDs (new/99-title DVDs, damaged DVDs) to MP4, MOV, H.264, etc for a wealth of devices. 1:1 output quality & ultrafast speed.
All-in-one video solution—enhance video and image with next-gen AI, convert, compress, record and edit at lightning speed with full GPU acceleration.
Complete iPhone iPad and iPod management solution to easily backup & transfer music, videos, photos, ringtones, books, etc between iPhone iPad and Mac. 100% safe and risk-free.

Process (4K UHD/8K) videos like never before! Enhance, edit, convert, compress, download videos, record footages, copy and backup DVDs, you name it.


 1. Get Started
Download and install VideoProc
Step 1: Before you get started, go to the official site VideoProc or click the download button to get the program on Mac.
Supported macOS: Mac OS X 10.6 and above.

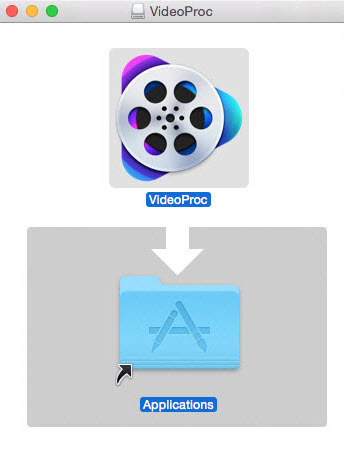
Step 2: Double-click the DMG file you download and open it. A finder window appears, drag the VideoProc icon to the Applications folder and it's done. Now, VideoProc is installed on your computer. You can drag VideoProc to the Dock for easy launching.
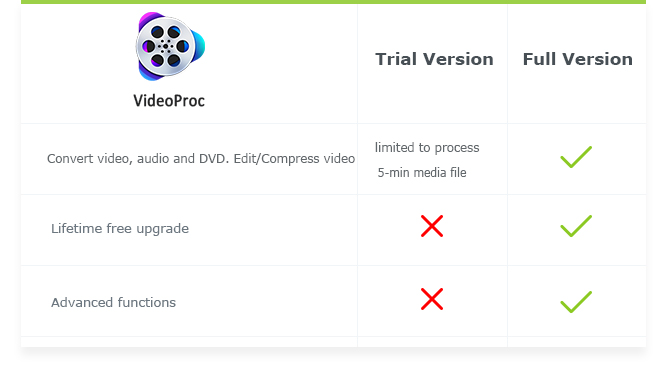
Trial Version Limitations
VideoProc offers users free trial, but the trial version has the following limits.
The trial version only allows users to convert 5 minutes of each video, audio or DVD for evaluating purpose.
Free users have no access to free update to the latest full version of VideoProc.
Some advanced features are not available in trail version.
You can follow steps below to register and update to the full version to remove the limits.
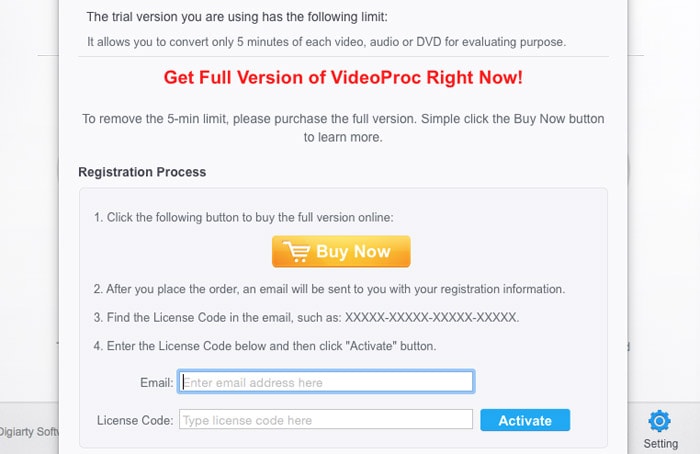
Register
Step 1: Click the Register icon at the bottom of the interface and the Register window will appear.
Step 2: Click the Buy Now button, finish your payment, and you'll receive the registration information.

Step 3: Enter your email address, license code, then click the Activate icon to complete the process and enjoy the full version of VideoProc.
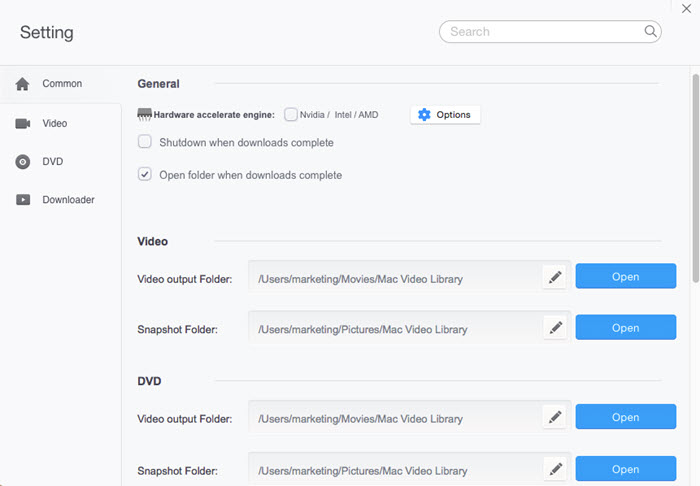
Settings
Click the Settings icon to get more options to change settings, including options to enable hardware acceleration, Video/DVD output folder, snapshot folder, default language, Downloader video output folder, music output folder, default resolution, default format, and concurrent thread.
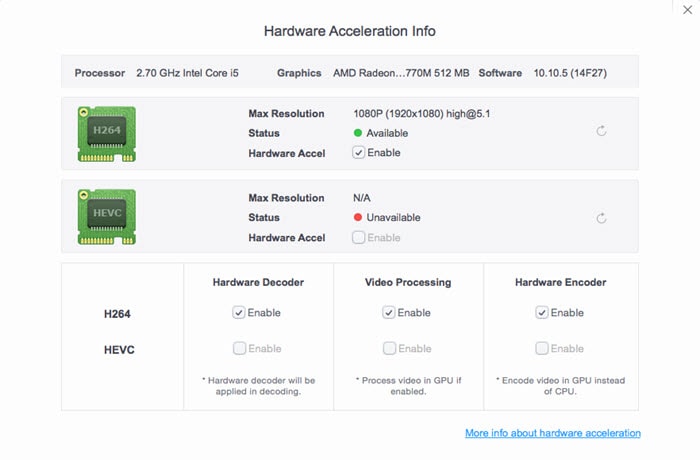
Enable hardware acceleration
VideoProc supports hardware accelerated video processing. To enable it, go to Settings > Common > General and check the box next to Hardware acceleration engine. Click the options icon, you'll get to know whether your computer supports hardware acceleration or not.
Alternatively, you can click the Video button or the DVD icon, and on the Video or DVD window, click the Options icon under Hardware acceleration engine on the right side of the window to check the status and check the box next to Nvidia/Intel/AMD to enjoy GPU acceleration.
User Interface
Video: Click the Video button to import videos, a video folder or music and process video and song files (convert, edit, compress, name and tag, etc.). Hardware accelerated 4K UHD video processing is supported as well.
DVD: Hit the DVD icon to deal with your DVD collections. You can decrypt, copy and backup DVDs.
Downloader: Click the Downloader button to download videos and music from 1000+ sites covering YouTube, Dailymotion, Vimeo, Facebook and more.
Recorder: Click the Recorder icon to enable recording. You can create a screen recording and capture activities with sound on your iPhone.
2.1. Video AI
2.1.1 How to Upscale and Enhance Videos
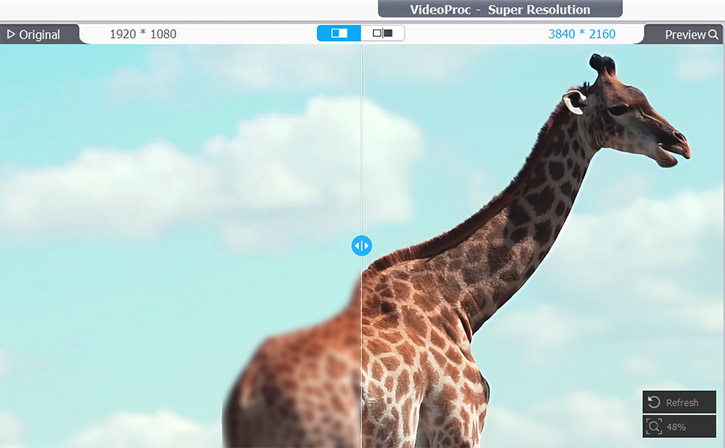
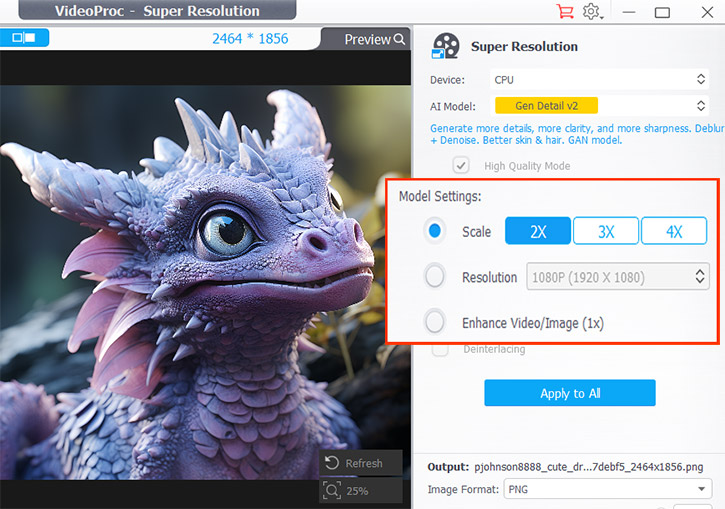
VideoProc Converter AI’s Super Resolution uses AI to enhance video quality. You can upscale low-resolution clips up to 2x, 3x, or 4x, reaching resolutions as high as 4K. It also restores noisy, grainy, or compressed footage, producing sharper visuals with minimal artifacts.
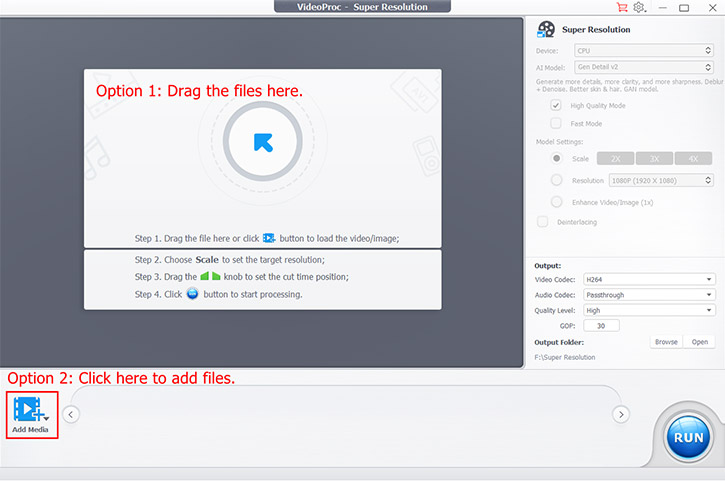
Step 1: Launch VideoProc Converter AI and open the Super Resolution tab on the home screen.
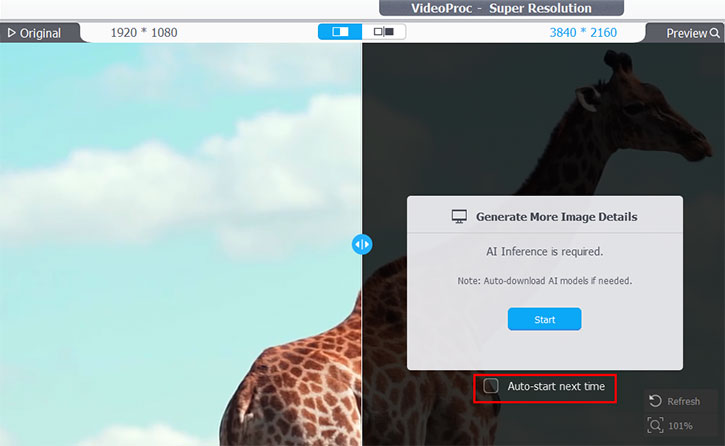
Step 2: Add your video files. Drag and drop clips or click the + / Add Media button. Multiple files can be added for batch processing. By default, AI analysis starts automatically; uncheck "Auto-start next time" to disable.
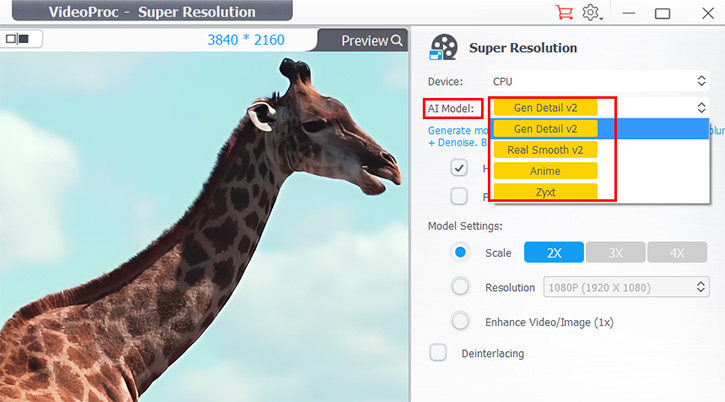
Step 3: Choose an AI model.
Gen Detail: Enhances clarity while preserving details, automatically deblurring and denoising.
Real Smooth: Builds on Gen Detail to provide smoother, brighter, and sharper outputs.
Step 4: Select a mode.
High Quality Mode: Default mode for maximum detail.
Fast Mode: Faster processing with slightly lower detail.
Step 5: Configure model settings.
Scale: Choose 2x, 3x, or 4x to enlarge the video while keeping the original aspect ratio. Max output is roughly 4K (width ≤ 5000 px, height ≤ 4000 px). Lower-resolution videos allow higher scaling (480p: 2x/3x/4x, 720p: 2x/3x, 1080p: 2x).
Resolution: Pick from 480p, 720p, 1080p, 2K, or 4K. If the selected resolution is lower than the source, the original resolution is kept. Aspect ratio is always preserved (e.g., 1920x1920 input → 2160x2160 at 4K).
Enhance 1x: Improve video quality without changing resolution.
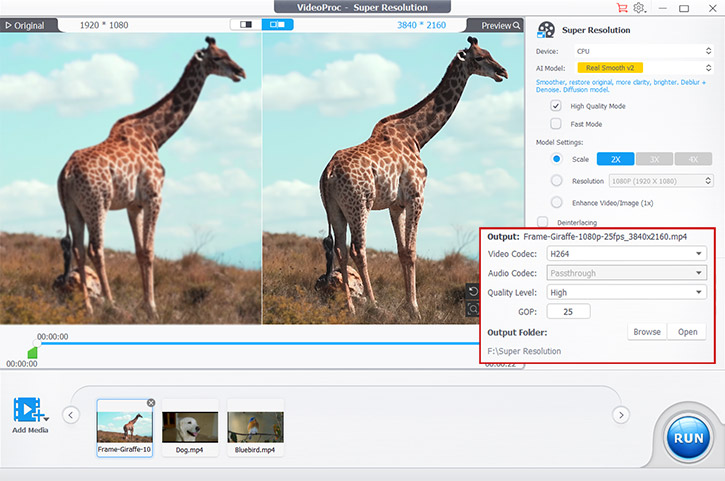
Step 6 (Optional): Adjust output settings.
Video Codec: Choose H264 for wide compatibility or HEVC for smaller file size (~50% smaller) though some devices/software may not support it.
Audio Codec: Pick AAC for standard lossy compression or Passthrough to keep the original encoding. For other formats, convert the output separately.
Quality Level: Select High, Medium, or Low depending on your preference for speed vs. output size. Higher quality slows processing and increases file size.
GOP Settings: Adjust the Group of Pictures (I-, P-, B-frames) to balance compression and quality. Lower GOP numbers improve quality but increase file size.
Destination Folder: Choose where to save your output file.
Step 7: Click the RUN button to start AI upscaling and enhancement. Preview results in Single or Dual Mode to compare original and enhanced videos. Use zoom, trim, or refresh analysis as needed.
2.1.2 How to Boost FPS with AI Frame Interpolation
VideoProc Converter AI’s Frame Interpolation lets you convert low-FPS videos to higher frame rates, e.g., 30/60fps → 120/240/480fps. AI generates realistic intermediate frames using deep neural networks with GPU acceleration (Nvidia/AMD).
Step 1: Launch VideoProc Converter AI and open the Frame Interpolation module.
Step 2: Add your video files. Drag clips or click + / Add Media. Batch processing is supported. Enable or disable auto AI analysis with "Auto-start next time".
Step 3: Set the output FPS multiplier (2X, 3X, 4X, 5X) and enable Deinterlacing for interlaced videos if needed.
Step 4 (Optional): Enable Skip Scene Changes to avoid interpolation artifacts at cuts. Adjust sensitivity (default 85) to refine detection.
More About the Skip Scene Changes Option:
When enabled, the AI will skip interpolating frames during detected scene changes to prevent distortion or visual artifacts.
Sensitivity Parameter: This defines how strictly the software detects scene changes or transitions.
A lower value detects fewer scene changes and interpolates more often, which may cause artifacts when frames differ significantly. A higher value detects more scene changes, skipping more transitions and reducing interpolation frequency.
The default value of 85 is recommended. If you see distortion, raise the value slightly (+1 or more). If interpolation feels too limited, lower it (-1 or more) to fine-tune results.
Step 5: Choose output format and settings.
Video Codec: Choose H264 for broad compatibility or HEVC (H265) for up to 50% smaller file size at the same quality. Note that HEVC requires more computing power and may not be supported by some devices or players.
Audio Codec: Select Passthrough to keep the original audio, or AAC for high-quality, widely compatible sound.
Quality Level: Use High for best results. Higher quality increases bitrate, processing time, and file size.
GOP: Controls how frames are grouped for compression. Smaller values give better quality; larger ones reduce file size. For most users, the default setting works best.
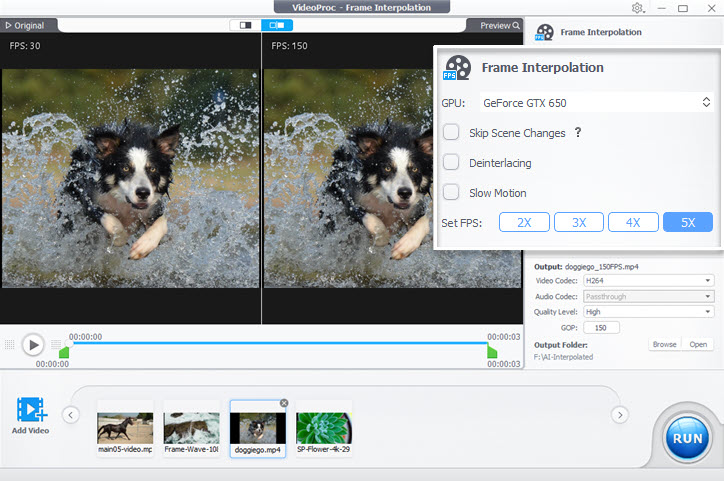
Step 6: Click RUN to start interpolation. Preview results in Single or Dual Mode, and use zoom, trim, or refresh as needed.
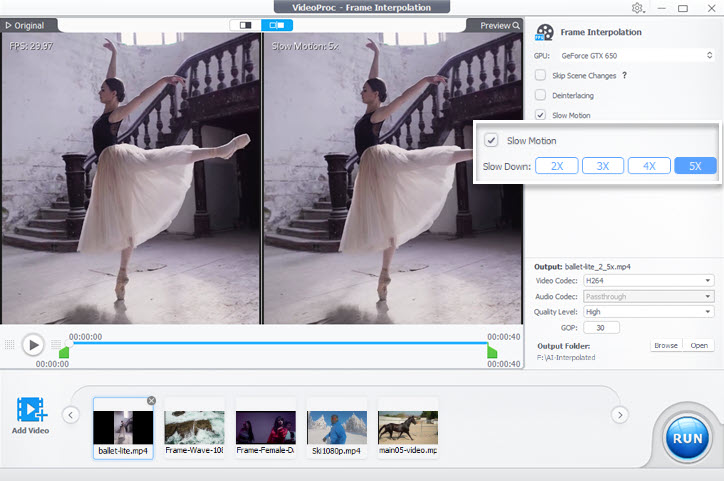
2.1.3 How to Create Smooth Slow-Motion Videos with AI
With the Frame Interpolation tool in VideoProc Converter AI, you can easily turn ordinary videos into smooth, cinematic slow-motion clips using AI-generated frames.
Step 1: Open the Frame Interpolation module and import your video file.
Step 2: Enable Slow Motion and choose your preferred playback speed. You can slow down the video by 2X, 3X, 4X, or 5X.
Step 3: Export the video.
Keep the default settings, select an output folder, and click RUN. For advanced users, you can adjust the Video Codec, Audio Codec, set Quality Level, or fine-tune the GOP value for more control.
Tip: To make the video even slower, repeat the process. For example, re-import a 5X slow-motion video and set it to 2X again — resulting in a total of 10X slow motion compared to the source clip.
Access More Speed Controls:
If you want more precise speed adjustments, use the Speed Changer in the Video Converter module. Before that, generate a high-FPS video (e.g., 240FPS) using Frame Interpolation as described above.
Step 1: Open the Video tab on the home screen and import your high-FPS video.
Step 2: Choose MP4 (H264) as the output format, then click Effect on the toolbar.
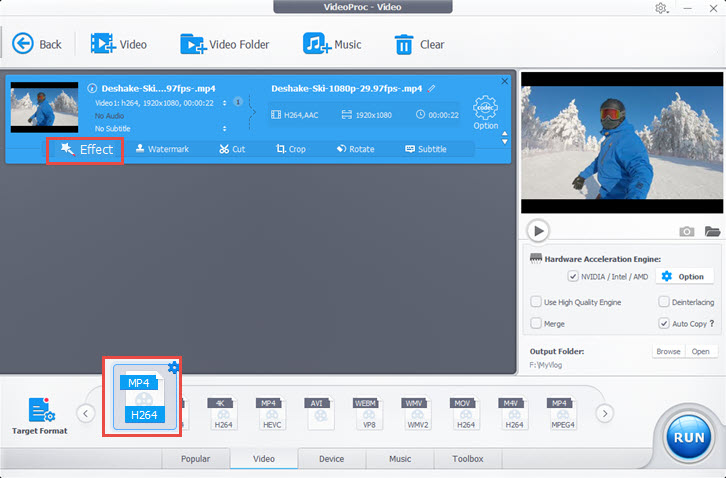
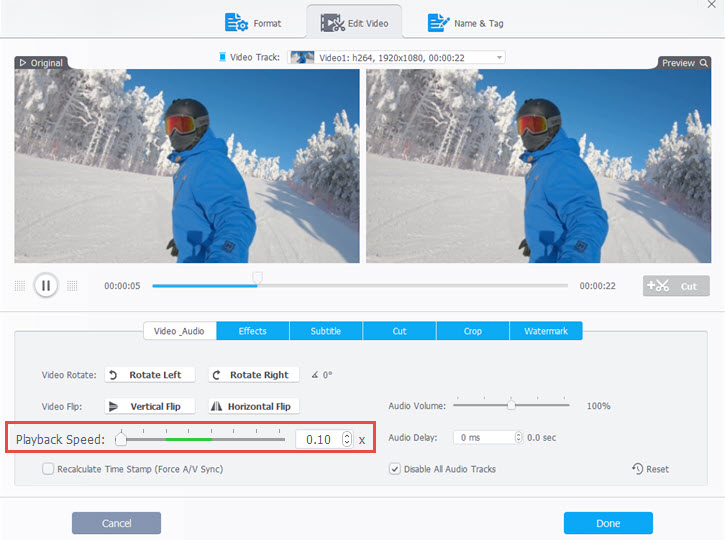
Step 3: Under the Audio & Video tab, drag the Playback Speed slider to the left.
For example:
Step 4: Click RUN to export the final slow-motion video.
If you want to turn a 1080p@30FPS video into a 4K@60FPS one, combine AI Frame Interpolation (to boost FPS) with Super Resolution (to upscale resolution) for the best visual results.
2.2 Image AI
VideoProc Converter AI provides a dedicated Image AI toolkit powered by deep learning. It helps you upscale, restore, and enhance photos with professional-level results — ideal for improving low-res, blurry, or AI-generated images.
2.2.1 How to Upscale and Enhance Images with AI Super Resolution
Super Resolution in VideoProc Converter AI uses advanced neural networks to enlarge and refine your photos while keeping natural textures and details intact.
Upscaling: Scale images by 2x, 3x, or 4x with well-trained AI models to generate 4K, 8K, or even 10K results, perfect for printing or large-screen display.
Enhancement: Remove noise, sharpen blurry details, and restore clarity with AI-powered algorithms designed to make images crisp and lifelike.
Note: The same process applies to video upscaling. For enhancing videos, see the AI Video Super Resolution guide.
Step 1: Launch VideoProc Converter AI and select the Super Resolution tab from the home interface.
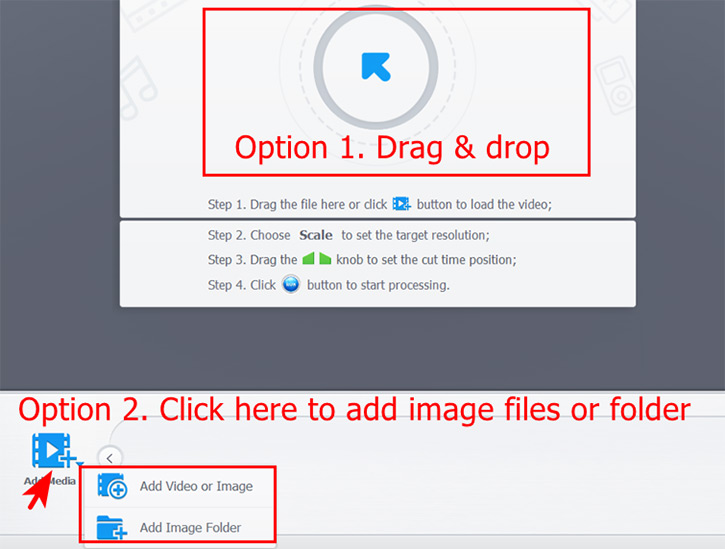
Step 2: Import your source images. You can drag and drop them directly or click Add Media → Add Image / Add Image Folder. Batch import is supported.
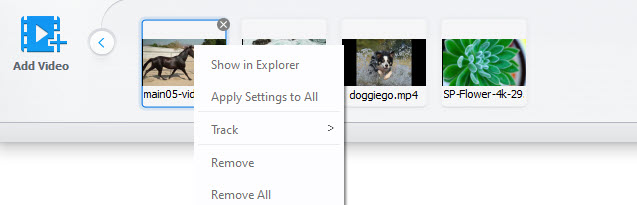
Tip: Right-click any thumbnail to locate it in Explorer, apply settings to all, or remove it. Once loaded, AI model preparation starts automatically. You may uncheck “Auto-start next time” if needed.
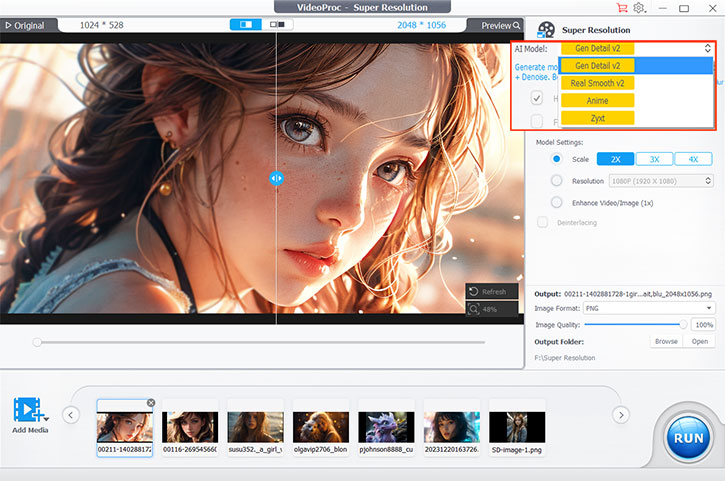
Step 3: Choose your preferred AI model.
Gen Detail (recommended): Enhances sharpness, restores details, and removes blur and noise automatically.
Real Smooth (recommended): Produces smoother, cleaner, and brighter images — great for photo restoration and enlargement.
Step 4: Set upscaling and enhancement preferences.
Scale: Choose 2x, 3x, or 4x. The aspect ratio stays unchanged. Max output: 10,000 × 10,000 px.
Resolution: Choose from 480p, 720p, 1080p, 2K, or 4K. If lower than the source, the original resolution is kept.
Enhance 1x: Improve image quality without resizing.
Apply to All: Apply settings to all imported images.
Note: “High Quality Mode,” “Fast Mode,” and “Deinterlacing” are video-only options and unavailable for images.
Step 5: Preview results before exporting.
Compare “Before” and “After” images using single or dual preview modes. Adjust zoom, refresh analysis, or view exact resolution info.
Resolution Display: Shows both source and output resolutions.
Refresh: Reanalyzes your image with the selected AI model.
Magnifier: Zoom in/out to inspect fine details.
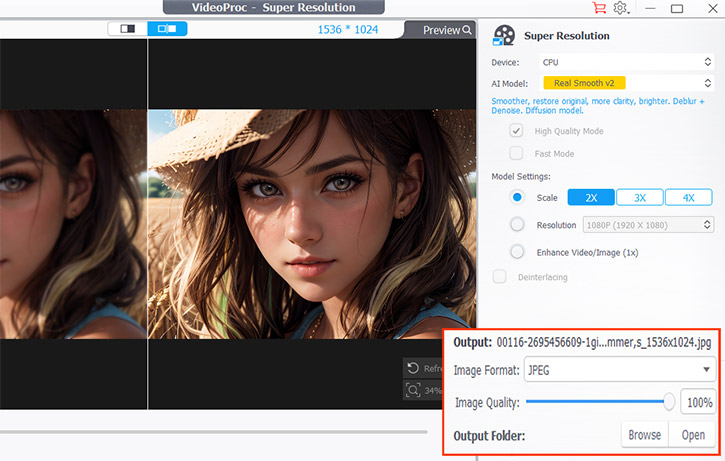
Step 6: Adjust output settings.
Format: Select JPEG or PNG.
Quality: Adjust with a slider (default 100%).
Output Folder: Set the save location for enhanced files.

Step 7: Click RUN to start AI enhancement. Your images will be processed into high-resolution, detailed, and clear results within minutes.
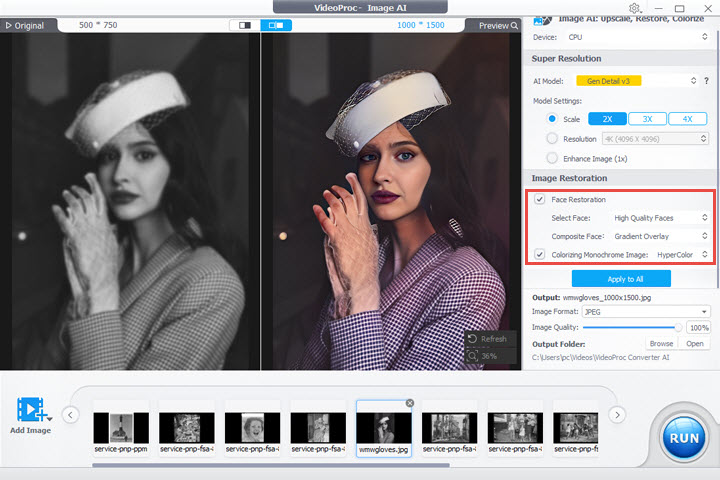
2.2.2 How to Restore Faces in Images with Image AI
VideoProc Converter AI's Face Restoration helps you enhance facial details—hair, skin, eyes, lips—and repair scratches or stains in portraits, group photos, or old images. No technical skills required, and the results are natural and clear.
Restore old photos, portraits, group shots, and family heirlooms with AI. Automatically fix blurriness, noise, scratches, and stains. Upscale/enhance images up to 10K for printing or large screens. Restore and colorize multiple images in bulk.
Step 1: Import Images
Launch VideoProc Converter AI and click Image AI on the home interface. Drag and drop images or folders, or click the Add Image button and choose Add Image or Add Image Folder. Batch processing is supported.
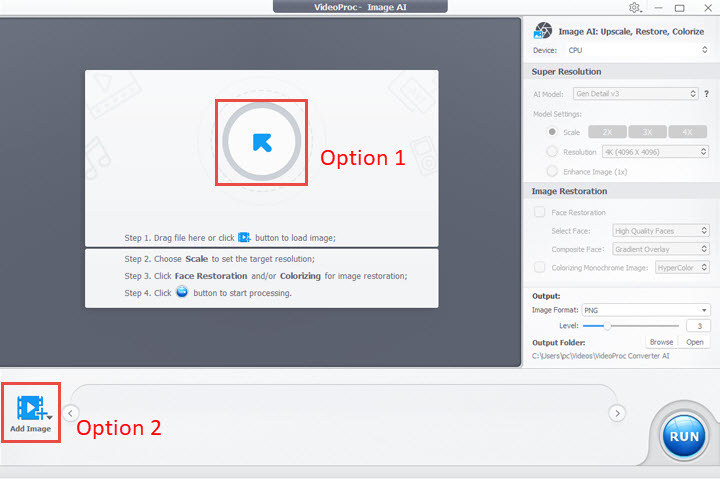
Tips: The first image is auto-rendered. Uncheck "Auto-start next time" to skip for later images. Remove single images via the X icon or right-click > Remove. Remove all via right-click > Remove All. Show in Explorer via right-click > Show in Explorer.
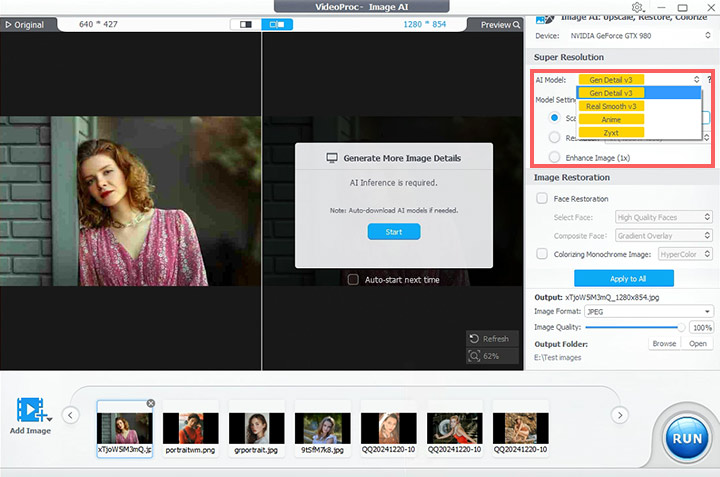
Step 2: Enhance or Upscale Images
Select an image, go to Super Resolution, pick an AI model, and set a target resolution.
AI Models: Gen Detail v3 for clarity and detail preservation; Real Smooth v3 for smoother, brighter results.
Scale Ratio: 2X, 3X, 4X to increase resolution (max 10,000×10,000 px). Repeat upscaling for higher resolutions if needed.
Resolution Presets: 1K, 2K, 4K, 8K. If lower than the source, the original resolution is retained. Aspect ratio remains unchanged.
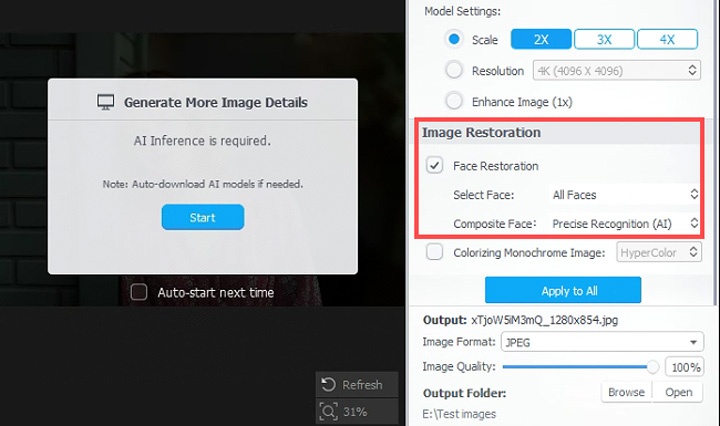
Step 3: Restore Faces
Go to Image Restoration and enable Face Restoration.
Select Face: High Quality Faces (best original quality), Center Face, or All Faces.
Composite Face: Choose Overlay, Gradient Overlay, or Precise Recognition to repair slight damages while preserving natural features.
Tips: Batch apply settings via Apply to All or right-click > Apply Settings to All.
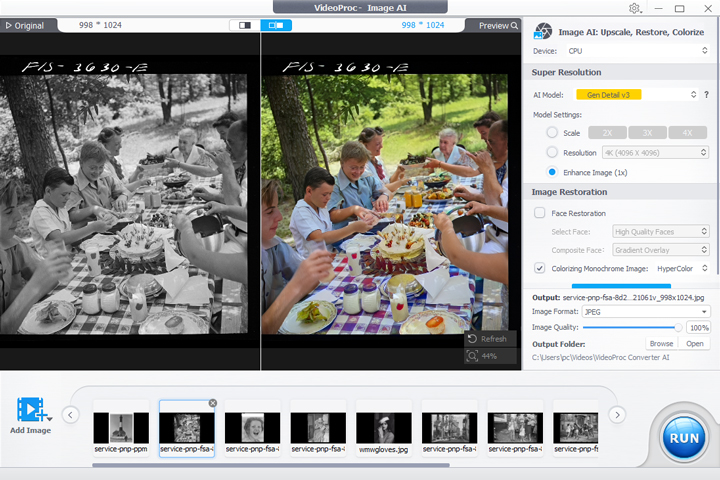
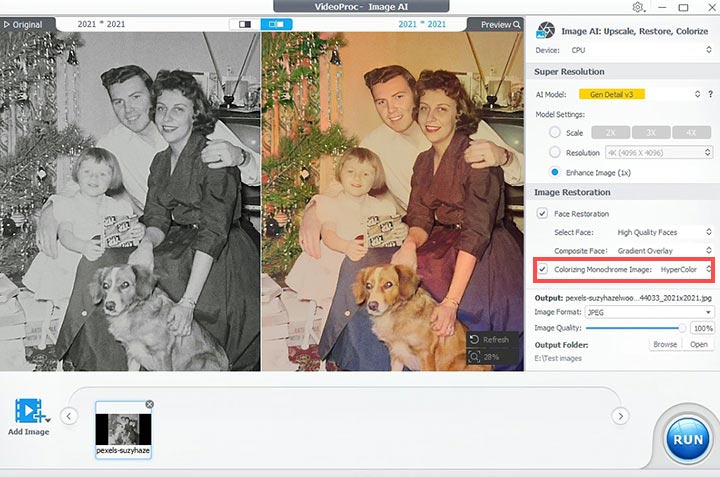
2.2.3 How to Colorize Black-and-White Photos with Image AI
VideoProc Converter AI's Colorizing Monochrome Image tool transforms old black-and-white photos into realistic, vibrant images. Advanced AI automatically restores colors for people, objects, clothing, and scenery with a single click.
Automatically colorize monochrome images with high precision, preserve original style, handle smooth color transitions, and enhance clarity in complex environments like nighttime or reflective surfaces.
Free Download Check Specifications > Buy Now Save with Coupon "*****SAVE" >
Step 1: Add Your Photos
Open VideoProc Converter AI, click Image AI on the main interface. Drag and drop one or multiple black-and-white photos, or click Add Image to select files or folders. Batch processing is supported.
Step 2: Enable Colorizing
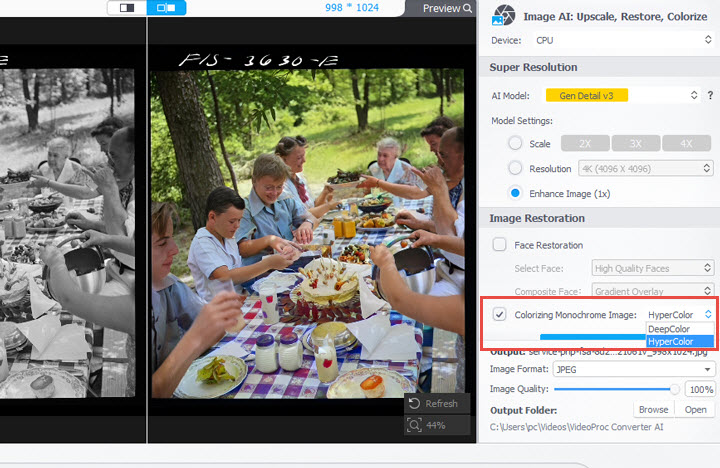
Choose your AI model and scaling options. For most images, select Enhance Image 1X. Scroll to Image Restoration and check Colorizing Monochrome Image. Then pick an AI color model:
HyperColor: Vibrant, rich colors for most scenarios (default).
DeepColor: Softer, more subtle colorization for a balanced effect.
The AI automatically applies colors to your photos.
Step 3: Export Colorized Photos
Select JPG or PNG, adjust output quality with the slider, choose an output folder, and click RUN to save your colorized images.
Colorize and Upscale Blurry Black-and-White Portraits
Step 1: Add Your Photos
Click Image AI and import blurry black-and-white images using drag-and-drop or the Add Image button.
Step 2: Upscale and Colorize
Choose scaling options to enlarge low-quality images. In Image Restoration, enable Face Restoration to enhance facial details, and check Colorizing Monochrome Image to apply colors.
Step 3: Export
Select the desired format (JPG/PNG), adjust quality with the slider, choose the output folder, and click RUN to upscale and colorize your photos.
Step 4: Preview .
Use single mode (slide marker) or dual mode (side-by-side before/after). See original resolution left, output right. Zoom with magnifier, reposition by dragging, and refresh to reanalyze images.
Step 5: Export Images
Select JPEG or PNG. Adjust quality with the slider (default 100%). Choose an output folder and click RUN to restore faces and export the final images.
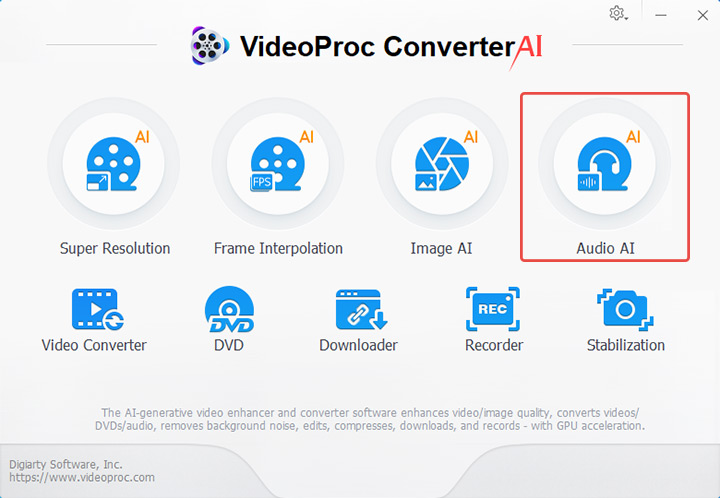
2.3 Audio AI
2.3.1 Remove Audio Noise with Audio AI
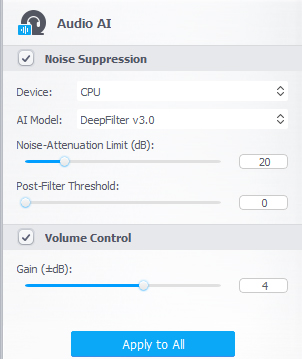
VideoProc Converter AI’s Noise Suppression helps remove unwanted background noise from audio or video recordings, producing clear, professional-quality sound. It targets common disturbances like traffic, wind, hissing, and chatter, ideal for podcasts, interviews, voiceovers, online courses, and vlogs.
Key features include: clearer vocals, adaptable noise filtering, adjustable settings for bulk processing, and real-time preview for polished results.
Preparation: Download, install, and launch VideoProc Converter AI.
Step 1: Click the Audio AI icon on the main interface to access the Audio AI workspace.
Step 2: Upload your audio or video file.
Option 1: Drag and drop your file(s) into the software.
Option 2: Click Add Media and select files from your local folders. Multiple files are supported for batch processing.
Step 3: Apply AI noise suppression and preview.
Check Noise Suppression, select the preferred AI model, and adjust parameters:
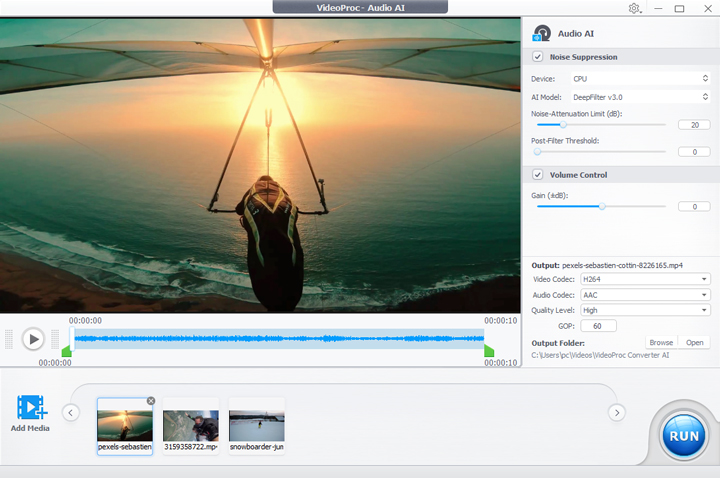
AI Model: Two models filter noise from speech, keeping clarity even in challenging environments.
Noise Attenuation Limit (dB): Sets the maximum noise reduction. Light noise: 6–12 dB, moderate: 18–24 dB.
Post-Filter Threshold: Removes residual noise. Lower values (0.01–0.02) preserve natural sound; higher values (0.03–0.05) target moderate background noise.
Volume Control: Adjust loudness if noise suppression reduces audio levels.
Tips: Toggle Noise Suppression to compare before-and-after. Use Apply to All for batch files. Temporary preview artifacts won’t affect final export quality.
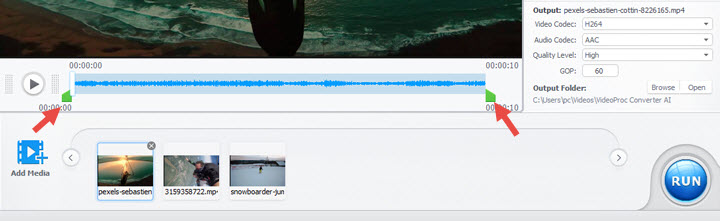
Step 4: Export audio.
Trim using waveform handles if needed, adjust audio/video codec, quality, and GOP, select output folder, and click RUN to export the file with enhanced sound.
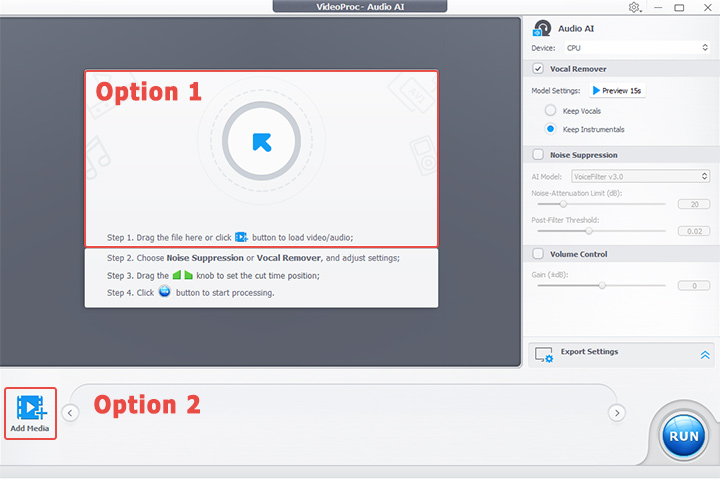
2.3.2 Remove Vocals or Instrumentals with Audio AI
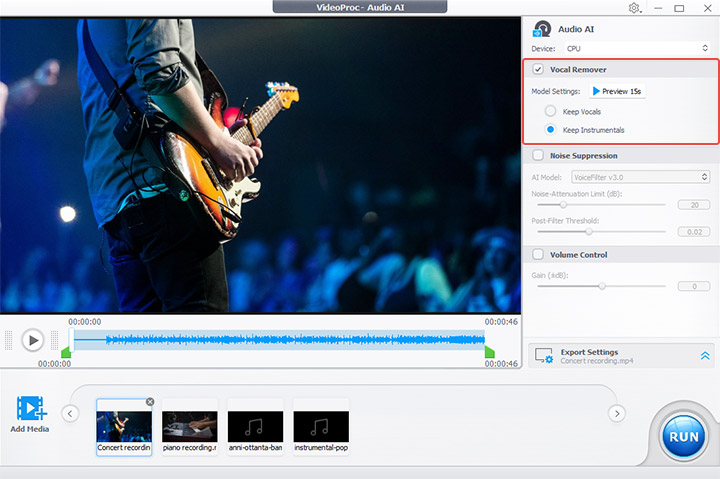
VideoProc Converter AI includes a Vocal Remover in its Audio AI module, which uses AI-powered audio separation to isolate vocals and instrumentals with high accuracy while keeping natural sound and transients intact. You can remove vocals to create clean instrumentals or extract vocals for acapella tracks. The process is fast, intuitive, and supports both audio and video files, making it perfect for karaoke, remixes, music practice, or audio restoration.
Step 1: Click Audio AI on the main interface to open the Vocal Remover.
Step 2: Import your audio or video file.
Drag and drop files or click Add Media to select files. Batch processing is supported.
Supported formats include a wide range of audio formats (MP3, WAV, FLAC, AAC, AIFF, etc.) and video formats (MP4, AVI, MOV, MKV, FLV, WMV, WebM, etc.).
Step 3: Choose a model and preview the output.
Keep Vocals: Removes instrumentals, creating acapella tracks for remixing, sampling, study, or teaching.
Keep Instrumentals: Removes vocals, generating karaoke tracks, background music for performances, or clean backing tracks for covers.
Step 4 (Optional): Adjust additional settings if needed.
Enable Noise Suppression to reduce background hiss, use Volume Control to adjust loudness, and set the export range using the green knobs under the preview window.
Step 5: Start the separation process.
Configure output settings: select audio/video codec, quality level, GOP (for video), and output folder, then click RUN to export your separated audio.
Audio Codec Options:
MP3: Small file, good quality, suitable for online sharing and portable players.
WAV: Uncompressed, studio-quality audio for professional editing or mixing.
FLAC: Lossless compression, reduces file size while preserving full audio fidelity.
Video Codec Options:
H.264: Broad compatibility and balanced quality/file size.
HEVC: Smaller files with similar quality to H.264; ideal for 4K+ playback.
AV1: Highly efficient, excellent quality; support still growing.
ProRes: Professional editing codec with large files but maximum quality retention for post-production.
3. Convert & Process Videos3.1 Transcode Videos to Any Format
Step 1: Import video files. You can directly drag video files or click the add video icon at the top of the Video Window. Or click the Video Folder icon to load a video folder. VideoProc is able to process videos and video folders in bulk, including 4K UHD/8K clips.
Step 2: Select an output format. The source video files should be loaded quickly, then pick an output format.
* Transcode video format from one to another. Click the Video button and there's a list of video formats for you to choose. Click the Popular button to check commonly used media formats.
* Convert video to devices. Click the Device tab to see more devices preset profiles for iPhone, Android, iPad, Samsung, Huawei, PS4, Xbox, OPPO, to name a few.
Step 3: Click the RUN button at the bottom right corner to begin processing videos.

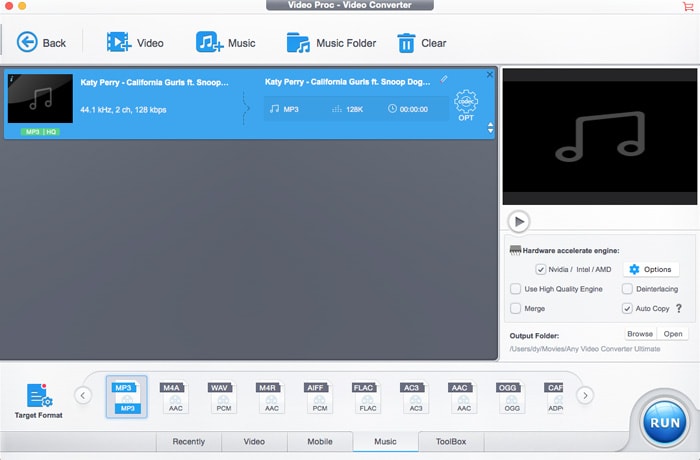
3.2 Switch Music Format
Step 1: Click the Video icon on the main interface, then hit the Music button at the top toolbar and select music files you'd like to process. Or direly drag the source song files. You can add more than one track at a time. Note that you can't import audio and video files at the same time.
Step 2: Select the format you want from the list of Target Format under Music tab.
Optional step
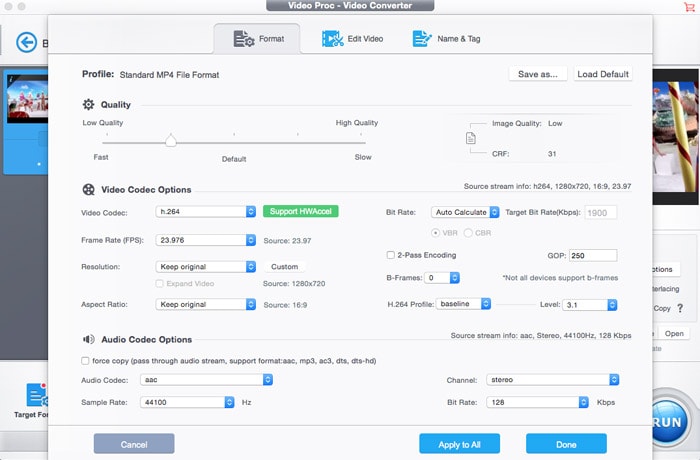
Adjust audio parameters: Hit the codec OPT button, under Format tab, you can adjust song quality, audio codec, channel, sample rate and bit rate.
Edit metadata: Click on Name & Tag tab to add and edit a set of information about the track, such as song name, artist name, album, genre, lyrics, and so on. Then Click the Done button to apply the editing and close the window.
Step 3: Click RUN button to process audio music transcoding.
3.3 Edit Videos
Click the Video button at the main interface and import the video you wish to edit. The guide below will walk you through the editing process.
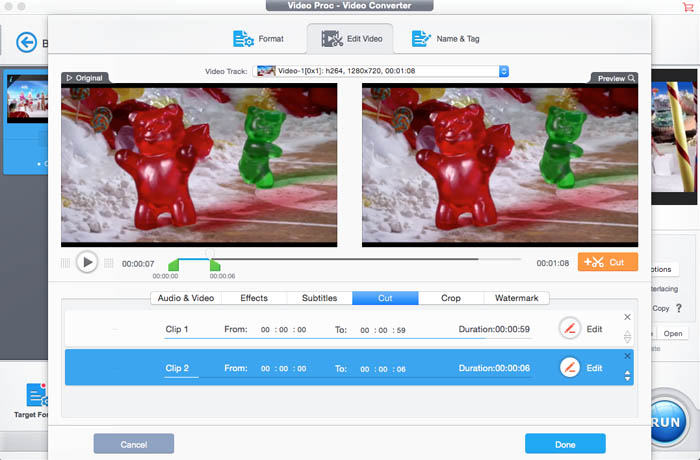
* How to Cut Videos
Step 1: Click the Cut icon below the video information and a new window will appear.
Step 2: Drag the edge of the clip towards the center to get the segment you want. Click the orange Cut button on the right, and click the Edit icon next to the clip trimmer, then fine-tune when your clip starts and ends. You can cut a video to several segments you wish to save as a new clip with unwanted parts being removed.
Step 3: Click the Done button to apply the change to your clips.
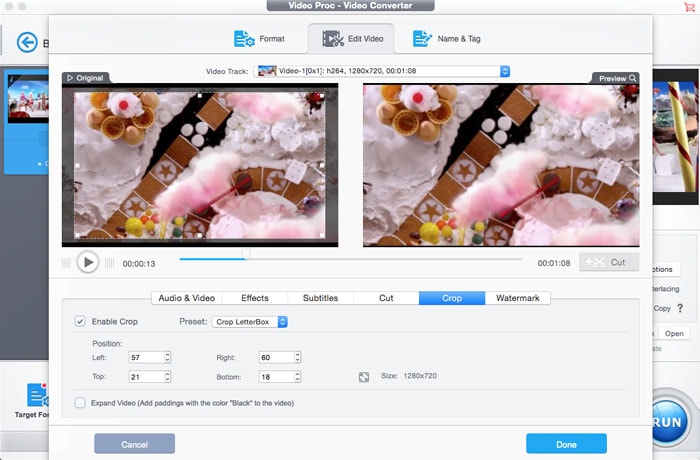
* How to Crop Videos
Step 1: Click the Crop button to show the cropping options.
Step 2: Check the Enable Crop box, and you should see an adjustable frame. Simply move the frame to crop the clip. Click the Preset drop-down icon to get a list of aspect ratio, select the ratio you wish to get and the clip will be automatically cropped. You can also head to the Position area and fine-tune the video size.
Step 3: Click Done to save the change and close the window.
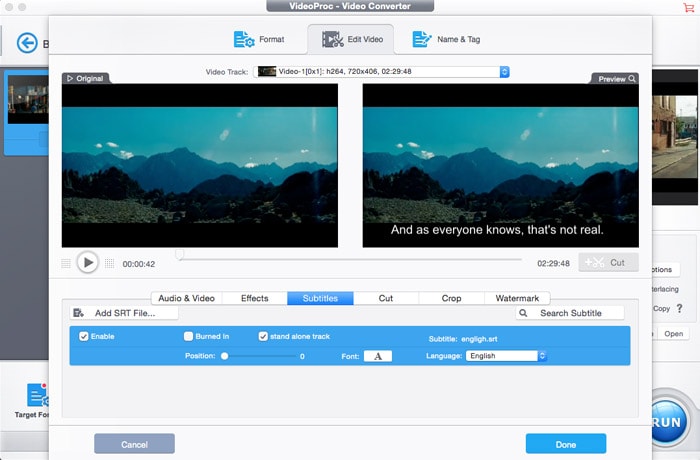
* How to Add Subtitles to Videos
Step 1: Click the Subtitles button to open the subtitles window.
Step 2: Click Add SRT File… and select a subtitle file from your computer.
Step 3: Click Enable and Burned In box, choose the subtitle position, language and font.
Step 4: Click the Done button to begin putting subtitles to the clip.
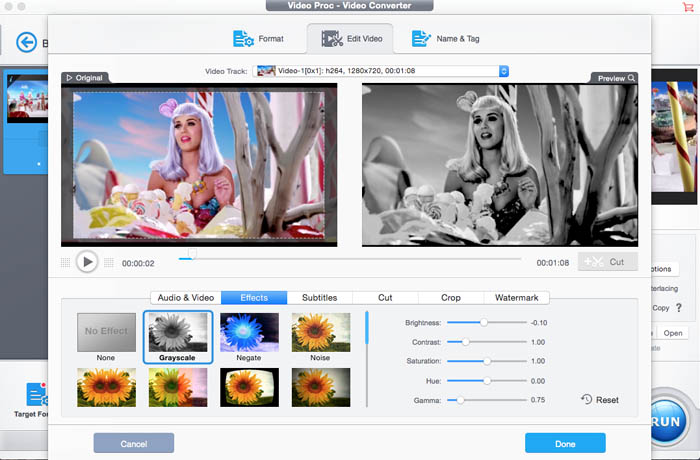
* Apply Effects to Videos
Step 1: Click the Effects button to show the video effects controls.
Step 2: Click the video effect and filter you want to add to the clip.
Step 3: On the right side, you can adjust video brightness, contrast, saturation, hue, and gamma. Click Reset to remove the adjustment.
Step 4: Click the Done button to apply the video effect to the clip.
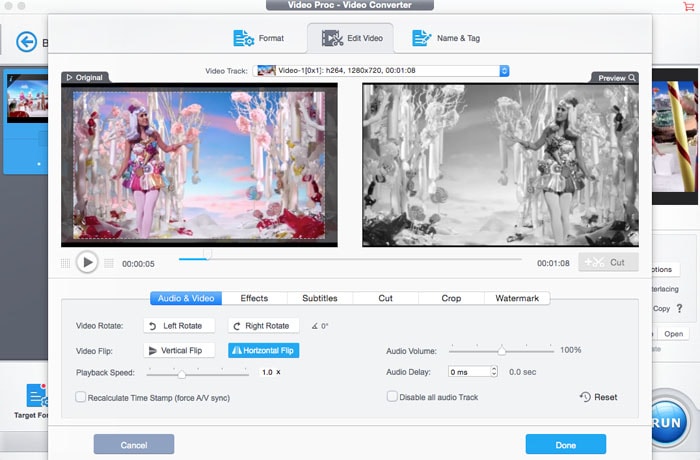
* How to Rotate Videos
Step 1: Click the Rotate button to show the Rotate options.
Step 2: You can click Left Rotate, Right Rotate, Vertical Flip or Horizontal Flip. Click the Reset to reset the rotation.
Step 3: Click the Done button to apply the change.
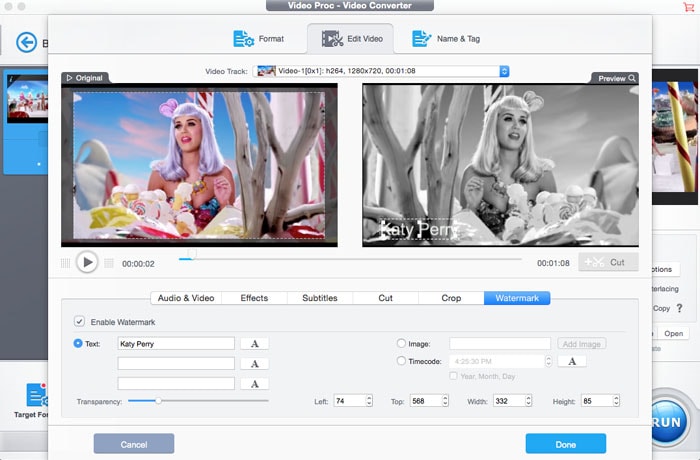
* How to Watermark A Video
Step 1: Click the Watermark icon and check the Enable Watermark box to get access to watermark controls.
Step 2: Enter the text watermark you wish to place. You can drag and put it to the size and position you like. Click the Image tab and choose an image and place the image watermark.
Step 3: If the watermark is fitting, click the Done button to add watermark to the clip.
3.4 How to Compress Videos
4K and 8K videos are always large in file size. VideoProc can reduce video file size by up to 90% with good quality reserved for space saving, faster sharing, and uploading.
Step 1: Import the video file you'd like to shrink.
Step 2: Do the following to make your video file size smaller.
* Click the Cut button to trim an unwanted section from the video.
* Click the codec OPT button to get more video settings. Drag the Quality Slider to the left side to lower down quality.
* Under Video Codec Options, change video codec to cut down the size, for example, HEVC is the most efficient codec for 4K Ultra HD videos.
* Decrease video bit rate by 30% to compress videos without noticeable quality loss. Lower down the resolution by clicking the Resolution drop-down icon. Bitrate changes when you adjust the resolution.
Step 3: Click the Done button to apply the compression settings.
 3. Video Toolbox
Toolbox offers easy access to process videos. With a few clicks, you can stabilize, denoise, merge, trim, split videos and more.
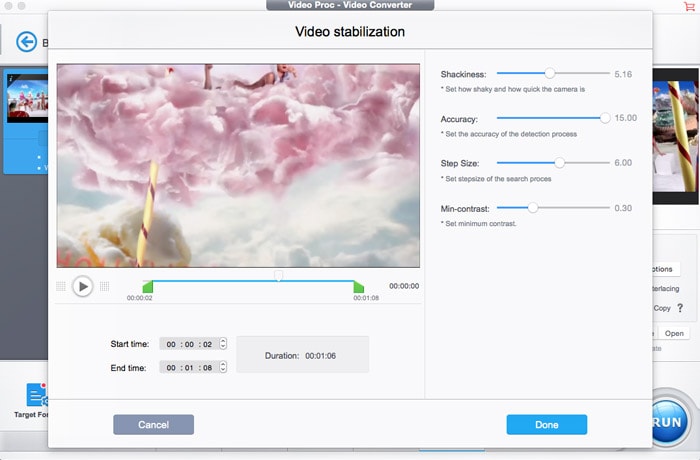
3.1 How to Stabilize Video
Step 1: Import the shaky footage you need to stabilize.
Step 2: Click the ToolBox button, hit the Deshake tab and then click the codec OPT icon to get stability controls.
Step 3: Drag sliders to adjust shakiness, accuracy, step size and min-contrast. Fine-tune the results to make the clip look better.
Step 4: Click the Done button to start to deshake your footage.
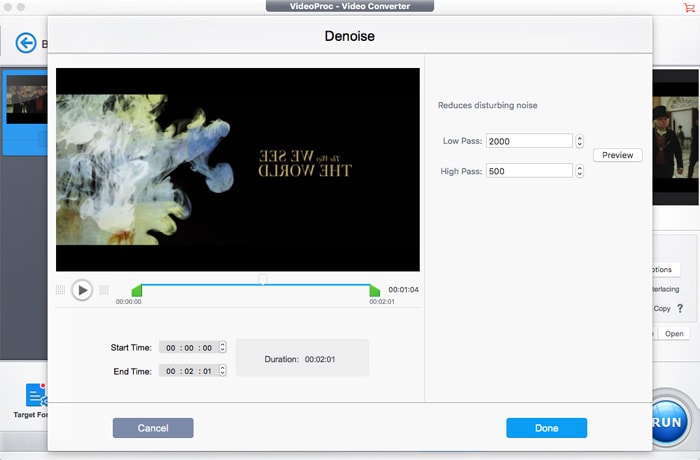
3.2 Remove background noise from a video
Step 1: Import the clip by drag-n-drop or clicking the Video button on the main interface.
Step 2: Click ToolBox > Denoise > codec OPT button to show the noise removal controls.
Step 3: Click the Low pass and High pass drop-down icon to get rid of noise from your footage.
Step 4: Click Preview to check the adjustment. Then click the Done button to reduce noise.
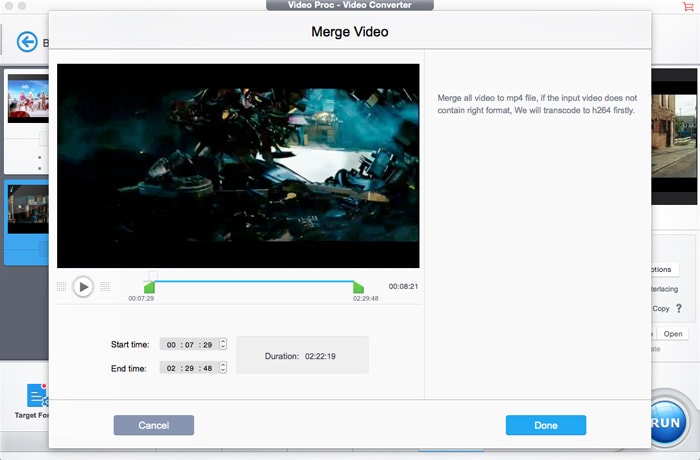
3.3 How to Merge Clips
Step 1: Load clips you want to join together from your computer.
Step 2: Click the ToolBox > Merge and then the codec OPT icon, and the merging options appear.
Step 3: Set the start time and end time, and click the Done button make the settings valid.
Step 4: Click the RUN button to begin combining separate clips into one.
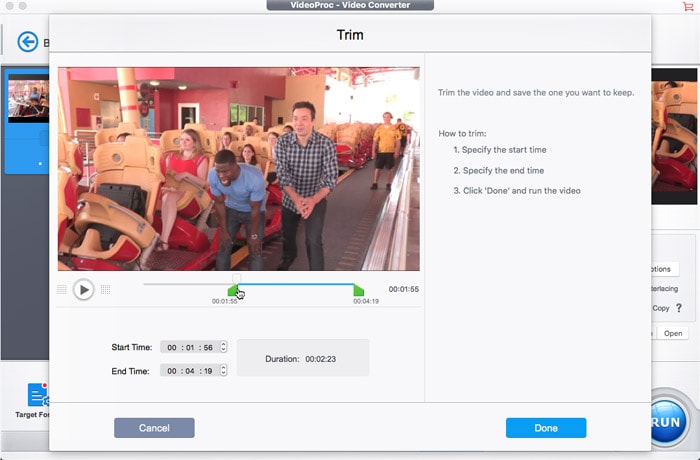
3.4 How to Trim Videos
Step 1: Import the footage you'd like to trim.
Step 2: Head to ToolBox > Trim, and click the codec OPT, then the trimming window pops up.
Step 3: Drag the slider to set the video start and end time. Click the Start time and End Time icon to fine-tune the time.
Step 4: Click the Done button to save the changes.
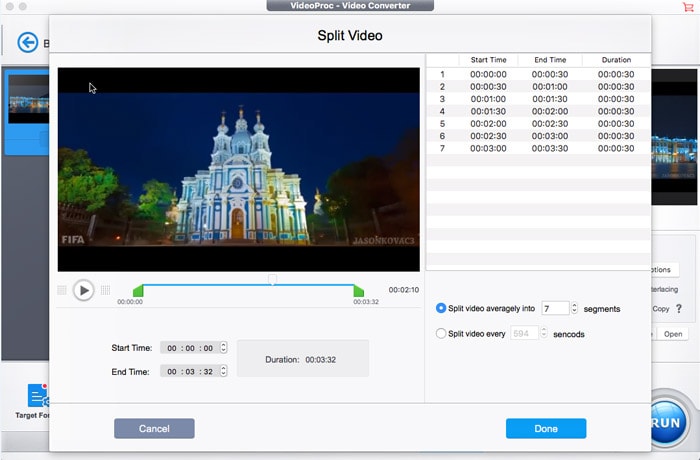
3.5 How to Split Clips
Step 1: Pick the clip you want to split into several parts.
Step 2: Click Toolbox > Split and hit the codec OPT button to activate the splitting function.
Step 3: Set the segments and time you want and click the Done button.
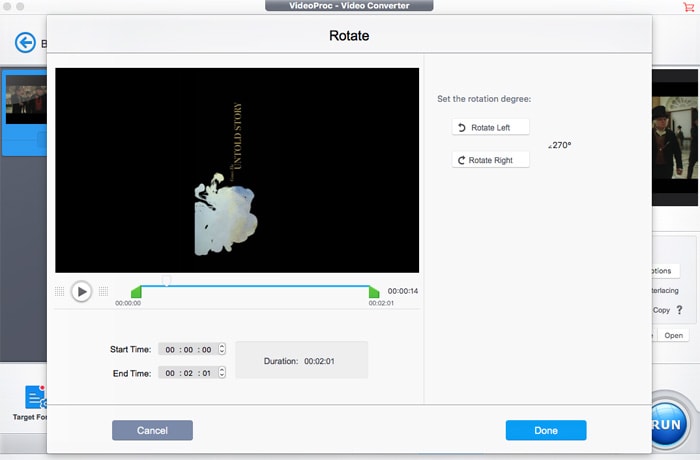
3.6 How to Rotate Videos
Step 1: Add the video from your computer.
Step 2: Click ToolBox > Split and click the codec OPT button, and the rotate window appears.
Step 3: Click Rotate Left or Rotate Right on the right side.
Step 4: Click the Done button to save the rotating.
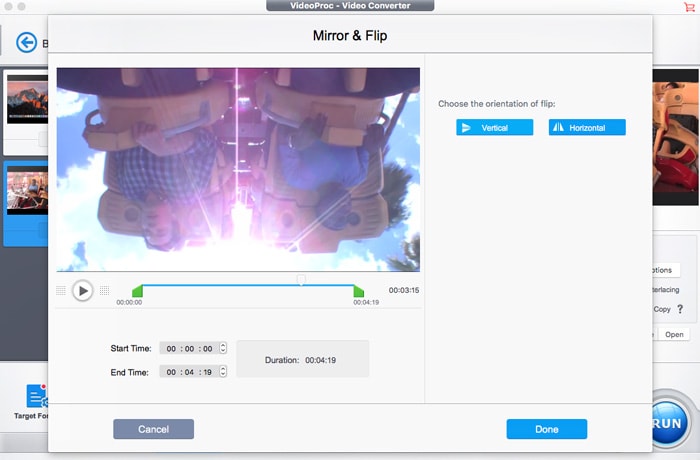
3.7 How to Mirror & Flip Videos
Step 1: Open the clip you want to process in VideoProc.
Step 2: Click ToolBox > Mirror & Flip, then hit above codec OPT button.
Step 3: On the Mirror & Flip window, choose Vertical Flip or Horizontal Flip. You can preview what it will look like on the window.
Step 4: Click on the Done button at the lower right corner to finish.
3.8 How to Create GIFs from Videos
Step 1: Import the video you wish to turn to animated GIFs.
Step 2: Click ToolBox > GIF and click on the codec OPT icon to show the GIF window.
Step 3: Set the loop time, image size, duration, and frame delay. Frame delay depends upon the frame rate and is determined by the formula: 1/fps*1000,where fps = frame rate per second.
Step 4: Click Done to save the GIF settings.
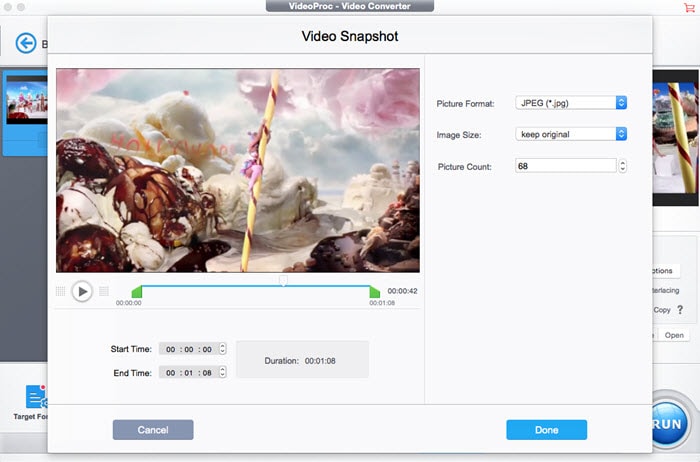
3.9 How to Take Snapshot from A Video
Step 1: Open the video from which you want to take pictures.
Step 2: To show the video snapshot window, click ToolBox > Snapshot and hit the codec OPT.
Step 3: Set the picture format (JPG or PNG), image size and picture number.
Step 4: Click Done to save the settings for taking pictures from a video.

3.10 How to Convert Video to M3U8
Step 1: Load the video you are going to process.
Step 2: Head to ToolBox > M3U8, and click the codec OPT button to show the M3U8 controls.
Step 3: Set the duration. You can enable the "Store all segments in a single MPEG-TS file".
Step 4: Click the Done button to apply the change.

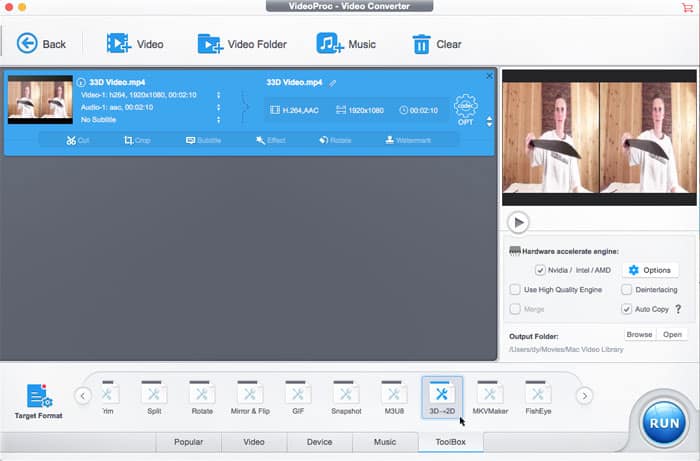
3.11 How to Turn 3D to 2D
Step 1: Import the source 3D video you wish to process.
Step 2: click the ToolBox > 3D-2D icon and hit the codec OPT button, and the transcoding window appears.
Step 3: Choose input format and output format by clicking the format drop-down icon.
Step 4: Click Done to save the 3D to 2D transcoding setting.
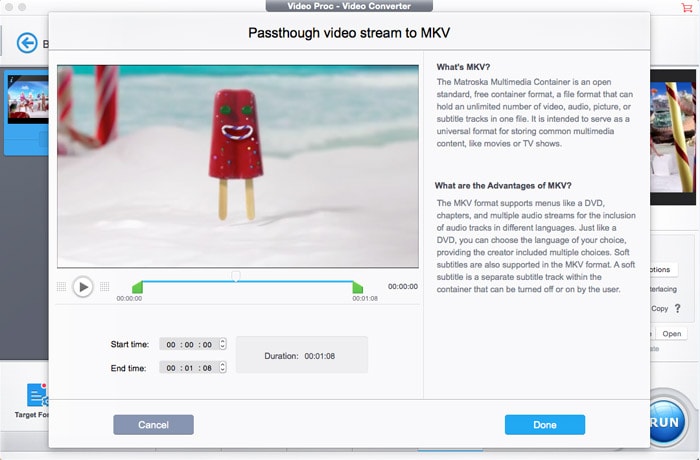
3.12 How to Remux Video to MKV
Step 1: Import the video you'll turn to MKV container format.
Step 2: Click the Toolbox > MKVMaker icon and click on the codec OPT button.
Step 3: On the MKV window, click Done. After you've all set and click the RUN button at the bottom, the video will be remuxed to MKV without re-encoding.
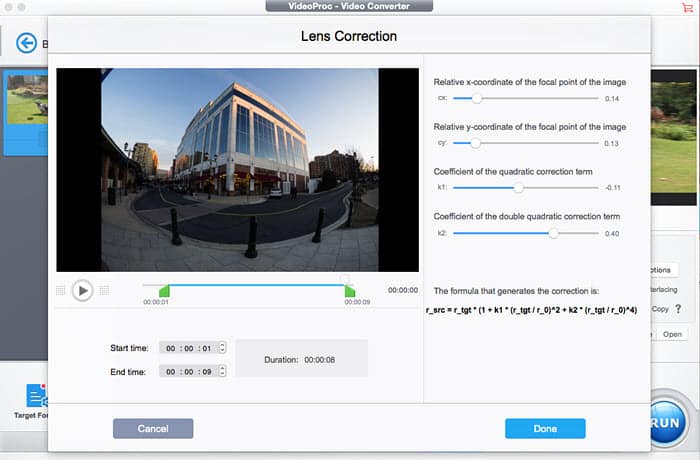
3.13 How to Use FishEye
Step 1: Add videos you want to apply the fish-eye effect to.
Step 2: Click the ToolBox > FishEye > codec OPT button to show the fisheye correction options.
Step 3: Adjust parameters for the output fisheye video.
Step 4: Click the Done button to apply the change.
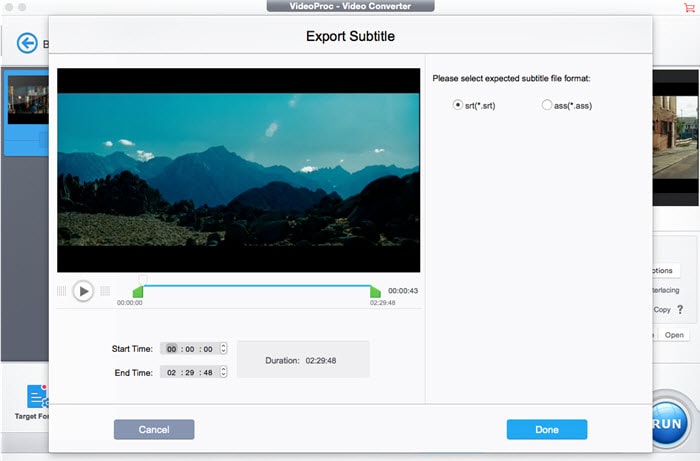
3.14 Export the Subtitle File from A Video
Step 1: Load the source videos to the tool.
Step 2: Click on ToolBox > Export and hit the codec OPT icon to show the subtitles window.
Step 3: Select the subtitle file format you want. SRT and ASS format are provided.
Step 4: Click the Done button to save the settings and close the window.
 4. Process DVDs
VideoProc also works as a DVD copy tool, enabling users to rip, convert and backup home DVDs and commercial DVDs speedily. It is even able to handle 99-title DVDs, workout DVDs, Japanese DVDs, Disney movies on DVDs, and more. Follow the guide below to digitize and backup your DVD collections.
4.1 How to Digitize DVDs
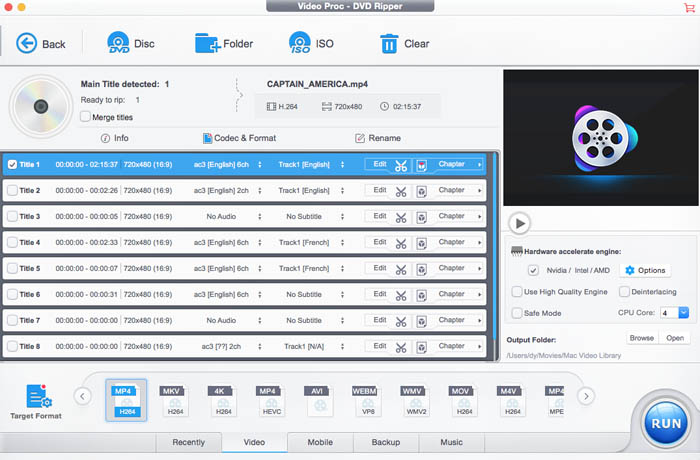
Step 1: Load DVD disc, DVD folder or ISO image. Click the DVD button and the DVD conversion window appears. Insert your DVD disc, click the Disc icon at the top, and select the DVD to load. Click the Folder or ISO image icon to load DVD Folder or ISO image.
Step 2: Select a target format. The DVD file can be loaded quickly. You'll see all the movie titles, DVD Info, and metadata editing options. VideoProc will automatically pick the right title for users even if the DVD contains up to 99 titles. Click the Video tab at the bottom to select an output format you want, such as MP4, MOV, AVI, WMV, to name a few.
* Click the Edit icon to get access to edit movies on DVDs before ripping. VideoProc is able to rotate, flip, cut and, crop movies, add effects, subtitles, and watermark to movies with a few clicks.
* Click the Info icon, you'll get the information of the DVDs, including DVD type, aspect ratio, frame rate, resolution, language, codec and more. You can also export the info.
* If you want to edit the movie tag, click the Rename icon to show tag controls. You are allowed to edit movie name, title, artist, movie genre, etc.
Step 3: Click the RUN button to start processing DVD digitization.
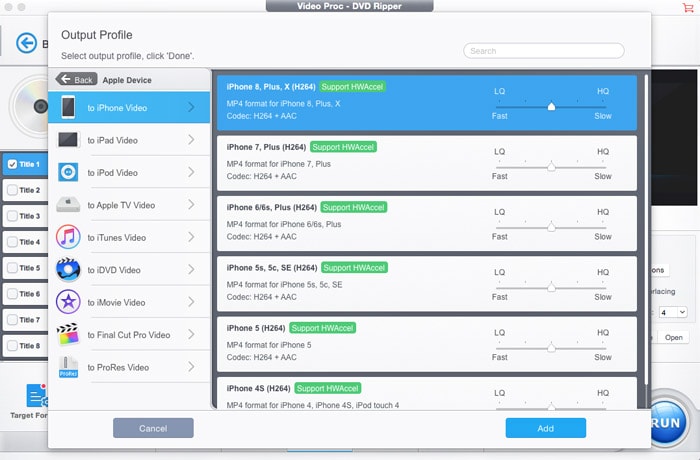
4.2 How to Convert DVDs to Any Device
Step 1: Import DVD disc, load DVD folder or ISO image to process.
Step 2: Click on the Device tab at the bottom, and select the device you want to put DVD on. It offers a wide range of mobile devices presets, including Apple iPhone iPad, Android, Microsoft etc. phones, tablets and game consoles.
Step 3: Edit and rename movies on DVDs as you wish.
Step 4: Click the RUN button to start to transcode DVDs to mobiles.
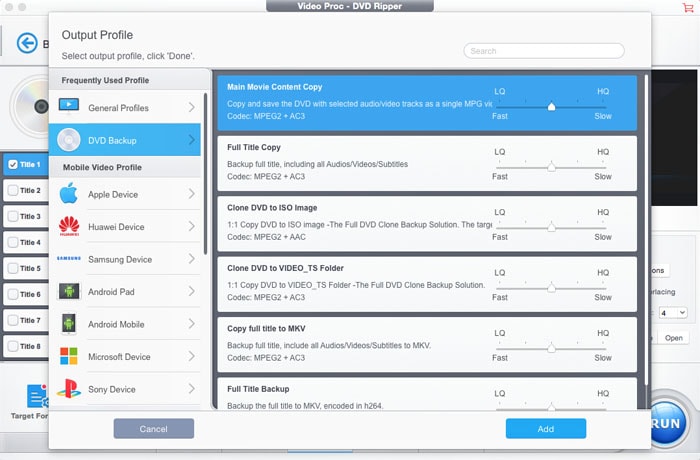
4.3 How to Backup DVDs
Step 1: Insert your DVD disc and load your DVD by clicking on the DVD button and the Disc icon.
Step 2: Click the Backup tab to show the DVD backup options.
Step 3: Select a backup type you prefer. Six modes are available, including Main Movie Content Copy, Full Title Copy, Clone DVD to ISO Image, Clone DVD to VIDEO_TS Folder, Copy full title to MKV, and Full Title Backup.
Step 4: Click the RUN button at the bottom to begin to make a copy of your DVD movies.
 5. Download Videos and Music
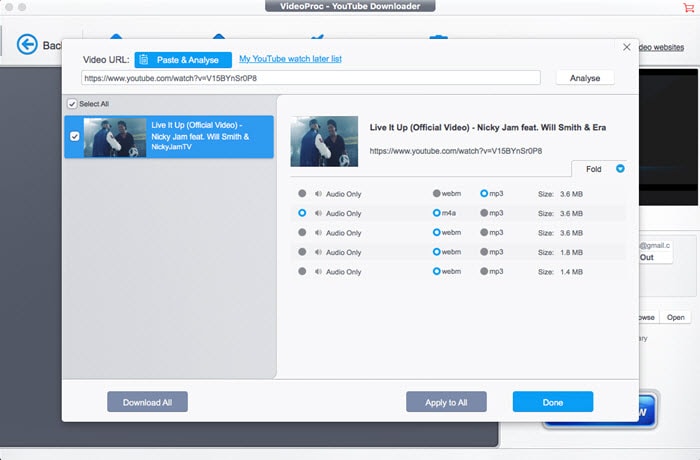
5.1 How to Download Videos
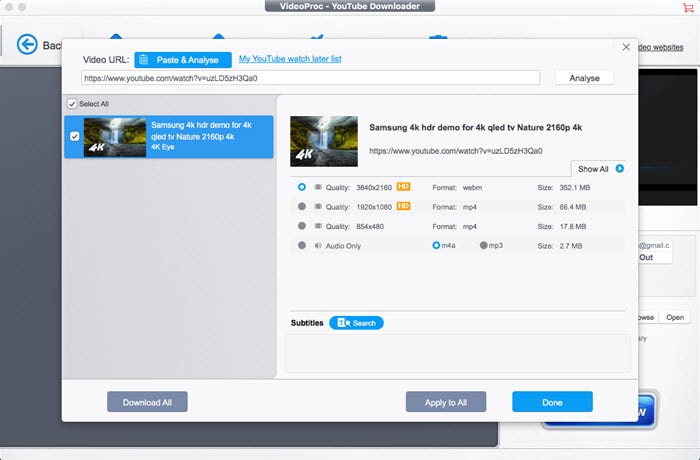
Step 1: Click the Downloader button on the main interface and the downloader window appears.
Step 2: Click Add Videos icon at the top toolbar, copy the URL of the video you want to save offline, and click on the Paste URL & Analyze button to load the video. After the video is loaded, pick the video format and resolution you want and click Done to make it valid and close the screen.
Step 3: Click the Download Now button at the bottom right corner to start downloading videos.
5.2 How to Save Songs
Step 1: Click the Downloader button to open the downloader window.
Step 2: Find out and open the song you want to save on your browser, copy the song URL to the Video URL box and click Paste URL & Analyze to load the track. Choose the audio format, bit rate etc., then click the Done button to save it.
Step 3: Click the Download Now to start to grab songs.
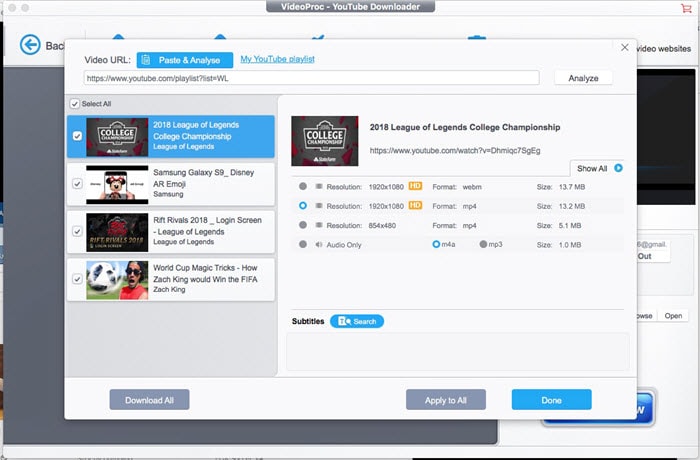
5.3 Download YouTube Watch Later Playlist
Step 1: Click the Downloader button to show the downloading options.
Step 2: Click the Sign in button and log in with your YouTube account.
Step 3: Click the Download my water later list, and VideoProc will automatically analyze it and gives a screen with format, file size, res etc. Pick the one you want and click the Done button.
Step 4: Click the Download Now button to save your YouTube Water Later playlist content.
 6. Record Footages
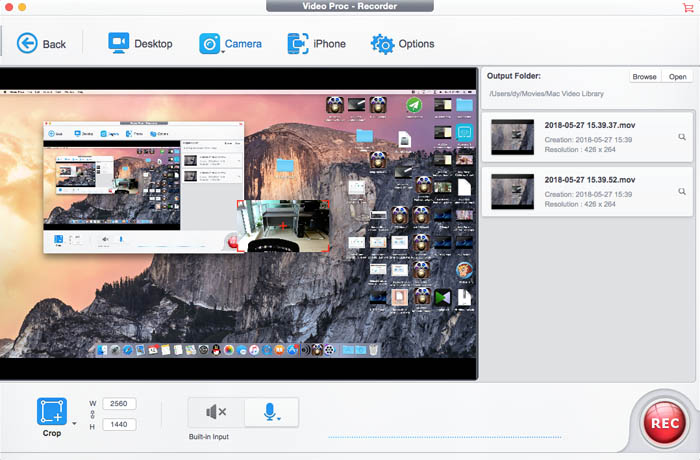
6.1 How to Capture Desktop Screen
Step 1: Click the Recorder button and the record screen pops up.
Step 2: Choose a recording type you want.
* Click the Crop icon and drag the frame to select a portion of the screen to record.
* Pick No audio to record the screen with no sound or select a system sound recorder.
* Click the Browse button to select a destination folder you want.
Step 3: Click the red REC button to start recording your computer's screen activity with or without sound.

6.2 Make A Record of Webcam Video
Step 1: Click the Recorder button and then click the Camera icon at the top.
Step 2: Adjust your camera to make it looks good.
Step 3: Change recording settings as you wish.
Step 4: Click the REC button to begin recording webcam video on your computer.
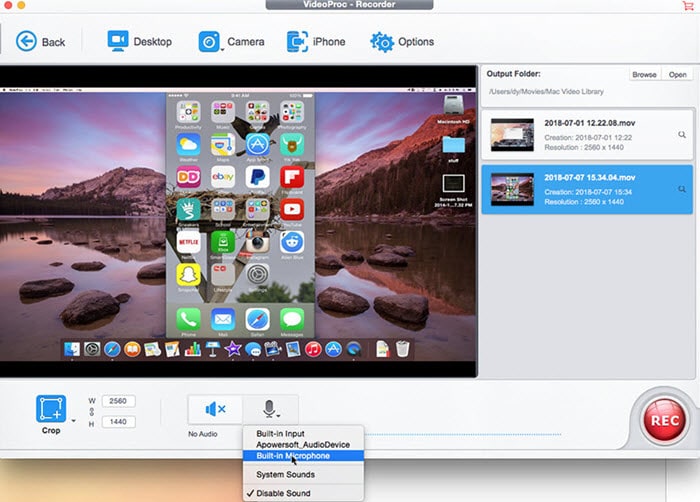
6.3 Record iPhone's Screen and Audio on Mac
Step 1: Connect your iPhone with your computer using an iDevice USB cable.
Step 2: Click the Recorder button, and click the iPhone icon on the top toolbar.
Step 3: Now you'll see your iPhone's screen, unlock your device to get ready to record, and select audio system.
Step 4: Click on the red REC button when you want to get started.
 7. Uninstall VideoProc
Use these steps to uninstall VideoProc and remove its caches.
Step 1: Go to the Application folder, find VideoProc and directly movie it to the Trash.
Step 2: Open the Library folder, find all the VideoProc caches and delete them.
Home | About | Site Map | Privacy Policy | Terms and Conditions | License Agreement | Resource | News | Contact Us
Copyright © 2025 Digiarty Software, Inc (MacXDVD). All rights reserved
Apple, the Apple logo, Mac, iPhone, iPad, iPod and iTunes are trademarks of Apple Inc, registered in the U.S. and other countries.
Digiarty Software is not developed by or affiliated with Apple Inc.

 1. Get Started
 2. AI Tools