


Macxvideo AI
Macxvideo AI is your all-in-one media solution—enhance video, image, and audio with next-gen AI, convert, compress, record and edit video fast with full GPU acceleration.
All-in-one Video Converter with Next-Gen AI Enhancement!

The fastest, most powerful DVD ripper yet to backup & rip all sorts of DVD (UDF/ISO9660) to virtually any format for watching on Mac iPhone iPad and Android, 100% lossless quality.

All-in-one video solution - enhance video and image with next-gen AI, convert, compress, record and edit at lightning speed with full GPU acceleration.

The ultimate solution to manage, backup and transfer photos, videos, music, books, etc between iPhone iPad and Mac. Also export iTunes purchases to non-Apple devices.
Top solution to liberate movies from DVD disc and convert DVDs (new/99-title DVDs, damaged DVDs) to MP4, MOV, H.264, etc for a wealth of devices. 1:1 output quality & ultrafast speed.
All-in-one video solution—enhance video and image with next-gen AI, convert, compress, record and edit at lightning speed with full GPU acceleration.
Complete iPhone iPad and iPod management solution to easily backup & transfer music, videos, photos, ringtones, books, etc between iPhone iPad and Mac. 100% safe and risk-free.

Macxvideo AI is your all-in-one media solution—enhance video, image, and audio with next-gen AI, convert, compress, record and edit video fast with full GPU acceleration.


Before you get started, go to the official site Macxvideo AI or click the download button to get the program on Mac.
Supported OS: macOS 10.15 or higher. See system requirements >>

Step 1. Double click the "macxvideo-ai.dmg" file, and drag Macxvideo AI app to the Application folder to install it.
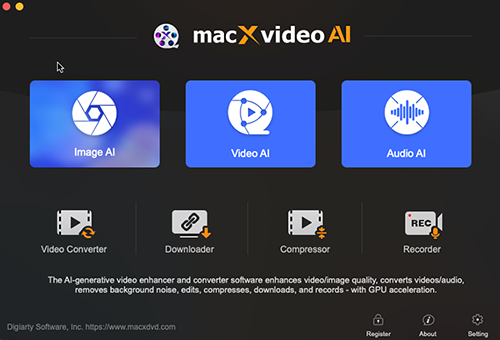
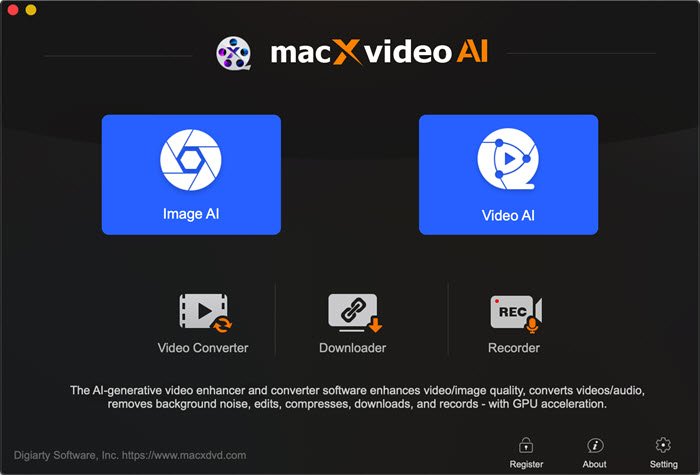
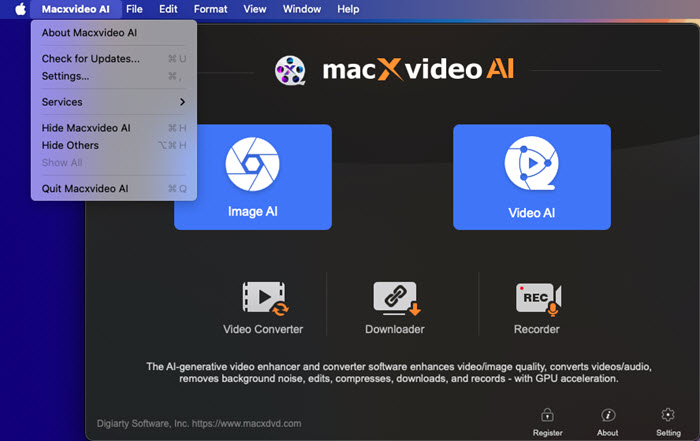
Step 2. When the installation is completed, open up Macxvideo AI (trial version). Then, you will see the main interface as below, with 6 sections provided - Video AI, Image AI, Video Converter, Downloader, Compressor, and Recorder.
The trial version of Macxvideo AI has the following limitations:
1). Advanced AI Features: Video AI and Image AI include up to 5 watermark-free exports. Audio AI allows up to 5 watermark-free video exports or audio processing for up to 5 minutes. Further video or image exports will contain a watermark.
2). Standard Video Tools: Converter, Compressor, and Editor support video processing with a maximum length of 5 minutes.
3). Screen Recorder: Recorded content is exported with a watermark in the trial version.
4). Downloader: Video downloads are limited to 1080p resolution. 2K, 4K, and 8K downloads require a full license.
5). Updates: Future version upgrades and newly added AI features are not included with the trial version.
※ Tip: A full license removes these restrictions and includes free updates, access to new AI features, and technical support. Learn more about the trial limitations >>
Here is how you can upgrade to Macxvideo AI full version.
① Click "Buy Now" below to purchase the full license code.

② Or click "Register" / "Cart" button on the main UI and click "Buy Full License".

※ You will receive product information with license code via email once you complete the order.
Step 1. Open Macxvideo AI, click "Register" button.
Step 2. Input your "Licensed Email" and "License Code".
Step 3. Click "Activate" to complete the registration process.
※ There are no spaces in the license code field. It's highly recommended to copy & paste your code to avoid any typos.
※ Please make sure you have proper Internet connection when registering Macxvideo AI program.
Step 4. When you have registered successfully, you can enjoy the full Macxvideo AI.
The latest AI tools take advantages of cutting-edge deep learning techs and make it easy to upscale video, enhance image, and boost frame rate efficiently. Whether you want to restore your old content, remove noise, blur, reduce wobble, or upscale your video to higher resolution, Macxvideo AI is here for you, delivering a cinema-grade quality with full GPU acceleration.
Important: When dealing with the AI-related tasks, hardware plays a crucial role in determining the efficiency and speed of the processing. Make sure your computer meets the basic system requirements as listed below. The higher the better. Otherwise, you can't utilize these AI tools.
▪ General GPU Requirements:
No extra hardware requirements beyond the system specifications for macOS 10.15. Mac models compatible with macOS 10.15 Catalina:
- MacBook (Early 2015 or newer)
- MacBook Air (Mid 2012 or newer)
- MacBook Pro (Mid 2012 or newer)
- Mac mini (2012 or newer)
- iMac (2012 or newer)
- iMac Pro (2017 or newer)
- Mac Pro (2013 or newer)
▪ Mac Computer Hardware Requirements for Deep Learning Inference Optimization:
- Apple Silicon (M1, M2, M3, M4 series) or Intel-based Mac with Metal-compatible GPU (Intel HD 5000 series or higher, AMD Radeon RX 500 series or higher)
▪ Supported OS: macOS 10. 15 (Catalina) or higher recommended
▪ Processor: macOS: Apple M1/M2/M3/M4 series chip, or Intel® Core i5 (6th Gen) or higher
▪ RAM: 4GB or above
▪ Hard Disk Space:8GB or above
Macxvideo AI is an incredible AI-powered video enhancer and upscaler, making old videos back to life. Its AI models trained by the advanced deep learning algorithms is exceptional at denoising, sharpening video, and even adding authentic details while scaling video up by 200-400%, enhancing video resolution to 4K, and therefore bringing old memories new again!
Step 1. Click "Video AI" button to enter video upscaling window.
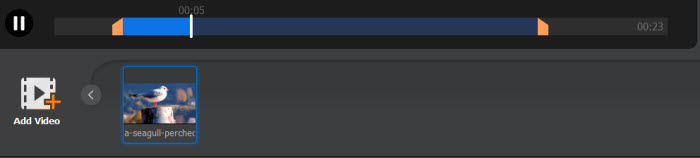
Step 2. Tap "Add Video" icon at the bottom of the window to load your input video file. Or just drag and drop the video you want to enhance to the main interface. You can preview your enhanced video effect via the preview compare window or full window.
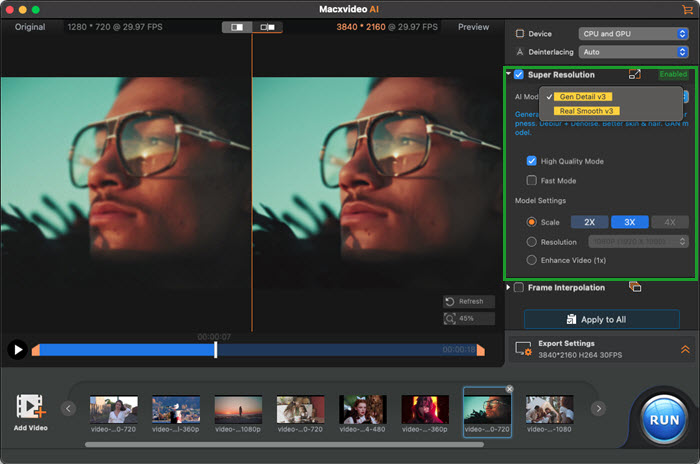
Step 3. Tick "Super Resolution" option and choose your preferred AI model. Macxvideo AI offers 4 dedicated AI models to help you enhance and upscale different types of videos.
▪ Gen Detail V3: This AI model excels in adding authentic details while improving video clarity and sharpness. It excels in enhancing videos that require meticulous attention to details like skin, hair, animal fur, architectural textures, etc, while addressing blur and noise issues in bad-quality contents.
▪ Real Smooth V3: This AI model specializes in rendering smoother, clearer, and brighter videos, and restoring original. This AI model is tailor-made for enhancing contents with relatively fewer details, such as 2D contents, glass surfaces, smooth textures, and line drawings.
▪ Anime: The AI model is tailor-made for upscaling and denoising anime and cartoons. This model runs efficiently on most computers.
▪ Zyxt: It is designed for enhancing and upscaling photorealistic photos of low resolution, producing realistic and visually appealing results with improved detail and sharpness.
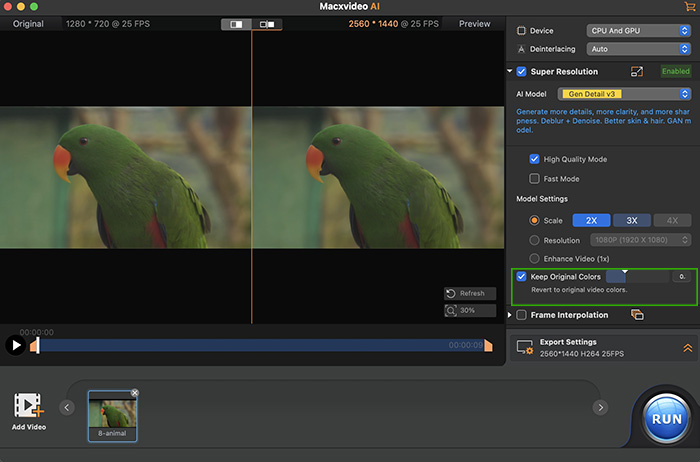
Keep Original Colors: After using AI Video Super Resolution, some videos—especially those with people—may show slight color shifts compared to the original. For example, footage enhanced with Gen Detail V3 might look a bit darker or more gray than the source.
If this happens, turn on Keep Original Colors and adjust the slider from 0 to 1. A higher value makes the colors match the original video more closely and helps restore the original look.
Step 4. Choose a quality mode or speed mode based on your preference.
▪ Fast Mode: Prioritize speed for rapid processing, ideal for speeding up computer-intensive projects and enhancing large video files quickly.
▪ High Quality Mode: Focus on superior visual quality, delivering exceptional details and enhanced clarity.
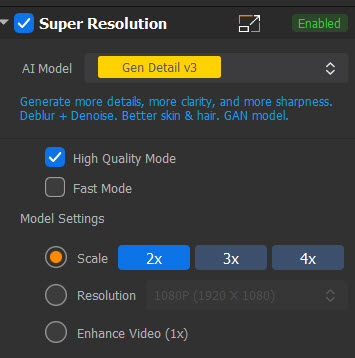
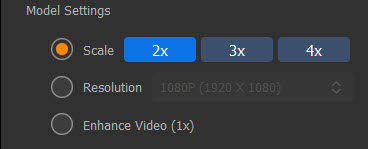
Step 5. Do some model settings.
1). Choose the Scale or Resolution presets you need. You can opt for 2X, 3X or 4X. The default setting goes to 2X. For video resolution below 1080p, you’re advised to choose 3X or 4X at your disposal. As for video resolution 1080p or even higher, 2X is the best option. Or you can choose the Resolution profiles, ranging from 480p, 720p, 1080p, 2K, to 4K.
Generally, the higher the multiplier, the higher the resolution clarity, but it may appear less natural. It is recommended to try different settings and preview to achieve the best results. In most cases, a two-step 200% multiplier yields better results than a one-time 400% multiplier.
2). The option "Enhance Video (1X)" is used in cases where the resolution remains unchanged, or the original resolution is relatively high, and the goal is to remove noise, blur, pixelation, and enhance the image quality without upscaling.
Step 6. Trim your video length before video upscaling and enhancing. Move the progress bar to cut off the unnecessary clips and keep your desired video duration.
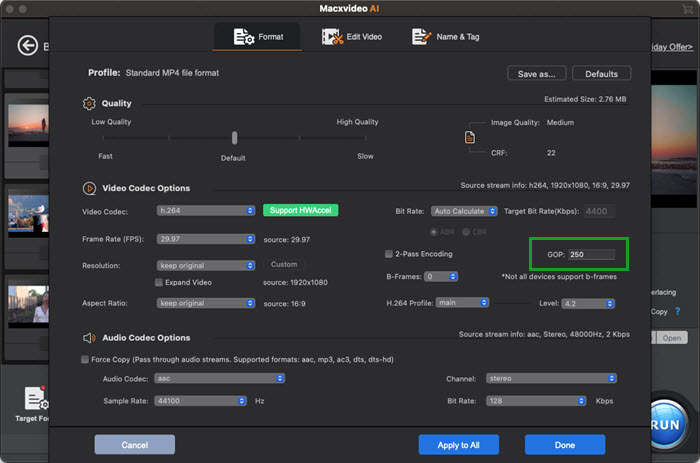
Step 7. Select output video codec, quality level and GOP. Move your mouse to the lower right-hand corner of the interface and tap Export Settings, where you choose output video codec H264, HEVC, AV1, or ProRes, quality level (from Low to Highest) and GOP.
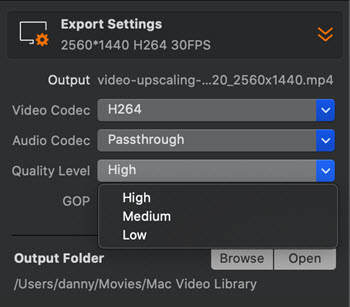
Note: GOP stands for "Group of Pictures". In video coding, it's a collection of pictures in a coded video stream that specifies the order of frames. In general, the smaller the value, the higher the quality, and the larger the value, the greater the compression. For videos with minimal motion, a value between 90 and 250 is generally sufficient; for fast-paced scenes with frequent scene changes or for GOP values used in post-production processing, a value of 30-60 is common.
Step 8. Click "Browse" button to choose a file folder for the output video storage.
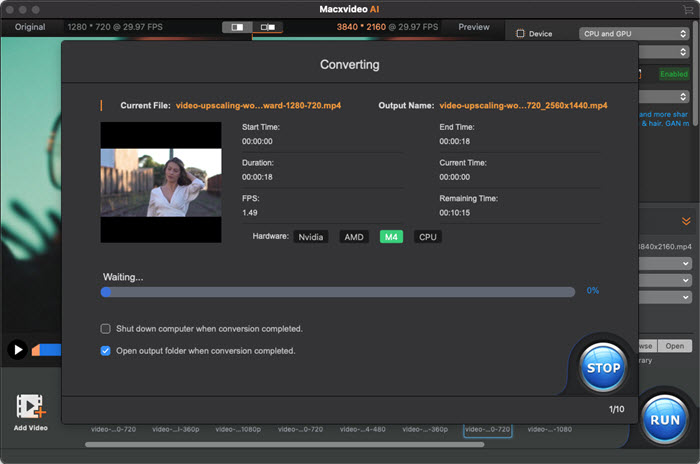
Step 9. Hit the "RUN" button to begin enhancing video quality at GPU hardware accelerated speed.
Macxvideo AI Frame Interpolation function will automatically interpolate intermediate frames and increase the video frame rate (fps). By converting videos that are originally around 24fps or 30fps to high frame rates such as 60fps, 120fps, 240fps and beyond. Therefore, you can make choppy videos more natural, smooth, and create a stunning slow-mo video with ease.
This function is very suitable for anime and fast-moving action movie frame interpolation. Follow the steps below to boost your video frame rate with AI.
Step 1. Navigate to AI Frame Interpolation window just by click "Video AI" on the main UI. After clicking on the "Video AI" button, wait for the Hardware Detection process to complete.
Step 2. Click on the "Add Video" button or simply drag and drop a video you want to interpolate video frame to this program. Once loaded, you will get the operation panel.

Section A: Import File
Click on the "Add Video" button to add more videos. Macxvideo AI lets you process more than one video at the same time, including video enhancement and frame interpolation.
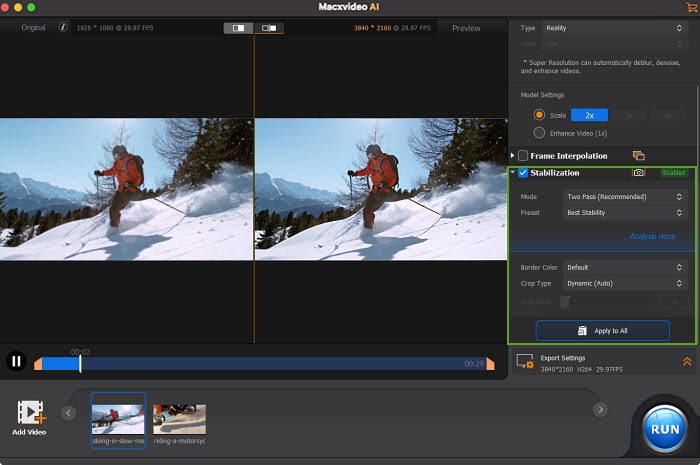
Section B: Playback Window
- The original video is displayed in the left window, and the interpolated video will be previewed in the right. You can choose the switch button to choose a preview mode.
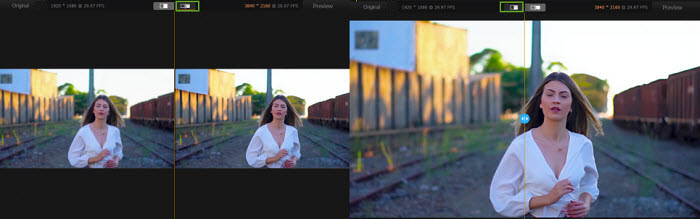
- You can see the original and interpolated video information at the top.

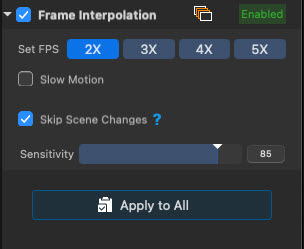
Section C: Frame Interpolation Settings
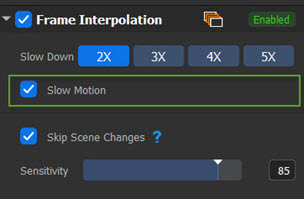
Check "Frame Interpolation" box and you can start frame interpolating your video to 60fps, 120fps, 240fps, and even 480fps..
Set FPS: Choose from 2X, 3X, 4X, and 5X to set the desired FPS.
▪ [2X]: Double the frame rate. For example, you can change a video that originally had a frame rate of 30fps to 60fps.
▪ [3X]: Triple the frame rate. For example, you can change a video that originally had a frame rate of 30fps to 90fps.
▪ [4X]: Quadruple the frame rate. For example, you can change a video that originally had a frame rate of 30fps to 120fps.
▪ [5X]: Quintuple the frame rate. For example, you can change a video that originally had a frame rate of 30fps to 150fps.
Tip: To achieve the desired frame rate, one can repeat the process multiple times to reach the target frame rate. For instance, selecting 2X twice can convert a 30fps video to 60fps and subsequently to 120fps. This approach yields superior output quality compared to directly choosing 4X.
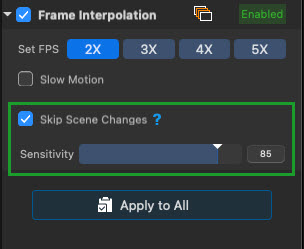
Skip Scene Changes: Whether to always compare the difference between two frames and not insert the frame if the difference is too large.
- When to disable it:
If the scene in the video does not change much, there is no need to check this option. For example, if the adjacent frames are all about playing basketball, Macxvideo AI will interpolate your video to give you a smoother and higher-quality video.
- When to enable it:
If the adjacent frames are very different, you are suggested to check this option to not perform frame interpolation to avoid artifacts. For example, the first frame is about playing basketball and the second is about playing table tennis where the two pictures change a lot, enable this option will tell Macxvideo AI’ frame interpolation function to skip the two frames.
When "Skip Scene Changes" is enabled, you can adjust the value of "Sensitivity" to detect scene changes.
[Sensitivity]: You can set the value from 0 to 100. A higher value will assume and skip more scene changes. The best sensitivity setting is 85.
If the value is low, you tell Macxvideo AI the scene changes less, and the frame interpolation will be more frequent. However, the actual scene changes a lot and should not be interpolated. As a consequence, the frame interpolation makes the video look bad.
If the value is set high, you tell Macxvideo AI that the scene changes a lot and it will skip the adjacent frames. The interpolation frequency is relatively low, which also avoids picture distortion.
Slow Motion: Slow down playback speed to see more details.
Create slow-motion video by choosing 2X, 3X, 4X, or 5X to slow down the playback speed. For example, you can create a slow-motion video about the passing through an egg, a water glass, a watermelon, etc.
Section D: Export Settings
Once you finish adjusting the frame interpolation settings, you can set the export settings.
▪ Video Codec: You can choose H.264, HEVC, or ProRes to encode your video.
▪ Audio Codec: You can choose Passthrough or AAC to encode your audio. *Pass-through is a safe choice if you want to copy the source audio without changing it, and AAC is a safe choice if you want to reduce the file size while maintaining high audible quality.
▪ Quality Level: You can choose output video quality from Low, Medium, and High.
▪ GOP: The smaller the value, the higher the quality, and the higher the value, the greater the compression. For videos with little movement changes, 90-250 is generally sufficient; for videos with fast action and many scene changes, the GOP value is generally 30-60. If there is no particular need, simply use the default value of GOP as is.
▪ Output Folder: Click on the "Browse" button to choose a folder on your computer to save the interpolated video. Or click on "Open" to open Macxvideo AI folder.
Step 3. Hit the RUN button to start the frame interpolating your video with Macxvideo AI.
Note: Your export video will be saved in MP4 format. If you need another format, you can use Macxvideo AI’s "video conversion" function.
Macxvideo AI applies cutting-edge AI models combined with GPU acceleration to deliver efficient and accurate video stabilization. With four ready-to-use presets, the tool makes the process effortless. Simply choose your preferred mode — whether you want maximum stability, faster performance, minimal cropping, or a well-balanced result — and the program will automatically analyze and stabilize your footage. You can further fine-tune the results by adjusting border fill, cropping style, and crop ratio.
1 Open "Video AI" from the main interface to enter the stabilization workspace.
2 Import your video by dragging it into the window or clicking the "Add Video" button at the lower-left corner.
Tips:
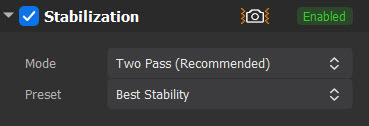
3 On the right panel, turn on "Stabilization", choose the desired "Mode" and "Preset", and the software will begin automatic analysis.
- About Mode:
▪ One Pass mode works faster by analyzing fewer frames, producing good but slightly less refined results.
▪ Two Pass mode takes longer but performs deeper analysis for smoother, more precise stabilization.
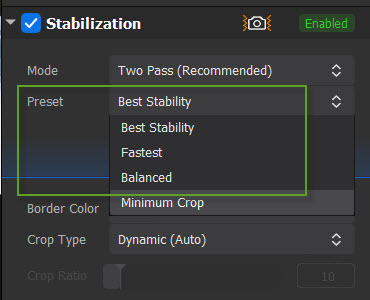
- About Preset:
▪ Best Stability: Maximizes stabilization but crops more edges.
▪ Balanced: Offers a compromise among stability, cropping, and processing speed.
▪ Fastest: Prioritizes speed with moderate stabilization.
▪ Minimum Crop: Keeps most of the frame with average stabilization strength.
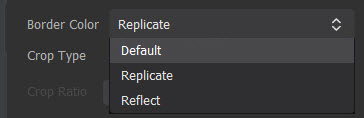
Note: You can refine the result using the Border Color, Crop Type, and Crop Ratio settings.
- About Border Color: Determines how the edges of the frame are filled.
▪ Default: Fills edges with black bars.
▪ Replicate: Extends edge pixels outward to fill gaps.
▪ Reflect: Mirrors nearby pixels symmetrically for a seamless look.
For better visual consistency, it’s recommended to select "Replicate" or "Reflect".
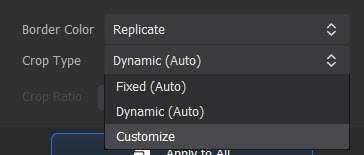
- About Crop Type: Defines how the video frame is cropped during stabilization.
▪ Fixed: Best for mild, consistent shakes.
▪ Dynamic: Ideal for variable shake patterns, automatically adjusts cropping based on motion intensity.
▪ Customize: Lets you manually set the crop ratio. Higher ratios crop more for stronger stabilization; lower ratios preserve more of the frame but reduce stabilization strength. You can preview the effect instantly after adjustment.
4 Preview the stabilized video and tweak the settings if needed.
Tip: Use the "Apply to All" option to apply your settings to all loaded clips.
5 Adjust export settings — choose video codec, audio codec, quality level, GOP value, and output path.
Supported video codecs: H.264, HEVC. Audio options: Passthrough, AAC. Quality levels range from Low to Highest.
Generally, smaller GOP values yield higher quality but larger files. For low-motion footage, use 90–250; for fast motion or frequent scene changes, 30–60 is recommended.
Click "Browse" to change the save path.
6 Finally, click "RUN" in the lower right corner to export your stabilized video(s).
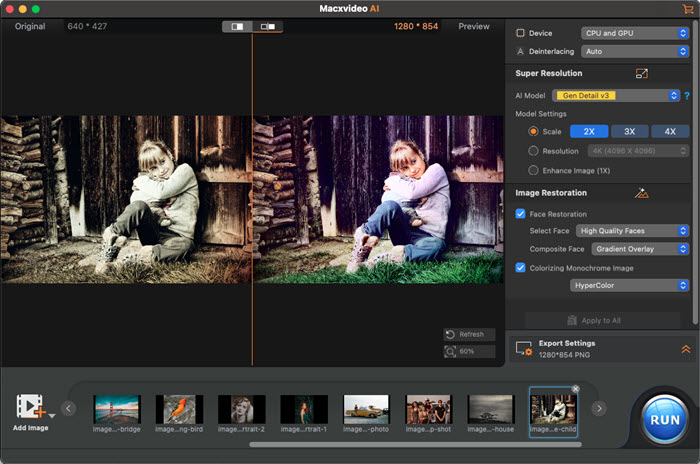
Macxvideo AI utilizes cutting-edge AI technology to refine rough images, remove noise from photos, sharpen blurry photos, and upscale low-resolution images up to 4 times for high-quality enhancement. You can even restore face, and colorize black and white photos at will. Use the following steps to enhance your images.
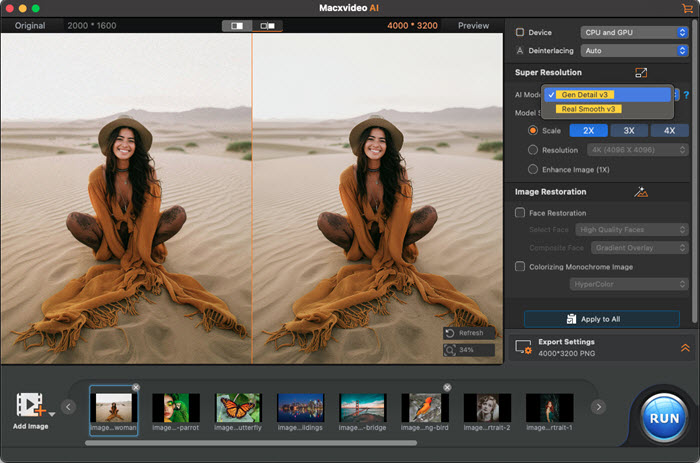
Step 1. Click the "Image AI" button on the main interface and the Image AI window should appear.
Step 2. Load the image file you'd like to enhance. You can directly drag the image and drop it to the window or click the "Add Image" button at the bottom to select an image file to import. You can select more than one image to import for batch processing.
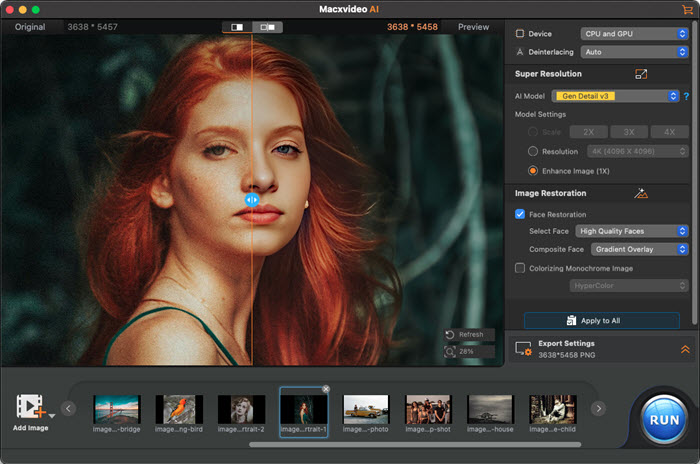
Step 3. Choose one AI model as per your needs. As it is mentioned above in video enhancing, Macxvideo AI is also integrated with the 2 dedicated AI models in Super Resolution during image enhancement.
▪ You can opt for Gen Detail v3 model if you want to generate more realistic details, improve texture stability after super-resolution, or handle images that commonly suffer from checkerboard and block artifacts.
▪ Choose Real Smooth v3 if you'd like to make a smoother, clearer, and brighter image while generate details.
▪ Select Anime if the input is an animated cartoon image.
▪ Resort to the Zyxt model to enhance photorealistic photos of low resolution.
It's worth mentioning that the deblur and denoise technogies are implemented althrough the 2 AI models. That means you can remove blur and noise from the images whatever AI models you choose.
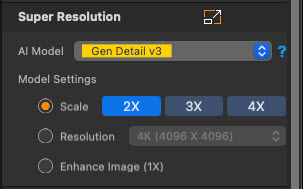
Step 4. Adjust Super Resolution Model Settings: There are 3 settings available for you to choose.
▪ For clean enlargement so that you can view your images on bigger screen, print them later, or so without distortion, check 'Scale' and select '2X', '3X', or '4X'. This program allows to scale up to 4K/8K/10K.
▪ Opt for the 'Resolution' presets if you'd like to directly convert your image to 1080p, 2K, 4K, or 8K.
▪ To improve only the image quality, remove noise, grain, blur, and pixelation from your video, or restore your old images, check 'Enhance Image (1X)'.
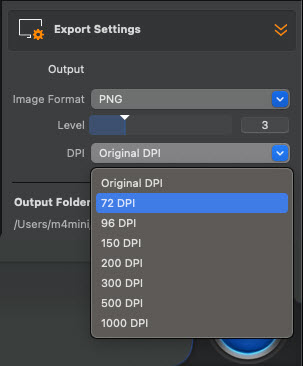
Step 5. Ajust Export Settings: Generally, default settings work fine. If needed, customize the image format (JPG or PNG), set preferred Image Level (0-10), choose a proper DPI option (e.g. 72DPI, 300DPI, 500DPI, 1000DPI) for quality prints, and save location based on your preferences.
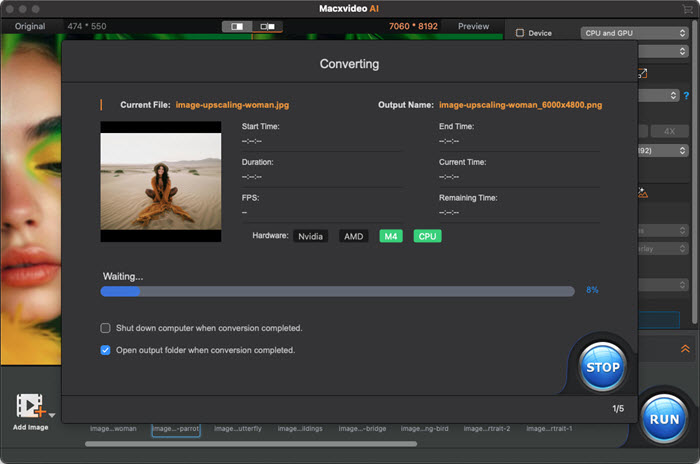
Step 6. Click the "RUN" button at the bottom right to initiate the image enhancement process. Once completed, check the effects of the enhanced image in the designated save folder or the preview window.
Macxvideo AI offers an easy solution for you to restore faces, whether they are close-ups, group portraits, or in distant subjects, so those memories can live on. You can get rid of blur from face, remove facial scratches, add clarity of your old photo, and create more realistic details and textures that even pores are visible.
It now includes new AI Face Restoration models, which use intelligent facial reconstruction to produce more natural and lifelike results.
Step 1. Click the "Image AI" button on the main interface and the Image AI window should appear.
Step 2. Directly drag and drop one or more old low-res faces you'd like to restore to the window or click the "Add Image" button at the bottom to select the photo(s) to import. You can also click "Add Image Folder" to restore multiple photos in one folder for batch processing.
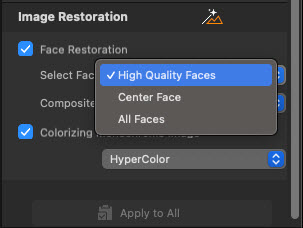
Step 3. Choose an AI model and scaling settings as per your needs, move down the Image Restoration section and check the box "Face Restoration". This tool will automatically restore face. There are three face restoration modes you can choose.
▪ High Quality Faces: Focus on repairing degraded or flawed faces but with discernible details. Avoid processing severely blurred faces such as extremely out-of-focus faces as insufficient detail can impede precise facial reconstruction and lead to unrealistic artifacts.
▪ Center Face: Concentrate on restoring the primary or main face in the image.
▪ All Faces: Infer and repair all detectable faces within the image.
Step 4. Choose the JPG or PNG format, and tap "RUN" button at the bottom to begin face restoration. Once completed, check the effects of the enhanced image in the designated save folder or the preview window.
Macxvideo AI is your go-to solution for photo colorization.It is able to colorize black and white photos within seconds.
Step 1. Click the "Image AI" button on the main interface.
Step 2. Directly drag and drop one or more black and white photos you'd like to colorize to the window or click the "Add Image" button at the bottom to select the photo(s) to import. You can also click "Add Image Folder" to colorize multiple photos in one folder for batch processing.
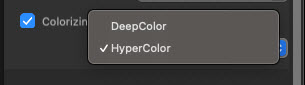
Step 3. Choose an AI model and scaling settings as per your needs, move down the Image Restoration section, check the box "Colorizing Monochrome Image", and choose a color mode. This tool will automatically add color to the B&W image.
Step 4. Choose the JPG or PNG format, and tap "RUN" button at the bottom to begin photo colorization.
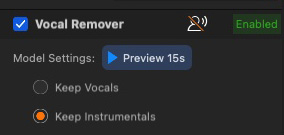
Macxvideo AI’s Vocal Remover allows you to easily isolate vocals or instrumentals with just a few clicks. This tool helps you create karaoke tracks, extract clean background music, or obtain vocals for remixes, covers, and voiceover projects. Powered by advanced AI separation models, it delivers clear and accurate results, making it suitable for music enthusiasts, producers, and content creators who need professional audio stems without studio equipment.
1 Click the "Audio AI" button on the main interface.
2 Add the audio or video file you want to extract vocal or instrumentals. Drag and drop directly, or click the "Add Media" button to browse and select your file.
3 Tick the Vocal Remover option in the right panel. Then choose between:
4 (Optional) Click Preview 15s to listen to a short sample before running the full process, ensuring your preferred setting is applied.
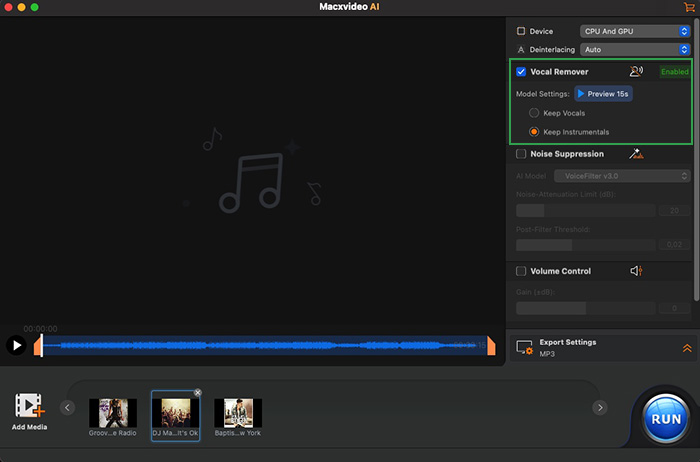
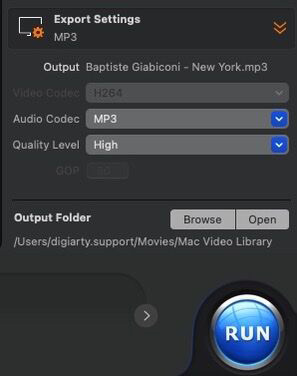
5 Choose output format for your file. It supports a wide range of audio and video formats including MP3, FLAC, WAV, AAC, H264, HEVC etc. Finally, click the RUN button to start the AI vocal separation. The software will quickly process and output your chosen audio track, whether it’s pure vocals or clean instrumentals.
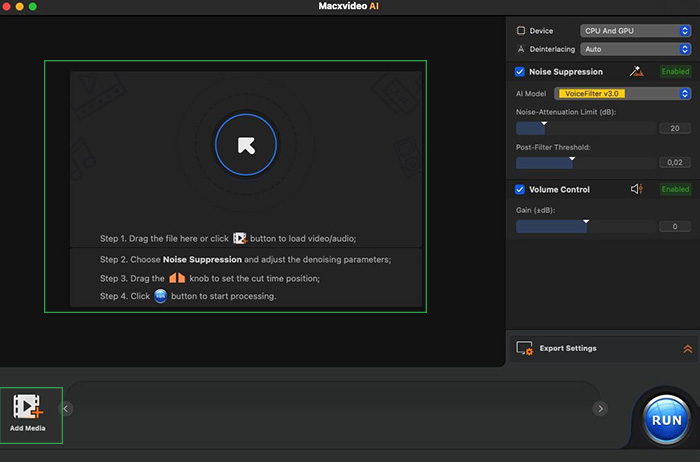
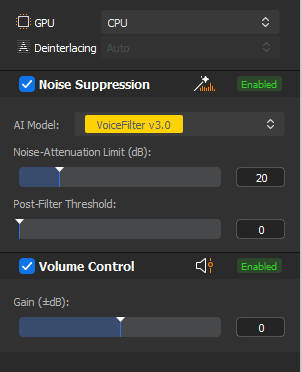
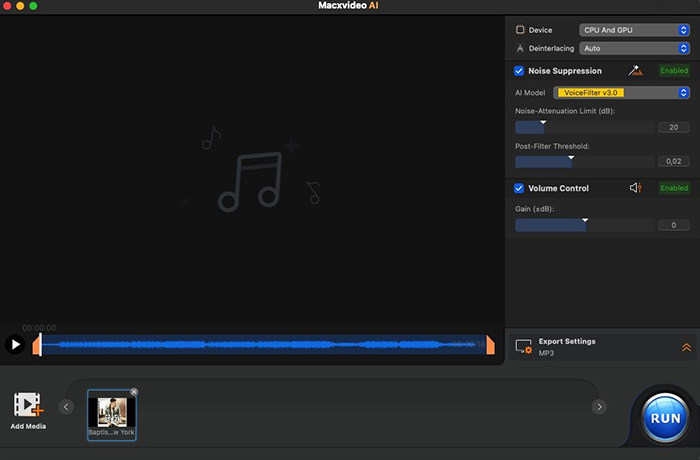
Macxvideo AI's Noise Suppression tool provides a simple yet powerful way to distinguish between desired audio signals and unwanted noise and remove those bothersome background noise from your audio and video recordings. By leveraging advanced AI technology, this feature effectively mitigates common distractions like traffic, wind, microphone, and ambient noise, resulting in pristine sound quality. Whether you're a content creator, professional, or casual user, this tool enhances the listening experience for your audience across a range of media, including podcasts, interviews, voiceovers, and vlogs.
1 Click the "Audio AI" button on the main interface.
2 Directly drag and drop one or more audio or video files that you want to remove the background noise. Or you can also click the "Add Media" button at the bottom to browse and select the audio or video files to import.
3 Set AI noise suppression model and parameters. Make sure the Noise Suppression is ticked on, choose the preferred AI model, and adjust the parameters accordingly.
4 When you've done, click on the "Play" buuton to preview the audio after noise removal. And you can also uncheck the box of "Noise Suppression" and tap on the "Play" to listen to the original audio for a comparison.
Tips:
5 Choose output format for your file. It supports a wide range of audio and video formats including MP3, FLAC, WAV, AAC, H264, HEVC etc. Tap "RUN" button at the bottom to stark removing background noise from your audio or video files.
Before converting video files, you need to enable the video converter first.
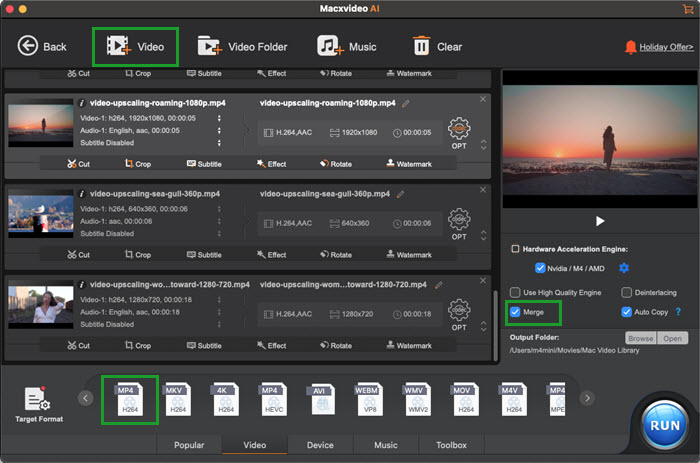
Step 1. Click "+Video" button to import one video or multiple videos (for batch transcoding) into the program.
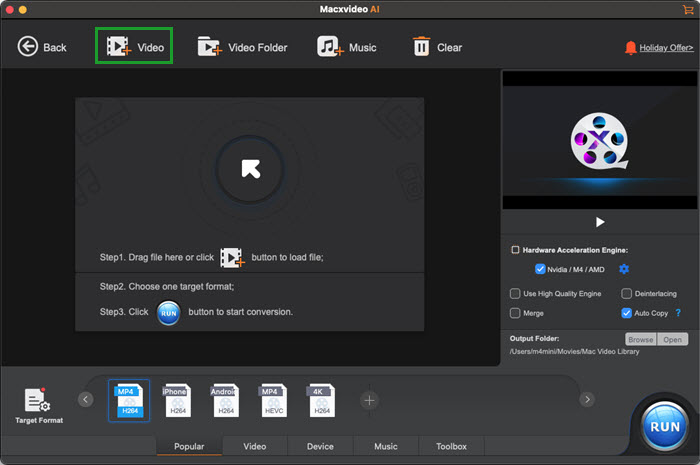
Step 2. Click "Video" tab on the bottom of the interface. Many popular video formats are presented. Select the desired one as output format.

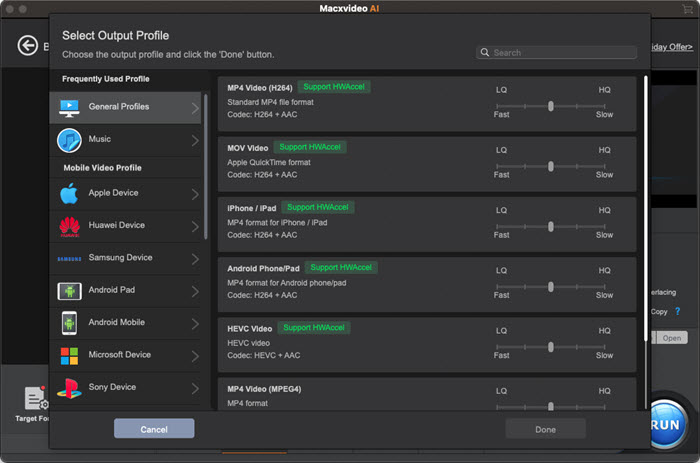
If there is no format you want, click Target Format button to get more profiles.
▪ General Profiles: Transcode video to H.264, MPEG4, MOV, HEVC, WebM and more.
▪ Music: Convert video to audio file in MP3, M4A, WAV, FLAC, AAC, iPhone Ringtone etc.
▪ Mobile Video Profile: Transfer video to Apple, Huawei, Samsung, Android, Microsoft Device and Sony Device.
▪ Web Video Profile: Make the video compatible with YouTube, Facebook, Vimeo and other online video-sharing sites.
▪ HD Video: Turn the video to TS, AVCHD, MKV and MPEG HD.
Step 3. Click "Browse" button to set a new destination folder.
Step 4. Click "RUN" button to start transcoding.
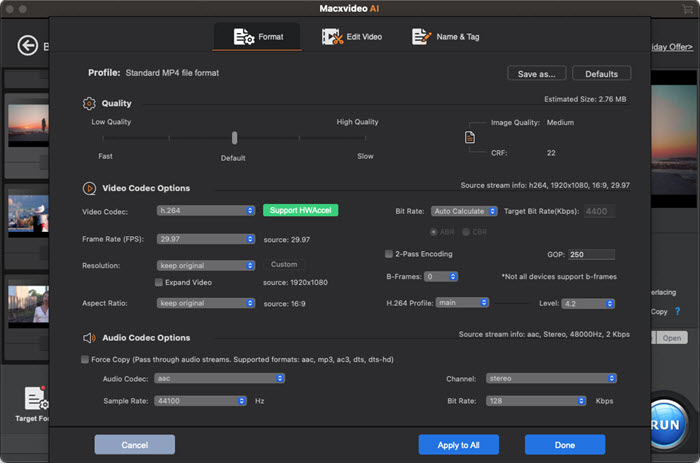
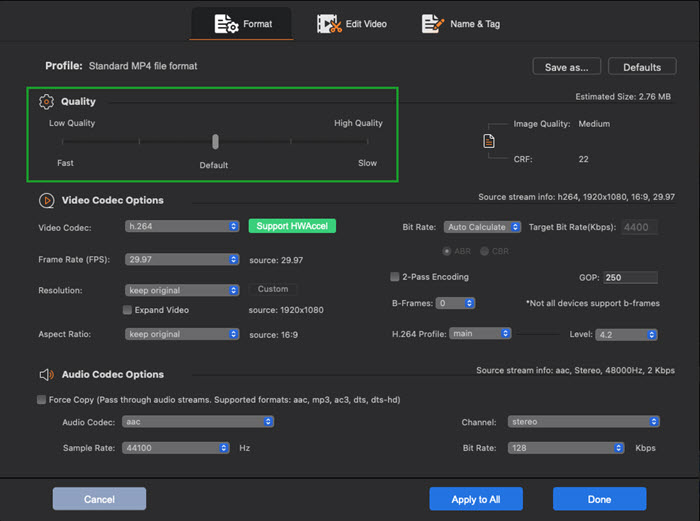
※ Tip: Click Codec Option. Format settings window appears allowing you to adjust parameters.

▪ Quality: Move the pointer to High Quality for higher image quality or Fast for the fastest transcoding speed.
▪ Video Codec Options: Modify frame rate, resolution, aspect ratio etc. for obtaining better playback effects.
▪ Audio Codec Options: Audio channel, sample rate and bit rate can be fine-tuned for outputting Hi-fi audio.
Step 1. Click "+Music" button to load a song or several songs into the program.
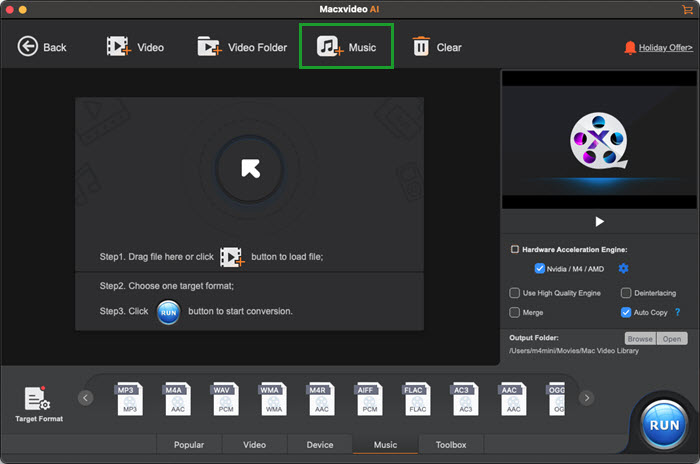
Step 2. Select "Music" tab on the bottom of the interface and output audio formats are listed. Select one as output format.
Step 3. Click "Browse" button to choose a destination folder to save resulting file.
Step 4. Click "RUN" button to start music conversion.

• Convert Videos to MKV with Multiple Video/Audio/Subtitle Tracks
Step 1. Launch Macxvideo AI and click "Video Converter" button.
Step 2. Click "+Video" to import at least two videos you want to convert as a multi-track MKV file.
Step 3. Move to "Video" tab and select "MKV H264" as output format.
Step 4. Check "Merge" option. Another new option "MKV Multi-track" appears. Check it as well.
Step 5. Click "RUN" to start conversion.
• Convert Video from Multi-track MKV
Step 1. Click "+Video" to add a multi-track MKV video.
Step 2. Move to "Video" tab and select a format as output format, for example "MP4 H264".
Step 3. Title, video/audio/subtitle tracks are displayed on the left in the video info bar. The number indicates how many video/audio tracks are included in a MKV video.
Click "Video1" to change the track from Video1 to Video2 or keep original. Please note that only one video track can be selected.

Click "Audio1" to select Audio1 and Audio2 or keep one track.

Step 4. Hit "Browse" button to set a new output folder and Click "Run" to start conversion.
If you are going to reduce video file size, take advantages of the Video Compress feature, which allows you to compress large 4K or high-frame-rate video to the target size without compromising too much quality.
The Compressor feature lets you easily compress video to be up to 90% smaller than original without compromising quality.
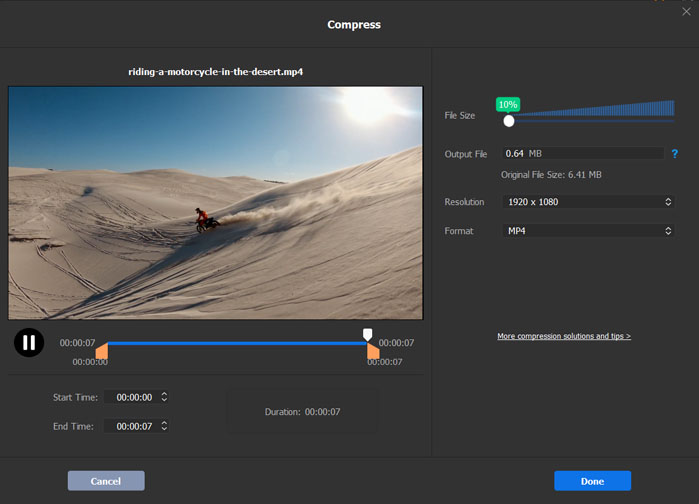
Step 1. Click "Compressor" on the main interface. Drag and drop the source video to the interface, or click "+Video" or "+Folder" to load the video you want to compress.

Step 2. Click "Options" button to open the "Compress Options" window. Enter the target file size you desire near the File Size box. Or you can drag the slider to change the compression ratio from 10% to 100%.
Step 3. Optionally, you can lower down the resolution, or drag the compressor slider to directly downsize the video.
Step 4. Click Done and hit "RUN" to begin compressing video.
Tips: Macxvideo AI supports batch compression. You can add multiple videos or even an entire video folder, then simply drag the batch compressor slider to apply the compression level to all files at once.

This program gives you full control over the parameter settings. By adjusting video codec, resolution, bit rate, frame rate, GOP, etc, you can also reduce video file size with acceptable quality.
Please be aware that the program is preloaded with pre-configured profiles with best balance in size and quality, you can rely on the profiles if you don't want to mess around with the settings. But if you are an advanced user, feel free to set the settings for your specific needs.
Option 1. Change Codec
Step 1. Drag and drop the source video to the interface, or click "+Video" or "+Folder" to load the video you want to compress.
Step 2. Go to the "Target Format", hit "Video", and choose "MP4 HEVC" as the output format.
Step 3. Hit RUN to begin shrinking video size using advanced HEVC codec.
Note: You can also change the codec to VP9 if you are using WebM as the output format. Please make sure to check the box of hardware acceleration and not to check "Auto Copy" option at the right side.
Option 2. Lower Bitrate
Video bitrate is closely related to the video file size. Higher bitrate makes better image quality but larger file size. Generally, you can lower the bitrate value than the default quality setting to compress video without perceivable quality degradation. For a 4K video, the recommended bitrate is between 35mbps and 45mbps at standard frame rate and 53mbps and 68mbps at high frame rate. For a FHD 1080p video, the recommended bitrate is between 8-12mbps.
Step 1. Click "Video Converter" on the main interface. Drag and drop the source video to the Video Converter interface, or click "+Video" or "+Folder" to load the video you want to compress.
Step 2. Click the "Codec Option" where you can change the settings.
Step 3. Drag the Quality slider to the left, which ensures faster processing speed and smaller file size, but produces relatively poor quality compared with the right.
Note: The target bitrate automatically changes as you move the quality slider. Optionally, you can manually set the bitrate to lower value by selecting "Manual" as the "Bit rate" mode, in such way to reduce video file size.
Option 3. Reduce video resolution
Video resolution is the number of pixels in a video frame. The more pixels a video has, the more detail it will have and the clearer it will look. But a video of higher resolution such as 4K also involves in bigger file size and may be of no dramastic difference on a small screen like mobile phone compared with a video of lower resolution 1080. You can downsize video by lowering down resolution.
Step 1. Drag and drop the source video to the compressor interface, or click "+Video" or "+Folder" to load the video you want to compress.
Step 2. Click the "Video Codec" where you can change the settings.
Step 3. Find the "Resolution" under the "File Size" column, choose a video resolution lower than the original one from the drop down list.

Option 4. Decrease video frame rate
Video frame rate, also referred to as FPS (frames per second), measures how many frames appear within a second. Higher frame rate generally results in smoother video quality. But when the frame rate is too high, especially in a video without too much motion, it will look unnatural and the video may suffer frame what is called the "Soap opera effect" and big file size. So you can decrease video frame rate to further shrink video.
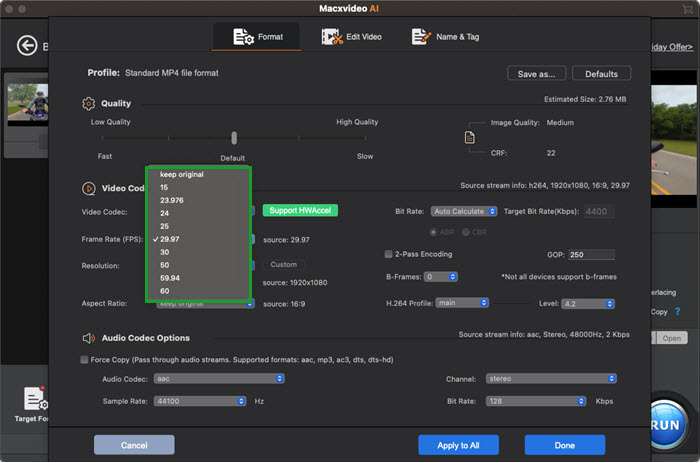
Step 1. Click "Video Converter" on the main interface. Drag and drop the source video to the interface, or click "+Video" or "+Folder" to load the video you want to compress.
Step 2. Click the "Codec Option" where you can change the settings.
Step 3. Find the "Frame Rate" under the "Video Codec Options" column, choose a desired video frame rate as you want from the drop down list.
Note: Please uncheck the "Auto Copy" option from the right side.
Option 5. Increase the GOP
GOP stands for group of picture. In video coding, it is a collection of successive pictures within a coded video stream. A GOP structure includes I-frames (intra-coded frames) and P-frames (predictive coded frames), as well as B-frames (bi-directionally predictive coded frames). Generally, a higher GOP value means more opportunities to compress, and therefore smaller the overall file size.
Step 1. Click "Video Converter" on the main interface. Drag and drop the source video to the interface, or click "+Video" or "+Folder" to load the video you want to compress.
Step 2. Click the "Codec Option" where you can change the settings.
Step 3. Find the "GOP" under the "Video Codec Options" column, choose a desired GOP value as you want.
Note: By default, the GOP is 250, meant to achieve a higher compression rate. If you have a video of low motion, you can leave the value unchanged. Generally, the value between 90 and 250 is OK. But if you have some videos of high motion such as some extreme sports, make sure to set the GOP value between 30 and 60.
Note: You can also change the audio settings such as bitrate, sample rate, or channel number to further reduce the video file size.
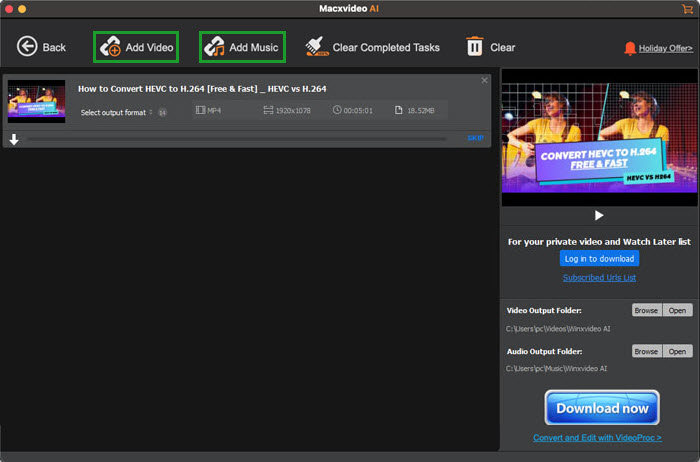
Step 1. Click the "Downloader" button to access the Downloader panel.
Step 2. Open your browser, find out the video / music you want to download, and then copy its URL.
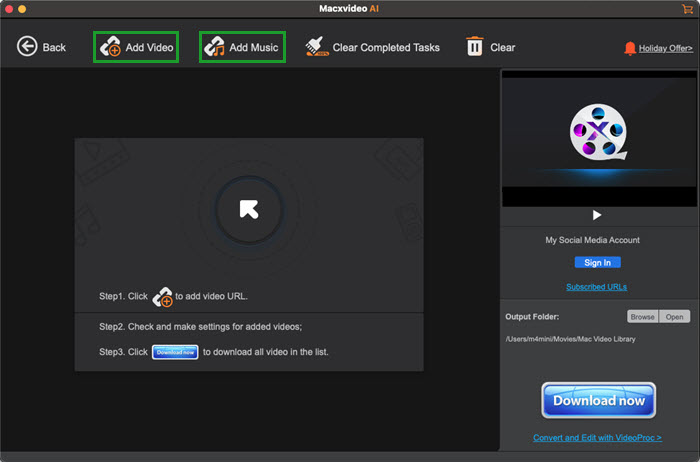
Step 3. Back to the Downloader, click "Add Video" or "Add Music", and then hit "Paste URL & Analyze" to insert the URL you just copied. The video link will be analyzed instantly.
※ Tips: Macxvideo AI supports batch URL and enables downloading multiple URLs simultaneously for improved efficiency and time savings.
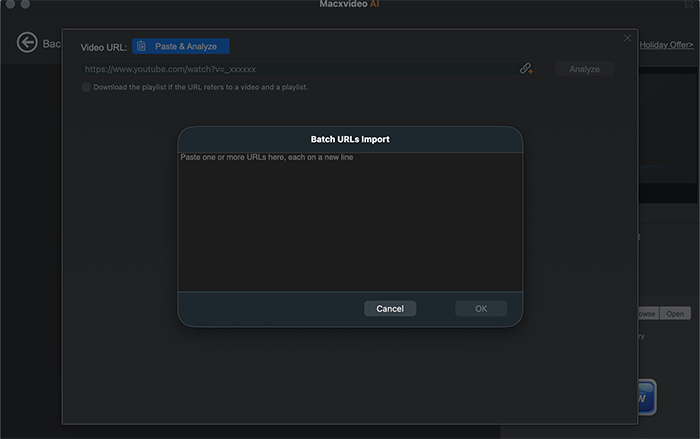
Note: If you want to download URL in batch, make sure to download the latest version of Macxvideo AI. To activate the feature, click the "Add URL" icon, then paste multiple URLs, each on a new line into the "Batch URLs Import" window.
Step 4. Choose desired output quality and format, and click "Done".
Step 5. Click "Browse" to specify output folder based on your own needs. Hit the "Download now" button to start video / music downloading.
Step 1. Click the "Downloader" button to open Downloader tool.
Then, click "Add Video" button.
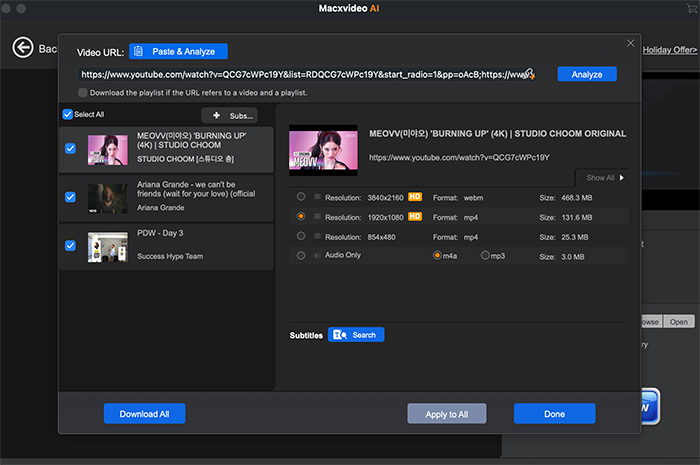
Step 2. Open your browser to get the playlist / channel URL, copy it, and then click "Paste URL & Analyze" button to parse the link. Then all videos in the channel or playlist will pop up in the left column. You can select all videos or some of them.
Note: You can check the box: Download the playlist if the URL refers to a video and a playlist.
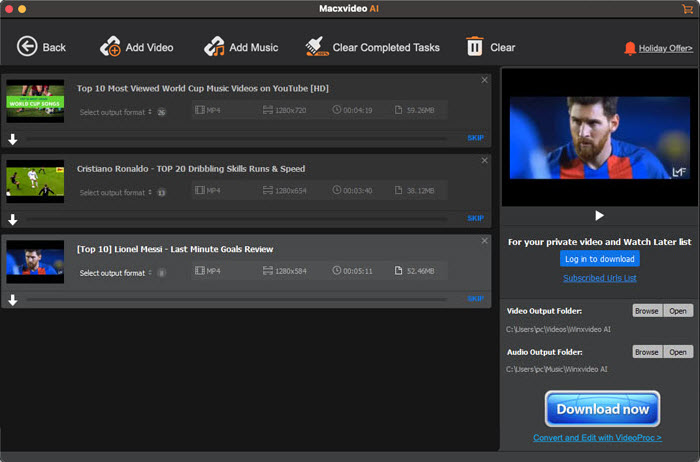
Step 3. Choose the output quality and format.
Step 4. Click "Download Selected Videos" if you just need to download some of the videos. Click "Download Full Playlist" button when all videos are what you want.
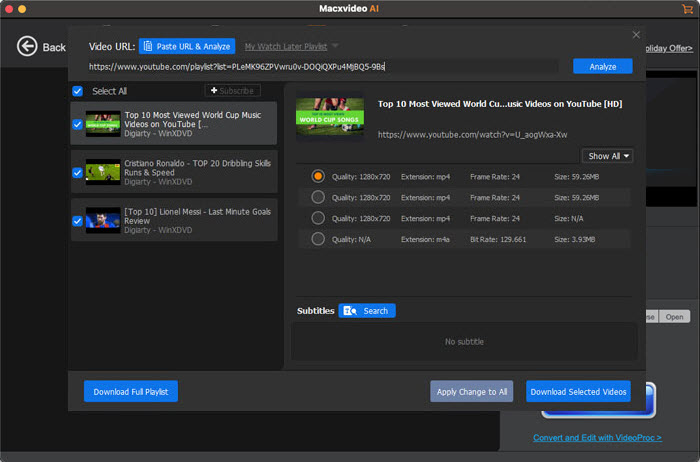
Step 5. Hit "Browse" button to set output folder, and "Download now" to get playlist / channel videos download started.
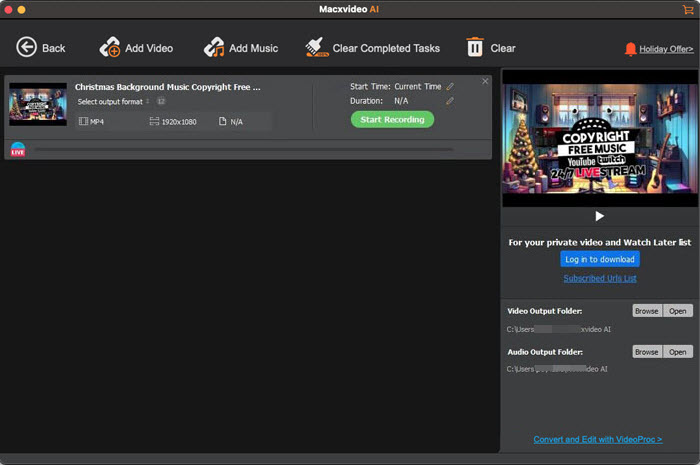
Step 1. Click "Add Video" button.
Step 2. Search live streaming you want on YouTube and copy the URL. Click "Paste URL & Analyze".
Step 3. Soon, video title and versions will be listed. Select one version.
Step 4. Click "Download Selected Videos".

Step 5. Click the green "Start Recording" button to download and record YouTube live. Also, you can adjust the "Start Time" and "Duration" by clicking the "pencil" icon and stop recording at any time.
M3U8 is a file format for storing playlists for streaming audio and video content over the internet, which uses the HTTP Live Streaming (HLS) protocol to send media content in small, bite-sized chunks that can be downloaded and played one after the other. It plays an important role in live and VOD streaming. You can rely on the program to download M3U8 live and VOD streaming here.
Step 1. Please go to your preferred platform and find an on-demand video.
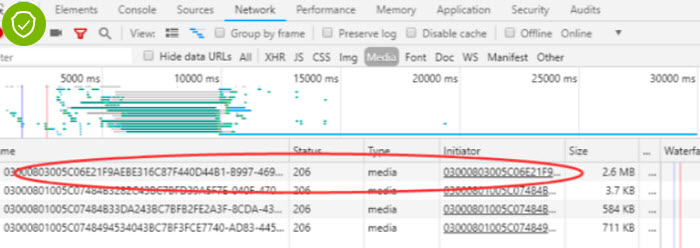
Step 2. Press the key F12 or you can right click the video page and select "Inspect" to open the Developer Tools.
Step 3. Click the "Network" > "Media" and search .m3u8 till the index.m3u8 files appear.
Step 4. Copy the URL.
Step 5. Launch the program, also do the same steps above, and copy the M3U8 link to the panel, click Analyze.
Step 6. Hit "Download Now" to start saving M3U8 content.
Note: Downloading any copy-protected content is not recommended. Please check the local law and download online content for fair use.
Click "+Video" button to import one video or multiple videos you want to edit into the program.

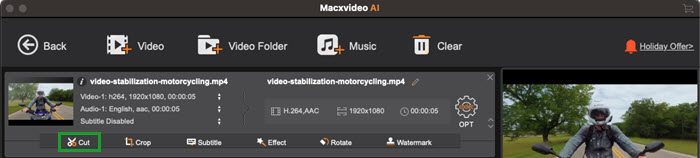
Step 1. Drag your video to the program, or click "+Video" or "+Folder" to add one or more video files.
Step 2. On the Edit Toolbar, click "Cut".
Step 3. Drag the organge knobs on two ends of the video to set the start and end time positions.
Step 4. Click the orange Cut button on the right and then the middle part between the knobs will be kept.
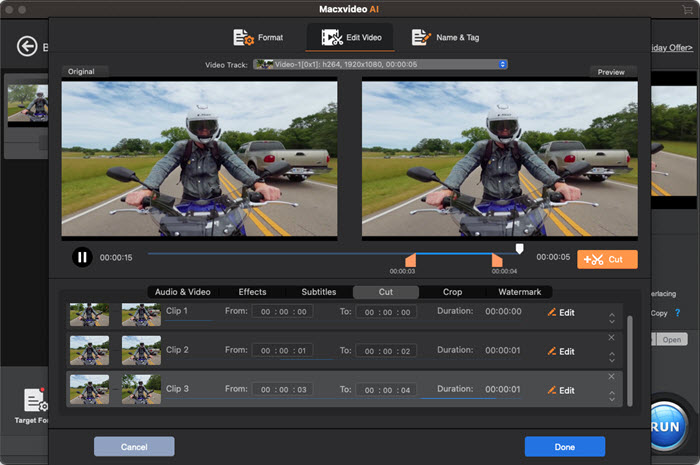
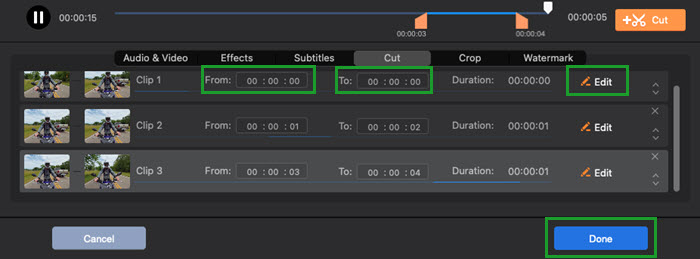
Step 5. Click the Edit icon next to the clip trimmer, then fine-tune the start time and the end time of the clip. And click "Done" to complete the cutting of clip 1.
Step 6. If you need to cut out a different clip, drag orange knobs again to set different time position and repeat step 3 – step 5.
Step 7. After cutting into different clips, you can adjust the sequences of the clips by clicking the up and down arrows of each clip.
Step 8. When everything is OK, click the "Done" on the bottom right. The multiple short clips cut from the original video will be merged into a new video.
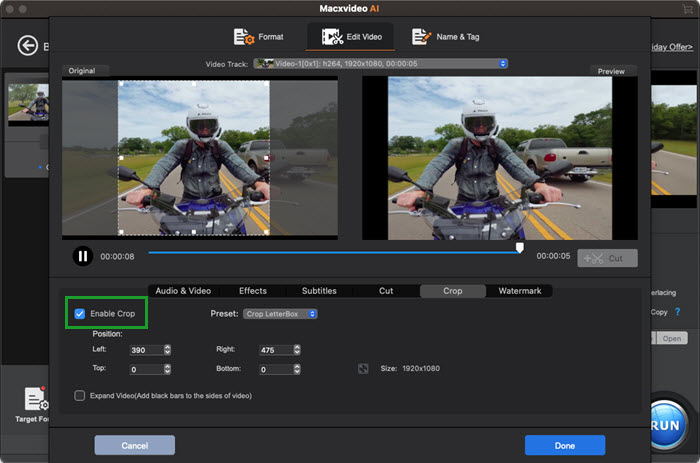
Step 1. Click the "Crop"button to open the video cropping window.
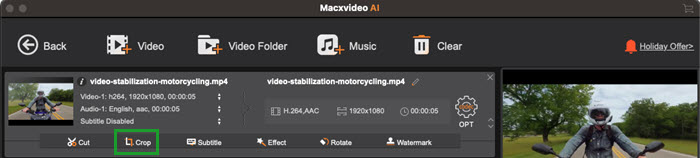
Step 2. Tick the "Enable Crop" option, and you can see the dot line on the four sides of the original video.
Simply drag the dot line to freely crop the video to remove unwanted areas of the video frame.
Click the "Preset" drop-down icon and you'll get a list of options to automatically crop the video: Crop LetterBox, Keep Current, Keep Origin, 16:9, 4:3, 1:1.
You can also crop the video by setting specific Position and get desired video size.
Step 3. Click "Done" to save the change.
Note: There isn't any quality loss as video cropping won't change format.
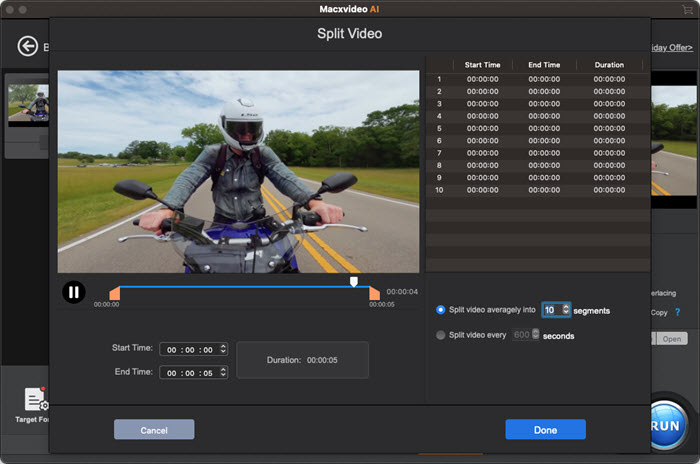
Click "ToolBox", find "Split" button and double click it or hit the "Codec Option" button on the right of the video display column on the "Macxvideo AI - Video" interface to open the Split dashboard.

※ Tips: By default, Macxvideo AI will split video averagely into 10 segments and split video every 60 seconds.
Step 1. If necessary, trim the video on the left into the duration you need to split.
Step 2. If necessary, change the default segments and time you want.
Step 3. If necessary, fine-tune the start time and end time of individual segment.
Step 4. Click "Done" on the bottom right of the window.
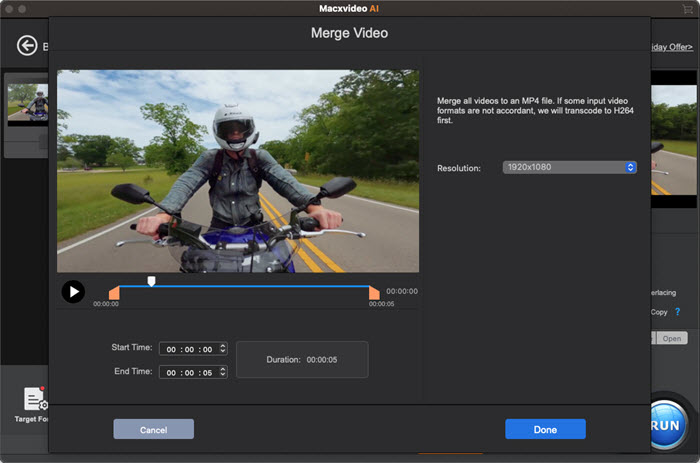
You can merge video clips with Macxvideo AI in two ways.
1. Directly merge source videos into one.
Step 1. Click "Video –> +Video" to load all the video clips you'd like to merge into one from computer.
Step 2. Choose a target output format.
Step 3. Tick "Merge" button on the main UI. And click "RUN" to fast merge all added video clips into one file.

2. Trim needed video clips and merge them into one at one go.
Step 1. Click "Video –> +Video" to import all your source videos. Choose a target output video format.
Step 2. Tap one video and click "ToolBox -> Merge -> Codec Option", and you can freely set Start Time and End Time to cut favorite clips from each video. Click "Done".
Step 3. Hit "RUN" button to start fast combining the cut video clips into one.
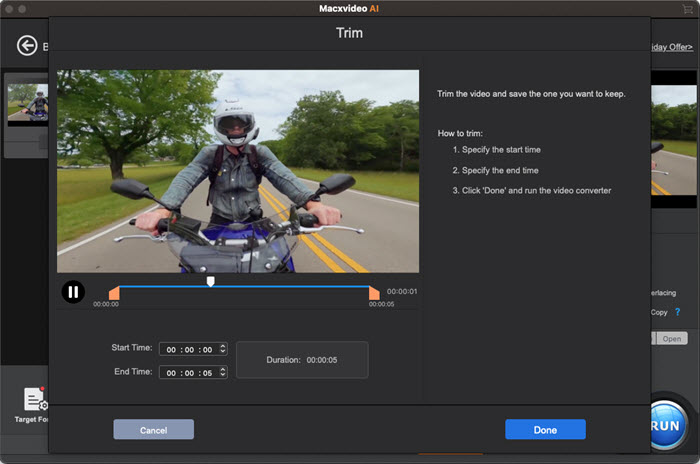
Trimming is different from cutting. It only allows you to remove the unwanted start / end part, instead of cutting out any parts of a video.
Step 1. Click "ToolBox", find "Trim" button and double click it or hit the "Codec Option" button on the right of the video display column on the main interface to open the Trim dashboard.
Step 2. Specify the start time by dragging directly or change the time data next to Start Time.
Step 3. Specify the end time by dragging directly or change the time data next to Start Time.
Step 4. Click "Done" on the bottom right of the window.
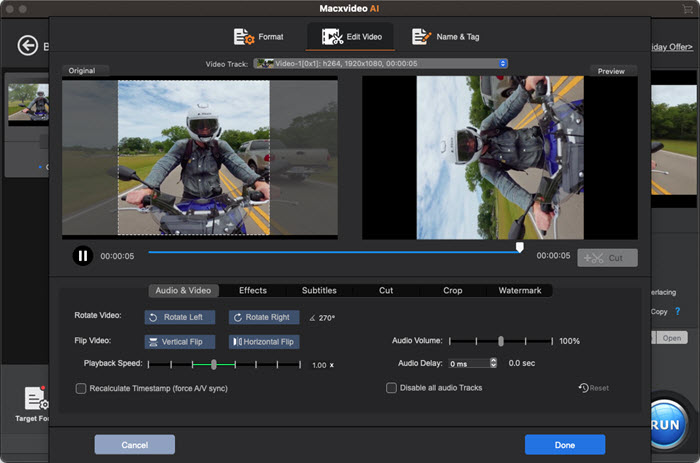
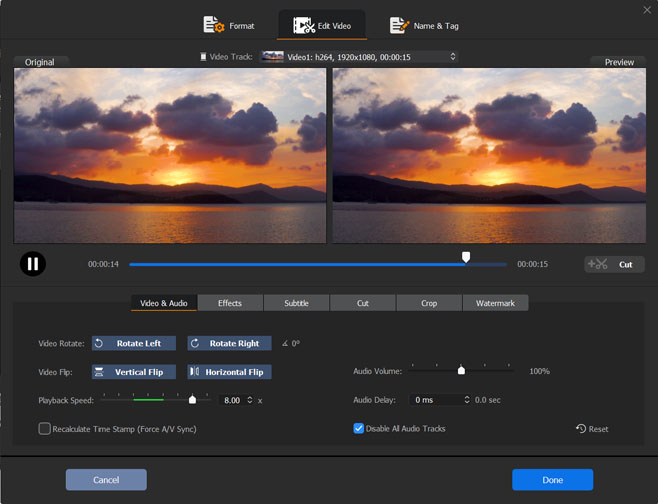
You can also take advantages of the tool to rotate video by 90/180/270 degrees as well as flip video at will.
Step 1. Drag and drop the video to the program, or simply click "+Video", "+Folder" to load the files.
Step 2. Click "Rotate" in the Edit toolbar.

Step 3. Rotate the video clockwise or counterclockwise as per your needs. Or you can flip the video vertically or horizontally.
Step 4. Click "RUN" on the bottom right of the window to save the video.
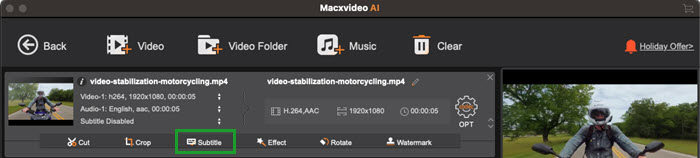
Extract subtitles from MKV, MP4,etc, and add external subtitle files like ASS, SSA, SRT to your movie, TV episode or any other video you want to burn subtitle in or export subtitle from.
You have two ways to load an existing subtitle file from your computer or the external hard drive / USB drive that is connected to your computer:
Method 1. On the video display column on the "Macxvideo AI - Video" interface, click "Subtitle" and then click "Load Subtitle" of the dropdown menu. Browse to find and select the corresponding SRT or ASS subtitle file from your computer and click "Open".

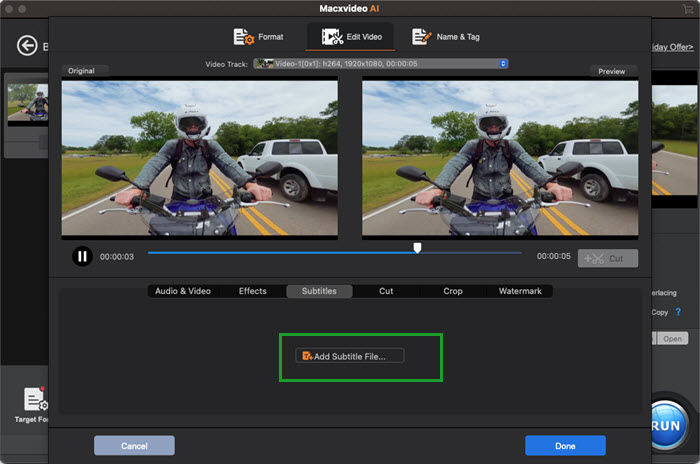
Method 2. Click "Subtitle" item on the Edit Toolbar. If it is gray, choose an output video format first. On the Subtitle dashboard, click "Add Subtitle File" to load a corresponding SRT or ASS subtitle file from your computer.
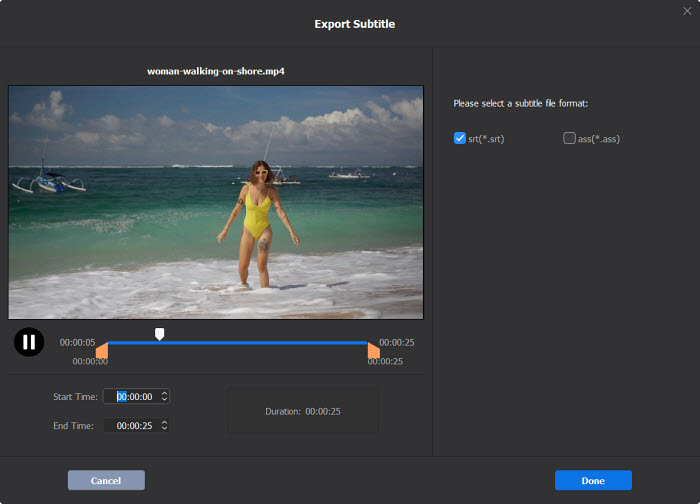
Step 1. Add a video that has subtitle, and double click "Export Subtitle" in the ToolBox.

Step 2. Set the Duration (Start Time and / or End Time) of the video if necessary.
Step 3. Select .srt or .ass as the output subtitle format.
Step 4. Hit "Done" button.
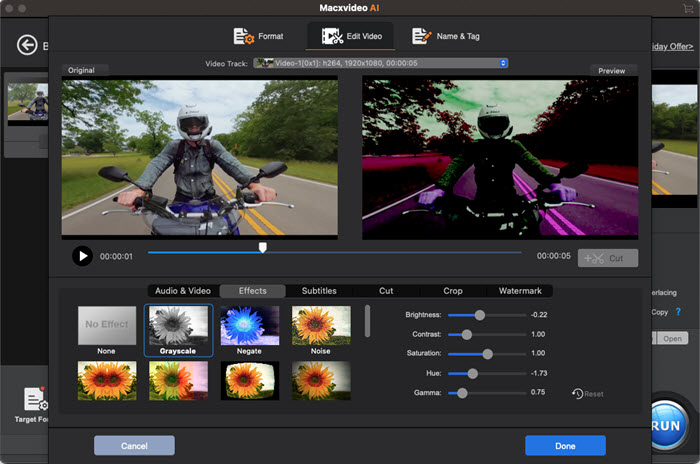
Step 1. Click "Effect" function button labeled in magic wand icon to pop up the video effects controls.
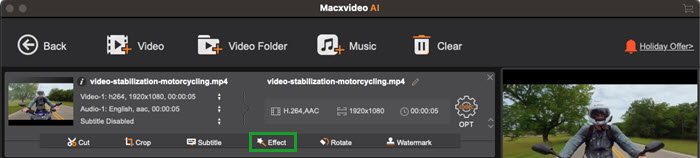
Step 2. Preview and choose the video filter effect you like most.
Step 3. You can also ajust video brightness, contrast, hue, gamma, saturation to achieve more satisfied visual effect.
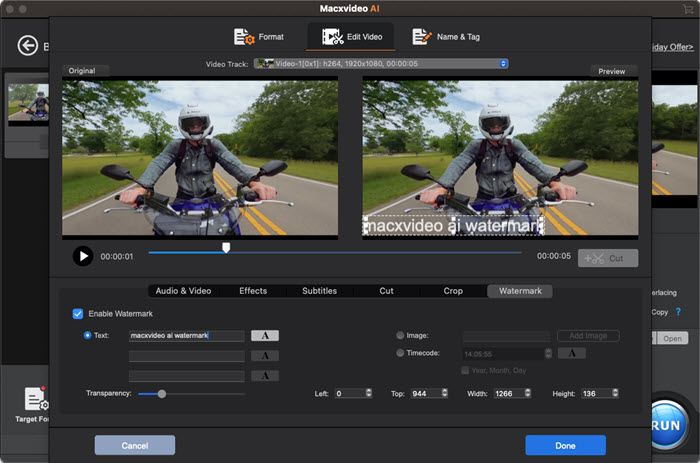
Step 1. Click Watermark in the Edit Toolbar.
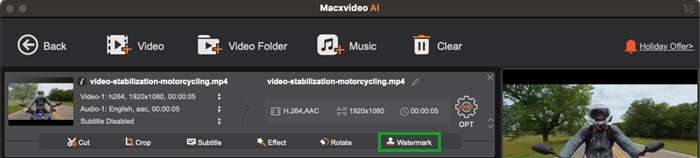
Step 2. Click "Enable Watermark" after which you can add watermark as you like.
Step 3. Add text or images to personalize your video. Here you can also adjust transparency, position, font, color, and more.
Step 4. Click "RUN" to save the video with watermark.
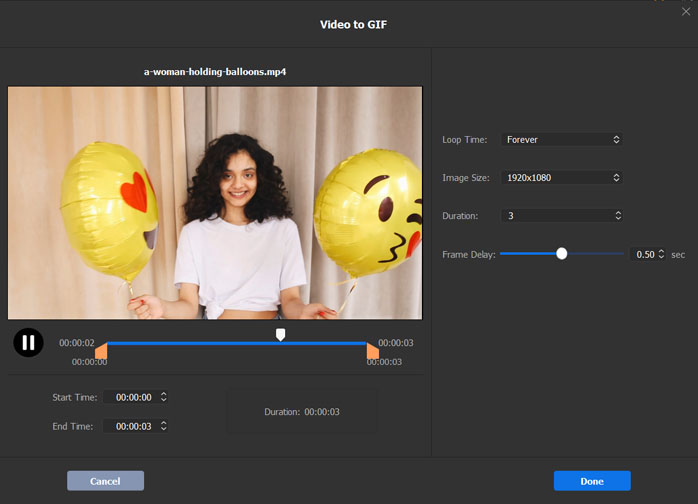
Step 1. Navigate to ToolBox and double click the "GIF" button or the setting icon to open up a "Video to GIF" window.

Step 2. Set the loop time, image size, duration, and frame delay.
Step 3. Click Done -> Run to output the animated GIF file.
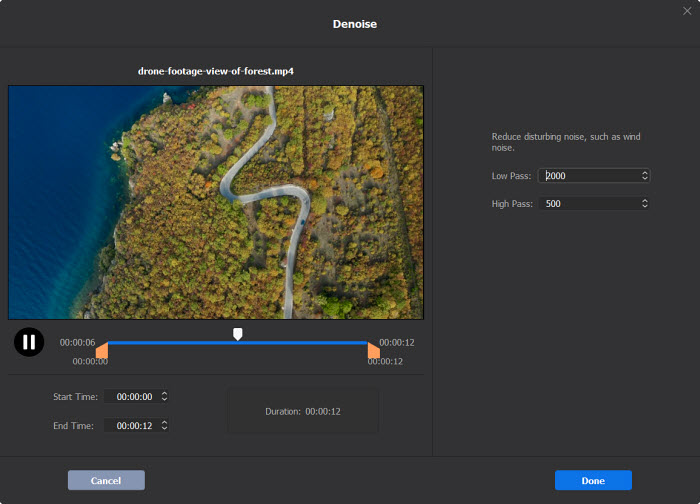
Step 1. Click "Toolbox" tab and select "Denoise". Double-click Denoise button or hit the gear icon on the top right corner of this button to access to controls.

Step 2. Move two orange cursors to trim the segment which has disturbing noise. Otherwise, manually input Start and End Time.
Step 3. Redefine values of Low Pass and High Pass to reduce the noise.
Step 4. Click "Done"
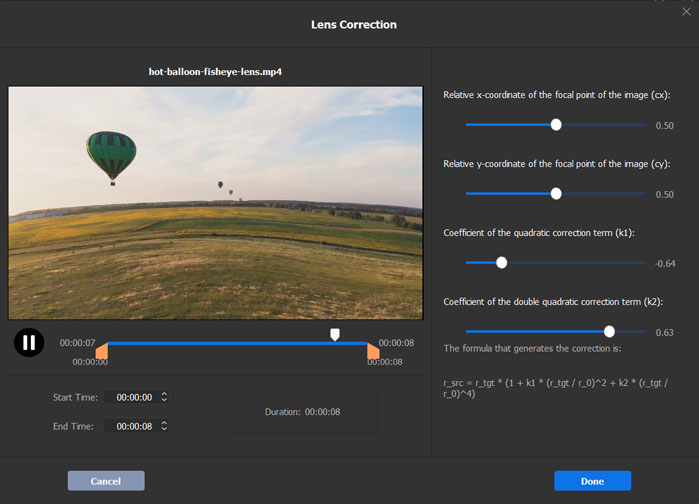
Step 1. Click "Toolbox" tab and move the right arrow to find "Fisheye" option. Double-click Fisheye button or hit the gear icon on the top right corner of this button to access to lens correction controls.

Step 2. Move two orange cursors to trim the segment which has fisheye effect. Otherwise, manually input Start and End Time.
Step 3. Move the sliders to adjust cx (relative x-coordinate of the focal point of the image), cy (relative y-coordinate of the focal point of the image), k1 (coefficient of the quadratic correction term) and k2 (coefficient of the double quadratic correction term) to remove fisheye lens.
Step 4. Click "Done".
Step 1. After loading the video you want to passthrough to MKV, click "ToolBox" tab at the bottom bar and locate "MKVMaker".

Step 2. Double click "MKVMaker" if you need to trim source video. You can drag the orange knobs to specify start and end time points or manually set "Start Time" and "End Time". Then, hit "Done".
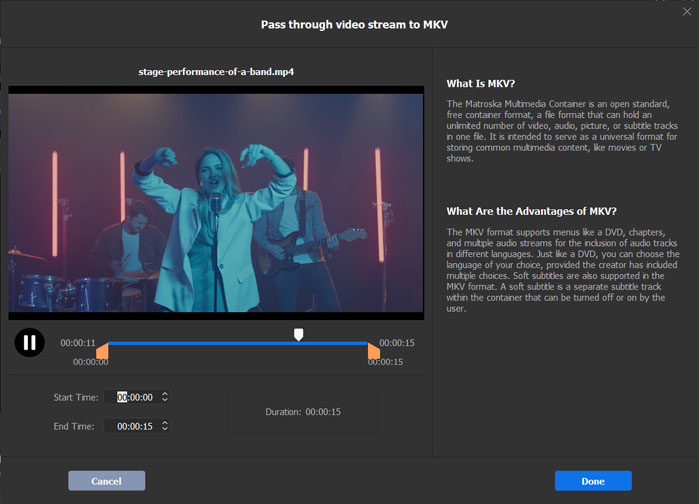
Step 3. Hit "RUN", and your video will be immediately converted to MKV without re-encoding. New MKV file will keep original quality, resolution, codec and other parameter settings.
Step 1. When a source 3D stereoscopic video is loaded successfully, head over to the "ToolBox" section, find and double click "3D -> 2D" option to access to controls.

Step 2. Choose input 3D format first and then select output 2D/mono video as "left eye only" or "right eye only". You're also free to trim source video to maintain the fragment you prefer.
Step 3. Click "Done" -> "RUN" to convert 3D movie into 2D format in a flash. Thus you can wath 3D film on any 2D screen normally.
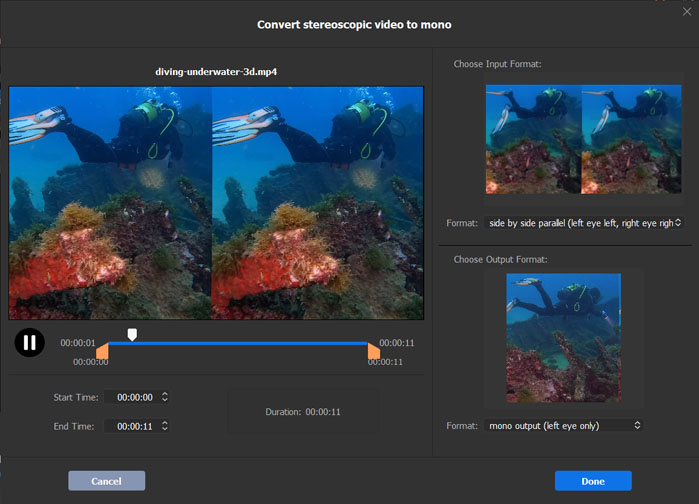
※ Tip: Macxvideo AI is able to make 2D video out of 3D one in the following formats:
- side by side parallel (left eye left, right eye right)
- side by side crosseye (right eye left, left eye right)
- side by side parallel with half width resolution (left eye left, right eye right)
- side by side crosseye with half width resolution (right eye left, left eye right)
- above-below (left eye above, right eye below)
- above-below (right eye above, left eye below)
- above-below with half height resolution (left eye above, right eye below)
- above-below with half height resolution (right eye above, left eye below)
- alternating frames (left eye first, right eye second)
- alternating frames (right eye first, left eye second)
Macxvideo AI enables you to capture video snapshots in 2 ways.
Method 1:
Step 1. Open Macxvideo AI -> Click "Video" button -> Click "+Video" button to load source video.
Step 2. Tap "ToolBox" and locate "Snapshot" function -> Double-click Snapshot button or click the wheel-like icon at the top-right corner of the button to open the video snapshot window.

Step 3. Choose picture format (PNG or JPG). Select preferred image size (recommended: keep original). Set picture count (how many pictures you'd like to capture from the video). Then click "Done".
Step 4. Finally hit "RUN" button to start capturing snapshots from video. Once the job is finished, the output folder will auto pop up, and you can find your snapshots folder. In this way, you can catch multiple snapshots one time.
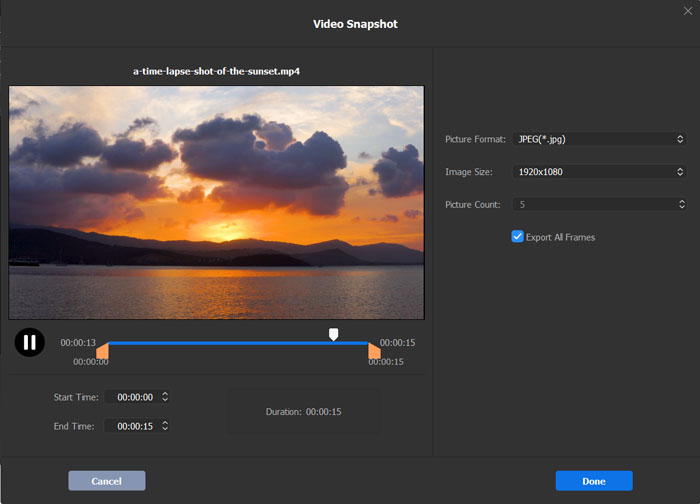
※ Tips: 1 Macxvideo AI captures one picture per second by default. It will auto calculate the total video time and set the Picture Count. But you can freely change the number.
2 In the preview window, you can also freely drag the two orange knobs or set specific Start Time and End Time to cut a preferred video clip for capturing snapshots.
Method 2:
Step 1. After you load your original video, you can see a video preview window on the right, click the arrow "Play" button and the video will begin to play.
Step 2. You can drag the play slider to a particular point. When you see your favorite scene in the video, rightly click the "Camera" icon and Macxvideo AI will auto capture and save the current video scene to computer.
Step 3. Click the "Folder" icon next to camera to open the output picture folder to check the captured video snapshot.
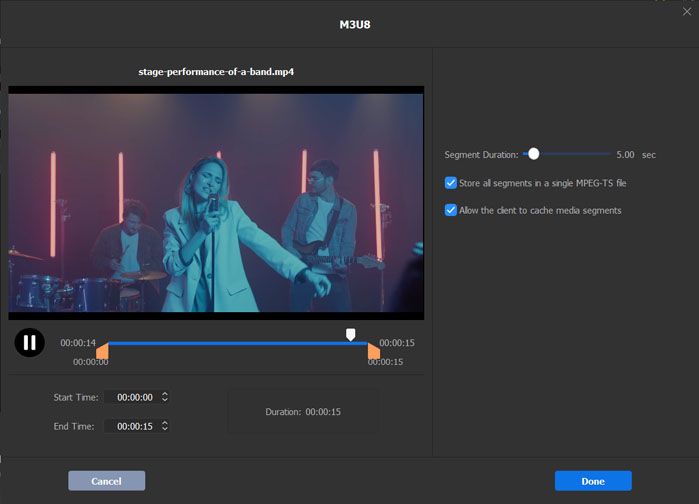
Step 1. Move the mouse on "ToolBox" tab and select "M3U8" option. Double-click the button to enter setting window.

Step 2. On the left panel, preview window with progress bar is presented. Move the orange cursors or manually input start/end time to trim a clip for exporting as M3U8.
On the right panel, move slider to set "Segment Duration" (5 seconds by default). Tick or untick options "Store all segments in a single MPEG-TS file" and "Allow the client to cache media segment" according to your needs.
Step 3. Click "Done".
With this software, you can also speed up or slow down video playback speed from 0.1x to 16x. Here are the steps.
Step 1. There are two ways to locate the eature. Click the Edit toolbar or simply click Options on the main interface and switch to Edit Video.
Step 2. Go to "Audio & Video", drag the Playback Speed slider to either slow down the video to 0.1x minimally or speed up the video to 16x maximally. Or you can enter the desired speed as you want.
Note: you can enable the box of Recalculate Time Stamp to force A/V sync and therefore avoid audio delay due to the speed change.
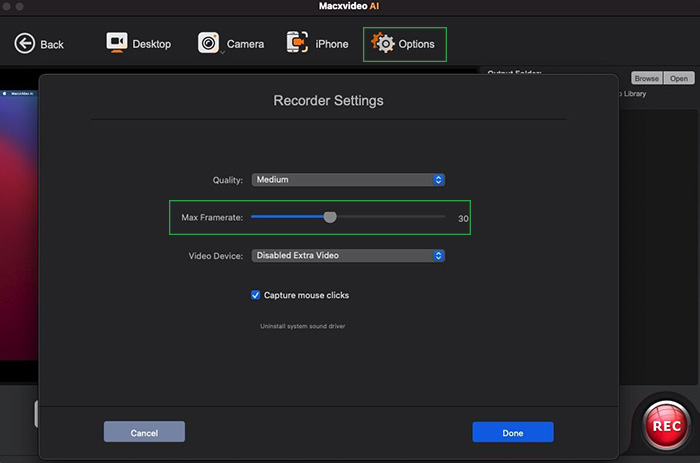
Macxvideo AI allows you to record desktop screen activities, capture video with your webcam, or record both simultaneously. It supports 4K screen recording at up to 3840×2160 resolution and screen captures at up to 60fps for smoother, high-quality recordings. The Recorder module also includes an Audio Recorder, enabling audio-only recording for podcasts, voiceovers, or any sound capture without video.
Step 1. Click "Recorder" button in the main screen, and then get access to Recorder interface.
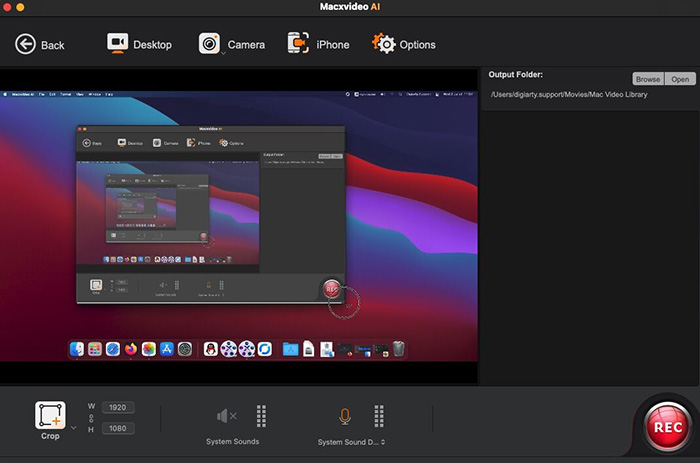
Step 2. Exit Settings window, and then click "Desktop" button to load your computer screen.
Tips: To record screen in 4K 60fps, click Options to show up the Recorder Settings window. You can adjust the recording quality, max framerate, video device, etc.
Step 3. Click "Crop" button at the bottom left corner to specify the area you want to record. To record the entire screen, you don't need to trouble "Crop".
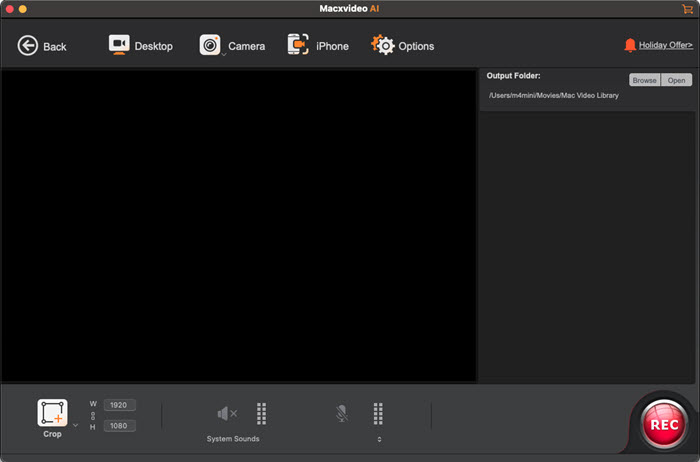
Step 4. System sound and microphone are turned on by default. Enable or disable audio according to your own needs.
Step 5. Click "REC" button at the lower right corner, then it will begin recording screen within 5 seconds.
Step 6. Click "STOP" button, when you need to finish screen capture.
Step 1. Click "Recorder" button, and choose "Camera" to fire up your camera.
Step 2. Microphone is enabled by default, thus you can record facecam video with your voice.
Step 3. Click "REC" icon to start recording camera video.
Step 4. Click "STOP" button to stop video recording.
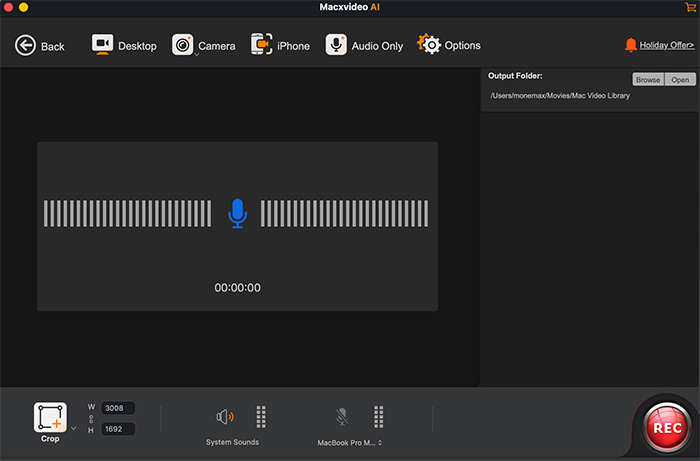
Step 1. Click the "Recorder" button and select "Audio Only" to enable audio-only recording.
Step 2. Turn on your microphone and system sound.
Step 3. Click the "REC" icon to start recording audio.
Step 4. Click the "STOP" button when you finish recording.
Step 1. Click "Check Update" to check the update information for latest version of Macxvideo AI.
Step 2. Click "About" to check your license information, current version No. of Macxvideo AI, release date, etc.
Step 3. Click "Help" to open the detailed user guide page of Macxvideo AI.
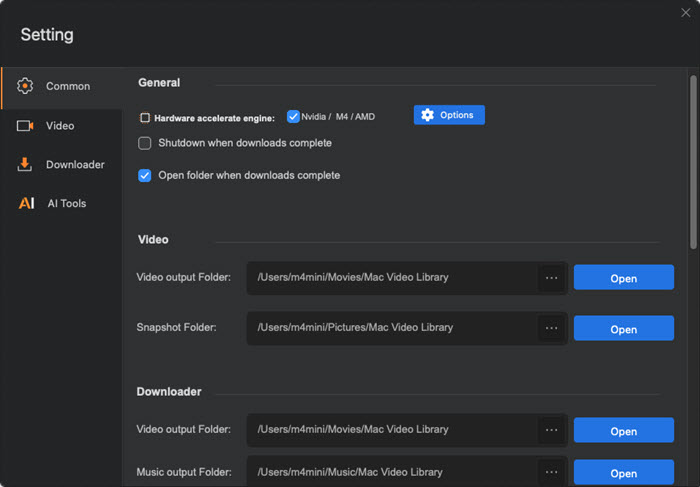
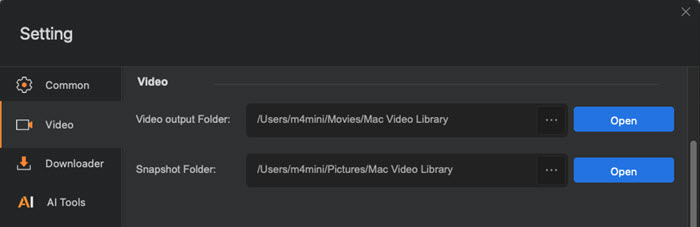
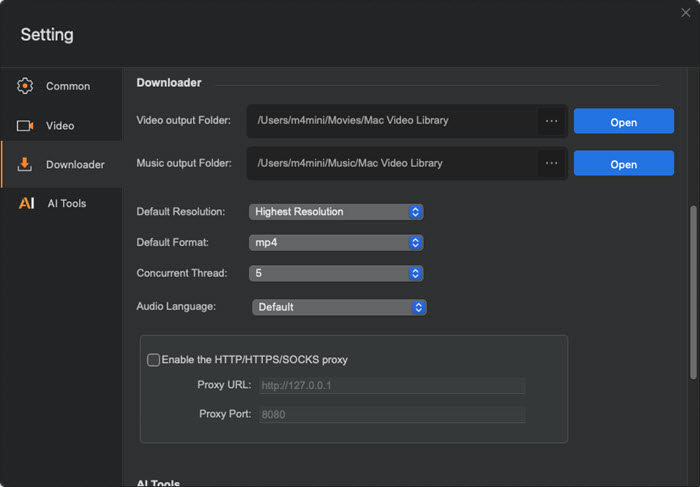
Default video output folder: /Users/xxx/Movies/Mac Video Library
Default music output folder: /Users/xxx/Music/Mac Video Library
Default movie format: MP4, FLV, 3GP, WebM, M4A, MP3. Choose preferred one.
Default resolution: Set default resolution for the downloading video: Highest Resolution, 1080p, 720p, 480p, etc.
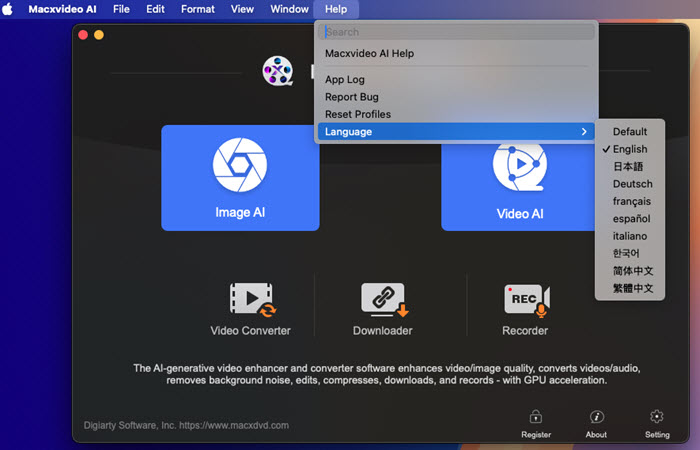
Under Help -> Language, you can change the default software language: English, Japanese, German, French, Chinese (Simplified), Chinese (Traditional), etc. Once you choose a language and click "Continue", the software will auto restart.
Home | About | Site Map | Privacy Policy | Terms and Conditions | License Agreement | Resource | News | Contact Us
Copyright © 2026 Digiarty Software, Inc (MacXDVD). All rights reserved
Apple, the Apple logo, Mac, iPhone, iPad, iPod and iTunes are trademarks of Apple Inc, registered in the U.S. and other countries.
Digiarty Software is not developed by or affiliated with Apple Inc.
