

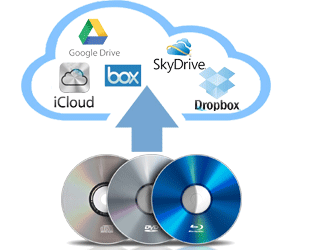
Have you noticed that watching DVD movies has becoming increasingly inconvenient in recent years, as the DVD players leave the market and DVD drives disappear from PCs gradually. It's time to free your films or TV shows from their shiny silver prisons so they'll still be watchable without DVD players or DVD drives. Given this, converting DVD to digital free and uploading DVD to cloud storage device extend your viewing options to your phone, tablet, TV, Roku box, game console etc.
Cloud storage emphasizes more on saving and managing data. If you rip and upload DVD to cloud, you can make a backup copy of all your precious movies and videos online, and then make your DVD library available and accessible through the network disk such as Dropbox, Amazon Cloud Drive, Google Drive, Seagate personal cloud media storage, etc. In that case, here we go, to upload and store DVDs in cloud.
To Upload DVD to Cloud Storage Device, Convert DVD to Digital First!
As you try to upload DVD to cloud storage device, the fact is that you usually get an error since almost all the DVDs are protected with encryption (CSS, Region Code etc.), refusing to copy DVD to cloud storage device directly. Therefore, you need to convert DVD to digital formats with a DVD to cloud ripper.
MacX DVD Ripper Pro is precisely the one which will get the movies off DVD discs in MP4, MOV, FLV, H.264 or whatever video/audio files. It's also your ultimate solution to rip any DVDs regardless of DVD protections like DVD CSS, region code, RCE, Sony ArccOS, UOPs, Disney X-project protection, Cinavia etc. for storing in Cloud, NAS, Hard Drive, Seagate Central, or playing on iPhones, iPads, Apple TVs, Android tablets and smartphones, Sony PSP, Xbox 360/One, Wii, Roku, WD TV Live, etc.
How to Convert DVD to Cloud Service
Step 1: Load DVD movie.
At very beginning, you need download the DVD to digital converter on Mac or Windows version on PCs and launch it. Then insert your DVD disc into your computer's hard drive. Click "DVD Disc" button to load your DVD to the program. DVD ISO/IFO, VIDEO_TS folder are supported, too.
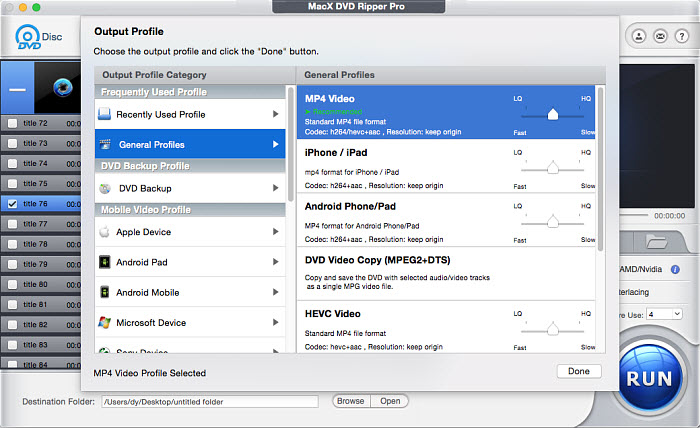
Step 2: Specify output format.
As MP4 is the most popular file format, you can just select "Mac General Video" > "MP4 Video" as the output format.
Step 3: Start ripping DVD to Cloud for storage.
Click "RUN" icon to start transcoding DVD for Amazon Cloud Drive, OneDrive, Dropbox, iCloud etc. You are advised to check the Safe Mode to ensure a smooth DVD to cloud conversion, though it may take more time than normal DVD ripping.
Tips: Since Cloud Storage Devices/Apple iCloud, etc has limitations about the uploading video size (If you only have the free account, you only have 5 GB of space), please pay attention to the video size when ripping DVD movies to Cloud. If your converted DVD is oversized, you can also compress video files to save space on Cloud network disk.
Disclaimer: The software company only advocate using this DVD to Cloud ripper to convert DVD to digital formats under the concept of Fair Use and don't encourage any illegal reproduction or distribution of copyrighted content. Please abide by the local DVD copyright law before doing it.
Upload Converted DVD Videos to Cloud Storage Device
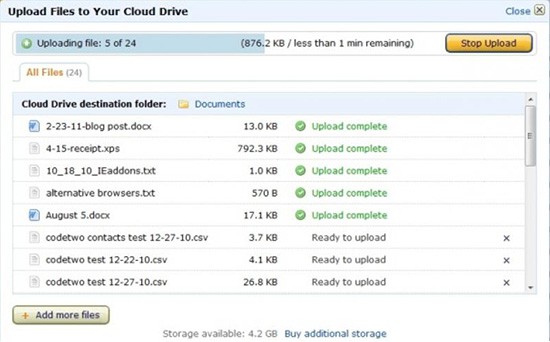
Once get your movies off DVD discs, you can upload the DVD library to cloud for different use, namely playing the files online through mobile phones/tablets, TVs, Roku box, Xbox 360 etc., or downloading them to local disks. Take uploading DVD to Amazon Cloud Drive as an example, register and log in your Amazon Cloud account. And here are 3 steps to upload DVD to Amazon Cloud:
- Click Add Files. Then drag and drop files into the window that opens, or click Select Files to browse your files.
- Choose a destination folder for your files or create a new folder.
- Click Add to [folder name].


Bella has been working with DVD digitization for over 12 years. She writes articles about everything related to DVD, from disc drive, DVD copyright protection, physical structure, burning and backup tips. The unceasing passion of DVD movies helps her build a rich DVD library and ensure a practical solution to address almost all possible DVD issues. Bella is also a crazy fan for Apple products.


