

You're not strange to this situation: after you record a 4K video using your GoPro or iPhone X and playback it on your device, you will find that there is annoying background noise in your video. Generally, this background noise is resulted from your device microphone or the external noisy environment. No matter which, the background noise causes interference to your video and you just wanna remove the unwanted sound pollution from video.
Yet, here comes the question: can any type of background noise be removed from video? The answer is negative. In general, the noise that keeps certain frequency (aka white noise) can be easily removed from video. White noise contains ambient noise, hum, rumble, buzzes, etc. They have something in common: constant, consistent and predictable. The rest noise includes people talking, birds chirping, trumpet, whisper, doors slamming, etc. They're difficult to be eliminated from video, for they lack continuity and regularity. Therefore, when it comes to remove background noise from video, we're talking about getting rid of white noise from video. If some background noise removal apps claim to remove any type of background noise, keep in mind that it's just a gimmick stunt.
Well, since majority of video processing tools are dedicated to removing white noise from video, which tools perform better? Calm down! We choose several candidates for your reference. After you have the basic understanding about them, you'll have your own judgement.
1. Free Remove Background Noise from Video Using Audacity
Audacity makes a respectable showing firstly with its audio editing features and its free open source tag. Among its various audio editing features, this one - remove background noise from video, is warmly welcomed and widely used by its users. Cuz it's easy to use and fast to accomplish your background noise removal request. How to use Audacity to get rid of background noise from video for free? Let's check the process.
Note: Audacity is an audio editor that can only handle audio files, video excluded. Prior to adding audio file into Audacity, you'd better to use a free video converter like macXvideo to free convert video to audio (e.g., MP3) first. And then you go on noise removal process with Audacity.
Step 1: Free download Audacity from its official website, install and launch it on your Windows, macOS or Linux.
Step 2: Tap "File" to open the hidden menu, from which selects "Open" to import the audio file you wanna edit.
Step 3: Play and listen to the audio file to find out which parts is ruined by background noise.
Step 4: Tap "Effect" at the top banner and choose "Noise Removal.." from the extended list.
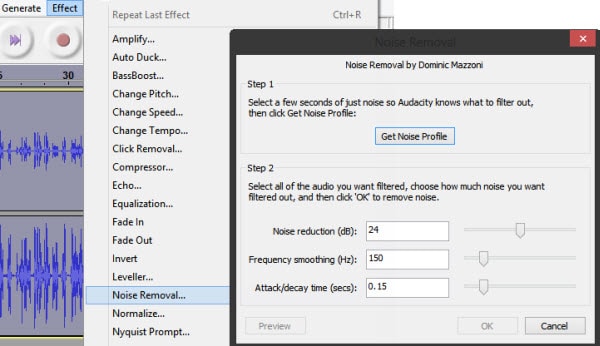
Step 5: Hit "Get Noise Profile" > choose "OK". And you have no need to do anything further to the settings. It's fine to just keep the default settings. Afterwards, this free background noise removal software will magically being to remove background noise from audio file and export the audio file as a new MP3 file on PC.
Step 6: Opt for "Preview" to check if the background noise is eliminated from your audio file. If the white noise is gone, you can then import the new audio file into your video via third party software.
2. Free Reduce Background Noise from Video Using iMovie
You might think Audacity is too troublesome to eliminate background noise from video, since it needs to extract audio from video first and then goes to the noise removal phase. Luckily, you don't have to 100% rely on Audacity, for you have Plan B - iMovie. This Mac free video editor not only enables you to trim, crop, merge videos, add special effects to videos, but also reduce background noise from video at greatest of ease. How to cut out background noise from video in iMovie? The procedure is easy peasy.
Step 1: Run your iMovie on your macOS-based computer. Followed by the import of your input video via the downwards arrow icon at the top banner.
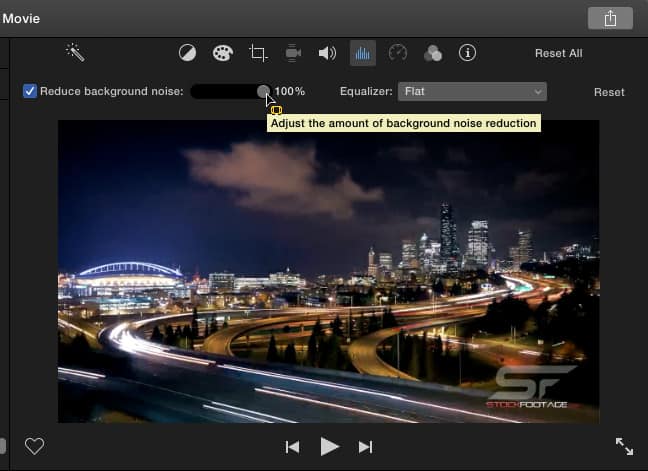
Step 2: Shift your attention to the upper right corner of the interface, where you can find the volume icon  . Click on it and the option of "Reduce background noise" pops up.
Step 3: Move the slide bar to adjust how much background noise you wanna reduce, 1%, 10%, 50%, 80% or 100%. It all depends on your need.
Step 4: Tap the upwards arrow icon at the upper right corner of the home screen to export your video. Click "File" from the drop-down list, name your output file and select the destination folder to save the output video. When the whole background noise removal is over, you can open this video file in QuickTime to check whether the background noise reduction fits the bill. Do it again in iMovie if it's not satisfactory.


Digiarty Software, Inc. (MacXDVD) is a leader in delivering stable multimedia software applications for worldwide users since its establishment in 2006.
Hot Products
Tips and Tricks
