
It is likely that a majority of people can't understand what you want to describe if you speak your native language in your YouTube video. But, if there is subtitle translation, things will get better. Thus, getting your YouTube video embedded with subtitles seems to be pretty necessary. Next, we introduce you two easy ways to put subtitles on a video which you try to upload to YouTube.
Prior to the detailed guide, you'd better download external subs or create new proper subtitles (.srt, .ssa, .aas, .txt, etc) for your YouTube videos. It is more favorable that you can find out needed your native language subtitles (English/Hindi/French/German/Italian) from the popular sites like Moviesubtitles.org, subscene.com, subtitles.hr and more.
Way 1: Add Subtitles to a Video on YouTube Itself
Experienced YouTubers will think it is very simple because there is a subtitle setting button on YouTube. Perhaps many of you haven't noticed that. Now, you can follow our steps to add subtitles and closed captions to the video with YouTube itself.
1. Log into your YouTube account and click "Upload" on the YouTube site (upper right corner of any YouTube page). Then upload your MP4/MKV/3GP/AVI video to YouTube.
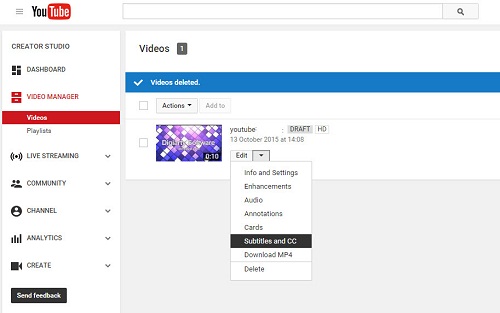
2. Select "Video Manager" which will bring you to your personal page of uploaded videos.
3. Choose the video that you want to add captions/subtitles/translations. By the way, this guide is also efficient for the former uploaded YouTube videos.
4. Click the right of the Edit button and then select "Subtitles and CC" from the drop-down menu.
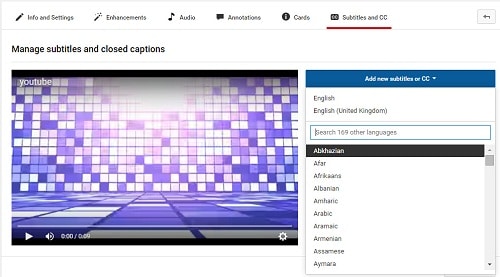
5. Hit "Upload a file" and click "Browse" to choose your downloaded subtitle file (.srt, .ssa, .txt, etc). If you are uploading a transcript (with no time syncing), select Transcript, otherwise, select Subtitle file.
6. Choose the appropriate language. You may also enter a track name here. Last, click "Upload file".
Sometimes you also will feel depressed in the process of embedding foreign language subtitles to your YouTube videos, like this guy.
"I uploaded a video on YouTube and went to 'Video Manager' and correctly followed all the instructions. Later, I only can see the notice that subtitles is publishing so that I click to update. But at last, I can't see the subtitles I added when I open the video. I've been trying this for two days now and I still don't know what went wrong? Is there any alternative way to solve the problem?"
Way 2: Add Subtitles to Video with a YouTube Video Editor
In fact, there are many reasons leading to the YouTube subtitle adding failure. No matter for YouTube newbie or advanced users, you are not suggested to spend much time and energy on resolving such kind of complex issue. And honestly, you can turn to the functional video editing tool like Macxvideo AI. It can help you easily add external SRT subtitles to MP4, MOV, FLV, 3GP, AVI, MKV, SWF and more with high quality. Besides, you can also cut, trim, crop, merge, split and transcode any videos for easier sharing and then enjoy the foreign-language films without any limits.
Step 1: Free download the YouTube video editing software on your Mac and launch it, import the video by clicking "Add File" button. Note: you should download windows version if you are a windows user.
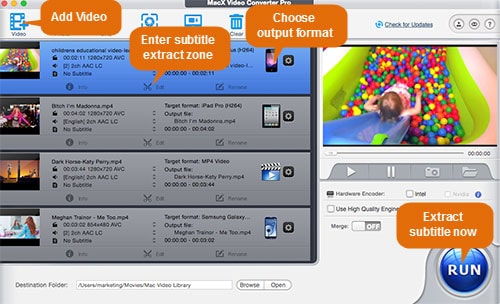
Step 2: Choose the output format as you like. Infused with 320+ video and 50+audio codecs, Macxvideo AI can easily convert video to any format to various YouTube supported video formats (MP4, FLV, AVI, MOV, 3GP, MKV, MPEG, WMV, SWF) with fastest speed.
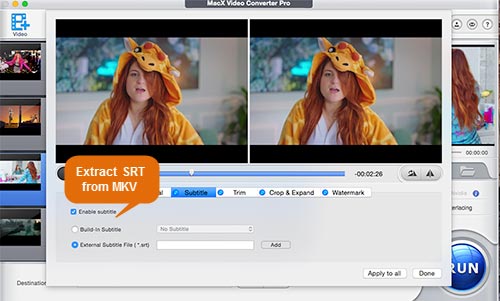
Step 3: Click "Edit" button on the main interface. After the "Edit" window pops up, click "Subtitle" button, hit "Enable subtitle" > "External Subtitle File", click "Add" button to import external subtitle .srt file you've saved on your computer, and then press "Done" button to finish embedding subtitles into video.
Step 4: Hit "Browse" button to choose a folder on your computer to save the edited movie and click the "RUN" button to start to convert the video with added subtitles.
Tips: You also can download YouTube videos for offline editing further with Macxvideo AI. It has ability to download any 720P/1080P and 4K UHD video from YouTube as well as other 1000+ online sites, including Facebook, Yahoo, Dailymotion, Vimeo, Vevo, Metacafe, Myspace and many more. Moreover, infused with 350+ output profiles, this video converter for Mac also can help you to convert the downloaded videos to a video format that is playable on any pads and phones on the go.


Candice's particularly skilled in writing and sharing video-related contents. Her guides cover from deep-seated video/audio parameters, to media entertainment on different platforms. She also enjoys shooting and processing videos by herself for a more reliable basis of informative info with her articles, which are never at the expense of eliminating an entertaining read.


