
Large video files mean that your hard drive or memory card is taken too much space; you cannot upload your video to YouTube, Facebook, Dailymotion etc.; you're unable to send video via emails; and even you are not allowed to play large video on mobile devices. You'll need to squeeze its video size losslessly, at least without any significant loss of quality. So how to compress video files on Mac and Windows? Provided there is a superb HD video shrinker, things will work out fine. In this article you will get the best HD video compressor both for Mac and Windows, and also the a step-by-step guide to shrink 4K/HD (MKV, M2TS, AVCHD, etc.) videos to small files.
Best HD Video Compressor to Shrink 4K/1080P Video Size
Downloading compressor is always the initial step for MKV, AVCHD, M2TS, or MP4 video reduction. But since the different definition of the "BEST" for green hands and professionals, if only there is an easy-to-use but powerful HD video compressing software. Macxvideo AI is precisely one that fits beginners and veterans both, allowing you to reduce video file size by changing video formats, adjusting parameters (resolution, frame rate, bitrate etc.), trimming or cropping videos etc.
What Makes Macxvideo AI The Best HD Video Shrinker
As is known to all, beyond the video formats, the video file size depends on many variables: HD vs. SD, frame rate, bitrate, color depth, and even the amount of movement in the video. Thankfully, the free video compressor - Macxvideo AI can adjust these parameters that count for a lot when you shrink and downsize video file size.
Convert Video Formats: Video format matters a lot for video file size. And some formats like AVI, MKV, M2TS naturally take much more space than MP4, FLV, WebM, MOV etc. It is capable of converting and squeezing videos to smaller size formats.
Lower Resolution (HD to SD): The video resolution is closely bound up with video size and quality. Higher resolution usually results in larger video file size. Changing the original video to a smaller resolution will lead to a smaller file size. To compress a HD MP4 video in 1920×1080P, you are suggested to lower it to 1280×720, 640×480, 640×360 for a smaller size.
Decrease Bit rate: As for the bit rate, lowering the bit rate will bring about the decrease of the video file size. But please keep in mind the image quality will be bad in case you make the bit rate too low. We suggest you lowering bit rate 20-30% of original file. For example, 720p video should have a bit rate between 5k-10k kbps while 1080p have a bit rate of 10k-20k kbps.
Reduce Frame rate: With respect to frame rate, it has a lot to do with the file size. the lower frame rate, the smaller size you will get, and vice versa. To compress YouTube HD video via downsize the frame rate, you can set it at 23.97fps to lower the file size of MP4 before video shrinking.
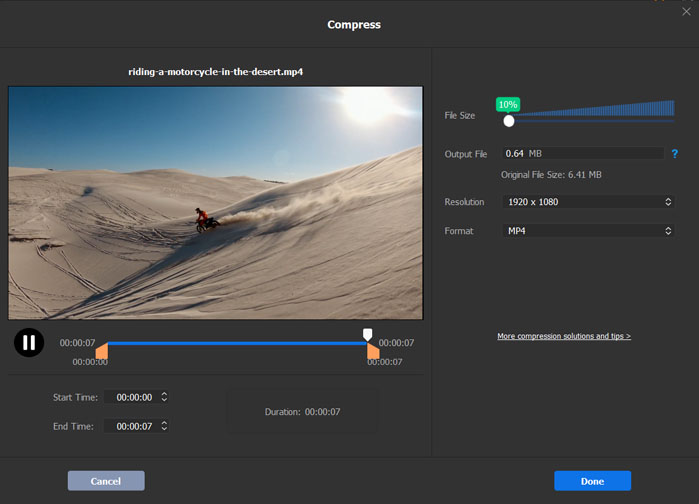
Trim/Crop Video Files: If you still unsatisfied with the video size after setting parameters, you can trim the video into clips or crop the black bar (if there is) to reduce the video size for email or uploading.
Besides the above main factors, some additional terms also make Macxvideo AI worthy the title of BEST. Namely, it boils down videos at super fast speed, owing to the support for Intel QSV hardware acceleration.
With the High Quality Engine built in, a balance between file size and video audio quality is kept while narrowing video files size. Still, it's compatible on the latest macOS and Windows platform, such as Sierra, El Capitan, Windows 10 etc.
How to Shrink Videos with Macxvideo AI?
Before going over the step-by-step guide of how to compress video files via MacX Video Converter, you are supposed to free download the HD/4K video downscaler of Windows or Mac version according to the platform you are running.
Step 1: Load Large Video Files
After launching the program, then click "+ Video" button to load your large video files for boiling down.
Step 2: Choose Output Format
Then there automatically pops up a window for choosing video format among 370+ audio and video codec. According to the different demands for video shrinking, you can choose MP4 to compress video for email or FLV, MP4, MOV for uploading to YouTube, Facebook, Vevo etc.
All in all, MP4 is the highly suggested video format thanks to its high compression rate, good video quality and wide compatibility.
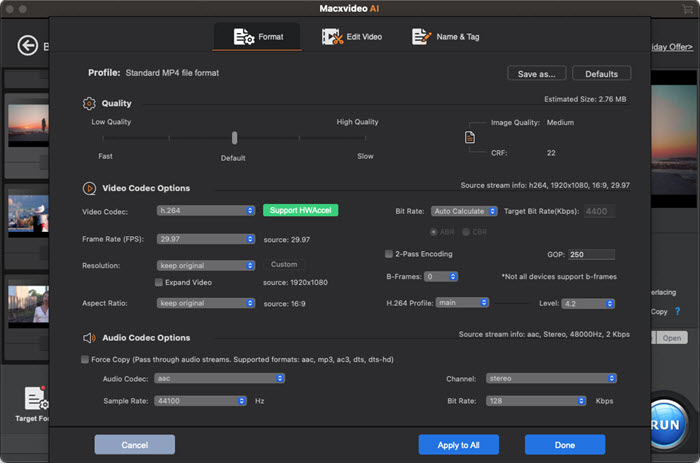
Step 3: Adjust Parameters to Make Video Smaller
Resolution, frame rate, bitrate also matter a lot on video size. You can make full use of these options provided by the awesome video file size reducer. Click the Gear icon and do as below:
Step 4: Start Shrinking Video Now!
As you pressed the "RUN" icon in the lower right corner of the interface, it will come to the process of HD video downscaling. You can estimate the left time based on the progress bar.


Candice's particularly skilled in writing and sharing video-related contents. Her guides cover from deep-seated video/audio parameters, to media entertainment on different platforms. She also enjoys shooting and processing videos by herself for a more reliable basis of informative info with her articles, which are never at the expense of eliminating an entertaining read.


