
If you use iMovie to edit videos quite often, you might have experienced the same dilemma as reading the following iMovie user: I trimmed a video that was about 920MB, then I exported it, the size jumped to over 9GB. How could this happen? Can I bring down the file size in iMovie because 9GB is huge for email and posting? iMovie does a lot more than editing. The video editing software from Apple also lets you reduce video file size on Mac or iPhone iPad for email, YouTube, Facebook, Vimeo, and iTunes etc. Here's our guide on how to compress video with iMovie.
iMovie Alternative: Compress Videos without Quality Loss on Mac
If iMovie doesn't show satisfying video compression result on Mac, iPhone, or iPad, resort to more professional video compression software like Macxvideo AI.
- Compress videos from 1GB to 10MB with good quality reserved thanks to High-Quality Engine.
- Compress video in several ways. You can trim, cut, adjust the resolutions, bit rate, video codecs, quality etc.
- The Hyper-Threading tech and Intel QSV/Nvidia/AMD GPU hardware acceleration tech make the tool compress videos at world's fastest speed (5X faster than iMovie) with low CPU usage.
- Work on macOS and Windows, compress video with presets for YouTube, Facebook, Vimeo, iPhone, iPad, computer, etc.
Table of Contents
- Step 1. Import video files to iMovie
- Step 2. Edit movie clips in iMovie
- Step 3. Trim, crop, resize videos in iMovie
- Step 4. Compress videos in iMovie with export settings
Part 1. How to Compress Videos with iMovie
Part 1. How to Compress Video Files with iMovie
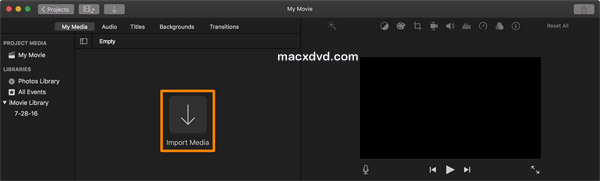
Step 1. Import video file
You have several ways to import videos you'd like to resize in iMovie. Import a video by directly dragging it from Finder. Select a single file or command-click to choose multiple videos, or pick a file folder and drag them to an event in the Libraries list in iMovie. Alternatively, open the Import window, click the download arrow in the toolbar and select files to load. Ways are slightly different for different versions. iMovie for Mac now supports to import HEVC 4K video. Check the list of best video formats for iMovie to ensure your source videos are accepted by iMovie.
Step 2. Edit videos in iMovie
Edit videos as you like with iMovie. Follow our iMovie video editing tutorial to split clips, insert transitions, crop videos, create the fade in and fade out effects, and more. Note that video editing possibly affects output video file size. You can skip this step if you don't need to do any video editing on Mac or iOS devices and just directly move to the next step. Scroll down to use steps to resize video in iMovie for email, YouTube, Facebook, Vimeo etc.
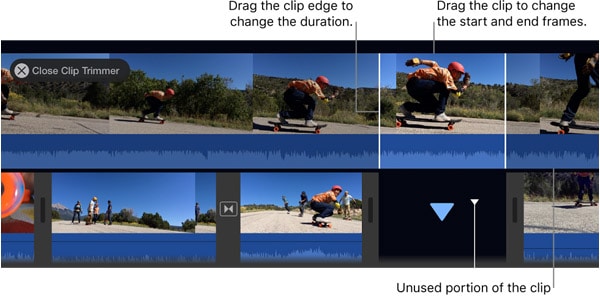
Step 3. Trim clips in iMovie to downsize videos
Video length and bit rate determine file size. So the first way to make video size smaller in iMovie is to trim your video. You can trim clips in the timeline by simply dragging to remove an unwanted part and shorten the video duration. To do so, in the timeline, review your video to ensure the video clip you want to remove and drag the video toward its center to move the video start point and end point. You can also remove frames from the video, just go to Window > Show Clip Trimmer, drag the edge toward the clip's center.
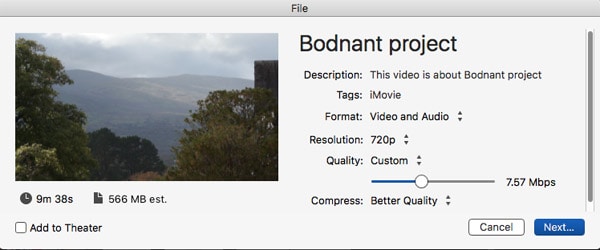
Step 4. Compress videos with iMovie export settings
Click Share icon in the toolbar, and click File at the top. On the File window, there are various video options like description, tags, format, resolution, quality, and compress. Format, resolution, quality and compress settings affect final output video size. Click the format menu and choose a smaller-sized video audio format, in fact, codecs instead of container formats influence video file size, check out the list of best video codec for video compression.
Click Resolution pop-up menu and lower down video resolution to shrink video size in iMovie. 4K delivers four times the file size of 1080p HD video, and 1080p twice the size of 720p, consuming other settings are the same. You can convert 4K to 1080p/720p, 1080p to 720p in iMovie to get smaller sized output without noticeable image quality loss. Meantime, click the Quality drop-down icon to decrease the quality. You can manually adjust the video bit rate by picking Custom option under Quality menu.
The final step is to choose an iMovie export compression setting. Select an option. Better quality will result in larger file size. And click Next to close the dialog and move to the next step.
Step 5. Start to process video compression in iMovie
Enter the file name, choose a location for the output, and click Save. You'll see a progress indicator, click it to check more details. The indicator disappears once the whole process is done.
iMovie File Size too Big? How to Fix?
Many users reported that video files got bigger after editing with iMovie even if they trimmed the video. When you export videos with Best Quality, you will get a larger video file. If you export at just Good Quality, the output file size is smaller. Higher quality means higher bitrate and larger file size. When a clip is imported into iMovie, iMovie unpacks(decompress) the video file for editing, which makes the video become larger. To make iMovie video files size smaller, use Good Quality instead of Best Quality.
You can export video in a more compressed format, such as MP4 instead of pro res for iMovie. When exporting videos in iMovie, set the Resolution to lower one, Quality (Custom), Compress (Faster), and adjust the video bitrate slider bar to reduce the bitrate. You could share the file to email in iMovie, which shows a box with options to share at Small, Medium, or Large size, and at a lower resolution. It will be a much smaller file size but also worse quality now.
iMovie Alternative: Compress Videos by up to 90% without Visible Quality Loss
iMovie is not the best video compression software for Mac, sometimes it goes wrong, 3 out of 10 users once encountered any of the following problems - iMovie not exporting, iMovie crashing when exporting, terrible compressed video quality, to name a few. You have many better iMovie alternatives to choose from, and Macxvideo AI is the most popular one.
The high-end video compressor is available for both Windows and macOS. It can reduce the file size of 8K/4K/1080p/720p HD video by up to 98% with 5x faster speed than iMovie gives thanks to its unique compression algorithm, embedded High-Quality Engine, and support for Intel/AMD/Nvidia hardware acceleration. You are offered various video audio options to resize big video files, for example, bit rate, frame rate, resolution, codec format, trimming, cutting, aspect ratio and more, together with preset profiles for YouTube, Vimeo, DVD, iPhone, iPad, mobile devices etc.


Candice's particularly skilled in writing and sharing video-related contents. Her guides cover from deep-seated video/audio parameters, to media entertainment on different platforms. She also enjoys shooting and processing videos by herself for a more reliable basis of informative info with her articles, which are never at the expense of eliminating an entertaining read.


