Edit Video with iMovie? Here's An Easier Way
Feel clueless when editing videos with iMovie? Why not choose an easier way?Macxvideo AI, a simple but powerful iMovie alternative to edit video on Mac like trimming, cropping, cutting, adding subtitles or watermarks etc.
A Complete iMovie Tutorial: How to Edit Videos with iMovie for Mac?
As you launch your iMovie on your Macbook, Macbook Pro/Air and open it, you will find the startup window is divided into tables on the top. Media is used to check iMovie libraries with a collection of meida that shares a same top. Theater section is used to import, share, and play your custom videos and projects online from any of your devices. Project tab lists all your iMovie projects made, in order to open and edit these back again.
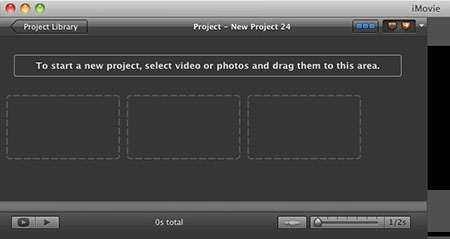
1. Create a new project.
A project is what you work on iMovie. As you hit on Create New icon,you can see there are two options: Movie and Trailer. Movie is used to create custom videos and slidshow from scratch, whereas Trailer starts from a ready template, close to film-like video. Here we choose Movie as an example.

2. Import your video for editing
There are several ways to import your video. Click on the Import button on the top; drag and drop from your Macbook. Or if your video is already in the Media, you can browse inside your own personal library from My Media tab, then drag and drop your files on the timeline.
3. Edit videos with iMovie
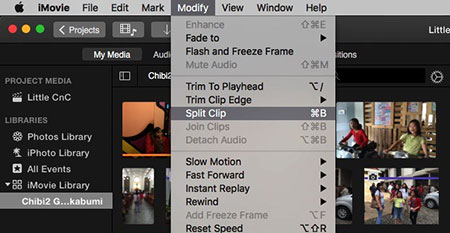
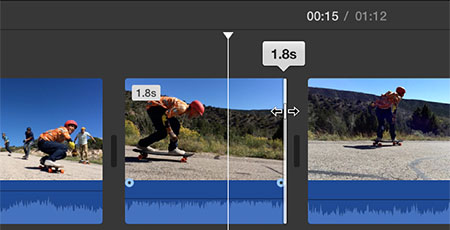
 Split clip: One of the first things to know is how to split clips. Breaking one clip into several shorter ones allows you to edit each chunk separately, so you will have more flexibility. In the timeline, select the clip you want to split. Hover your mouse to a location in the clip, click the mouse to fix the position, then go to Modify - Split Clip menu, or use Command + B shortcut key combination.
Trim clip:
In the timeline, skim to the beginning or end of the clip you want to extend or shorten. To extend the clip, just drag the edge of the clip away from its center. While to cut MP4 video clip, you need drag the edge of the clip toward its center.
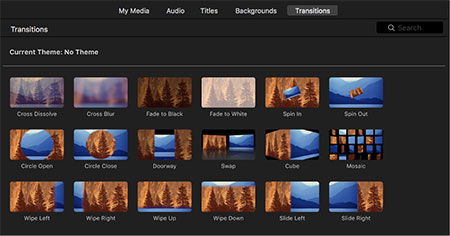
Insert Transition:
Transitions allow you to move from one clip to another with style. You can insert transitions from the insert tab. Just select an inserting point between clips, then pick one of the transitions and drag it to the inserting point. Now you can edit the length of the transition by double clicking on it, typing in the value that you want, and click Apply.
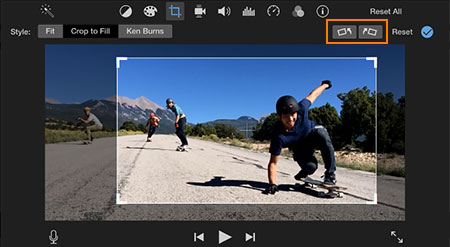
Crop & Rotate video clips:
iMovie for Mac is also available to crop and rotate MP4 videos. You can select the clip you wanna crop or rotate in the timeline. Then there shows a cropping control bar, click the Crop to Fill button, an adjustable frame appears on top of the clip in the viewer. You can move and resize the frame, like change 4:3 aspect ratio to 16:9, or any other as you like. Finally apply the crop, your video has been cropped.
As for rotate video, follow the same step to show the cropping control bar, and click the Rotate Clockwise/Counterclockwise button on the right side of the cropping controls.
Fade In, Fade Out, and More:
You can also create a fade in and fade out effect at the beginning and end of a clip/project by adding appropriate transitions. But the easiest way to do so is via Project Settings. In the middle of the screen's right side, next to the zoom slider, there's the Settings button (which doesn't look like a button). If you click on it, you will have a small Project Settings window. Check the Fade in/out from black and checkboxes.
There are other options that you can customize from this window, such as changing the project's Theme and applying Filter.
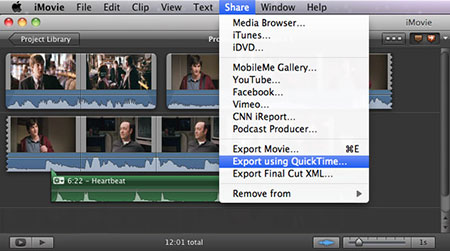
4. Export videos from iMovie
Before exporting, you can also compress large file size in iMovie. Once you are done with so much video editing, you will be able to export your creation in different formats. To do this, all you have to do is clicking on the Share button, located once again at the top of the application or by going to the menu File > Export in both cases you will find. You can select the video format that you find better by clicking on Export using QuickTime or just naming in in the Save As field after you click on Export Movie...
Of course, iMovie is not confined to the above mentioned functions. To figure out how to use iMovie to edit videos on Macbook, Macbook Pro/Air, iMac etc. with iMovie, you can click to see the full iMovie tutorial from Apple.
iMovie Alternative - Edit Videos on Mac Easier
Well, iMovie actually allows you to edit videos on MacOS. But Rome is not built in a day, so is editing videos with iMovie. In this case, you can turn to an iMovie alternative if you still feel to edit videos with iMovie. Macxvideo AI is known for its easy-to-use and user-friendly graphical user interface. Thus you can trim, crop, rotate, merge videos, or add subtitles/watermarks like what iMovie does but in simpler steps. Let's check how to edit videos with the alternative to iMovie:
4 Steps to Edit Videos on Mac via Macxvideo AI
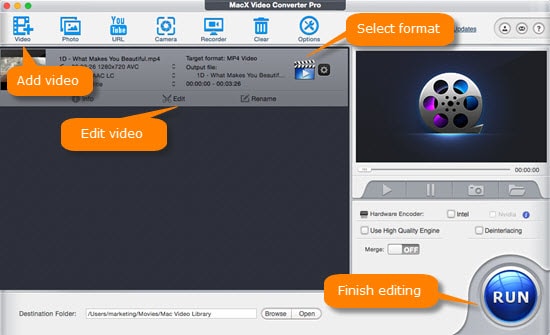
Step 1: Free download the iMovie alternative and launch it. The click "Add Video" to load your target video.
Step 2: Choose the output format for your videos, like MP4 MOV iMovie video formats or AVI, FLV, WebM, M2TS, H.264, HEVC any other video formats.
Step 3: Click on the "Edit" button to enter the editing interface, where you can trim, crop, add subtitle/watermark, rotate as you like.
Step 4: Hit the "RUN" icon on the lower right corner, you will get your edited videos after a few minutes.