
Apple gives a detailed guide on Finder for newbies, however, it doesn't mention Finder's compression utility that enables users to reduce video file size on Mac and shrink videos and folders to a zipping archive without quality loss. If you get huge videos or video folders but limited storage space or you need to downsize videos for faster emailing, sharing and downloading, try Finder before you resort to other video applications for macOS. Mac tips and tutorials are our bread and butter. From start to finish, here's our guide on how to compress video with Mac finder easily.
Option 1. Resize Videos with Mac Finder via Encode Media Dialogue
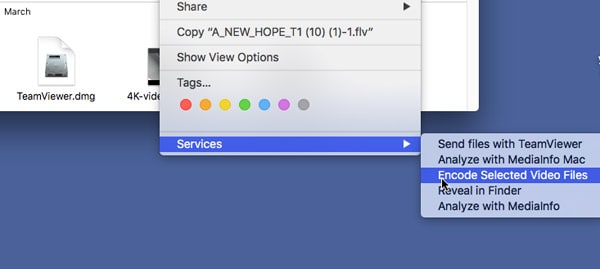
Step 1. Open Finder and Select A Video
Click the Finder icon in the Dock, a window appears, then find the video file. Right-click the video, select "Encode Selected Video Files" at the bottom of the pop-up menu. You should see the Encode Media dialogue that can work as a free video compressor for Mac and let you resize video in Mac Finder easily. Move Step 2 to do the task efficiently.
Tips: some users pointed out they didn't see the Encode Selected Video Files option. To fix such problem, you need to activate the video file encode option. To do this, go to System Preferences > Keyboard > Shortcuts on your computer, and click Services on the left pane, find Files and Folders, check the boxes next to "Encode Selected Video Files" and "Encode Selected Audio Files", and make the settings valid. Go back to the video file you are going to downsize, right-click it, you should see the Encode Selected Video Files option under Service.
Step 2. Start to Reduce Video Size in Finder
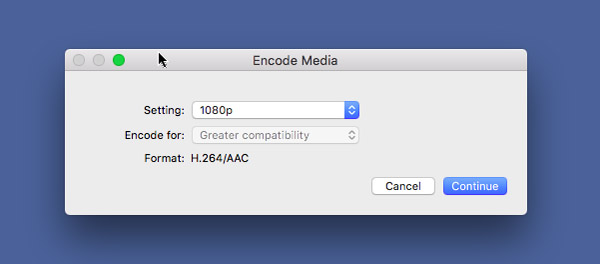
It compresses video file size in Finder of macOS by lowering down video resolution. In the Encode Media dialogue, there are format information, Settings and Encode options. Click Settings drop-down icon, and select your ideal one for out file, 480p, 720p, 1080p, Audio Only or Apple ProRes. You can convert 4K UHD to 1080p/720p, or shrink 1080p to 720p/480p, or extract audio from video to make output video file smaller.
Click Encode drop-down menu, select Greater compatibility instead of High quality to reduce video file size in Mac Finder. It's a trade-off between video file size and video quality. Then click Continue to close the dialogue and the process with Mac Finder begins. There's no process indicator. After the task is completed, open the folder you save the file in and check the video file size.
We compressed a video with 2160p to 1080p and the file size was reduced by 80.27%. According to our test, the compression speed was fast, output video played smoothly and image quality was acceptable. Below is our test result.
Input Video: 148MB, 23s, 3840x2160, MPEG-4, AVC, AAC audio, 51.9Mbps, 29.97fps.
Output Video: 29.2MB, 26s, 1920x1080p, MPEG-4, AVC, AAC Audio, 10.1Mbps, 29.97fps.
Option 2. Compress and Zip Video Files/Folders with Mac Finder
You can make videos much smaller for faster emailing, sharing and downloading by zipping files or file folders with Finder on Mac. Read our tutorial below to learn how to get started. It's quite simple and speedy.
Step 1. Open Finder and Choose Videos or Folders
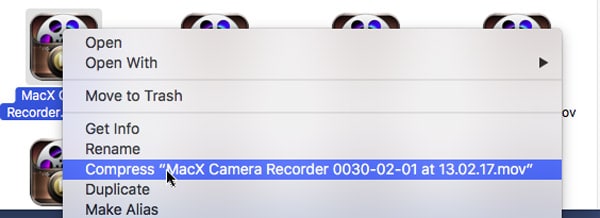
Choose the video or folder in the Finder on Mac, right-click the video or folder.
Step 2. Begin video progress
Select Compress (file name), and the Mac will do the remaining work. This can be done quickly, and you'll find your video ends in .zip.
Troubleshooting: 1. Can't find the "Compress" option
Some users feel confused that the pop-up menu doesn't have the Compress option when they right-click a video file. Note that you won't see the option if you select a dynamically created video, for example, a video in All My Files. Or if you have a video file or folder with .zip, you can't zip and reduce it again. Also, check the permission settings if you can't zip video with Mac Finder, select the video, go to File > Get Info> Sharing & Permissions and click the pop-up menu next to users name to check the permissions settings.
2. Zipping file doesn't change the size
It's normal that you compress video files into a zip archive with Mac Finder but find the zipping doesn't make file size much smaller. This could happen if the source video file or folder is already reduced or encrypted.
Finder Doesn't Satisfy You? Here's A Professional Video Compressor for Mac
It's easy to shrink video file size with Mac Finder, but compression options are limited to lowering down the resolution. Macxvideo AI is a nice choice for users who want a more advanced tool to replace Finder.
What makes MacX outshine other competitors is "98%" - it is able to shrink video size by up to 98%, and 98% of original quality can be reserved after reduction, thanks to optimized compression algorithm and High-Quality Engine. Compared to video reduction with Mac Finder, the software offers a wide range of options to resize videos without noticeable quality loss, such as trimming, cutting, converting codec formats, adjusting video resolution/bitrate/aspect ratio, and more. Click the Download button below to get it shot now.


Candice's particularly skilled in writing and sharing video-related contents. Her guides cover from deep-seated video/audio parameters, to media entertainment on different platforms. She also enjoys shooting and processing videos by herself for a more reliable basis of informative info with her articles, which are never at the expense of eliminating an entertaining read.


