
Q: When I upload a video to instagram it comes out very poor quality and blurry. Before I post it, it is in high quality on my phone and is perfectly clear. Is there a way to fix this? To make the video on Instagram just as clear as on my phone? - From GoPro Forum
Sharing videos on Instagram has become a vital part of people's live. But things always go wrong owing to the large file size especially for HD or 4K ultra HD videos. So to upload a HD video to Instagram, the first thing comes to process and compress videos for Instagram, which is not confined to reducing the video file size, but also changing the format/codec, adjusting resolution, frame rate, bit rate etc., and editing videos. It means that is essential to grab a Instagram video compressor to make HD video available for Instagram.
Instagram Ruins Your Video Quality After Uploaded?
 Shrink it without quality loss through Macxvideo AI!
An excellent Instagram video compressor to transcode video format, narrow video resolution, bitrate, frame rate, and crop or trim the length of video to make it finally acceptable for Instagram, but no quality loss.
Video Upload Technical Requirements for Instagram
Before you shrink HD video for Instagram or Instagram Story, it's fatal to learn about the requirements for Instagram video uploading. Here is the specific demands for sharing videos on Instagram.
- File Size: Maximum of 4GB
- Duration: 3 seconds to 60 seconds
- Video Formats: MP4 and MOV.
- Frame rate: 30fps max
- Audio codec: AAC, 128kbps is best for Instagram.
- Resolution: Maximum 1920×1080 pixels, Minimum resolution goes 600×315 pixels for landscape, 600×600 pixels for square, and 600×750 pixels for vertical video.
- Bitrate: No limit to bitrate file if you're using two pass encoding, as long as your video doesn't exceed 1GB. Otherwise 8 megabits per second for 1080p and 4 megabits per second for 720p.
- Aspect ratio: Landscape (1.91:1), Square (1:1), Vertical (4:5). 1:1 Square video at 1080×1080 pixels is commonly used.
Then, what the best video setting for uploading to Instagram?
The best video format for Instagram upload is MP4 with H.264 codec and AAC audio, 3,500 kbps video bitrate, 640 × 640 pixels resolution.
Compress video to the best Instagram video settings>>
How to Shrink Video for Instagram with High Quality
Actually, if you have a video that meets all the requirements for Insta except in higher resolution like iPhone 4K video, you'll find it looks blurry since Instagram will shrink the file and lower the quality in the background as soon as you upload it. In order to keep the excellent quality of your video, you need a software to compress video for Instagram uploading.
Macxvideo AI is featured to compress and process videos for Instagram, involving various ways:
- Change large footprint format to Instagram video format, like MKV to MP4, MTS to MOV, and transcode video to H.264, VP9 from HEVC, MPEG4 etc.
- Downscale video resolution to 640p from 720p/1080p and even 4K without losing quality, lower bitrate to 3500kbps and reduce frame rate to 29.96fps.
- Trim the length of video to make it no more than 60 seconds, and crop the pixel dimension to finally reduce the video file size for Instagram.
Better yet, this Instagram HD video shrinker processes and compresses MP4 video in an incredible fast speed but highest quality reserved in the efforts of multi-core utility, Hyper-threading tech and High-Quality engine. If you happen to have a i5 or i7 processor on Macs with Intel QSV hardware acceleration built in or a hardware accelerated graphic card like Nvidia GeForce, AMD Radeon™ HD 7000 Series or better, MacX will speed up the Instagram video size reduction up to 5 times faster.
Step by Step Tutorial to Compress Video for Uploading to Instagram
Step 1: Free download Macxvideo AI & add video to the program.
First, free download the program according to your platform, then install and open it.
Free download Mac version (macOS 10.15 or above supported)
Free download Windows version (Windows 11/10/8.1/7)
Click on the + Video to add your desired videos. Or you can also drag-n-drop the target video to program window. Adding several videos for batch compression is available as well.
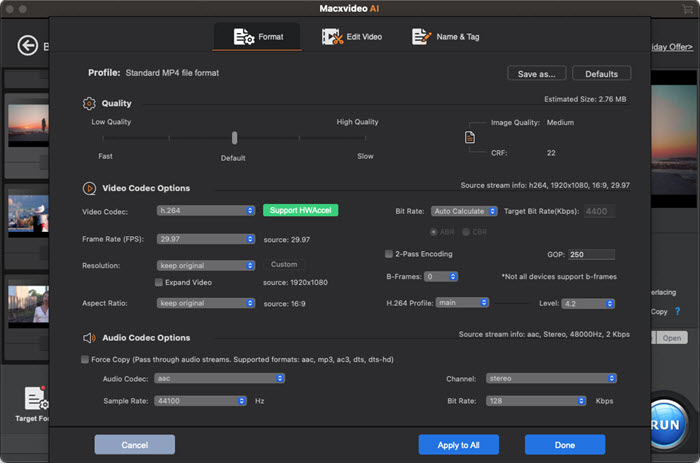
Step 2: Choose output format.
Tap General Profiles, the choose MP4 Video (h264+aac) and click Done button to select video format for Instagram. Or you can choose MOV as output format as well in the same way.
Step 3: Lower video resolution, bitrate, frame rate, and aspect ratio.
Click on the ![]() icon to adjust the parameters of video. According to the best settings for Instagram video uploading, you can compress video as follows:
icon to adjust the parameters of video. According to the best settings for Instagram video uploading, you can compress video as follows:
Click the Keep Original frame box next to Frame Rate and choose 29.97fps from the drop-down list, similarly choose 640p resolution, 16:9 aspect ratio and 3500kbps bitrate if it's in VBR mode.
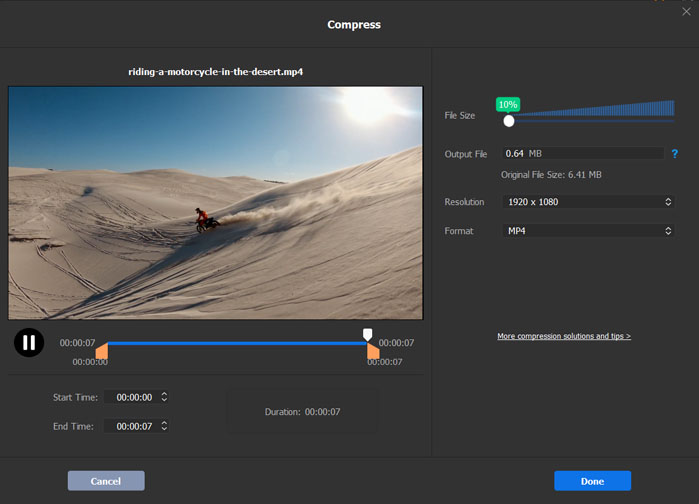
Step 4: Trim the length of video and resize the pixel dimensions.
Click on  button to get ready for video trimming and crop. Click Trim and check on the box of Enable Trimming to set the Start/End time of the video. Please note that your video should be no more than 60 seconds. As 1:1 Square video is commonly used, you need crop the video to 1:1 aspect ratio simply through clicking on Crop & Expand and Enable Crop. Then you're able to choose 1:1 aspect ratio from the Crop Presets, or you can also type in the specific position of your shear box on the video picture to customize it to 1:1.
Step 5: Start Instagram video compression now!
Tap RUN button to start procession video shrinking for Instagram. A blink of an eye, or no more than a second your video processing will be accomplished. After all the output video is veritably short and small in size.
Transfer compressed video to mobile and upload to Instagram
Now that you have learnt how to compress video files and get a shrinked Instagram mobile file, you will need to transfer the video to mobile. For Mac or PC/iPhone users, the best way is to use MacX MediaTrans. For Mac or PC/Android users, programs like Google Drive and Dropbox are nice options.
![]() A Guide to Transfer Videos from Mac to iPhone
A Guide to Transfer Videos from Mac to iPhone
After you finally made it, it's time to upload the video.
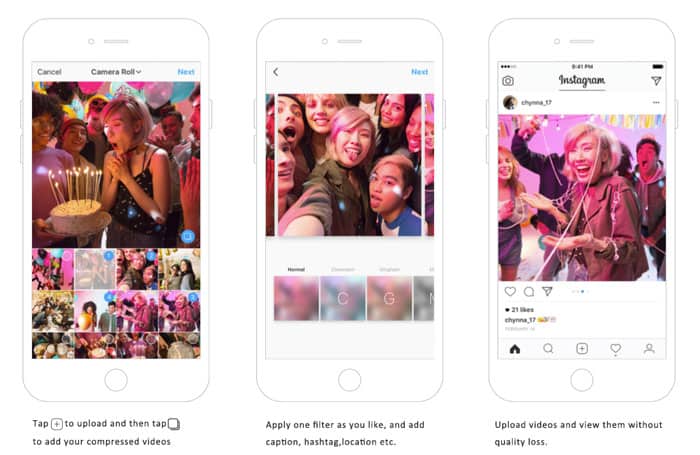
- Open the Instagram App on your mobile phone.
- Tap on the Add icon on the lower middle position.
- Go to Gallery to pick up the video file you've narrowed and transferred just now.
Note: Instagram defaults to 1:1 aspect ratio. If you want to post a 16:9 aspect ratio video, you need tap the Crop button to change it to 16:9. Meanwhile, you're able to make some editings and add hashtag, location, caption etc. for your video as well. Just tap the blue arrow, add a filter if you like, change the cover image, and/or mute the video. Or tap the blue arrow to add a caption, hashtag, location. Finally tap the check mark to as you're done.


Candice's particularly skilled in writing and sharing video-related contents. Her guides cover from deep-seated video/audio parameters, to media entertainment on different platforms. She also enjoys shooting and processing videos by herself for a more reliable basis of informative info with her articles, which are never at the expense of eliminating an entertaining read.


