How Do You Compress Large 4K/HD Video on Mac? Find Answers Here
The importance of data compression cannot be overemphasized too much. It has a direct impact on the user experience and transmission cost. For example, you will spend 11min uploading a 7s raw video at 10 Mbps data transmission speed but the transmission time will be decreased to 500ms when the raw video is compressed with H.264. This is not the end, a video in raw form make storage costly. The compression using same codec will greatly reduce the number of bits required to represent the video from 817 MB to 708 k.
Given a high demand on media compression in anticipation for a faster media transmission and less space occupation, this guide will explain everything regarding to video file compression, from the exact file size each video takes up to the trustworthy video compression software.
Best Tool to Compress Oversized 4K/2.7K/HD Video on Mac with No Quality Loss Visually
Macxvideo AI is a professional video converter and compressor that can make video to 90% smaller automatically and manually with maximum image quality kept. You can convert among 200 video formats, and reduce video size by tweaking compression ratio, video length, resolution, bit rate, codec, frame rate, and more to suit your Mac, iDevice, Android, social sites and more.
Macxvideo AI is for macOS, while Winxvideo AI (from our WinXDVD brand) is for PC.
Table of Contents
Part 1. Why Is File Compression Important
Videos are great but they can also cause headaches. Here are some scenarios:
• You were once crazy about your birthday gift GoPro Hero and shot massive extreme sports footages, which easily steal away your hard drive space and slow down your computer but you are unwilling to delete them at all.
• You did some content creation with your DJI P4P when travelling in England but found it too big to email your grandpa and even run into choppy or broken up playback when viewing it because it is oversized.
• You just want to share a funny video of your 5-month baby from your iPhone but it took you hour to upload to YouTube and even stuck.
• You scored some memorable moments for your graduation ceremony using a Canon 4k-enabled camera, but what's frustrating is when you try to send them to your friend via whatsapp, it prompts a message of too large file size.
No more bothering. Compressing video will solve all the problems. It can:

Maximum storage space of hard drive/mobiles/cloud service
File compression reduces the amount of space required to store the video data. This is especially beneficial if you have a space-constrained mobile device. For example, a 64 GB iPhone will hold a 4K UHD video as long as 5 hours when compressed using HEVC codec, but less than 2 minutes for uncompressed raw video will devour your iPhone's space. Deleting the video is a temporary solution while using video compression to resize video will solve the problem once and for all and therefore make more room to store more videos.
Follow the guide if you want to free up some space on iPhone >>
Send video via Email, Whatsapp, etc with no size limit
Almost all email systems put limitations on the video size attachments. For example, Gmail and Yahoo only allow for 25MB video sending while Outlook and iCloud mail impose a limit of 20MB per video. If the video exceed the limitation, it will be slow, require you to upload to Google drive, and even receive an error message. So compressing video to reduce the amount of data to reasonable size will make it easy and quick to transfer via mail.
Click to learn how to compress and send large video over email >>
Upload video online as fast as possible
The size of the video plays a decisive role of the amount of the time it takes to distribute over the internet. Generally, the upload speed is around 1.5 mb/s. You can also test your internet connect and find your upload speed with speedtest.net or testmy.net. Accordingly, the amount of time required to distribute over the internet at 1.5mb/s bandwidth will be calculated as follows:
- A reasonable 500 Mb video will takes around 5min33s to upload online;
- A 1 Gb video will consume 11min22s for distribution;
- A large 1.5 Gb video will need as long as 17min4s.
Note: The internet connection is not as exactly as your expect. So the upload time will float up or down. So you are for sure unwilling to waste your time in uploading. By downsizing the large video into a smaller one, it will greatly reduce the amount of time it takes and lower the bandwidth required to transmit the data.
Follow the guide to compress and upload big video to YouTube >>
Play videos on whatever device screens flawlessly
There are times you cannot play videos on your mobile phone or tablet successfully, even though your gadget supports FHD video resolution and various video formats. Chances are some video files you want to view are from camcorders, online sources, to name a few. They are shot at different settings, e.g. the video resolution goes beyond your device screen, the bit rate is as high as 1000 Mbps which, as a result, ends up being queerly large size and quickly chews up your device storage space. This is why you need to resize video and rescale the video dimension in such a way to decrease the video size and fit your device's display properly.
Archive and backup videos fast and easily
Backing up and transferring videos from one computer to another is as easy as copy and paste. But if the videos are several gigabytes in size, to compress the video files will greatly save your time and thus save storage space. Besides, the compression involving in video format transcoding will also ease the process from Windows platform to macOS computer.
Wanna backup video between iPhone and Mac, here is the tips >>
Part 2. Do You Know the File Size of Your Video?
Peoples' zeal for immersive media viewing experience leads to the rapid development of 4k Ultra HD. It gradually permeates in every aspect whether it is 4K UHD television, broadcasting, online video transmission, mobile device, camcorders or IP camera systems. However, the video content in 2160p will quickly devour your hard drive, and therefore, 4k videos are tagged with space-hogging and heavy bandwidth consumption, even though there are significant gains in storage, internet bandwidth, and processor technology nowadays. Despite manufacturers such as Apple, GoPro, DJI, Microsoft, etc successively applies the advanced video compression standard such as HEVC for the large UHD video, the amount of data is still striking and asks for high computation required for rendering and processing the data, especially when the length of video data reaches to hours. E.g. some iPhone users reported "The operation couldn't be completed" with an error code 9937 when trying to export a 10G 1hour video. So do you know the exact video file size you shot? Take a look at how big the size of video.
How Much Space Does a 1 Minute Video Take Up?
File Size of H.264 Video per Minute |
||||||||
Resolution/Frame Rate |
iPhone |
GoPro Hero |
DJI P4P |
Canon |
FDR |
Panasonic |
Olympus |
JVC GY-HM170UA |
4k 60fps |
/ |
/ |
750MB |
/ |
/ |
1.098GB |
/ |
/ |
4k 30fps |
350MB |
450MB |
750MB |
2.23GB |
750MB |
750MB |
765MB |
1.098GB |
4k 24fps |
270MB |
450MB |
750MB |
1.5GB |
750MB |
750MB |
765MB |
1.098GB |
Slo-mo 1080p 240fps |
480MB |
Not Support |
||||||
Slo-mo 1080p 120fps |
350MB |
450MB |
750MB |
Not Support |
||||
1080p 60fps |
175MB |
225MB |
600MB |
375MB |
375MB |
1.46GB |
390MB |
375MB |
1080p 30fps |
130MB |
225MB |
450MB |
262MB |
375MB |
1.46GB |
225MB |
375MB |
720p 30fps |
60MB |
185MB |
225MB |
/ |
22.5MB |
/ |
135MB |
/ |
- Note:
- [1]. The iPhone and GoPro Hero let you shoot 4k 60fps video in HEVC to save storage space.
- [2]. The table just shows the maximum file size of the video at each of these resolutions and frame rates it takes up per minute.
- [3]. The size of video recorded by Samsung, Huawei, security cameras and any others will be coming soon. We will keep updating this sector.
How Long a Video Will Devour Your Memory Space?
From the above table, we can calculate and get some approximate figures.
For 4K UHD video
- 1. Around 30-45min iPhone video will engulf the 32Gb iPhone and 1h48min-2h42min footage will max out the 64Gb iPhone (44Gb available space).
- 2. The 64Gb SD card can accommodate the 4k GoPro video within the length of 2h25min.
- 3. Terribly 28 minutes will clog up your 64 Gb memory card when the UHD video is shot with Canon XC10 but 2 hours for Panasonic 4K camcorders.
- 4. The 64Gb SD card will be exhausted with a 1h27min 4k footage recorded via DJI P4P or Sony FDR AX100.
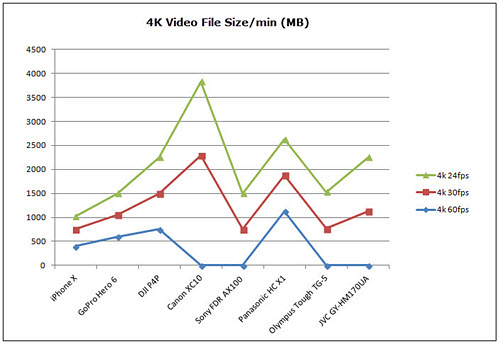
The graph on the right side explains the exact file sizes of the 4k videos each the phone or camcorder shoots based on different frame rates.
See more 4k video size >>
For 1080p FHD video
- 1. The maximum video length for a 64Gb iPhone goes to 5h48min when recorded in 1080p 30fps.
- 2. Maximally 4h41min 1080p video at 1080p 30fps by GoPro will eat up the 64 Gb memory space.
- 3. JAV, Panasonic and Olympus with 64Gb memory card can shoot a video around 3 hours in 1080p.
So you might be as well get some questions. Why the 4k video shot by Canon is almost 2.8x as large as iPhone video in 4k resolution? What could be the cause that the file sizes vary greatly even when the videos are shot at the same resolution? Check the next chapter below.
Part 3. What Affects Video File Size?
Before we go further into the file size section, there is a formula you should know:
Time (second) x Bitrate (kbps)/8 =Video Size (kb)
For instance, the file size of a 90min 720p H.264 video at 3.4Mbps is equal to: (90x60) x (3.4x1024)/8=2350080Kb = 2295Mb = 2.24 Gb
Note: A video file comprises both image and audio, which use different bitrates respectively. So the bitrate in the formula refers to the sum of audio and video bitrates ; 1 Kb = 1024 bit, 1 KB = 1024 Byte, 1 Mb = 1024 Kb, 1 MB = 1024 KB, 1 Byte = 8 bit, 1 MB = 8Mb, 1 Mb = 0.125 MB.
What Can We Learn from the Above Formula: From the above formula, the decisive factors affecting the video file size are the bitrate and length of the source video. However, the bitrate vary with resolution and frame rate to some extent. Besides, there are still some factors give an indirect impact on the amount of data needed for representing the video, including the type of media format, color depth used in the image, sampling rate, video codec, and even subtitles. Below are the details.
1. Video Length Decides the File Size
It's beyond all doubt the video file size can be guesstimated based upon the length of the video. Longer video file will make a direct contribution to larger file size. Generally, cutting down the video length and removing the unnecessary segment of your video will help to resize the video to a smaller one. For example, a FHD MP4 video at a length of 2:34:23 will downsized from 5.9Gb to 5.6Gb when 9min video segment is removed from the source content. This is also a good way to shrink video size without causing quality loss.
Wanna cut/trim video to reduce file size? Check the answer >>
2. Lower Bitrate Brings Smaller-Size Video
Video goers may be not strange with the bitrate. Here are statistics - YouTube encodes videos with VP9 at a bitrate of 18Mbps, Netflix requires 15Mbps for H.265 video encoding, Comcast broadcasts video with H.265 at a bitrate of 18-22 Mbps. So what is Bitrate? Does it have something to do with the video file size? Can you compress and resize video by adjusting the bitrate. Here is the answer.
Bitrate is the number of bits per unit of time during data transmission. It's symbol of bit/s. It plays a decisive role in video quality during video compression. Bitrate involves in CBR (constant bitrate) and VBR (variable bitrate). The former keeps the bitrate the same during video encoding, which is helpful in multimedia streaming and processes data faster than VBR. However, CBR is on the hip for the quality instability of the encoded content, whereas VBR is effective especially when the content to be encoded contains both simple and complex areas, such as the video switched between fast motion and slow motion. Thus, video encoded with VBR is smaller and even half of the file size, and outputs better quality at the same file size. However, it consumes more time to encode video compared with CBR.
Generally a higher bitrate means a less media compression ratio, which accordingly accommodates higher image quality in the video output. But bitrate is proportional to the video file size. So lowering the bitrate will greatly cut down the video size, this being considered as a great way to compress video for small size purpose. (see how to change video bitrate to shrink video size >>)
 Does Highest Video Bitrate Give Rise to Best Result?
Theoretically, it is. However, when the bitrate rises to a certain extent, going beyond what our naked eyes can distinguish, there is almost no quality difference. So when setting the bitrate to reduce the video size, it has the optimal value. Here is the recommendation with H.264 codec in accordance with the video resolution.
- • Supposing the video resolution goes to 1280x720p, the bitrate is preferably 3500Kbps.
- • When the video resolution reaches to 1920x1080p, set the bitrate at 8500Kbps. But some reaches to 30mbps, take MKV H.264 for example.
- • If the resolution of the video is 3840x2160p, the bitrate shall be optimized to 15-20Mbps.
- • For the HEVC encoded video, the bitrate can be around 10-15 Mbps.
Note:
1. Upping the bitrate disproportionately will increase the amount of data, thus wasting the memory space.
2. Decreasing the bit rate improperly may produce awful video quality.
3. If the video source is bad, no matter how you improve the bitrate, the video quality will not be elevated, but the file size will increased.
3. Advanced Codec Downsizes Video File
There are many video compression technologies, including H.261, MPEG-1 MPEG-2, H.263, MPEG-4, H.264, and the newer VP9 and HEVC, among which H.264, VP9 and HEVC are the most popular.
• H.264
H.264 is also known as MPEG-4 AVC or MPEG-4 Part 10, which uses CAVLC and complex CABAC (15% higher than CAVLC in the compression ratio) to remove coding redundancy. It applies interframe coding to eliminate temporal redundancy and intrafram coding to get rid of spatial redundancy. YUV420 is adopted to efficiently represent color images. H.264 offers good video quality and substantially lower bitrates of 50% compared with its previous MPEG-4 Part 2, H.263 and MPEG-2. As of 2014, H.264 is one of the most commonly used video file compression formats for recording, distributing and compressing video contents. It is popular as the video encoding standard for Blur ray Discs, used for low bitrate video streaming over Vimeo, YouTube, iTunes Store, as well as HDTV broadcast. Read more: how H.264 outperforms MPEG4 >>
• HEVC
HEVC is the successor of H.264. HEVC resembles H.264 in terms of coding frame, in which transform, quantization, interframe prediction, intraframe prediction, etc also exist but brand-new encoding technologies are applied to improve the compression efficiency. It is the best video compression standard for 4K and even 8K UHD. HEVC format is available in some camcorders like the newer GoPro series, iPhone with iOS 11 or later, Mac computers, Windows 10/11, and even some video encoder software such as VLC, Handbrake and Macxvideo AI.
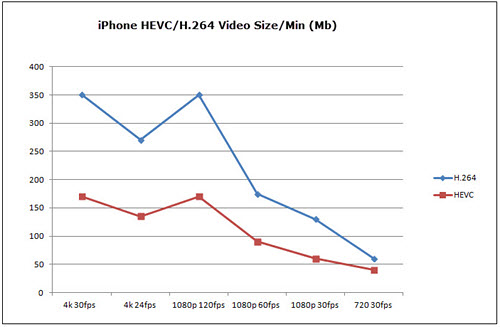
Compared with H.264, HEVC further doubles the data compression ratio - dramatically improve the video quality at the same bit rate or halve the video size at the same level of video quality. A 1 min MOV video recorded with iPhone will take up different storages when encoded with H.264 and HEVC, for example
- • It takes up 350Mb in H.264 but 170Mb in HEVC when the video is shot at 4k at 30 fps
- • It takes up 175Mb in H.264 but 90Mb in HEVC when the video is shot at 1080p at 60fps.
Take a look how HEVC outperforms H.264 in video size at each of the resolutions and frame rates Apple iPhone uses.
Tips: Compress iPhone 4K H.264 for smaller size
• VP9
Like HEVC, VP9 is another new video compression format that achieves 2x compression ratio gain compared with its predecessor VP8. The open and royalty-free format acts as a competitor against HEVC. VP9 is mainly used on Google's YouTube, which makes a sense YouTube doesn't include HEVC support. This pose a great problem when uploading a 4k UHD video if it is not encoded with HEVC, as the file size will easily exceed 128Gb that YouTube requires. Read more: VP9 vs HEVC
These video coding formats mentioned above involve in process of compression and are used to reduce the spatial, temporal, visual and coding redundancies in such a way to bring less amount of data and bandwidth saving. So by converting the video from older codec to advanced video codec like HEVC, the data in the video is rearranged in a more efficient way, thus the file size will therefore decrease. For example, you can just compress large 4K/HD videos by changing the video codec to the advanced one, such as H.264 to H.265, if your computer is well configured.
4. Do Resolution and Frame Rate Really Matter?
Resolution is a measure of the size of the pixels. Videos can be categories into SD, HD 720p, FHD 1080p, 4k and 8K UHD nowadays when it comes to resolution. Whereas frame rate refers to the frequency (rate) at which consecutive images called frames appear on a display. Most videos are presented at 24 or 30fps while 60fps is widely available for its life-like experience. The higher the number of frames, the smoother the video will display. But there is the real fallacy: video of higher resolution and frame rate will need more data to store more pixels and more data will be needed to accommodate the frames, thus resulting in larger file size. Is it the truth?
According to Gopro, a 4k 30fps video has a bitrate of around 60 Mbps but a 720p 120fps video owns only 30 Mbps. That's why you get a bigger video with higher resolution.
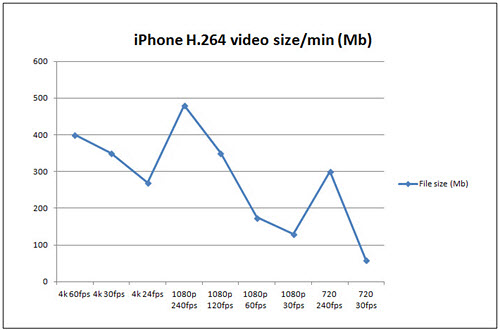
Here is another proven fact with iPhone H.264 video. From the image shown on the right side, we can clearly see that size of 1080p 240fps video is up to 480 Mb, 80 Mb larger than that of 4K UHD 60fps video. The former has a bitrate of approx. 64 Mbps while the latter is just 53 Mbps.
As a matter of fact, video resolution and frame rate have nothing to do with the size and quality, what matters most is the bitrate and video length. Bitrate increases along with the video resolution and frame rate in order to have the best video viewing experience. So we'd like to say both they play an indirect role in influencing the file size, rather than a direct determinant. Tests show the file size will be decreased slightly from 5.9Gb to just 4.5Gb when the video resolution is lowered from 2:34:23h FHD 1080p to 720p. And lowering the frame rate doesn't give any video size reduction at all.
5. Does Video Format Affect Size?
The container is also referred to as wrapper format that holds the video data, audio data, subtitles, and metadata of the video file. Most known formats include MP4, WMV, FLV, MKV, AVI, MOV, WMV,WebM, etc. MVK and AVI are popular for high quality but consume much space, whereas FLV, WMV and MP4 manage to offer smaller video file. For example, an uncompressed AVI will occupy as much space as 272 Mb but the FLV and MP4 only need more than 2 Mb to store the video file. The resulting file size also has a direct relationship with the bitrate. So it's a good way to convert video to MP4 at a lower bitrate with a video transcoder if you need to compress a video file.
Part 4. How to Compress Video for Different Purposes
Now you understand compression involving in changing video settings is bound to video quality degradation, dependant on the video source itself, bandwidth required, codec used, quality of the output video you desire, bitrate and frame rate needed, playback platform, and many more. What matters you most is how can you get a great ratio of size to quality, without getting involved in these obscure industry-specific terminologies too much. So all you need is to pick the right software to do the task. Macxvideo AI deserves to be mentioned.
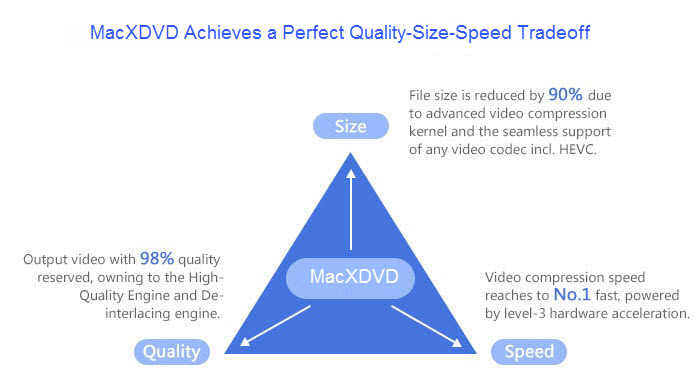
Unlike common video compressor for Mac that processes video slowly, gets output file even larger than before, or makes resulting content quality awful, Macxvideo AI successfully compresses video fast and easily with perfect balance between size and quality. This is achieved owning to:
- 1. Level-3 HW acceleration support for video decode/encode/compress/transcode/edit, accelerating video processing speed to a new level;
- 2. Preset profiles for web, mobile phones, tablets, gaming systems, etc, easing video shrinking process without needing to know settings.
- 3. Built-in 370+ codecs and formats including the most advanced HEVC, H.264, MPEG-4, MP4, MOV, WMV, etc.
- 4. Resize video without compromising output quality and ensure 98% quality reservation.
Take a look at the detailed tutorials below and see how Macxvideo AI performs.
Tutorial 1: How to Compress and Resize Video for Uploading Online
Prior to the guideline, you need to know the maximum video file size and time duration the social medias will accept.
Social Medias |
File Size |
Duration |
YouTube |
No bigger than 128 Gb |
No longer than 12 hours |
No bigger than 15 Mb |
No longer than 60 seconds |
|
No bigger than 10 Gb |
No longer than 240 minutes |
|
Dailymotion |
No bigger than 2 Gb |
No longer than 60 minutes per video |
No bigger than 16 Mb |
No longer than 3 minutes |
|
Vimeo |
No bigger than 500 Mb per week for Basic account |
No video length restriction |
Generally, 1-hour iPhone 4k video will consume a memory space of approx. 20Gb and the content shot by GoPro in 4K will suck up around 26Gb at the same length, greatly exceeding the limits imposed by all the social media sites or services mentioned above. So to resize and shrink video for YouTube, Vimeo and more is imperative. But how to compress video with the best settings for online upload. Here we take compressing video for YouTube as an example.
Step 1: Free download Macxvideo AI on either Mac or Windows as per your need.
Step 2: Click Video on ther interface to enter into the video compression window. Then load the source video by tapping the + Video button.
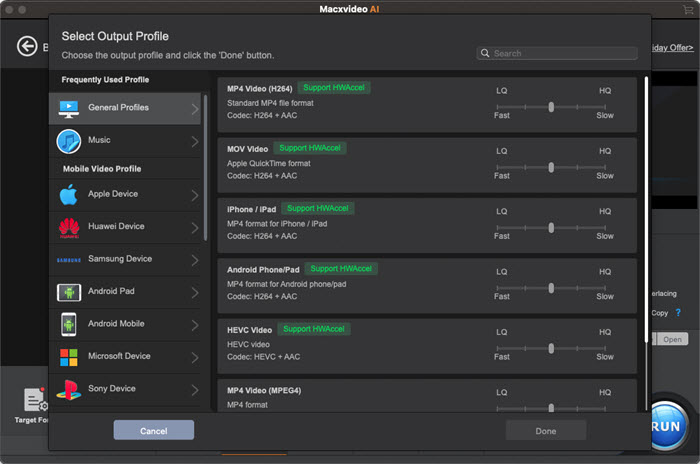
Step 3: Once the program scans the video information, an output profile window pops up asking you to choose the specific. Select MP4 from the formats menu at the bottom of the interface. Or you can scroll and find the Web Video Profile > YouTube Video > MP4. Just leave the parameters unchanged, be it bitrate, resolution, frame rate or so, since the Macxvideo AI's development team already preconfigured the settings that ensure the best size-quality ratio.
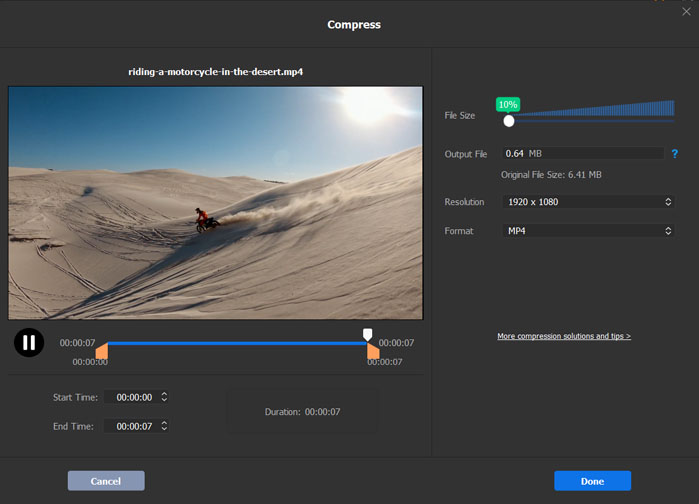
Optional: Go to the Toolbox and select "Compress", Enter your desired target file size, or adjust the slider to set the compression ratio anywhere from 10% to 100%.
We know YouTube compresses videos too much, resulting in extremely compromised video quality. For example, it compresses to 2160p with H.264 video at a bit rate equal to 18Mbps and shrinks 1080p video at a bit rate around 2.804 Mbps in order to maintain a smaller file size. But this is achieved at the expense of unbearable quality loss.
Here are some suggestions of the best video compression settings for YouTube upload, if you are willing to do some complex settings.
1. Transcode the video to MP4 H.264 if the video recorded is encoded in other format.
2. The recommended audio codec is AAC-LC with bitrate and sample rate reaching to 128kbps for Mono or 384kbps for Stereo, 512kbps for 6.1, and 96khz or 48khz, respectively.
3. Remain the frame rate unchanged. But make sure to deinterlace the content if it is recorded at interlaced fields per seconds. For example, you need to do a video processing to deinterlace the 1080i60 to 1080p30 to get progressive frames.
4. For HDR and SDR uploads, here are the specific video bitrate in accordance with your video resolution.
For SDR uploads at a frame rate of 24-30fps:
Recommended bitrate for 4K video is: 35-45 Mbps >
Recommended bitrate for 2K video is: 16 Mbps >
Recommended bitrate for 1080p FHD video is: 8 Mbps >
Recommended bitrate for 720p HD video is: 2-5 Mbps >
For HDR uploads at a frame rate of 24-30fps:
Recommended bitrate for 4K video is: 44-56 Mbps >
Recommended bitrate for 2K video is: 20 Mbps >
Recommended bitrate for 1080p FHD video is: 10 Mbps >
Recommended bitrate for 720p HD video is: 6.5 Mbps >
5. YouTube prefers to use aspect ratio 16:9, make sure to adjust video resolution to fit the YouTube player. Or else, you will get black bars or cropped, stretched videos during playback.
The recommended resolutions are: 2160p: 3840x2160, 1440p: 2560x1440, 1080p: 1920x1080, 720p: 1280x720, 480p: 854x480, 360p: 640x360, 240p: 426x240.
If the videos you shot with your camcorders, cameras don't match with the resolutions above, please up or lower the resolution according to the list.
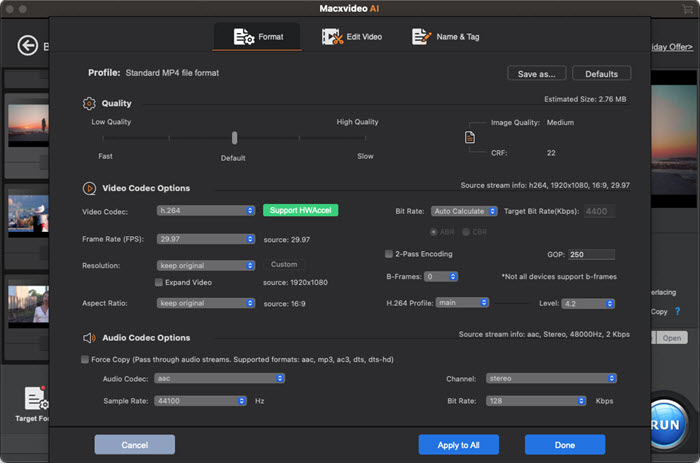
Step 4: Click the cogwheel button on the main interface and tweak the parameter settings according to our suggestion.
Step 5: Tap on the Edit button to activate the video cropping and trimming features. This is helpful to do some video size reduction to some degree with almost no quality loss.
To crop the video to remove the black bars and suit YouTube's 16:9 player: Choose Crop & Expand > Enable Crop > Choose Crop Presets:16:9 > click Done. You can also drag the border at the left of the preview window, or up or down the Left and Top position, or the Width and Height value according to your needs.
To trim the video to remove the unwanted parts and cut down the file size: Click Trim > Enable Trimming > set the start time and end time as per your needs or drag the slide bar in the preview window >click Done.
Step 6: Click RUN to kick off the video processing. Hardware processing will be enabled automatically for a faster video file compression, if your computer is equipped with Intel® HD graphics GPU or Nvidia NVENC GK107 chip or higher.
Detailed guide: How to compress video for YouTube upload >>
Check the media compression ratio performed by Macxvideo AI (The test result doesn't include trimming or cropping).
Macxvideo AI's video Compression ratio: 26:1
|
||||||||
Social Medias |
iPhone MOV Video
|
Output File |
||||||
Length |
23s870ms |
23s870ms |
||||||
File Size |
148 Mb |
7.01 Mb |
||||||
Bitrate |
51.9 Mbps |
2466 Kbps |
||||||
Resolution |
3840x2160p |
1280x720p |
||||||
Frame Rate |
30fps |
30fps |
||||||
Video Codec |
AVC |
AVC |
||||||
Audio Codec |
AAC LC |
AAC LC |
||||||
Computer specs: 27-inch iMac (OS X Yosemite), 2.7 GHz Intel Core i5, 8GB 1333 MHz DDR3, Graphics AMD Radeon HD6770M 512 MB. |
||||||||
Tutorial 2: How to Compress iPhone MOV Video on Mac to Maximize Memory Space
Normally, a 30-min 4k 60fps video will devour the 32Gb iPhone, the video at the length of 1h48min can exhaust the iPhone's 64Gb memory space and 4 hours and a half will eat off the 128Gb iPhone space. So there are times you want to compress them to store more videos. Here are the recommendations.
1. Change the video codec from H.264 to H.265/HEVC, if you are using the latest iPhone supporting iOS 11 or other mobiles upgraded to Android 5.0. The HEVC codec will half the video file size with even better quality. See the best HEVC video converter >>
2. Decrease the video resolution to 640x480, which is acceptable by iPhone, and even other mobile devices.
3. Lower the bitrate at a proper value in accordance with your codec, resolution and frame rate so that the video quality will not degraded dramatically. Optimally, you can compress the video to H.264 AVC at 8Mbps or 5Mbps to HEVC, in such a way the video size will be reduced to 1/3 with high quality retained. VBR is preferred for a more efficient video encoding and compression.
Note: Bitrate is suggested to decreased by 20-50% in such a way the video quality doesn't affect too much.
4. There is no need to lower the frame rate as it will give a negative impact on the smoothness with mosaics. But if you own a low-end computer, you'd better lower the frame rate at 24 fps, along with the bitrate and resolution in order to have a smooth playback.
5. Crop and trim the video to cut down the file size by following the above mentioned tutorial.
Below is the video file shrinking and downsizing result using different codecs, resolutions, and more.
Macxvideo AI's video Compression ratio: 41:1
|
||||||||
Social Medias |
iPhone MOV Video
|
Output File 1 |
Output File 2 |
Output File 3 |
||||
Length |
23s870ms |
23s870ms |
23s870ms |
23s870ms |
||||
File Size |
148 Mb |
15.5MB |
12.7MB |
3.58MB |
||||
Bitrate |
51.9 Mbps |
5466 Kbps |
4458 Kbps |
1258 Kbps |
||||
Resolution |
3840x2160p |
3840x2160p |
1920x1080p |
1920x1080p |
||||
Frame Rate |
30fps |
30fps |
24fps |
30fps |
||||
Video Codec |
AVC |
HEVC |
AVC |
HEVC |
||||
Audio Codec |
AAC LC |
AAC LC |
AAC LC |
AAC LC |
||||
Computer specs: 27-inch iMac (OS X Yosemite), 2.7 GHz Intel Core i5, 8GB 1333 MHz DDR3, Graphics AMD Radeon HD6770M 512 MB. |
||||||||
Part 5. Are There Any Other Apps to Compress Video File?
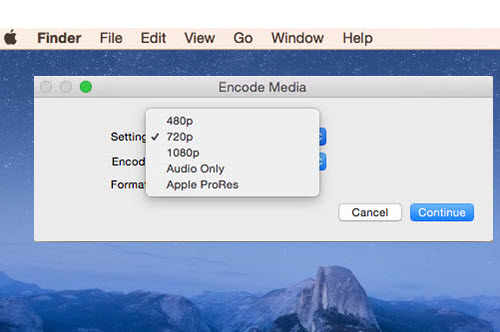
1. Mac Finder
Mac has built-in apps such as Mac Finder. It is the default file manager and graphical user interface shell used on Mac, which not only manage how you communicate with your Mac but also provide some unforgettable additional features such as effective compression of videos. You're free to reduce video file size without installing any third-party software.
Click File > Encode Selected Video Files > Choose the Settings (480p, 720p, 1080p, Audio Only, Apple ProRes) > Decide whether to encode video with Greater Compatibility or Higher Quality > click Continue. The format is going to be M4V, which is only applicable to Apple platform. The end result is satisfactory with file size reduced to 10.6 Mb at 720p, 5 Mb bigger than Macxvideo AI at the same resolution.
Pros:
• User-friendly Interface
• It's fast, easy and free
Cons:
• Output format is only restricted to M4V
• There are limited options to compress video files.
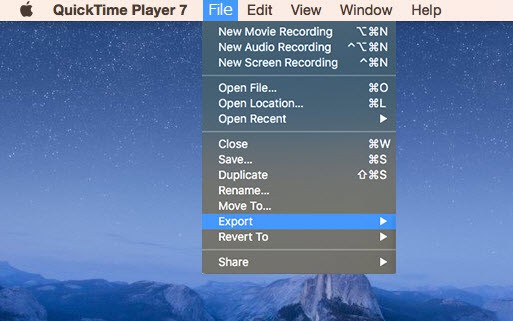
2. QuickTime Pro
QuickTime is another Mac users favored tool offering easy access to video compression. You may watch videos or even make video with Quicktime, if you can reduce video file size with it, there is nothing better than achieving a lot at a stroke. It's suitable to downsize MOV and reduce MP4 file size. QuickTime Pro offers video shrinking feature at the cost of $30, here is the tutorial.
Step 1: Open the video in QuickTime Player.
Step 2: Click File Menu to select Export. This will open a window with several options from various resolution to iPhone iPad devices or iTunes etc. Choose your desired one.
Step 3: Rename your compressed video if you'd like to distinguish between the original and the compressed copy.
Pros:
• Easy to use
Cons:
• QuickTime is primary for MP4, MOV files only.
• It asks for $30 to compress media files.
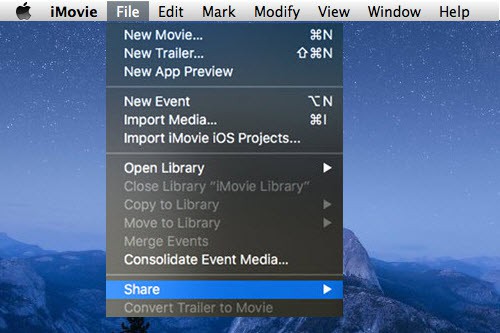
3. iMovie
If you're at a loss on how to compress a video on Mac, you can turn to iMovie, one of the best video compression software on Mac since it's quick, free, and easy to use. This should take your video file and make it about one half its original size or smaller depending on what options you choose later. Here we go for reducing MP4 file size via iMovie.
Step 1: Import your video file into iMovie by clicking the "Import Media" button. This step may be slightly different for different versions of iMovie.
Step 2: Click and drag anywhere on the video strip until a yellow box appears.
Step 3: Adjust the size of the box and drag the selected section of video into the large gray area at the bottom of the window.
Step 4: Go to File > Share > File; Lower resolution and Quality to make a smaller file size; Click Next and name the file; then click Save to end the video files compression task.
Pros:
• Easy to use and free
Cons:
• Get errors such as a file compression error
• Slowed speed
• A mix-up of audio and video files
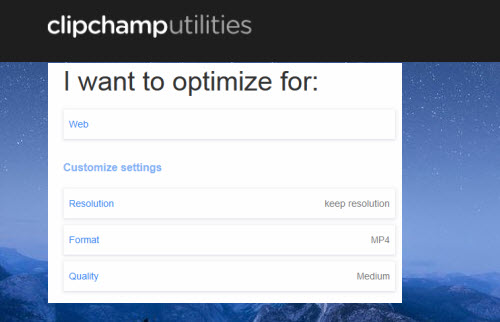
4. Clipchamp
Clipchamp, as one of the best online video compressor tools, is not only talented on converting, edit and recording videos, but also compressing videos online without the need to install third-party software. It is preconfigured with 4 profiles, covering Web, Windows, Mobile, and Animation GIF. You can directly upload the compressed video to Google Drive, Facebook, YouTube and Vimeo.
The compressing of video file with Clipchamp involves in: Click Convert Video File button > Sign up with a Google or Facebook account > choose a video to be compressed > select profile (Web, Windows, Mobile, Animation) and set the settings as per your needs > tap Start (you are also allowed to upload the video directly on YouTube or Facebook).
Pros:
• It's free and easy
• There is no annoying ads
Cons:
• Output formats are limited to MP4, VP8, VP9 and FLV, WMV, ASF and GIF.
• Signup is required to get access to video transcoding and compression.
• Grainy digitized quality appears for some time.
• Compressed video is watermarked.
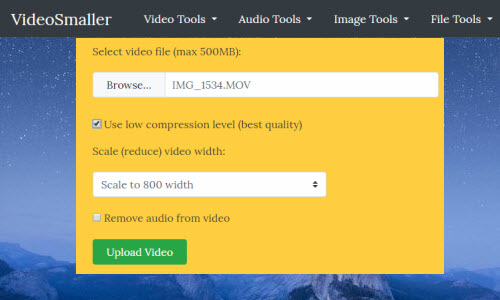
5. VideoSmaller
The name of VideoSmaller gives a good explanation for the site. Working as a truly effective free video compressor without downloading a software, you can free to reduce the size of video online without compromising quality. Once you load the video by hitting the Browse button, it directly scales down the video resolution to the one you prefer in such a way to make video smaller. However, there are sometimes you might encounter 504 gateway timeout error during the process of resizing a video.
Pros:
• Support decent file format.
• Easy to use and understand interface.
• No registration required.
Cons:
• The size of the video to be compressed shall be less than 500Mb.
• Video compression won't work properly.
Part 6. External Sources: How Video Compression Works
The prerequisite for compression is there are some types of redundancy and irrelevancy in video dataset. The video type compression is meant to remove the wasted space consumed by storage media in such a way to reduce overall size of the media file.
1. Does the Video Have Redundancy?
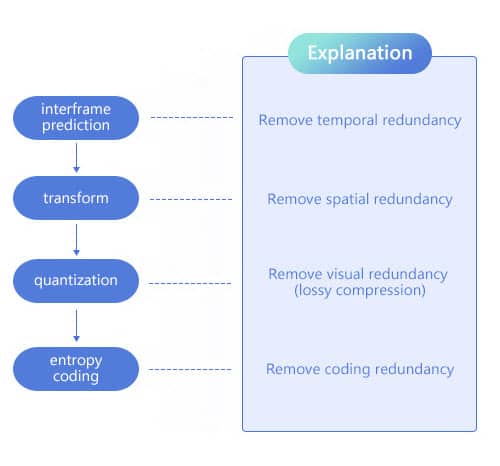
Yes! The video redundancy can be categorized into 4 types.
• Spatial redundancy (aka intra frame redundancy). The nearby pixels of are correlated with each other. This usually happens in still image. The reduction of spatial redundancy is also called intraframe compression.
• Temporal redundancy (aka interframe/interpixel redundancy). When there are moving images like HDR, adjacent frames have the same values in the same location. Process of reducing the temporal redundancy is generally what we call interframe delta compression, which is the primary tech in data compression.
• Visual redundancy. Human eyes are generally insensitive to drastic changes of the video. This is a precondition for lossy compression at the expense of minor image quality loss that naked eyes cannot even distinguish.
• Coding redundancy. Uncompressed image is coded with the pixel at a fixed length. Compression is may be achieved with variable length code schemes such as Huffman coding.
2. How Is the Video Shrinked and Compressed?
Technically, the core technology of data compression is the removal of redundancies mentioned above. And compress methods can be sorted into lossless and lossy compression. The former involves in two-step algorithms, which transforms the original video to a format in which the temporal redundancy is reduced in the first step, and then the coding redundancy is removed with an entropy encoder in the second step. This method reaches a compression ratio of only 2:1 but it completely recovers the original video without any loss. Known for its high fidelity, lossless compression is especially important in the field of satellite and medical X-ray.
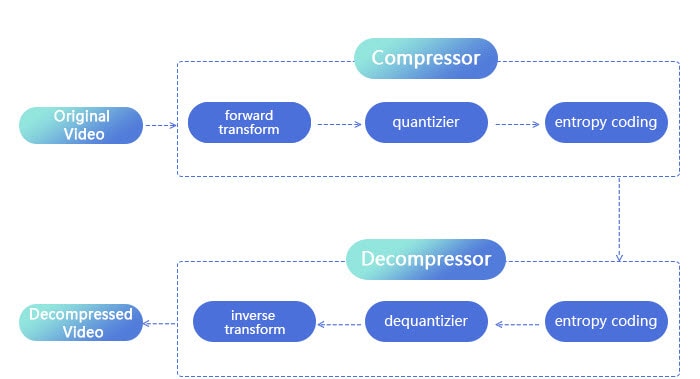
While lossy compression achieves a compression ratio as high as 50:1 at the cost of something unimportant based upon the ocular perception. The loss of video information cannot be recovered but the degradation of video image is still acceptable. Lossy compression is categorized into intraframe compression and interframe compression, each involving in few step algorithms in accordance with the 4 types of redundancy mentioned above. The former is specifically used for compressing the video within the one frame. The latter is adopted by more advanced video encoder, which derives from the correlation of neighboring frames, which encodes based on the vector difference between the current frame and the adjacent frames. Below are the process for general lossy video compression.
The Lossy Intraframe Compression Workflow:
- Step 1: Do away with spatial redundancy to pack the original video efficiently during transformation.
- Step 2: Use a quantizer to take out the visual redundancy so as to cut down the video bits.
- Step 3: Wipe out coding redundancy with entropy encoder for more efficient compression.
The Lossy Interframe Compression Workflow:
- Step 1: Remove temporal redundancy to pack the original video efficiently during transformation.
- Step 2: Get rid of the spatial redundancy during quantization.
- Step 3: Eliminate the visual redundancy with a quantizer to represent the video with as few bits as possible.
- Step 4: Wipe out coding redundancy and encode the quantized bits efficiently to get more compression.
Typically, MPEG-1, MPEG-2, MPEG-4, H.264 and HEVC standards are the examples of inter-frame compression. The graph on the right side shows how the interframe compression works.
Know more about interframe compression vs intraframe compression.