
As HD, 4K, and now 8K videos become more popular, the need to compress videos is rapidly increasing. Whether you're sharing large videos on platforms like WhatsApp, TikTok, YouTube, Instagram, or via email, or simply looking to save storage space on your devices, video compression is essential. In this article, we've compiled the best video compression software for Mac in 2025, covering free and paid options, desktop and online tools, as well as built-in and third-party solutions to help you compress videos without losing too much quality.
A Quick Comparison of Best Video Compression Software for Mac
Not sure which video compressor is right for you? If you care most about squeezing files down while keeping the best possible quality, Macxvideo AI is worth a look. For a completely free and reliable option, HandBrake remains a solid choice. Avidemux is ideal when you need to hit an exact file size, while FFmpeg is best suited for users comfortable working with command lines. And if you just want something fast without installing extra software, QuickTime or Finder can get the job done.
| Software | Compression Rate | Best for | More info |
|---|---|---|---|
| Macxvideo AI | 40%-90% | From novices to professionals |  |
| HandBrake | 50% | Flexible customization |  |
| Avidemux | 70% | Target size compression | |
| FFmpeg | 80% | Advanced users | |
| VLC | 40% | Quick compression | |
| QuickTime Player | 40% | Simple tasks | |
| Finder | 30% | Basic file compression | |
| iMovie | 50% | Editing & compression | |
| Final Cut Pro X Compressor | 50% | Professional workflows | |
| Clipchamp | 30% | Online use | |
1. Macxvideo AI [No Quality Loss]
Best for: Compressing large videos for WhatsApp, email, YouTube uploads, or 4K/8K footage while keeping quality intact.
Compress Video by: 40%-90% | Performance: 98%
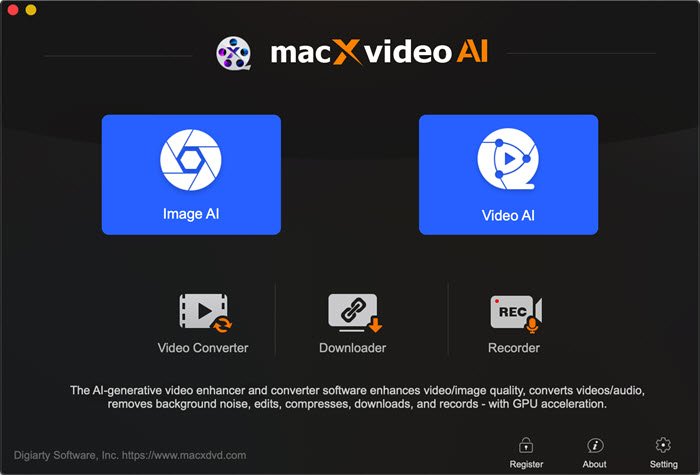
The first Mac video compressor we recommend is the third-party program Macxvideo AI. It works with almost any video format and resolution, letting you adjust output format, resolution, and file size according to your needs.
Key features of Macxvideo AI:
- Reduces video file size (40-90%) using modern codecs like HEVC, minimizing visible quality loss.
- Supports over 420 device and platform profiles, including YouTube, iPhone, WhatsApp, and email presets.
- GPU-accelerated compression for up to 5x faster performance on Mac.
- Enhances clarity, sharpness, and detail; removes blur and noise; upscales videos to 4K/8K.
- Includes video conversion, editing, downloads, and screen/webcam recording—useful for both casual and professional tasks.
Macxvideo AI is for macOS, while Winxvideo AI (from our WinXDVD brand) is for PC.
How to compress a video on Mac with Macxvideo AI
Step 1. Free download the video compressor on your Mac and run it. Click "Compressor" on the main interface.
Step 2. Select the +Video at the top left corner to load the video files you want to downsize. You can add multiple videos for batch compression if needed.
Step 2. Drag the compressor slider bar to change the compression ratio. Choose an output format via the video codec section:
- In the pop-up output profile window, choose your desired output format. To compress videos without losing quality, select a profile encoded with HEVC (H.265), which uses more advanced compression techniques than older formats like H.264.
- If you're uploading the compressed video to a specific platform (e.g., YouTube, Facebook), select the preset optimized for that platform.
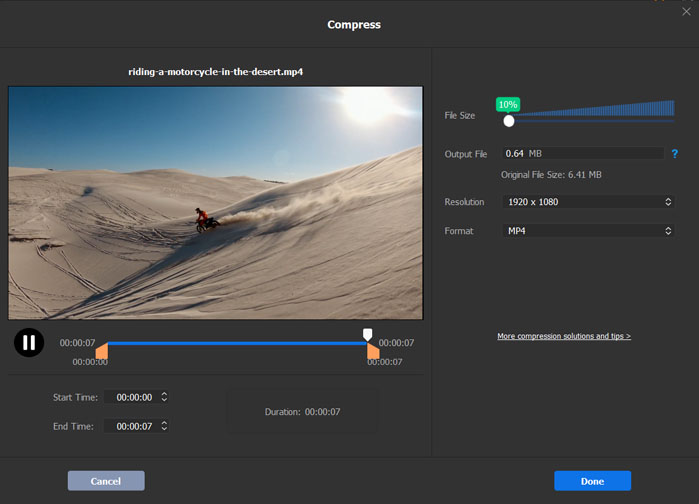
Step 3. You can adjust or lower the video resolution (such as downscale 4K to 1080P, 1080P to 720P), and lower the video/audio bit rate by 20-50% compared with its default one. Normally, the smaller video you want, the lower bit rate.

Step 4. Click Done and hit RUN to start compressing.
Explore more video tools: best video enhancer software for Windows and macOS.
2. Handbrake [Free]
Best for: Free open source video compression for advanced Mac users
Compress Video by: 50% | | Performance: 98%
The next tool on our list is HandBrake, a widely popular and free open-source video compression software for Mac. It has a wide range of features to help you easily compress a video to different sizes for Instagram, TikTok, WhatsApp, email, etc.
Key features of HandBrake:
- Support compressing videos in any video format & resolution.
- Downsize video by changing the codec, lowering video resolution, bit rate, cropping, trimming, etc.
- Provide a lot of advanced features. It's great for tech-savvy users, but can be overwhelming for novices.
- Output formats are MP4 and MKV.
How to compress video on Mac with HandBrake
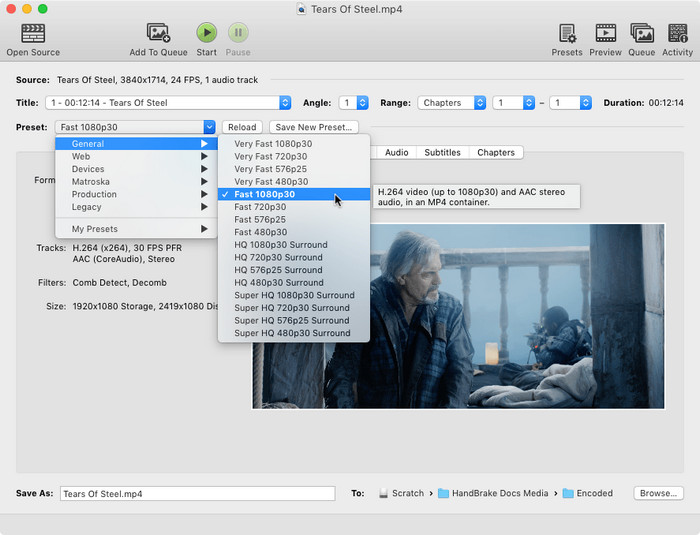
Step 1. Launch the free compression software on Mac and click the Open Source button to import the video you want to shrink.
Step 2. Under Preset, you can select an output with different qualities. The faster and slower preset will result in a smaller video size but lower quality. So you need to balance it.
Step 3. Under the section below, there is a slew of settings to change to compress the video on Mac. Under Summary, select MP4 for wider compatibility and Webm for web usage.
Step 4. Under the Video tab, you can change the video codec to H.265 or VP9 to get better compression. Lower the Quality by 1-2 RF to get a smaller video without noticeable quality loss.
Step 5. Under the Dimensions tab, resize the video to a lower resolution and crop the image if necessary.
Step 6. After all the settings, hit the Start button to begin reducing video file size. Learn detailed steps to compress video using Handbrake >>
3. Avidemux [Compress to target size]
Best for: Compressing videos to a specific file size on Mac with basic editing and format flexibility
Compress Video by: 70% | | Performance: 95%
Another free open-source video compressor for Mac is Avidemux. This is a free non-linear video editor for Mac to compress, cut, edit, filter and encode easily. It allows Mac users to compress the video to a smaller size for Instagram, TikTok, Whatsapp, YouTube, etc. in different ways. Users can downsize the video to a smaller video format like HEVC, VP9, x264, FLV, etc., adjust the bit rate & resolution, crop and resize to make the video smaller, and split a long and large video. The best part of the free Mac compression software is that users are allowed to set the desired output size.
How to compress video on Mac with Avidemux?
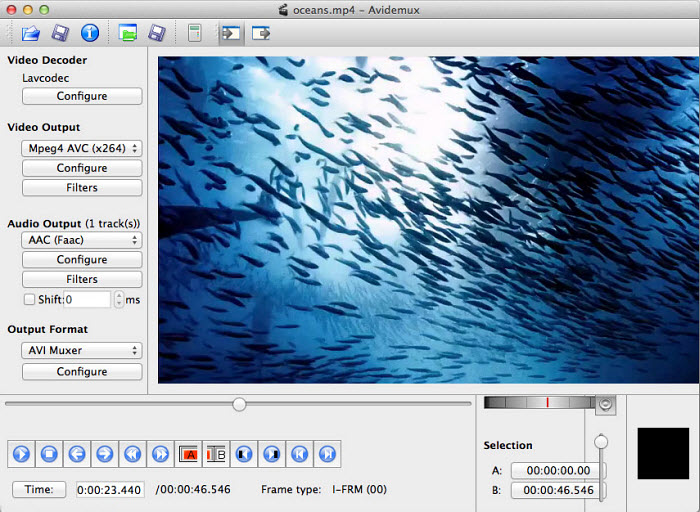
Step 1. Download Avidemux and open it. Click the Open Video button to load the video you want to compress.
Step 2. Under the Video Decoder, select Video Output to HEVC x265, Mpeg4 AVC (x264), or VP9 for a smaller output size. Set the Audio output to AAC (FDK) to ensure the best results. And then select an output muxer like MP4, MOV, WebM, etc.
Step 3. Next, click Configure in Video Output. Under the General tab, navigate to Encoding Mode -> select Two-Pass – Video Size in the list. Then you can enter the video size you want to shrink the video into the box Target Video Size (in MB).
Step 4. If you want to further compress the video on Mac, click Video on the top menu of the main interface > Filters > click swsResize or Crop to adjust the resolutions and crop off unwanted parts from the video.
Step 5. Back on the main interface, you can use the buttons marked A and B under the timeline to split a long video into smaller clips.
4. FFmpeg [For Advanced Users]
Best for: Advanced Mac users who want complete control over video compression via command line
Compress Video by: 80% | | Performance: 98%
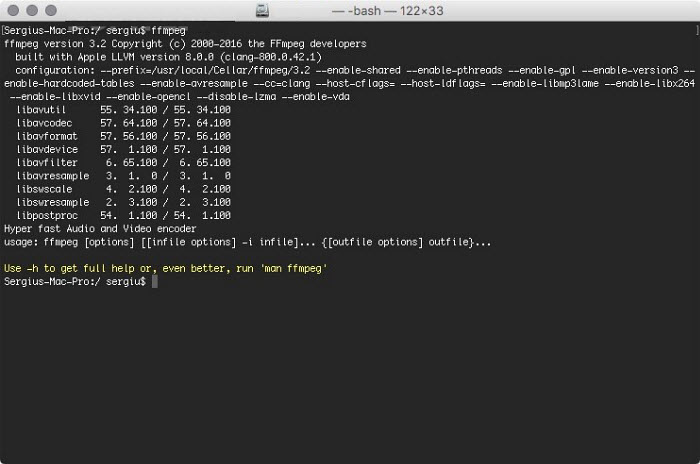
FFmpeg is a collection of free libraries and tools to process multimedia content such as audio, video, and subtitles on Mac and other platforms. It's a very advanced and powerful compression software free for Mac that can easily reduce the file size of a video, like a 720p video from 1.7 GB to 67 MB without changing resolution or any quality loss! The only drawback is that it requires a steep learning curve.
How do I compress videos using FFmpeg on Mac?
Step 1. Install FFmpeg on Mac using Homebrew: in Terminal, type the command "brew install ffmpeg" and hit Return.
Step 2. First, put the video you want to compress on your Desktop, Movies folder, or somewhere FFmpeg can get at it.
Step 3. Open a new Terminal window and you may see something like "yourname@yourcomputer ~ %", change the ~ to the folder containing your video file, and hit Return. You should now be in the folder that contains your original video file.
Step 4. Now you can use the commands and flags to compress videos on Mac. For example, -c:v specifies the video codec; -b:v specifies video bitrate; -c:a specifies audio codec; -b:a audio bitrate; ; -filter:v specifies a filter... There are many command lines on FFmpeg official site and various forums, below are some simple measures to shrink videos on Mac:
- Compress videos to smaller formats: ffmpeg -i input -c:v libx265 -crf 26 -preset fast -c:a aac -b:a 128k output.mp4
- Change the bitrate: ffmpeg -i input -c:a copy -c:v libx265 -b:v 1M output.mp4
- Compress 4K video to 720P: ffmpeg -i input -c:a copy -s 1280x720 output.mp4
5. VLC [Free]
Best for: An easy and fast video compressor alternative to Mac QuickTime
Compress Video by: 40% | | Performance: 95%
VLC is another popular video player among Mac users. But it is quite an unknown fact that even the VLC media player can be used as a free video compression software for Mac. In fact, you can find more compression options in VLC than in QuickTime Player. With VLC, you can select a smaller-size format like MP4, WebM, FLV, others in H.265, H.264, MPEG4, etc., adjust the audio and video bitrate, and resize the video with one click.
How to compress videos on Mac with VLC?
Step 1. Open VLC, click File > select Converter/Stream. Then use Open Media to load your video.
Step 2. Next, in the Choose Profile section, click Customise. First, click the Encapsulation button from the popping-up window. Select a smaller format like WebM, MP4, or FLV based on your need.
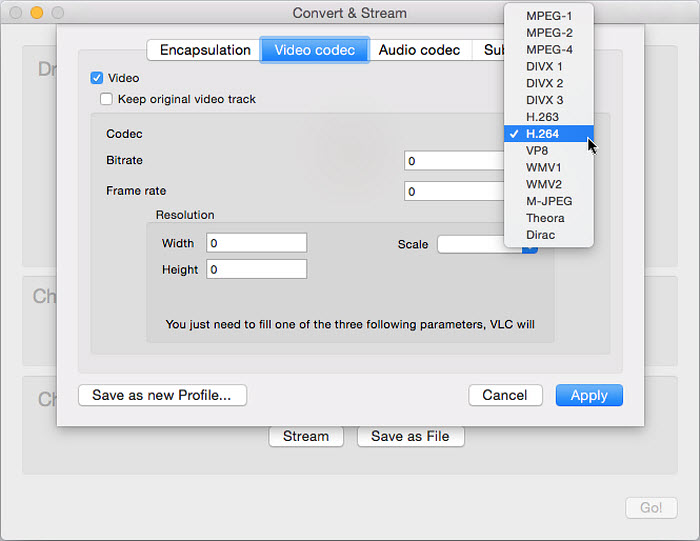
Step 3. Then click on the Video Codec button. Here you can select a more advanced codec for the video like H.265 for smaller output results. Lower the bitrate and resolution a little bit if necessary. You can also open the dropdown menu of Scale and select a value below 1 to downscale the video.
Step 4. Click Apply and back to the main interface. Click Save as File to set an output folder and click Go to start.
6. QuickTime Player [Built-in Tool]
Best for: Suitable for very simple and quick video compression on Mac
Compress Video by: 40% | | Performance: 95%
Apple's default media player - QuickTime - actually can help free compress videos on Mac. There are options to adjust the video resolution to 4K, 1080P, 720P, and 480P to make your videos smaller. The drawback to it is that it offers only a few options to reduce the file size on Mac, but it gets the results done. Another thing to note is the compressed output video will be encoded in MOV format, regardless of the import format.
How do I compress video on Mac with QuickTime Player?
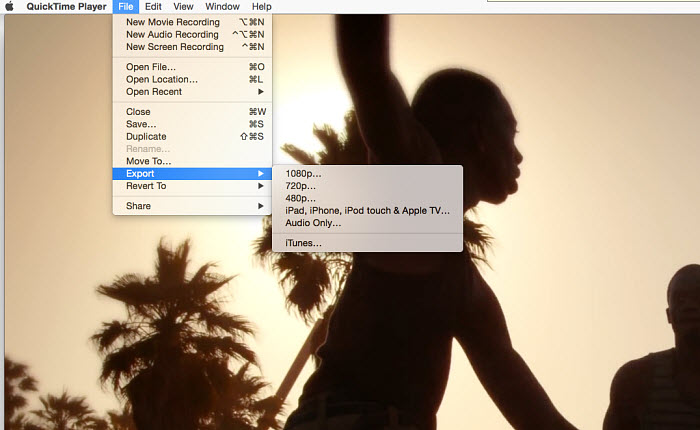
Step 1. To make a video smaller for free, open the app from your Applications folder. Click File > Open File to navigate to the video that you want to compress and open it.
Step 2. Next, click File > and select Export. Then you can see 4k (if applicable), 1080p, 720p, 480p, or exporting audio-only options. To downsize your video on Mac without noticeable quality loss, you're suggested to compress videos to a resolution slightly lower than the original quality. For example, you can compress 4K to 1080P to get a relatively good result.
Step 3. Then set the file name and output folder. Click Save to start to compress.
7. Finder [Compress Any File]
Best for: Quickly compressing multiple video files on Mac without installing extra software
Compress Video by: 30% | | Performance: 95%
Finder is another built-in Mac tool that provides basic video compression features. It offers video compression and decompression on Mac in the ZIP format. That means videos can be compressed without losing quality on Mac during the compression.
However, in other words, the output file size of the compressed video won't be too much smaller than that of the original video, though the actual amount of compression will depend on the type of your file.
How do I compress video files on Mac with Finder?
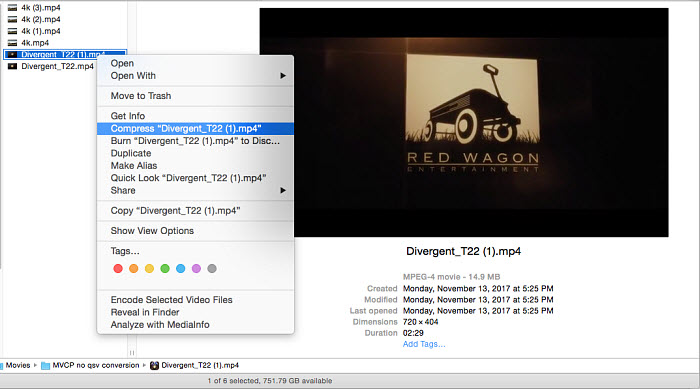
Step 1. Open Finder and select the video or video folder in the Finder. Right-click on it and select "Compress file name".
Step 2. The Mac will begin to compress the video. Once finished, a .zip file with the same name will be displayed next to the file you selected.
Step 3. The zip file contains the compressed video and your original video is untouched. Double-click on it to decompress the zip file and the Mac will extract the files right next to it. For information on Finder compressing video on Mac here.
8. iMovie [Easy & High Quality]
Best for: Free video compression with basic editing on Mac for sharing or storage
Compress Video by: 50% | | Performance: 98%
If you want a more versatile free video compressor for Mac, don't miss iMovie. Like Finder and QuickTime, iMovie is pre-installed on Mac computers. It has more editing features to make videos smaller on Mac. To be specific, it lets you split a long video into shorter clips, cut off extra parts from the video, change the video dimensions, and adjust the output resolutions. All the features can shrink a video to your desired size.
How to compress videos on Mac with iMovie?
Step 1. Open the iMovie app on Mac. Select the Create New icon to create a new project and click Import Media to load your video into the app. Then drag the video to the timeline.
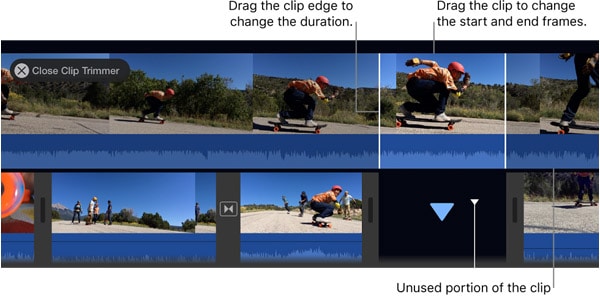
Step 2. On the timeline, right-click on the video and click Split Clip so as to split it into shorter clips. This is suitable for compressing a very long and large video without losing quality. You can also select Show Clip Trimmer to trim the unwanted length by dragging the edge toward the clip's center.
Step 3. To further downsize a video on Mac, click the Crop button on the menu bar above the video window. Then you can remove portions like the black bar from the video image. This will also result in smaller file size.
Step 4. If you don't want to make any changes to your video, you can skip Steps 2 and 3. Simply drag your video to the timeline, and click the Share button in the upper right-hand corner. Select File and lower the resolution & quality of the video to make it smaller.
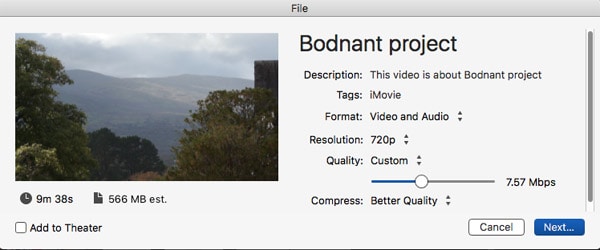
Step 5. Check the final sizes of different settings on the left hand below the video preview window. If it's OK for you, simply click Next.
9. Final Cut Pro X Compressor [Advanced]
Best for: Professional Mac users compressing Final Cut Pro videos with full control over quality and output
Compress Video by: 50% | | Performance: 98%
The Compressor is designed to work with Final Cut Pro to provide more power and flexibility to the output. It provides high support to compress 4K videos, HDR, and 360° videos. Users can compress videos on Mac by encoding the output to HEVC, H.264, MPEG-4, etc., and adjusting parameters and choosing from a variety of frame rates and resolutions. It offers a one-click solution to compress and upload videos for popular video websites, including YouTube, Vimeo, and Facebook.
How do you use Mac Compressor to compress videos?
Step 1. Apple Compressor is not free. You need to install and purchase FCP first. Open Compressor and add media files from your computer or a connected storage device. Each media source file in Compressor is called a job.
Step 2. Under the Settings, select to compress your video to Apple Devices in 4K HEVC, HD, SD, YouTube & Facebook, or others. Then set a save location from the pop-up menu.
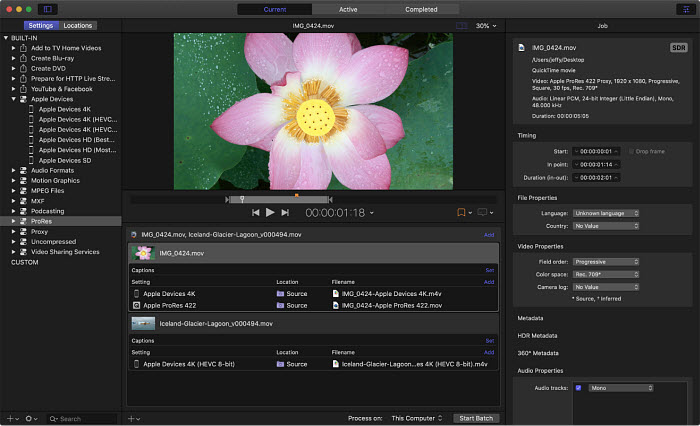
Step 3. If necessary, adjust the video properties such as resolutions, bitrate, etc. Customize the final cropping, sizing, and aspect ratio using the Cropping & Padding properties in Compressor. Set the encoder type to faster for a faster codec, standard quality, and smaller size.
10. Clipchamp [Free Online]
Best for: Quickly compressing videos online on Mac without installing software
Compress Video by: 30% | | Performance: 90%
If you don't want to download desktop-based video compression software on Mac, you can simply use free online video compressors, just like Clipchamp. When an internet connection is available, simply open a browser on your Mac, get access to the Clipchamp utility, and then you can import a video for compressing.
Key features of Clipchamp
- Reduce MP4, AVI, MOV, WebM, and more video formats.
- Support batch processing.
- Provide presets for web (Facebook, YouTube, Vimeo), Windows, and Mobile.
- Allow you to downsize videos to a desired resolution (240p, 360p, 480p, 720p, 1080p, 1440p, and 4K) and quality.
- Available output formats include MP4, WebM, and FLV.
How to compress video with Clipchamp on Mac?
Step 1. Open a web browser on your Mac computer, and access the Clipchamp online video compressor.
Step 2. Drag the target video into the dotted box.

Step 3. Choose what you want to optimize for, web, Windows, Mobile, or Animation. You can also hit Customize settings to specify resolution, format, and quality.
Step 4. Hit Start to begin processing your video.
How We Picked the Best Video Compressors for Mac in 2025
Choosing the right video compressor can be tricky, so we took a hands-on approach to find the best options for Mac users. Here’s how we went about it:
1. Doing Our Homework
We checked out a wide range of video compressors—free and paid, popular names and hidden gems—covering everything from pro-level software to simple, beginner-friendly apps.
2. What We Looked For
- Compression Efficiency: How much a tool can shrink files without killing video quality. Options to tweak bitrate or resolution scored higher.
- Ease of Use: Tools that are simple for beginners but still let pros dig into advanced settings got extra points.
- Supported Formats: The more codecs and resolutions a compressor handles, the better. H.264, H.265 (HEVC), VP9, and common resolutions were all considered.
- Speed: Fast compression matters, especially for big files. We tested how each tool handled real videos.
- Extra Features: Batch processing, quick conversions, editing tools, or presets for YouTube/Instagram are nice bonuses.
- Price & Value: Free tools with strong features ranked high, but we also considered paid options that are worth the money.
3. Hands-On Testing
We didn’t just rely on specs or reviews. Each tool was tested on different Mac setups with videos of various lengths, formats, and resolutions to see how they perform in the real world.
4. What Real Users Say
We also looked at user feedback across forums and review sites to get a sense of how these tools hold up day-to-day. Combining our tests with community input helped us pick compressors that are truly reliable.
After considering all this, we’re confident that the tools on our list meet different needs—whether you want something quick and simple or a more advanced solution for serious video work. Check out the comparison table below to see which one fits you best.
How Free Video Compression Software Reduces File Size on Mac
Free video compression software for Mac, such as Macxvideo AI, HandBrake, QuickTime Player, and iMovie, use a combination of techniques to shrink video files while keeping quality acceptable. Here are the most common methods you can use:
1. Lowering Bitrate
Reducing the bitrate controls how much data is used per second of video. Free software lets you adjust the bitrate to balance file size and quality. For example, lowering bitrate by 20–50% can significantly reduce size without noticeable quality loss.
2. Reducing Resolution
Downscaling your video from 4K to 1080p, or 1080p to 720p, is an effective way to shrink the file. Free tools like QuickTime or HandBrake allow you to choose export resolutions for different use cases, such as WhatsApp or email.
3. Choosing Efficient Codecs
Modern codecs like H.265 (HEVC) and VP9 provide higher compression efficiency than older codecs like H.264. Free software like HandBrake supports these codecs for smaller files with minimal quality loss.
4. Trimming and Cropping
Removing unnecessary parts of a video or cropping black bars reduces file size. Tools like iMovie or HandBrake allow you to trim or crop videos easily before compression.
5. Removing Extra Data
Free Mac software can remove extra audio tracks, subtitles, or metadata that are not needed. This helps reduce file size without affecting the main video quality.
By combining these techniques, you can compress videos on Mac efficiently using free tools, whether you’re sharing via email, WhatsApp, or just saving storage space.
FAQs about Free Video Compression Software for Mac
1. Can I compress videos on Mac for free without losing quality?
Yes. You can compress videos on Mac for free with minimal or no visible quality loss by using modern codecs like H.265 (HEVC) and slightly lowering the bitrate instead of the resolution. Free video compression software for Mac like HandBrake allows you to adjust these settings to achieve smaller file sizes while keeping the video visually sharp.
2. What is the best free video compression software for Mac?
Macxvideo AI is widely regarded as the best free video compression software for Mac. It supports H.265 (HEVC) and H.264, offers advanced bitrate and quality controls, and works well for compressing large or 4K videos without noticeable quality loss.
3. Does macOS have any built-in free video compression tools?
Yes. macOS includes built-in tools such as QuickTime Player and iMovie that can compress videos by exporting them at lower resolutions or quality settings. These tools are easy to use, though they offer fewer options compared to dedicated free video compressors like HandBrake.
4. How do I compress a video for WhatsApp or email on Mac for free?
To compress a video for WhatsApp or email on Mac for free, export the video in MP4 format, reduce the resolution to 720p or 1080p, and lower the bitrate by about 30–50%. Free video compression software for Mac, provides presets and manual controls to make this process simple and effective.
5. What video format is best for free video compression on Mac?
MP4 encoded with H.265 (HEVC) is one of the best formats for free video compression on Mac. It offers high compression efficiency, good compatibility, and smaller file sizes compared to older formats like H.264, making it ideal for sharing and saving storage space.


Candice's particularly skilled in writing and sharing video-related contents. Her guides cover from deep-seated video/audio parameters, to media entertainment on different platforms. She also enjoys shooting and processing videos by herself for a more reliable basis of informative info with her articles, which are never at the expense of eliminating an entertaining read.


