
When you go out for a travel, it's inevitable for you to use your GoPro Hero 6 or iPhone iPad to shot some 4K Ultra HD videos or 1080p videos during the trip. When you plan to upload these travel videos to YouTube, Instagram, Vimeo or share them to your friends, it seems taking forever to finish the video uploading and sending tasks. That's purely because the videos are too large to upload/share, e.g., 600MB file size for a 1-min 4K video at 60fps. In such case, the effective solution appearing on your radar is to resize video on your Mac to reduce file size. Well, how can you resize video on Mac?
Before you go, you ought to know what factors affect video file size greatly. Generally, video format does something to video file size. Video resolution and bitrate also have a great impact on video size. Of course, if you trim the length of the video, you can make it smaller. According to the different factors for video file size, there are 4 disparate methods available to resize video on Mac:
- Adjust Video Parameters like Resolution, Bitrate and Frame Rate.
- Change Video Format to Resize Video.
- Crop Video Dimensions to Adjust Aspect Ratio.
- Trim Video Length and Split Video into Clips.
Resize Video 4K UHD 1080p HD with Highest Possible Quality
In accordance with your needs, you can choose any method above to resize video dimensions on Macbook Pro/Air. For example, change video format to get video files smaller with VLC, take advantage of Handbrake to downscale resolution, bitrate, aspect ratio etc., or trim the video length via QuickTime. Given this, you may wonder if there is a video resizer on Mac available to resize video in all 4 ways, that would be great. Fortunately, Macxvideo AI is the one!
- Compress a video on Mac by lowering its resolution (4K to 1080p, 1080p to 720p) without blocky or blurry issues, downscaling video bitrate, changing aspect ratio from 16:9 to 4:3, or tweaking video frame rate from 240FPS to 60FPS, 60FPS to 30FPS, etc. with 30% - 70% compression ratio.
- Further resize video file size via video codec conversion, such as converting H264 to H265 (HEVC) with 40%-50% compression ratio, H264 to VP9, MPEG-4 to DivX/XviD, MP4 to FLV, AVI to MP4, etc. (compression ratio=uncompressed file size/compressed file size).
- Trim and reduce video length to shrink video file size. What's plus, its "Crop" feature enables you to resize the aspect ratio of the video to downsize video.
- High Quality Engine ensures you a highest possible video quality, up to 98% quality reserved. Meanwhile, Intel QSV/Nvidia/AMD HW acceleration technologies quickens the whole video compression procedure at 5-8X faster speed than normal video compressors.
Tutorial: How to Resize Video on Mac without Losing Quality
Step 1. Free download the video resizer and add your video.
![]() Free download the video resizer on Mac and launch it. Then click on + Video button or simply drag and drop to add your video files to the program. Alternatively, you can also
Free download the video resizer on Mac and launch it. Then click on + Video button or simply drag and drop to add your video files to the program. Alternatively, you can also ![]() download MacX Video Converter for Windows if you intend to reduce video size on Windows 10/8/7/XP PCs.
download MacX Video Converter for Windows if you intend to reduce video size on Windows 10/8/7/XP PCs.
Step 2. Resize your video on Mac.
Given that this video resizer is capable of reducing video size on Mac and Windows in three ways, here let's take a look at one by one.
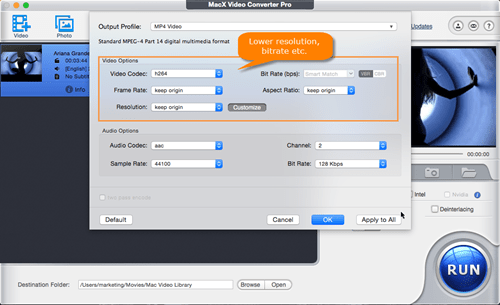
#1. Lower resolution, bit rate, frame rate.
Comparing to video format, video resolution, bitrate affects the size of your file more. Generally, a higher bitrate and resolution will output a clearer image quality but larger video size. Therefore, to reduce the size of video, you can change the resolution and bitrate. Besides, you can also adjust the minor factors frame rate, aspect ratio to make your video smaller with this video resizer on Mac.
Click on ![]() icon to enter the parameters setting window. Then you'll see Video Options and Audio Options. You can choose the lower resolution like compressing 4K to 1080p, 1080p to 720p/640p/480p, downscale video bitrate, depress video frame rate from 30fps to 24fps, change aspect ratio as well.
icon to enter the parameters setting window. Then you'll see Video Options and Audio Options. You can choose the lower resolution like compressing 4K to 1080p, 1080p to 720p/640p/480p, downscale video bitrate, depress video frame rate from 30fps to 24fps, change aspect ratio as well.
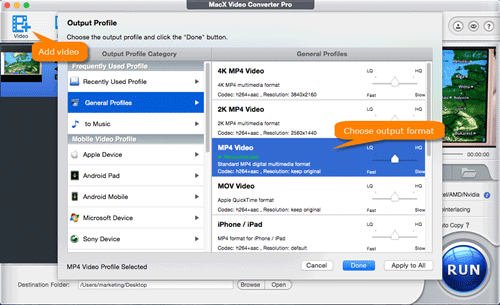
#2. Convert Video Codec to reduce video size.
Videos that encoded with different formats will have different size. Usually, if you have several video with all the same except the video formats, you will find that the size in H.264/H.265 MP4 and WMV format is smaller than the ones in MPG, MTS, M2TS, MKV etc.
Thus after your video added, choose a proper one from the automatically popped up window, such as select General Profiles > MP4 Video (h264+aac), or MP4 (HEVC) under "Mac General Video" according to your needs.
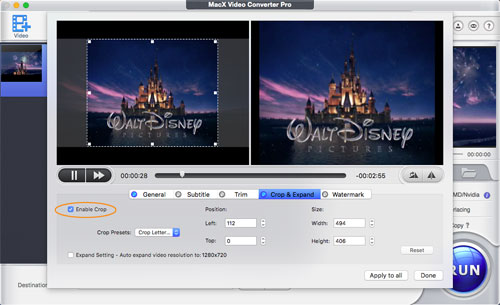
#3. Crop video dimensions to adjust aspect ratio
Cropping video display dimension is also a way to resize video, since it decreases the aspect ratio. Obviously, for a same content video, 4:3 aspect ratio version is larger than 16:9 and 1:1.
Click on ![]() button, choose Crop & Expand from the edit option bar and tick the box of Enable Crop. Then you can crop out the extra parts according to your final purpose. For example:
button, choose Crop & Expand from the edit option bar and tick the box of Enable Crop. Then you can crop out the extra parts according to your final purpose. For example:
- To watch video on iPhone iPad, choose 16:9 aspect ratio;
- To play videos on your HDTV, don't hesitate to select 4:3 one;
- To upload video as Instagram square video: crop the aspect ratio in 1:1.
Or you can also customize your video dimension for other unique use.
#4. Trim/split video into clips to shrink video size.
There is no doubt that the shorter the video, the smaller the size. The Trim feature allows you to split a large video of long length into several clips so as to reduce video size.
Click on ![]() button on the main interface. Choose Trim from the edit option bar and tick the box of Enable trimming. Now you're able to set the Start/End Time of your video.
button on the main interface. Choose Trim from the edit option bar and tick the box of Enable trimming. Now you're able to set the Start/End Time of your video.

Step 3. Start the video resize task.
If you'd like to specify the output destination, you can click Browse button to do so. And after all settings done, click on RUN button on the lower right corner of the panel. This video converter for Mac and Windows will finish the rest immediately.
Macxvideo AI - Reduce Video Size on Mac & Windows
Macxvideo AI, the best video resizer for Mac and Windows, which is able to resize video in three ways: change video format; lower video resolution, bitrate, frame rate, aspect ratio etc.; trim video into clips.


Candice's particularly skilled in writing and sharing video-related contents. Her guides cover from deep-seated video/audio parameters, to media entertainment on different platforms. She also enjoys shooting and processing videos by herself for a more reliable basis of informative info with her articles, which are never at the expense of eliminating an entertaining read.


