
Editing is an important part to make a good video, and video trimming maybe the first step. It's important to cut and trim video to remove unnecessary parts of a long video and have your audience focused on what is important, especially when you are going to upload the video on YouTube or other social sites (generally video within 3-min length is enough).
Why Need to Trim Video
- Remove the problematic clip you shoot with camcorder, camera, smartphone or so, e.g. bad noise, poor light, etc.
- Get ads off the video source you download from YouTube or other video portals.
- Resize video into a smaller one so as to upload it online faster or play on mobile device without maxing out storage space.
Video trimming and cutting is a great beneficial to us. However, video makers, especially the novices, may have trouble to find out the right video trimmer for the job. Some high-end movie editors like Adobe Premiere Pro CC may seem like a bit of overkill, some others may have limits on the video types that they can handle. This post is going to share users several ways on how to cut videos on Mac costlessly with different video trimmers. You can trim AVI, MP4, MKV, MPEG, FLV, Gropo vdieos on macOS freely and quickly, without re-encoding.
Best Video Trimmer for Mac - 100% Free and Easiest to Use
The very first video splitter for Mac is macXvideo. This free video editor packs simple video trimming ability to let you cut video clip on Mac in MP4, AVI, MKV etc into fragments, chop down long video footage, merge different piece of video clips, cut unwanted scenes and more. You can do the video trimming on macOS quickly and easily. To be specific, this video trimmer will help Mac users do as follows:
1. Accept any 4K UHD, HD 1080P/720p videos to be trimmed with no size limit, incl. videos shot by 4K Camcoders, Gopro, iPhone, iPad, Samsung, webcam recorder; videos downloaded from webs, ripped from DVD, shared by others from email etc.
2. Cut and trim any segment from the video freely with no quality loss and make it easier to share on YouTube or so.
3. Trim videos in any other digital formats, incl. MP4, AVI, MKV, HEVC, MOV, FLV, MPEG, M4V, and more.
4. Also merge, crop, rotate, reduce file size, add effects & subtitles, etc at fast speed.
How to Trim Video Clips on Mac Quickly & Easily
Way 1: How to Cut Videos on Mac Freely with macXvideo
To cut video on Mac, free download the video trimmer on Mac. It supports macOS High Sierra, Sierra, El Capitan and earlier.
Step 1: Launch the video splitter Mac and click the Add button to load the video you want to cut. You can also do this by drag and drop.
Step 2: Click the scissor icon below the video to enter into the video editing page. Here are a few editing options for you. Click the Trim button.
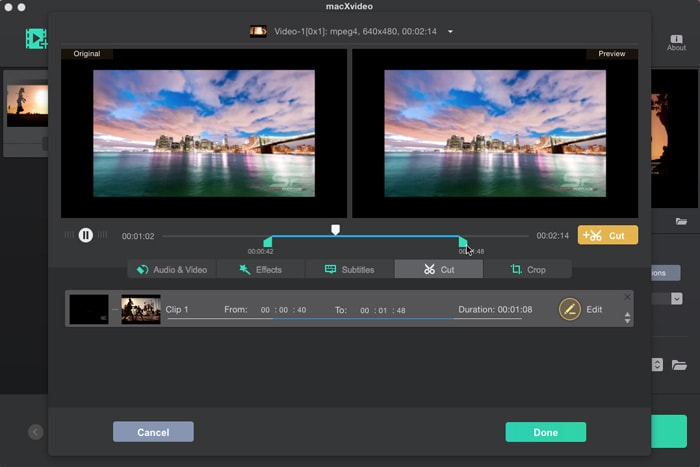
Step 3:Check the Enable Trim button and start to cut & trim video clip on Mac now. You can move the length icon on the progress bar to cut the video you'd like to save. Or you can enter the specific starting and ending time to split the video.
Step 4: After that, click Done and the trimming will apply. Besides that, the avi, mov, mkv, mp4 video splitter has options to let you export the trimmed video to different video types or for various websites and popular mobiles.
Way 2: How to Cut Videos on Mac Freely with QuickTime
Mac computers have offered ready solution to trim video length, just like iMovie, which has more exquisite tools for free video trimming on Mac. But if you simply needs some quick edits and cut a portion from the beginning or end of a video, then QuickTime will do it for you. Even though it's usually used as the default video player for Mac, QuickTime can trim video on Mac without re-encoding easily.
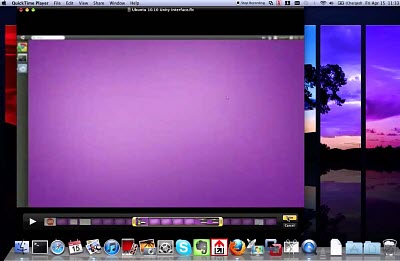
- Step 1: To get started, open the video clip in QuickTime Player. Note that the free video trimmer Mac can split videos in certain formats only (namely mov, mp4, mkv, mpeg, 3gpp, avchd, avi, dv).
- Step 2: Click the Edit menu and select Trim. Alternatively, press Command+T on your keyboard.
- Step 3: The video will show up with a timeline bar. Drag the yellow handles to set the start and end of the trimming bar to choose the section you want to save.
- Step 4: After that, click Trim and the videos will be trimmed as you want.
Way 3:How to Trim Video Clip on Mac using Powerpoint
If you have installed Powerpoint for Mac on your computer, you can also rely on it, though most of time it serves as a common tool to make presentations. You can cut and trim a video clip on Mac free with your PowerPoint slide in almost the same way with other two Mac video trimmers.
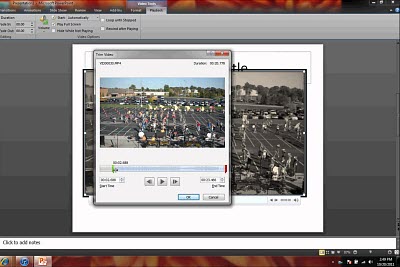
- Step 1: First of all, open a Powerpoint presentation. Click to add a new slide and select Media option from the slide.
- Step 2: Browse the local folder to select the video you'd like to trim. Powerpoint supports videos in ASF, AVI, MP4, M4V, MOV,MPG, MPEG, SWF, and WMV.
- Step 3: Right click the video and there will be a slew of options. Click Trim Video.
- Step 4: Drag the start and end marker on the timeline bar to cut the videos on Mac without re-encoding. Then click OK.
Way 4: How to Split Videos on Mac Free via VLC
The last method in this tutorial involves another famous video player - VLC. Admittedly, VLC is a versatile app, which can not only play videos from different sources, but also work as video editing software to convert formats and also free trim video on Mac without re-encoding. With this free video trimmer Mac, you can freely cut & trim mp4, avi, mkv, mpeg, flv, gopro and other videos. In fact, the software mainly uses its recording function to allow users remove the parts they don't want to save and do some quick trimmings.
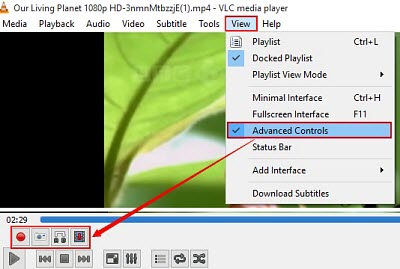
- Step 1: Open VLC. Click View and find Advanced Controls. Then Recording buttons show up.
- Step 2: Open the video. Click the first Recording button at the start of the video that' you want to trim. And click it again to stop at the end.
- Step 3: Use the Frame by Frame button to control the exact begins and ends of the recording.
- The recorded videos will be automatically saved to the Library/Videos.
Bottom line: Anyway, you can choose any of the above trimmeres to do quick video trimming & edits on Mac. Please note that they can cut the unwanted portion from the beginning or end only. If you want to trim a specific portion in the middle of the video, you will need to split videos on Mac into pieces and then merge them into one. Or just rely on other advanced video trimmer for Mac like iMovie, Final Cut Pro, Lightworks, Premiere Pro CC, Blender etc.


Candice's particularly skilled in writing and sharing video-related contents. Her guides cover from deep-seated video/audio parameters, to media entertainment on different platforms. She also enjoys shooting and processing videos by herself for a more reliable basis of informative info with her articles, which are never at the expense of eliminating an entertaining read.


