

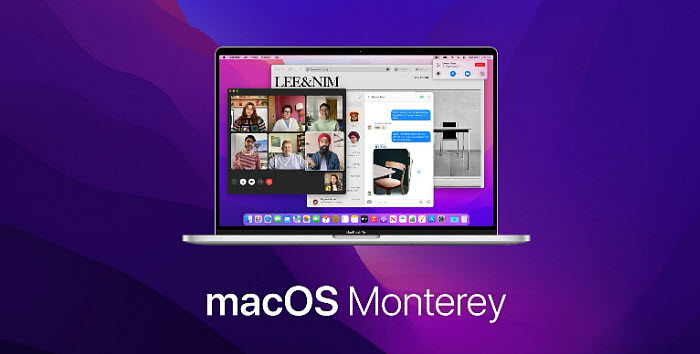
macOS Ventura to be released this Fall is Apple's next major OS update for Macs, designed to improve and redefine macOS Monterey, with more features, e.g. new Shareplay, spatial audio, Portrait mode in Facetime, improved messages, streamlined tab bar in Safari, etc, but doesn't necessarily means smooth operation. Problems with macOS Ventura such as installation problems, issue with M1 Mac installation, App incompatibility error, the battery life, WiFI issues, slow operation, overheating and iTunes not working upset many Mac OS fans and drive them in haste to downgrade macOS Ventura to macOS Monterey or previous macOS.
Back up Data before Downgrading macOS Ventura
MacX MediaTran is a professional data transfer software to backup/transfer/manage data between iPhone iPad and Mac at lighning fast speed. Your best iTunes alternative to backup files without data erasing. Support iOS 15 and macOS Ventura.
5 Steps to Downgrade Ventura to Monterey
Part 1. Suggestions before You Downgrade macOS Ventura to Monterey
- Don't boot Mac into Recovery mode and revert to macOS Monterey. This is only feasible to reinstall the system currently available on Mac like macOS 11.
- Don't launch macOS Monterey installer within macOS Ventura. This is because the latest version of macOS is always preferable.
- Erase macOS Ventura complete before reinstalling macOS Monterey.
- Don't make a backup using Time Machine, as it is only achievable when you are about to update to macOS Ventura rather than downgrade latest macOS.
- Make sure to connect to Wi-Fi or Ethernet.

Part 2. How to Downgrade Mac from Ventura to Monterey | No Data Loss
Step 1: Back up Your Mac before Update
Any upgrade or downgrade of macOS may put you in the danger of losing important files, documents or programs, if nothing has been done. This makes essential to back up all files you recently added to macOS Ventura, in case of any data loss your macOS Ventura downgrading. Totally, there are 5 types of backup Mac users can be use.
Option 1: Have a local backup and. copy and paste the files directly into your external hard drive HDD. Possible a good 1TB drive costs you $45.
Option 2: Store your file via cloud-based service, e.g. iCloud, DropBox, Google Drive, OneDrive. This way is inexpensive to secure your Mac data but takes a long time.
Option 3: Back up macOS Ventura data by transferring to iPhone or iPad. This is helpful especially when you want to backup the contents you need most, exclusive of those old trushy stuff. And Mac users are grumbling about iTunes' lengthy syncing and constant data erasing, here we introduces the good alternative to iTune such as MacX MediaTrans to backup and transfer data between iPhone iPad and Mac and free up more space on your Mac. The tool is available for transferring all types of data, including those iTunes won't support, to/from iOS devices.

Step 2: Make a Bootable Installer Drive
Prior to remove macOS Ventura from your Mac, it's a must to make a macOS Monterey installation drive. For the steps to proceed to have a bootable drive for macOS Monterey in order to have a successful downgrade from macOS Ventura to macOS Monterey.
- Find an external drive with at least 16GB of storage space, preferably a USB drive with a USB-C connector.
- Search for macOS Monterey, click on the Download to start downloading macOS Monterey installer software from the App Store.
- Quite the installer during the auto-launch because you are unpermitted to install it on top of macOS Ventura.
- Launch Terminal (Applications > utilities > Terminal). Here we just share last one. Open Terminal and paste this into Terminal window: sudo /Applications/Install macOS Monterey.app/Contents/Resources/createinstallmedia --volume /Volumes/Drive -- /Applications/Install macOS Monterey.app
- Enter admin password if asked.
30 minutes later, you will finish making an macOS Monterey installer into a bootable drive, ready to get rid of and downgrade macOS Ventura.
Step 3: Erase macOS Ventura from Mac
Once you have your bootable drive of macOS Monterey, you can completely remove macOS Ventura from your Mac with the following steps.
For M1 Macs: Turn off your Mac. Switch it on and press the power button until you see hte startup screen. Click on Options and Continue. Select a user when prompted and click on Next. Enter its admistrator password.
For Intel-based Macs: Click on the Apple icon -> select Restart from the dropdown menu. Keep holding the keys Command+R till your Mac reboots.
Once you enter the recovery mode, you can remove macOS Ventura from your Mac by following the steps.
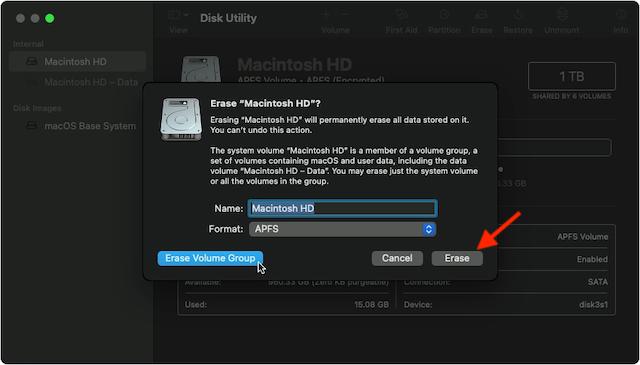
- Click on Disk Utility and tap Continue when the OS X Utility window appears.
- Choose your Mac's hard drive and Tap on Erase at the top of the window.
- name the file to be erased and choose Mac OS Extended format.
- Click Erase to wipe macOS Ventura.
Once you erase macOS Ventura from your Macbook Air/Pro, iMac or other Mac computer, you can quite Disk Utility.
Step 4: Reinstall macOS Monterey back on your Mac
Follow the steps below to reinstall macOS Monterey from your bootable installer after your Mac remove macOS 10.13.
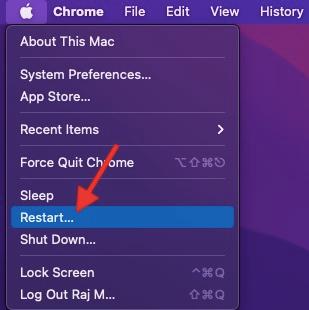
- Make sure your Mac is connected to the internet. Click on Apple menu in the top left corner and choose Restart from the drop-down menu.
- Hold down the Option/alt key while your Mac restarts, choose your boothable USB drive with macOS Monterey from teh startup disk options.
- Click Continue. Agree to the licensing terms before the software reboots on your Mac.
Note: Besides macOS installation, you can also downgrade macOS Ventura to an older version of OS X, such as El Capitan, Yosemite, Mavericks, etc, depending on how old your Mac is. Just go to the Mac App Store to upgrade to the version. This is conducted within the Internet Recovery Mode.
Step 5: Retrieve your files from Ventura backup
Now you can restore all your files from the backup as is mentioned in step 1 to finish the downgrade of macOS 10.13 without any data loss. Below we also list the steps to restore your data from Time Machine after your revert back to Monterey from macOS Ventura.
- Click on Apple and select Restart from the dropdown menu.
- Hold down the keys Command+R till your Mac restarts.
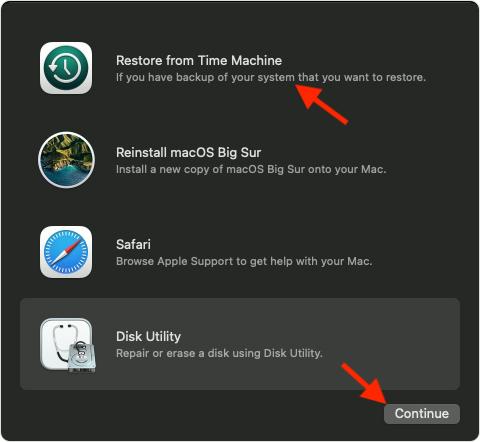
- Choose Restore from Time Machine Backup in the OS X Utilities section.
- Tap on Continue and select Backup Source to choose the files where you have saved.
- Select the most recent macOS 10.13 backup and continue.
Then all the macOS Ventura downgrade process are done. You will never worry about the problems when macOS Ventura is not working for you.
Part 3. Troubleshooting to macOS Ventura Update Problems
- Restart your Macbook when macOS Ventura installer fails to complete, and try again to download the installer.
- Remove the Server.app from teh Applications folder, reboot and install macOS Ventura, if it will not install on Mac.
- Turn WiFi off and turn it back on after 30 seconds, when you have problem connecting to your personal hotspot on the iPhone. and restart the device or change to Airplane mode.
- Inall the latest macOS Ventura updated version to fix the battery issue. Restart the Mac > turn down the screen brightness and update all apps to get better battery life.
- Check if the apps work with macOS Ventura, if so, update them.
- Turn off the Bluetooth and back on or restart Ma.
- Restart your Mac and update apps to solve the performace problem with macOS Ventura.
If nothing else fixes the macOS Ventura problems, we suggest you following the above steps to downgrade macOS Ventura or wait for release this Fall.
Related: how to speed up Mac, Best Mac apps, How to free up space on Mac


