

macOS 13 Ventura has brought many new features to improve your experience using a Mac. For example, you can enjoy more accurate search in Mail, enhanced image search in Photos, Messages, Notes, the Finder, and the web, Shared Tab Groups in Safari, editable Messages, iCloud Shared Photo Library, Stage Manager and more.
All the benefits are a strong reason to upgrade to Ventura. Here we will show you how to download and install the macOS 13 Ventura without errors as well as how to fix any problem that may occur during the macOS Ventura update errors like the The requested version of macOS is not available, Screen Saver errors, Ventura installation stuck, Calendar update errors...
Can I Update to macOS Ventura on My Mac?
You can upgrade macOS to 13 Ventura if you're running any of the following device:
- iMac (2017 and later); iMac Pro (2017);
- Mac mini (2018 and later); Mac Pro (2023 and later);
- MacBook Air (2018 and later); MacBook (2017); MacBook Pro (2017 and later);
- Mac Studio (2023)
Back up Your Mac to Avoid any Ventura Update Problems
Any bugs and problems can happen during Ventura update. And any download/install failure may cause data loss. Therefore, you're suggested to back up the important data saved on your computer. You can back up Mac to an external hard drive or other cloud storage services. Below we'll take Mac's built-in backup feature Time Machine as an example:
- Connect an external hard drive to Mac. Make sure the hard drive has enough space to store your Mac.
- Click System Preferences > Time Machine > toggle the switch from "Off" to "On."
- Then click the Select Disk… to select the hard drive. Then it will start to backup Mac.
Note: Time Machine is a complete backup solution, which requires large space and long time. If you only need to back up some important data, there are many third-party Mac backup tools and services to help.
How to Download and Install Ventura
- On your Mac, go to https://developer.apple.com.
- Click the Discover tab > click the macOS tab at the top of the page.
- On the macOS page, click the Download button at the top right corner and sign into your Apple developer account (if you don't have a developer account, click Member Center> sign in with your Apple ID > on the Apple Developer Agreement page, check the box to accept the agreement > click the Submit button. Then your Apple ID is a free developer account).
- Click the Install Profile button at the bottom of the page to download macOS Ventura.
- Find and launch the installer of macOS Ventura Developer Beta Access Utility. Double-click macOSDeveloperBetaAccessUtility.pkg to run the installer.
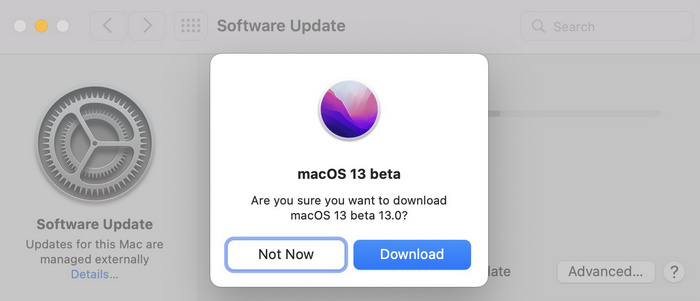
- When the installer downloads, System Preferences will check for an update to MacOS. Click Update to download and install macOS Ventura beta.
macOS 13 Ventura Update Problems and Fixes
Update to macOS 13 Ventura is not always smooth. Some known issues already happen during the download and install. First of all, let's exclude some basic reasons that may cause Ventura update errors. First of all, check if your Mac is compatible with the new system; second, make sure your Mac has enough storage for Ventura (~12GB). Open the Apple menu and click About This Mac > select Storage and check if there is at least 16GB free space.
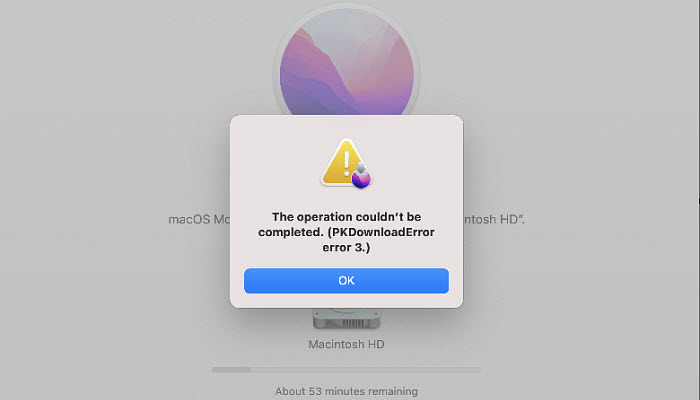
1. Ventura update failed with PKDownloadError error
There are users trying to update the macOS from Monterey v11.6.1 to Ventura but failed with the PKDownloadError error. After minutes of installing the downloaded Ventura update, it runs into a problem and breaks off the process, with an error message saying "The operation couldn't be completed. (PKDownloadError error 3.)". Some other users get the PKDownloadError error 8 during Ventura update. Here are some useful fixes:
- Try to download the Ventura installer with another network. For example, you can turn off the Wi-Fi, use your phone's hotspot, or connect to a VPN.
- Change the DNS settings on your home router to OpenDNS.
- Restart your Mac computer in Safe Mode (hold Shift key during restart) and try again.
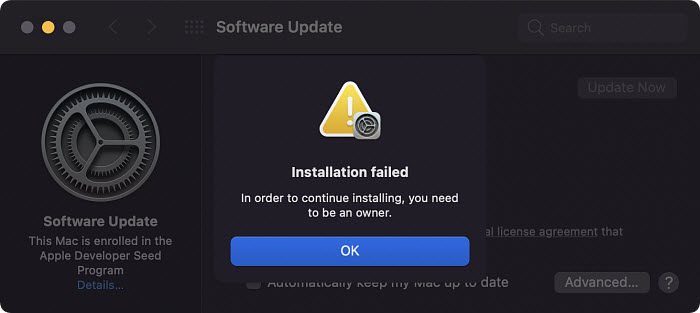
2. macOS 13 Ventura installation failed
"Installation failed. In order to continue installing, you need to be an owner." Many early users have reported this error when they update from macOS 11.4 to 12 Ventura. Some other users also get Ventura update error messages like "cannot be installed because of an error." To fix the error "Failed to get ownership for system", you can:
Update your Mac to macOS 13 Ventura using the command line to bypass the secure token/owner check from the Software Update preference pane:
- Press cmd + Spacebar to bring up Spotlight and search for Terminal.
- sudo softwareupdate -i -a -R
- -i Install
- -a All appropriate updates
- -R Automatically restart (or shut down) if required to complete installation)
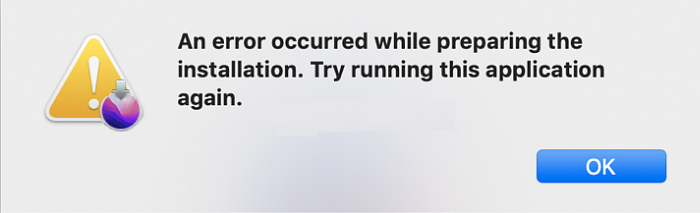
3. An error occurred while preparing the installation
"An error occurred while preparing the installation. Try running this application again." happens to Ventura update too. This is a common problem we can almost see with every macOS update. If your Ventura update stuck preparing the installation, here are some fixes:
- Restart your Mac and try again.
- Check if the date and time on your Mac are set correctly.
- Install the Ventura update in Safe Mode.
- Download Ventura directly from recovery mode and install it.
4. Can't install macOS Ventura on M1 Macs
Many users of M1 Macs says they they can't install macOS Ventura on their M1 machines. For example, some get the message "An error occurred while setting "Ventura" as the startup disk: The operation couldn't be completed. (SDErrorDomain error 108.)". Luckily, some other M1 owners have provided useful solutions to fix it:
- Installing the macOS 13 Ventura from inside the recovery mode:
1. Download the Ventura installer app onto your internal SSD.
2. Boot the M1 Mac into recovery mode by shutting it down first and pressing + holding the Touch ID key.
3. Connect the external drive and format it using Disk Utility; choose APFS as file system.
4. In the recovery mode, open Terminal, navigate to where the Ventura installer is stored (like ~/Downloads on your internal disk)
5. Start the installation process by executing ./Install macOS 13 Ventura.app/Contents/MacOS/InstallAssistant - Try another USB-A-port instead of the USB-C port. Try another external drive.
- Reset PRAM/ NVRAM and SMC [For intel Mac only]
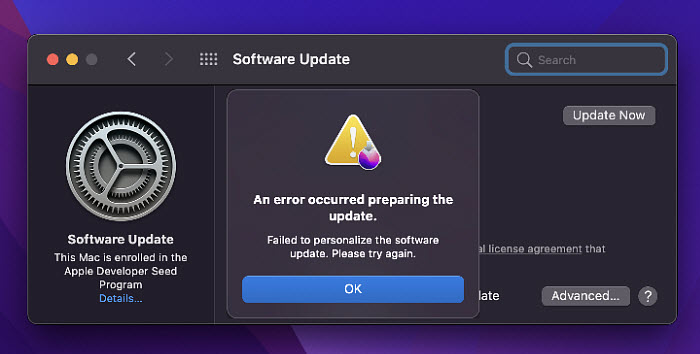
5. Failed to personalise the update. Please try again.
Here is another common error during macOS 13 Ventura update - "An error occurred preparing the update. - Failed to personalise the software update. Please try again." The "Failed to personalize" error is not new with Ventura. Here are some fixes:
- Installing the macOS 13 Ventura using Terminal Commands as per the guide above. Use sudo sh -c "softwareupdate -ia" via terminal.
- Update macOS 11 Big Sur to 12 Ventura in Safe Mode: Power off your Mac > Turn it back ON and immediately press & hold the Shift key > Only release Shift after the log-in screen is displayed. Type your Password. > Go for System Preferences -> Software Update and try to update again.
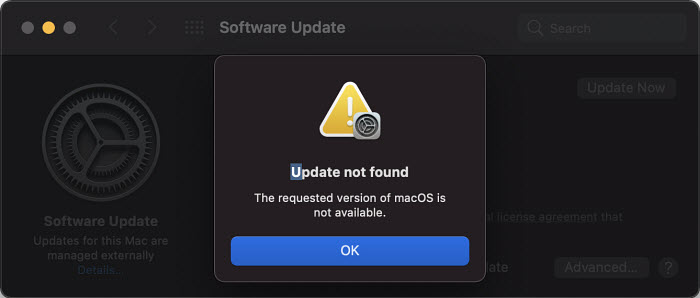
6. macOS Ventura update not found
Get the macOS 13update error "Update Not Found - The requested version of macOS is not available."? You're not alone. If the macOS Ventura "Update Not Found" and "Is Not Available" on your Mac, check if your Mac is compatible or not. If you still get the error on a compatible Mac, you can try:
- Command + R from the updates window to force a refresh.
- Opten terminal and follow the steps:
sudo -i
enter root password
/System/Library/PrivateFrameworks/Seeding.framework/Versions/A/Resources/seedutilUnenroll from the Beta Program
/System/Library/PrivateFrameworks/Seeding.framework/Versions/A/Resources/seedutil unenrollEnroll in the DeveloperSeed Beta
/System/Library/PrivateFrameworks/Seeding.framework/Versions/A/Resources/seedutil enroll DeveloperSeedClose and re-open System Preferences > Software Update
- There is too much traffic on the server. Try to update Ventura another time.
7. Ventura install is stuck
Updating to macOS Ventura 12 from macOS Big Sur might take significantly longer than expected. There are users who tried to download Ventura installer via system update for hours. But Ventura download gets stuck and the progress bar stops at some point like 25% or even 100%. Some others get stuck on "Preparing macOS Ventura 12.1 Update..." Rebooting and re-downloading the system won't fix.
- Shut down your computer, restart it and hold down the shift button until it starts in safe mode. Then redownload Ventura.
- Restart/refresh your Internet connection to avoid any network connectivity errors.
- Close any app that requires large amount of CPU, uninstall it and try again.
- Try to update macOS 13 Ventura again after rebooting in recovery mode.
- Try to update macOS 13 Ventura via the APP Store.
- If the macOS Ventura download gets stuck, there is high likelihood that Apple servers is overwhelmed. Give it sufficient time, wait patiently, or simply cancel the download. It might be much better to re-download macOS Ventura tomorrow.
8. macOS Ventura update error with non-Apple SSD
"I cannot upgrade from Big Sur (11.6.1) to Ventura. When attempting to run the installer from the applications folder, it fails to restart and prompts me to launch the application again. So I created a bootable USB using createinstallmedia and that progresses further, but during the restart process, it eventually fails with a "Mac os a required firmware update could not be installed. Compatible internal storage is required in order to update.' error message. It then launches the startup disk dialog and I reboot back into Big Sur."
If you get the same firmware upgrade error during Ventura update, or if the Ventura fails to update/install for reasons you don't know, check if you have a non-Apple SSD installed. An Apple internal SSD has to be installed in order to update the EFI firmware and OS boot loader. Therefore, you're recommended to reinstall the original Apple SSD, install Ventura to get the EFI update, then replace the Apple SSD with the OWC SSD or other non-Apple SSD, and upgrade from Big Sur 11.6.1 to Ventura.
9. Screen Saver not working after Ventura update
After the macOS 13 Ventura update, some users found their Screen Saver was not working, no matter which option (e.g., Classic, Ken Burns, etc.) they chose. When selecting the Photos library or a folder of photos, they would not render. The problem happens on iMac, MacBook Pro and MacBook Air. It's annoying for those who use this Screen Saver to choose photos frequently. If your Screen Saver is broken in Ventura, try:
- Set the Source to "Photos Library" and give some time to the system photos library to open and to show the list of albums. Then try again to select an album from the list of albums.
- The Screen Saver problem is that if you snooze the source of the photos you will see that the folder is empty. Just change the SOURCE destinationation.
10. macOS Ventura update not enough free space
If the macOS 13software won't install and says "There is not enough free space on the selected volume to upgrade the OS. An additional GB.MB is required", make sure you have more than 20GB of space on your Mac to download and install macOS Ventura successfully. However, if there are enough storage avaiable on your Mac and you still get the Ventura update problem, try this:
- Clear the local snapshots of Time Machine stored locally on your Mac. To do this, choose Apple menu > System Preferences, then click Time Machine. Turn off "Back Up Automatically". If that doesn't work, then delete the snapshots manually in the terminal: type tmutil listlocalsnapshots / and then type sudo tmutil deletelocalsnapshots 2020-06-01-002010;
- Sign out from AppStore -> Restart Mac -> Sign in to AppStore -> Download Xcode;
- Download the installer on an external hard drive and try again.
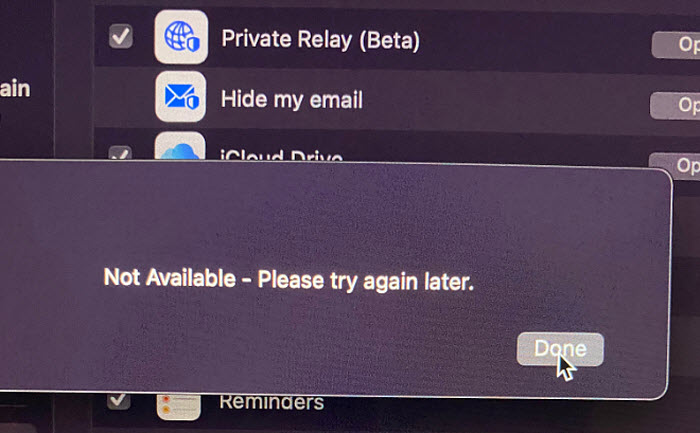
11. Hide My Email not working in Ventura
Some users reported that hid my email not working after the Ventura update. In the iCloud system preferences, it will prompt the error message saying "Not Available - Please try again later".
- First, try it again a few hours later. Just be patient and give it some time
- You can also try signing out of iCloud and back in again.
- The last resort is to perform a clean install and apply your time machien backup. But this may be troublesome for some users.
12. Slow Calendar after Ventura Update
Many users have reported the slow Calendar problems after they update to Ventura. Since the Ventura update the calendar is very slow and there are slow syncing, spinning wheels, short freezes and delays in Calendar when switching between days/weeks view. Luckily, some users have provided fixes to slow Calendar problems on Ventura:
- If you're also using other calander apps, such as the Exchange or Office 365 Calendar, just disable them. The Calendar app may interface with other servers.
- Apple also suggests you to boot in Safe Mode and disable any other third-party fonts and caches.
13. Ventura Bricked the Mac
The Ventura also bricks some MacBook Pro, MacBook Air, Mac mini, especially old Mac models. Some install Ventura successfully but when the update finishes and users reboot their Macs, they woin't power on anymore. Eveything goes fine until the screen suddenly turns black, no image on the screen, no sound, no clue.
- Check if Ventura is compatible with your hardware. Some Macs are dead after Ventura because the new software won't support some old displays.
- The download Ventura update files are corrupted during install.
- Unplug all external devices, including disk drives and monitors.
- Bring your Mac to an Apple Store to DFU restore it to Big Sur's firmware or otherwise recover it (it may get completely reformated).
14. Ventura Update Breaks Outlook
The Microsoft Outlook won't work properly after macOS 13 Ventura update. On some Macs, the Outlook crashes and freezes often. While the Outlook won't even open on some other updated Macs. It fails with a message "The application "Microsoft Outlook" can't be opened." To fix the maoc Ventura update problem, you can try the Outlook beta solution:
- After updating the macOS to Ventura, fource quite your current Outlook version > launch the Microsoft AutoUpdate v4.38, and from Advanced selected Beta Channel > chose to update only Outlook among other updates for other Office apps > restart the Outlook.
- After updating to outlook beta, created a new profile: open the Applications folder. Ctrl+click or right-click Microsoft Outlook, and then select Show Package Contents. Open Contents > SharedSupport, and then launch Outlook Profile Manager.
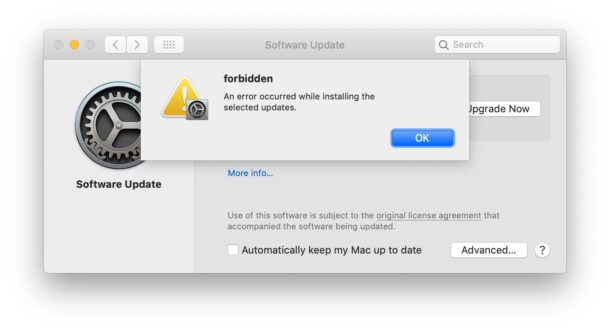
15. Software update forbidden
Confronted with an error message forbidden - An error occurred while installing the selected updates? So far, the reason is complex. For some users, they remove beta version from macOS and re-download macOS Ventura to get it fixed. For others, reboot their MacBook or iMac seemingly workable. If you're still in trouble, possibly contacting Apple support is the way to go.
16. Ventura not connecting to Wi-Fi
"I've updated to Ventura and I'm having trouble when connecting to WiFi networks. At first no network appeared and now even though it has connected silently to my usual network, it is showing as no connected, but internet actually works." For Ventura WiFi problems, you can try:
- Switch Location in the network preferences menu to somewhere else and try again;
- Remove the WiFi from the Network pane, reboot and reset SMC, then add the WiFi back.
17. Can't open apps after update
There are users reporting that they can't open apps or apps crash on startup after they upgrade to macOS Ventura. The failed apps include Messages, Dropbox, Mail, Safari, Finder, Airdrop, etc. When you have similiar problems, try to:
- Install the new Xcode Beta;
- Check if there is a new app update;
- Delete every internet account from the System Preferences panel (except iCloud) and create new ones.
18. Menu bar items disappearing
After update to Ventura, the new control center, WiFi and other system icons in menu bar are disappeared. What happened and how to get the missing icons reappear?
- Turn off fast user switching: System Preferences => Dock & Menu Bar => Other Control Center Mod... => Fast User Switching, and uncheck both checkboxes.
- Try to run it from Terminal: sudo /System/Library/CoreServices/ControlCenter.app/Contents/MacOS/ControlCenter
19. macOS Ventura battery drain
Some users from Apple community and reddit complained that Mac computer is showing battery health dropped 10% or even more in less than one week after installing macOS Ventura. Here are some proven tips to solve the problem with Ventura.
* Disable some apps. Ventura features updated and new apps that are supposed to exert pressure on your computer. You can use Activity Monitor to check the apps that are draining battery greatly, and disable them for see if it is fixed. Some users from reddit reported that battery life was improved significantly when Chrome helper app and the entire drive from Spotlight scanning are disabled.
20. Cannot connect to any bluetooth device on macOS Ventura
There are still many users experiencing difficulty with connecting to any Bluetooth device or suddenly everything drops connection to Macbook after updating to macOS Ventura. Here are some fixes for Bluetooth problems that are also feasible for other macOS updates.
Press Shift + Option, and then click on the Bluetooth icon in the menu bar, select Reset the Bluetooth module and then restart your Mac to see if the problem is fixed.


Rico has been fascinated with mobile technology for as long as he can remember. He is keen to share his experiences to those who get stuck in data transfer for both iOS and Android users. Besides his regular passion related to mobile data management, he also enjoys reading books, playing games and occasionally watching Marvel inspired movies.


