

Capturing precious moments on your iPhone is a breeze, but as your video library grows, you may find yourself wondering how to efficiently transfer those cherished memories to your Mac. Whether you want to free up space on your device or simply want to edit and organize your videos on a larger screen, we've got you covered.
In this comprehensive guide, we'll walk you through various methods and handy tips for seamlessly transferring your iPhone videos to your Mac. Say goodbye to the hassle of finding the perfect method – we've got the solutions you need to effortlessly manage your video collection. Let's dive in and make the transfer process a cinch!
The Quickest Way to Bulk Transfer iPhone Videos to Mac
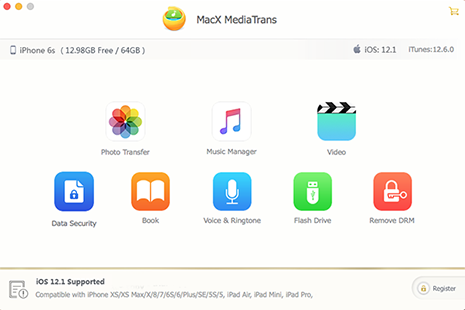
You need - MacX MediaTrans, 5X faster than iTunes and Finder App:
- 1-click to batch sync video, movie, iTunes protected videos from iPhone to Mac.
- Convert iTunes protected movies/TV shows/music to DRM-free MP4 format.
- Manage, resize, transcode, and rotate videos for iPhone.
- Sync music, photos, ringtones, eBooks, audiobooks, etc. between iPhone and Mac.
- Support the latest iOS 17 and macOS Sonoma 14.
Part 1. Transfer iPhone Videos to Mac via MacX MediaTrans at Fastest Speed
Follow guide below to use MacX MediaTrans to easily and quickly transfer iPhone videos, slow-mo, time-lapse recordings, movies, TV shows, music videos, etc. to Mac without iTunes syncing.
Download and launch this iPhone manager for Mac. It supports iPhone 15 and earlier, as well as macOS Sonoma and earlier.
Step 1. Connect your iPhone to the computer with a USB cable and then disable iTunes Auto Sync by following the instructions on the prompted window.
Note: Turning off iTunes sync is optional, but we strongly suggest you to do it in order to keep your iPhone data from getting erased.
Step 2. Click on the "Video" button on the main interface to open the Video window.
Step 3. On the left side of the Video window, you should see all the video content on your iPhone, covering Video Recorded, TV Shows, Movies, Music Video, etc. Click the type of video, and select video files you want to transfer from iPhone to Mac from the list.
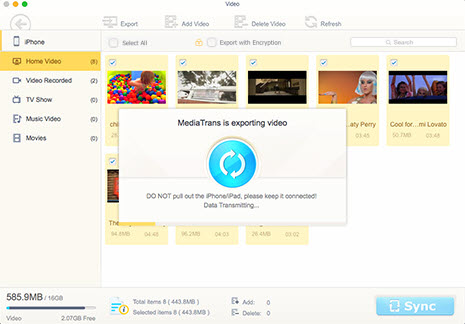
Step 4. Click the "Export" button at the top menu bar. Then the videos will be transferred from iDevice to your Mac computer in a flash.
Note: After you transfer the 4K/HD videos from iPhone to Mac, you may add new contents to mobiles by click Add Video button. When you import videos to iPhone from Mac computer, this software will automatically convert incomptible files into iPhone supported formats, resolutions, sizes and orientation.
Part 2. Export Videos from iPhone to Mac with iPhoto
In addition to the function to copy iPhone photos to Mac, iPhoto also provides an easy way to transfer videos from iDevice to Mac (MacBook Air/Pro, iMac etc). It is a built-in app, so that no extra software is required. Besides, iPhoto supports most common video file formats.
- Connect iPhone to Mac computer via USB cable.
- Open "iPhoto" and find your iPhone under Devices.
- Now you can see the photos and videos on your iPhone. Click "Import Photos" to transfer all videos, or click "Import Selected" to transfer the selected videos (slow-motion videos, time-lapse video, 4K ProRes video) from iPhone to Mac.
- Switch to "Last Import" and click "Edit". Select All and click Edit.
- Now click "Copy" and copy all the videos imported from iPhone. Go "Finder" and click "Edit".
- Simply press "Paste" and videos are imported to Mac. .

Part 3. Copy iPhone Video Footages to MacBook iMac Using Image Capture
Like iPhoto, many built-in apps on Mac can move videos from iOS devices to Mac without iTunes. If you have installed Image Capture, you have a fast and easy way to transfer iPhone slow-motion videos, time-lapse videos to your macOS.
1. Connect iPhone to Mac via USB cable and launch Image Capture. Now you can see a list of the photos and videos in your iPhone camera roll.
2. Select the videos you'd like to move to Mac and then click "Import". You can transfer multiple videos with Command key. To import all videos from iPhone to Mac, simply click "Import All" button.
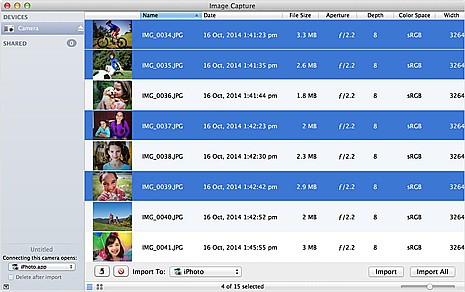
3. Now a window will pop up specifying the folder on Mac to save the iPhone videos. You can select the destination. Then click "Import" and the selected videos will be transferred.
Part 4. Free Sync Videos from iPhone to Mac Using iMovie
This method is often ignored by most users: iMovie. While it is well known as a video editing tool, it also features the ability to import (4K) videos, slow-motion videos, time-lapse videos from iPhone to Mac without iTunes. With iMovie, you can achieve this in a few clicks.
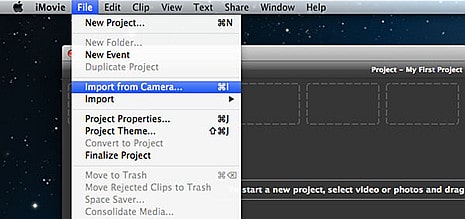
- Connect iPhone to Mac computer via cable. Open iMovie app on Mac.
- Click "File" and select "Import from Camera". Then your iPhone will be detected.
- Select the videos you'd like to import to Mac from the list.
- Click "File" and then "New Project". Drag and drop the videos and click "Share".
- Click "Export Movies" and the videos will be moved from iPhone to Mac now.
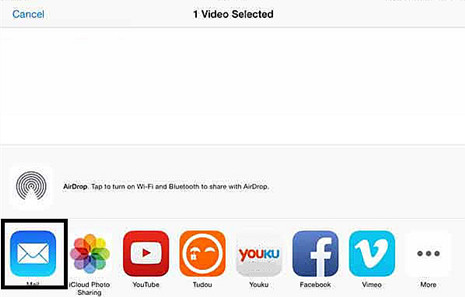
Part 5. Tranfer iPhone Videos to Mac Using Email
The last method is to send the video to your email account and download them to computer. This method applies to videos in small size. If you want to transfer iPhone movie to Mac, or 4k videos from iPhone to Mac this way, it will take a lot of time.
If you don't have a large-size video on iPhone to transfer to Mac without cable, sending an short video message via Apple Email app is also a way to go. This is the easiest way to import videos from iPhone to Mac. The biggest problem using email has strict size limit, which HD videos can easily cross. In other words, this method is not suitable for HD/4K video transfer. Besides, some Email apps may have requirements on the file format.
Max video file size you can send via email
- Gmail: 25MB
- Outlook: 20M
- Yahoo Mail: 20MB
- AOL Mail: 25MB
- 20MB = a 2 min 40s MP4 1280x720p footage (overall bit rate 1043 kb/s)
Part 6. Backup iPhone Videos to Mac Using AirDrop
Apple's AirDrop offers a faster and easier way to copy iPhone video files to Mac wirelessly without cable than sharing via email. And large 4K UHD videos or longer videos can be sent too. Use steps below to give it a shot.
- Find where the video you'd like to share to Mac locate, and open it. You can tap Select and choose multiple video files on iPhone to transfer.
- Tap the Share icon. After a few seconds, you should see the Mac computer icon, just tap on that icon.
- The transferred video from iPhone will download to the Downloads folder.
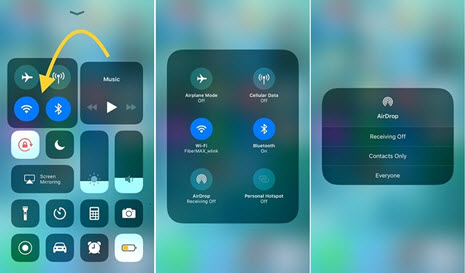
Tips: before you AirDrop videos from iPhone to Mac wirelessly, make sure the Wi-Fi and Bluetooth are enabled. Your Mac is required to use OS X Yosemite or later, and iOS 7 or later. Sometimes, AirDrop not working on iOS issue is quite annoying.
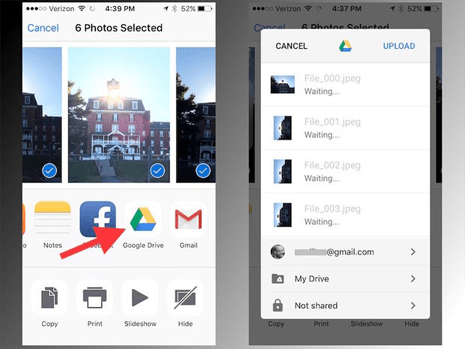
Part 7. Transfer Videos from iPhone to Mac using Google Drive
For those who possess large-sized videos on iPhone, you're suggested to utilize Google Drive, which is a cloud-based storage solution accessible from both your iPhone and MacBook/iMac. It's similar to Apple iCloud for multimedia files storage. It needs you to access to your cloud service on both your iPhone and Mac. It would be slightly more complicated than the above mentioned methods. But it goes faster and can handle your large-size iPhone videos without space trouble. Check the detailed steps if you're interested in this method.
On your iPhone:
Step 1. Download Google Drive. If you haven't already, download and install the Google Drive app from the App Store.
Step 2. Sign In. Open the Google Drive app and sign in with your Google account. If you don't have one, you'll need to create one.
Step 3. Upload videos.
- Tap the "+" icon or the "Add" button in the app to create a new folder or select an existing one.
- Open the folder and tap the "+" or "Add" button again to upload your videos.
- Select the videos you want to transfer, and they will start uploading to your Google Drive account.
Step 4. Wait for upload. The time it takes to upload your videos depends on their size and your internet connection. Make sure your iPhone is connected to Wi-Fi for faster uploads.
On your MacBook/iMac:
Step 1. Open Google Drive. If you haven't installed Google Drive on your Mac, download and install it from the Google Drive website.
Step 2. Sign In. Open the Google Drive app on your Mac and sign in with the same Google account you used on your iPhone.
Step 3. Sync videos. Google Drive will automatically sync the videos you uploaded from your iPhone to your Mac. You can find them in the "Google Drive" folder on your Mac.
Step 4. Access and organize. You can access and organize the videos in the Google Drive folder just like any other files on your Mac. If you want to transfer them to a specific location on your Mac, simply drag and drop them to the desired folder.
Step 5. Wait for download. Your network connection speed and video file size jointly decide the downloading time. Be patient and please yourself with a cup of coffee while waiting.


Rico has been fascinated with mobile technology for as long as he can remember. He is keen to share his experiences to those who get stuck in data transfer for both iOS and Android users. Besides his regular passion related to mobile data management, he also enjoys reading books, playing games and occasionally watching Marvel inspired movies.


