

When you need to upgrade iPhone, swtich to the new iPhone, or free up more space on iPhone, you will want to download photos from iPhone to MacBook Pro, iMac, MacBook Air, etc. Frankly, there are several solutions to transfer photos from iPhone to Mac and the majority of them claim to be damn easy. Yet, the general ways like iTunes turn out to cost you large amounts of time in batch (4K) photo transfer, alongside with oodles of iTunes errors, including iPhone won't sync with iTunes, iTunes couldn't connect to iPhone, iTunes library disappeared, etc.
In such case, iTunes alternatives for iPhone picture sync are seemingly in higher demand. In response to the user need, here we select 10 fast alternatives to iTunes to import photos from iPhone to Mac without iTunes errors.
Bulk Export iPhone Photos to Mac at the fastest Speed
MacX MediaTrans - best iTunes alternative to transfer photos between iPhone and Mac in case of software update or switching to new iPhone. You are allowed to bulk delete photos from iPhone to free up space and convert heic to jpg. Sync iOS music, ringtones, audiobooks, video and even iTunes purchases to Mac no data loss, without iTunes.
Part 1. Transfer Photos from iPhone to MacBook iMac with MacX MediaTrans
World's No.1 fast speed, versatility and ease of use earn MacX MediaTrans the top tier in this iOS photo transfer review. It's able to export pictures from iPhone to MacBook, iMac, iMac Pro or vice versa at world's fastest speed, 100 4K photos only 8 seconds, thanks to its advanced GPU HW acceleration tech supports. It can do more:
- Photos Transfer: backup iPhone photos to Mac (live photos, 4K image) and import photos from Mac to iPhone, too.
- HEIC to JPG: Auto convert HEIC to JPG during syncing process to make HEIC photos playable on Windows Android.
- Batch transfer: export the whole camera roll to Mac/PC, or selectively backup your best shot or precious memories.
- Bulk delete iOS photos: delete iPhone photos, music/video/ringtones, the industry 1st to delete camera roll.
- 100% image quality: 1:1 move photos from iPhone to Mac with intact quality, no compression or quality loss.
Below are the simple steps to move iPhone photos to Mac computer with this program.
Step 1. Free Download MacX MediaTrans
Free download this iPhone manager on Mac and then fire it up. Next, connect your iPhone to Macbook Pro/Air, iMac, Mac Mini or iMac Pro.
Note: there will pop up a window to advise you to properly set iTunes lest your iOS device data gets lost. So please follow the prompts to set iTunes first.
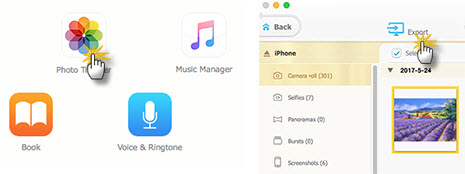
Step 2. Export all or selected photos
Click "Photo" icon to get the photos from iPhone Camera Roll. Choose the photos you wanna sync and then move it to your Mac (directly drag-drop supported).
- To export all photos: To transfer all photos in one stroke, click Export and there is an option of Select All, click it.
- To export photos selectively: Find your best shot or most precious pics, select with Ctrl pressed, click Export.
- To export albums: Sync photos from iPhone to Mac in album or batch. Arrange pictures, selfie, screenshots, wallpapers as per Day/Month/Year and move photos from iPhone to Mac in whole album with "Export" button, simple & fast.

Step 3. Export Photos from iPhone to MacBook iMac Now
Then the photos and albums will be saved on the computer. You can transfer as many photos as you want in one click.
When you export photos from iPhone to Mac, the software also enables you to export and convert HEIC to JPG format on Mac or export HEIC photos without changing picture format.
Supported iPhone iPad iPod & OS:
- iPhone: iPhone 15/14/13/mini/Pro (Max), 12 (mini), 11, 11 Pro (Max), XS(Max)/XR, iPhone X/8/8+/7/Plus/6s/Plus, iPhone SE, iPhone 6/6+, iPhone 5S, iPhone 5C/5, iPhone 4S
- iPad: iPad Pro, iPad mini 4, iPad mini 3/2/1, iPad (Retina), The New iPad, iPad 2, iPad
- iPod: iPod touch 5, iPod touch 4, iPod touch 3, iPod Touch, iPod nano, iPod Classic
- iOS: iOS 7 or higher
- iTunes: iTunes 12.3 or higher
- Mac OS X: Mac OS X 10.7 - 14 (macOS Sonoma)
Part 2. Transfer Pictures from iPhone to Mac with AirDrop
The second recommended way is to take full advantage of AirDrop. To use AirDrop, the preparation jobs include:
- Same Wi-Fi network guaranteed for your iPhone and Mac.
- Turn on the Bluetooth both on your iPhone and Mac.
- Operating system requirement: macOS 14 Sonoma and earlier; iOS 17 and earlier.
After all the preparation work is done, then you can enter to the point: start to sync photos from iPhone to Mac now.
Step 1. Access to the camera roll on your iPhone and choose the pictures you wanna export.
Step 2. When "Tap to share with AirDrop" appears, tap the MacBook Pro/Air or iMac icon below.
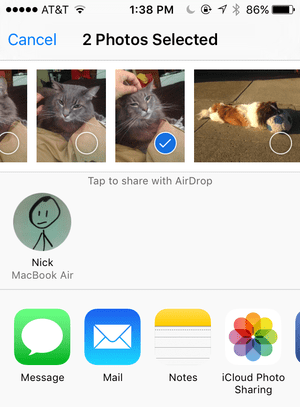
Step 3. If everything goes well, then AirDrop is now to transfer photos from iPhone to computer Mac.
Part 3. Export Photos from iPhone to Mac Using iPhoto
iPhoto is warmly welcomed by tons of fans because it can import iPhone photos to Mac computer, organize, edit, print and even share digital photos on macOS. And if you buy your Macintosh personal computer that is released between 2002 to 2015 and don't upgrade macOS to high version than Yosemite, then the iPhoto app bulit-in on your Mac can be used. As for the later produced macOS computers with Yosemite or higher OS, they're not equipped with iPhoto, Photo app instead. So to use iPhoto to sync photos from iPhone to MacBook, iMac, you need to check your Mac computer first and then continue.
Step 1. Connect your iPhone to your MacBook Pro/Air or iMac using the original iPhone USB cable.
Step 2. iPhoto app will automatically open on your macOS.
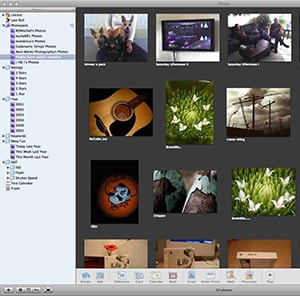
Step 3. Click on your iPhone device under "DEVICES" section at the left ride of the interface.
Step 4. Tick the photos you wanna import to your Mac. Followed by a hit to "Import Selected". Or just press "Import New" if you have the demand to copy all iPhone photos to MacBook Pro/Air, iMac, Mac Mini, Mac Pro, etc.
Note: as you can see, there is also a "Delete items" option at the top of the interface, via which you're allowed to bulk delete photos from iPhone.
Part 4. Sync Photos from iPhone to Mac Using Image Capture
To compare Image Capture with iPhoto, you will find that actually the original purposes between these two Apple designed photo applications are different. iPhoto is mainly to import, edit and print photos while Image Capture focuses on uploading photos from digital cameras, scanners and iOS iPhone iPad. Of course, there is one secret of Image Capture Apple doesn't tell you is that it can still help you transfer pictures from iPhone to Mac. How to? Read on:
Step 1. Connect your iPhone to your macOS computer and fire up Image Capture.
Step 2. Select your iPhone or other iDevices from "DEVICES" section.

Step 3. Tap "Import To" on the bottom of the interface to choose a destination folder to save your pictures on Mac.
Step 4. Opt for the pictures one by one and click Import, or select "Import All" if you need to bulk backup iPhone camera roll to Mac.
Part 5. Download iPhone Photos to Mac Using iCloud
iCloud Photos keeps your photos up to date and available automatically on all of your Apple devices (iPhone iPad, Mac computer), on iCloud.com, and even your PC. When iCloud Photos is activated, you have no need to manually transfer photos between iPhone and MacBook iMac. iCloud always uploads and stores your original, full-resolution photos in HEIF, JPEG, RAW, PNG, GIF, TIFF formats. Yet, one thing you need to know is that your pictures are not duplicated in your iCloud backup. Therefore, you ought to keep backup copies of your library lest any edit or delete reflects on all of your Apple devices.
To bulk download copies of your iPhone photos from iCloud.com, check below:
Step 1. Log into iCloud.com on your Mac with your Apple ID > click Photos.
Step 2. Select the photos images you wanna download for backup on MacBook Pro/Air or iMac.
Step 3. Click and hold the download button at the top right corner of the window. If you wanna keep the original format and full resolution, choose Unmodified Original. Or select Most Compatible if your HEIF photos have problems in later image editing programs.
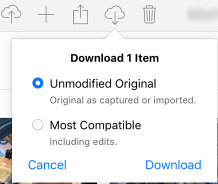
Step 4. Click Download option to download copies of your picture from iCloud to MacBook or iMac.
iCloud service is so convenient and simple to use, and why we recommend it in the minor place? Generally because iCloud free storage is so limited, only 5GB. Thus, you have to pay more to get expansive space, 50GB, 200GB and 2TB premium options. Beyond that, iCloud errors like photos not uploading to iCloud, iCloud backup couldn't be completed occur now and then. And you also need to guarantee a high-speed network connection for photos (esp. 4K) downloading in bulk.
Part 6. Export Photos from iPhone to MacBook iMac with WeChat
WeChat is a voice chatting app designed by Tecent for iOS iPhone iPad and Mac OS X users to free chat online. No exaggeration to say it's the most popular app in China now, no one of. Because it can do more things beyond your imagination. Among its many talents, super fast sharing and getting photos off iPhone to Mac is worth a mention.

It supports users to free copy photos from iPhone to Mac with 9 pictures per time after you log in your WeChat account on both iPhone and Mac. Followed by right-click "Save picture as" on Mac computer via WeChat dialog box. The iPhone photo transfer speed is comparatively fast as long as your network connection doesn't get stuck in traffic.
Part 7. Import Photos from iPhone to Mac with E-mail
If you don't have too many photos waiting to sync, just one or two photos, the fastest yet simplest way is to send photos from iPhone to Mac with E-mail.
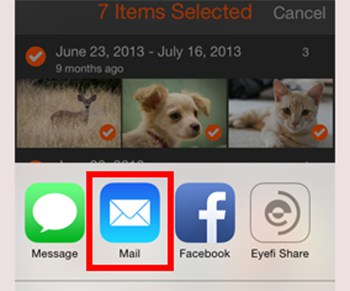
First of all, enter your photo app and then select the photo you wanna sync from photo album. Next, click the "Share" icon at the left side of the bottom; tap "Mail" icon. Final step, fill in your E-mail address, title and then tap "Send" button. Well, now the iPhone photos to Mac transfer with E-mail is accomplished super fast. But if you want to organize iPhone photos meantime, emailing is not a good option, you can turn to an all-around picture manager for iPhone.
Part 8. Copy Photos from iPhone to MacBook iMac Pro with USB Cable
Last but not least, the last way is also the traditional way for downloading photos from iPhone to MacBook iMac without using iTunes. Connect your iPhone to your Mac computer via USB sync cable. By default, the Photos app on your Mac is set to open automatically once you plug your iPhone into your Mac. And then the photos app on your MacBook or iMac will present all the photos of your camera roll so that you can simply tick 'Import All New Photos' to copy photos from iPhone to Mac at once.
Alternatively, you can select the individual pictures, selfie or images to import and keep. After iPhone pictures backup to Mac, you will get more space on your iPhone for later picture capture.
Part 9. Transfer iPhone Photos to Mac using WhatsApp
WhatsApp is not primarily designed for transferring photos from your iPhone to your Mac, but you can use it as a temporary medium for sending iPhone photos to yourself, and then download those photos on your Mac. Here's how you can do it:
Step 1. Open WhatsApp on your iPhone. Make sure you have WhatsApp installed and set up on your iPhone.
Step 2. Send Photos to yourself.
- Open the chat with yourself (you can create a chat by sending a message to your own number).
- Tap the camera icon in the chat box to access your iPhone's camera or photo gallery.
- Select the photos you want to transfer and send them to your own WhatsApp chat.

Step 3. Download photos on your MacBook Pro/Air or iMac.
- On your Mac, open a web browser and go to web.whatsapp.com.
- You'll see a QR code on the webpage. On your iPhone, tap the three dots (Menu) in the top right corner of the WhatsApp app and select "WhatsApp Web."
- Scan the QR code displayed on the web page using your iPhone's camera.
- Once the QR code is scanned, your WhatsApp chats will be accessible on your Mac.
- Open the chat where you sent the photos to yourself and download them to your Mac by clicking on each photo and selecting the download option.
Please note that this method might be a bit more cumbersome compared to other options like using iPhoto, AirDrop or third-party transfer tools. WhatsApp is best suited for sending photos to contacts or groups, and not necessarily for transferring large numbers of photos in bulk to your Mac.
Part 10. Sync Pictures from iPhone to Mac using iMazing
iMazing is a third party iPhone photo transfer program that allows you to transfer photos, as well as videos, music, and other data from iPhone to Mac or vice versa. It offers both wireless and USB connections. You can choose specific folders or albums to transfer and preview your photos before importing. iMazing also provides options for creating backups, managing app data, and more. Follow the straightforward way to transfer photos from iPhone to Mac via iMazing:
Step 1. Download and install iMazing on your Mac. You can find the app on the iMazing website (https://imazing.com/). Afterwards, connect your iPhone to your Mac using a USB cable. Make sure to unlock your iPhone and trust the computer if prompted.
Step 2. Open the iMazing application on your Mac. In the iMazing main window, you will see your connected iPhone listed on the left sidebar. Click on it to select your device.
Step 3. In the device management screen, click on the "Photos" section, which is usually located in the left sidebar under your device's name. iMazing will display your iPhone's photos and albums. You can opt for the images or albums you want to sync to your Mac.

Step 4. Click the "Export to Folder" button to choose the destination folder on your Mac where you want to save the photos.
Step 5. After selecting the photos and destination folder, click the "Export" button to initiate the sync process. You can monitor the progress in the iMazing window.
Once the transfer is complete, you can access the synced photos in the destination folder you specified.
You see, the above 10 ways are all available for transfer photos from iPhone to Mac. However, your option may be different according to your needs. For example, WinX is preferred for those who want to transfer all photos at fast speed and even convert HEIC to JPG. AirDrop, iPhoto, Image Capture are suitable for transferring specific photos at fast speed. iCloud depends more on WiFi connection. Email and Wechat both have size limit for photo transferring. USB cable offers a solid option for transferring photos, while you should always carry it.


Rico has been fascinated with mobile technology for as long as he can remember. He is keen to share his experiences to those who get stuck in data transfer for both iOS and Android users. Besides his regular passion related to mobile data management, he also enjoys reading books, playing games and occasionally watching Marvel inspired movies.


