

Believe it or not, iTunes is absolutely most commonly used tool to transfer music from iPhone to Mac. Yet, iTunes can be a disaster now and then. It's not only complicated in steps, you may also be annoyed with growing problems deriving from iTunes errors and inherent limitations. Check out why iTunes is not a preferred solution for iPhone iOS music transfer.
- Firstly, you have to authorize your Mac to get an acess of your iPhone music through iTunes. Yet, each Apple ID can authorize a maximum of 5 computers.
- iTunes only allows you to transfer music purchased from iTunes Store, those ripped from CD or downloaded excluded.
- Once you sync your music from iPhone to Mac with iTunes, the original music files on iPhone were erased, leading iTunes library disappeared on your source device. You can't keep them both on iPhone and Mac.
- iTunes 12 or newer is really buggy that users never stop complaining about it for freezing Mac, removing album art, etc.
- Most importantly, iTunes was shut down by Apple now!
To break these iTunes limits, you need a top iTunes alternative, offering a seamless music transfer from iPhone to Mac.
Sync Music (iTunes Purchased or Not) from iPhone to Mac with
MacX MediaTrans! - Simplest solution to transfer iPhone MP3, AAC, M4P, iTunes DRM-ed music to Mac.
 Bulk sync iPhone music to Mac at 5X faster speed & create/edit/delete music.
- Remove DRM from iTunes purchased music and convert AAC/M4P to MP3.
- Auto convert FLAC, WMA, AIFF, etc. to MP3 when import music to iPhone.
- Move music, ringtones, iTunes purchases, video, pics between iPhone and Mac.
Part 1. Bulk Transfer Any Songs from iPhone to Mac with MacX MediaTrans
MacX MediaTrans is a cutting-edge iPhone music manager that gives you full freedom to transfer music from iPhone to Mac and vice versa without erasing raw music data on iPhone. It's the best alternative to iTunes as it does what iTunes can and cannot do when transferring music files.
No computer authorization limit, and you don't have to log in your Apple ID to transfer both purchased or non-purchased music from iPhone to Mac. It also allows you to remove DRM from iTunes purchased music and convert M4P or M4B audio tracks to MP3 for better compatibility, even without an Apple ID. If you have some other formats music such as OGG, FLAC, WMA, ALAC, DTS, RA downloaded from online or ripped from CD or DVD discs, MacX will automatically convert them to MP3 or AAC when importing from Mac to iPhone. In addition, manage your iPhone music on Mac simple and organizedly, like create playlist, make ringtones for iPhone, batch edit artist info, bulk delete iPhone music.
Besides music, MacX MediaTrans supports wide file types for transferring, from videos, movies, Camera Roll, Photo Library, Podcasts, iTunes U, TV Shows, to Audiobooks and lots more. And auto convert any videos to MP4 during sync.
[Tutorial] How to Transfer Music from iPhone to Mac with MacX MediaTrans

1.1 How to Sync Non-protected Music from iPhone to MacBook Pro/Air, iMac
The below tutorial will show you how to transfer songs from iPhone to MacBook or iMac with button clicks (drag and drop also supported) with non-protected music. If you wanna read the guide to sync protected music from iPhone to Mac, scroll down to the section titled with 1:2.
Step 1. Plug in Your iPhone to Mac
Free download MacX MediaTrans on Mac OS X 10.6 or above. Then connect your iPhone to Mac computer with USB cable. You'll be noted with a hint to Trust this computer at the first time. Just select "Trust this computer" on iPhone to get an access of your iPhone.
Step 2. Select the Target Music
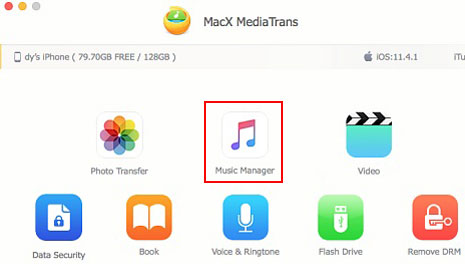
Click "Music Manger" button on the main interface to access the Music Manager sub-window. In the right content column, choose the target music tracks by ticking on the box at the preamble one by one, or checking the box of "Select All".
Step 3. Export Music from iPhone to Mac
Tap "Export" button at the top of the panel to sync music from iPhone to Mac. The iPhone music transfer tool delivers an ultra fast speed, up to 5 times faster than any others to export iPhone music to Mac computer.
1.2 How to Export Apple Music from iPhone to Mac for Sharing among Apple IDs or to Non-Apple Devices
You're supposed to stay here if the music on your iPhone is purchased from Apple Music and protected by DRM. This tutorial will show you how to decode DRM protected music and transfer protected music from iPhone to Mac. Plus, this thoughtful iPhone transfer app can even auto convert protected M4P music to MP3 for your convenient playback with VLC player, Android devices, or sharing among different Apple IDs.
![]() Please note that the precondition is only for personal legal usage, not for piracy or any illegal activity.
Please note that the precondition is only for personal legal usage, not for piracy or any illegal activity.
Step 1. Choose the purchased music you want to transfer from iPhone to Mac.
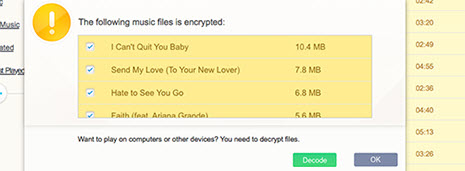
Step 2. Tap "Decode" to get rid of iTunes DRM protection; or click "OK" if you don't have such need. (in case you choose not to decode music, you can directly click "Export" button to transfer iPhone encrypted M4P music to Mac.)
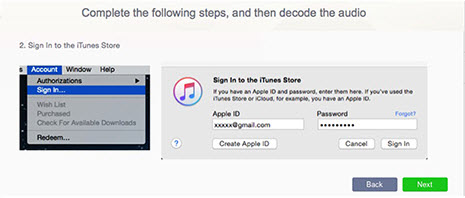
Step 3. Sign in to the iTunes Store on your Mac with your Apple ID; then tap "Next" button to continue.
Note:
To decode and put iPhone protected Apple Music to Mac, you need to check if the music on iPhone and iTunes is synchronized. If yes, just skip this part; if not, follow the tips to sync iPhone music to iTunes first.
- Open iCloud Music Library on your iPhone.
- Sign in to the iTunes Store.
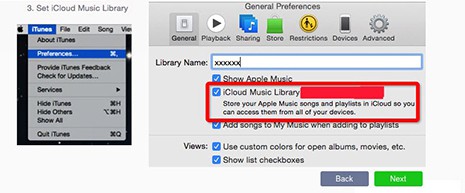
- Set iCloud Music Library.
- Share iTunes Library XML with other library on Mac's iTunes.
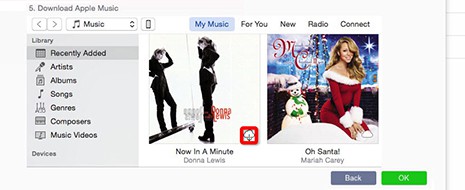
- Download Apple Music on iTunes.
Step 4. Tap "OK" after this DRM removal tool successfully removes iTunes DRM protection from Apple Muisc.
Step 5. Press "Export" button to transfer iPhone decrypted Apple Music to Mac.
When the whole music transfer process is over, you can open the iPhone music on Mac and will find that the M4P files now are transcoded DRM-free MP3 format. Hence, there is no burden for you to play iTunes purchased music on Zune, MP3 player, Android, Microsoft devices, game consoles and more.
1.3 How to Transfer Playlist from iPhone to Mac (macOS Ventura incl.)
For those who sort out iPhone songs into different playlist like favorite songs; recent play songs; Sports music, light music, R&B music, Hip-hop music, etc. and wanna transfer the whole playlist songs from iPhone to Mac, the operating process is still dead easy. Read on!
Step 1. Get iPhone Music Manager Ready. The first step is the same as previous one. No repetition here.
Step 2. Enter your iPhone music management interface via "Music Manager" button. Then double-click the iPhone music playlist you wanna transfer and then tick "All" at the top left of the whole music list.

Step 3. Press "Export" button and then the MacX MediaTrans' built-in media transfer engine will run into action to transfer playlist from iPhone to Mac with incomparably fast speed (Intel QSV supported).
Warm Prompt: In case you are sick of some music playlists and wanna delete music playlist from iPhone, you just select them on the left-side of the interface, right click to choose "Delete" and then these playlists will be removed instantly.
Part 2. How to Sync Music from iPhone to Mac Using Finder
Since iTunes went unavailable on macOS, Finder app has been a solid choice for transferring music from iPhone to Mac.
Step 1. Connect your device using a USB or USB-C cable or using a Wi-Fi connection.
Step 2. In the Finder on your Mac, select the device in the Finder sidebar. Click Music in the button bar.
Step 3. Select the "Sync music onto [device name]" checkbox to turn on syncing of your music. With the checkbox selected, syncing is set to transfer all your music to your device.

Step 4. To sync a selection of music, click "Selected playlist, artists, albums, and genres." Select the checkbox for each item you want to sync in the music list. Deselect the checkbox for any item you don't want to sync. Click Artists, Albums, Genres, or Playlists to see your content organized by that category.
Step 5. Select syncing options:
- Select the "Include videos" checkbox to include videos when syncing.
- Select the "Include voice memos" checkbox to include voice memos when syncing
- Select the "Automatically fill free space with songs" checkbox to have your Mac fill the free space on your device with songs when syncing. Use this option if you have a large music library on your Mac but don't have room to sync all of your music to your device. This option syncs as many songs as possible.
Step 6. When you're ready to sync, click Apply to sync music from iPhone to Mac instantly.
Part 3. How to Transfer Music from iPhone to Mac Using iTunes
Definitely, if you're an experienced iTunes user who cares less about its limits on computer authorization, data erasing, unidirectional sync etc., you can use iTunes to transfer music from iPhone to Mac. For example, when you have sufficient remaining authorization slots for Mac computer, you're about sync iPhone music to Mac to free up more storage space on iPhone, or all your music files are purchased from iTunes Store, iTunes comes an nice choice. Let's see how to do it.
Step 1. Launch iTunes on Mac. (Here, you're walmly suggested to download the latest iTunes version.)
Step 2. Get your iPhone connected to Mac computer with a USB cable. Afte that, authorize your computer in iTunes and enter your Apple ID and password to sign in.
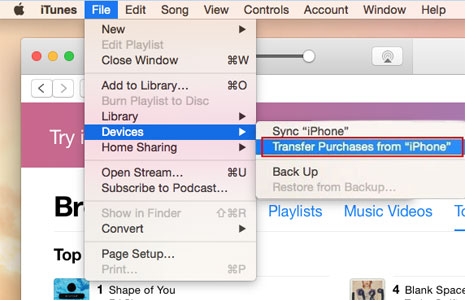
Step 3. Go to File > Devices and click "Transfer Purchases from [your device]" from the drop-down menu. Then, the music will be imported from iPhone to Mac.
Part 4. How to Sync iPhone Music to Mac via iCloud Music Library
Most Apple iPhone users are also Apple music subscribers. In case you're one of them and plan to transfer Apple music from iPhone to MacBook, iMac or Mac Pro, you're suggested to resort to iCloud music Library or Sync Library on your iPhone and Mac and sign in to your device with the same Apple ID. Afterwards, you're able to sync Apple Music from iPhone to Mac laptop wirelessly and painlessly. Check the how-to tutorial if you have no idea:
Step 1. Subscribe to Apple Music.
- Open the Music app on your iPhone > click "For You."
- Tap on "Try it Now" > select a subscription plan.
- Sign in with your Apple ID and confirm the billing information.
Step 2. Sign into your Mac with your Apple ID.
- Open the Apple Music app or iTunes.
- Opt for "Account" > "Sign In".
- Enter your Apple ID and password.
Step 3. Activate iCloud Music Library (on older macOS/iOS) or Sync Library on your Mac and iPhone.
- Head to "Settings" on your iPhone > "Music" > toggle on "iCloud Music Library" or "Sync Library."
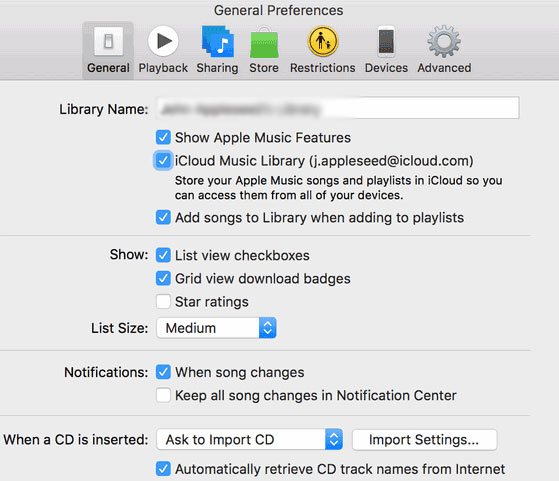
- Open the Apple Music app on your Mac > choose "Music" > "Preferences." > "General" > select "iCloud Music Library" or "Sync Library" > hit "OK."
Now your iPhone music songs are syncing to your MacBook or iMac wirelessly. If you have no Apple music subscription and still need wireless music transfer, you can rely on AirDrop, as well.
Part 5. How to Copy Music Songs from iPhone to Mac Wirelessly via AirDrop
Now your iPhone music songs are syncing to your MacBook or iMac wirelessly. If you have no Apple music subscription and still need wireless music transfer, you can rely on AirDrop, as well. Be noted that both your iPhone and Mac should use the same Wi-Fi connection and be placed within 40 feet (13m) of each other. And the bluetooth range is supposed to be roughly 30 feet.
Step 1. Enable AirDrop on your Mac and iPhone.
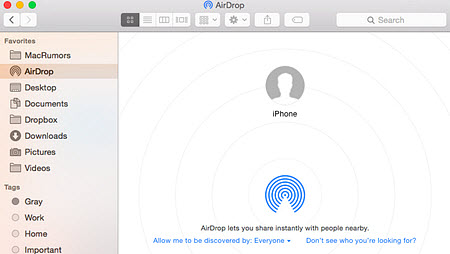
- Navigate to the Finder on your Mac > choose AirDrop from the left sidebar > change its visibility to everyone.
- Tap Settings on your iPhone > General > toggle on AirDrop.
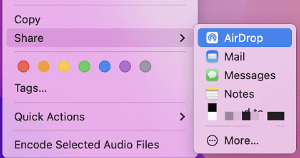
Step 2. Find the music file, tap it with two fingers, and tap "Share" > "AirDrop."
Step 3. Choose your iPhone as the target device.
Step 4. Tap "Accept" on your iPhone and choose an available app to open your music song.
Part 6. How to Move iPhone Music Files to Mac with Cloud Service
To save iPhone song files to Mac computer, how could you miss the cloud service? Hold on! Does this part introduce iCloud tutorial to backup iPhone photos to Mac? Of course not.
Here will show you a much better FREE cloud service to download music from iPhone to Mac. That's Baidu Cloud. If you have scarcely any acquaintance with this iCloud competitor, you're supposed to get closer to it:
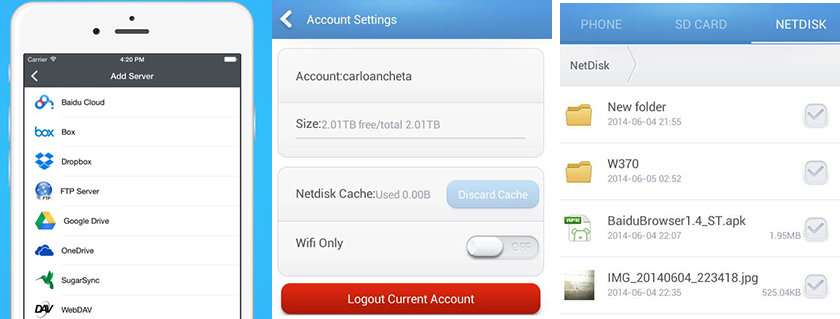
- Up to 2TB free storage space for you to upload music, audiobooks, video, photos, app, etc.
- Built-in file viewer to let you view files on iPhone, download, delete and share files.
- No add-ons or adware. Just register and sign in your Baidu account to enjoy these services.
How to Copy Songs from iPhone to Mac Using iCloud Alternative
Step 1. Download and install this free cloud storage application on your iPhone.
Step 2. Register an account or directly sign in with Baidu account if you have one. For the iPhone users, you can instantly get 2TB FREE storage space to save iPhone files once you add a bank card to your account (no need to pay). This will save you $9.99 every month compared with iCloud storage plans.
Step 3. Click "Transfer List" to upload iPhone files. And it will automatically backup your photos under Wi-Fi circumstance.
Optional: Click "Share" icon and you can directly share almost any file on your iPhone to your friends.
Step 4. Sign into Baidu Cloud on the website on your Mac computer. Next, choose the music file and tap "Download" option to download iPhone music to Mac.
Until now, the whole iPhone music to Mac transfer is finished. Currently, the Baidu Cloud 2TB is free to the public. But I guess it will charge soon or later once its users reach a large quantity. So if this iCloud alternative does make you excited, seize time and chance to give it a try now.


Rico has been fascinated with mobile technology for as long as he can remember. He is keen to share his experiences to those who get stuck in data transfer for both iOS and Android users. Besides his regular passion related to mobile data management, he also enjoys reading books, playing games and occasionally watching Marvel inspired movies.


