How to Remove DRM from iTunes Media Files, Music on Mac Losslessly
Updated by Candice Liu to DRM Removal, iTunes | Updated on Mar.12, 2025
The thing is, purchasing or renting movies from iTunes, to most of us, is somthing we take for granted. Yet, as you know, both iTunes rental movies and purchased movies are protected by Apple's FairPlay DRM technology, which protects copyright and prevents unlicensed sharing. And you are only allowed to convert movies and TV shows you purchased and rented from iTunes legally to no more than five computers with iTunes-linked Apple ID.
But for those who'd like to share iTunes movies to more than 5 computers or non-Apple devices, the DRM is disfavored as it prevents them from accessing to iTunes purchased or rented movies. Not to mention that iTunes rentals are only valid in 30 days. After you start watching the movie, you have 24 hours (in the US) or 48 hours (elsewhere) to finish it. Once the rental period expires, the movie will disappear from our iTunes library. Therefore, removing DRM on Mac for watching limitelessly on your other devices seems to be of top priority. But how could you do that? There are some ways, namely turn to a professional DRM removal software, take advantages of desktop screen recorder, and use iTunes to unblock protection from iTunes purchased AAC songs. Let's go with details below.
 Please note that the precondition of DRM removal is only for personal legal usage, not for piracy or any illegal activity.
 How to Remove iTunes DRM on macOS (Sequoia)?
If you're running on macOS High Sierra, you may find that you cannot remove iTunes DRM protections. Don't worry, it's a matter of macOS High Sierra itself. Absolutely, you can downgrade or upgrade macOS High Sierra. But that's too much complicated and troublesome. You're suggested to create a VM macOS Sierra on macOS High Sierra, and then follow the tutorial above to remove DRM from iTunes M4V, M4B, AAC files.
Here let's check how to dual boot macOS 10.13 High Sierra and Sierra 10.12.
Step 1. Download macOS 10.12 Sierra. And determine how much space you need.
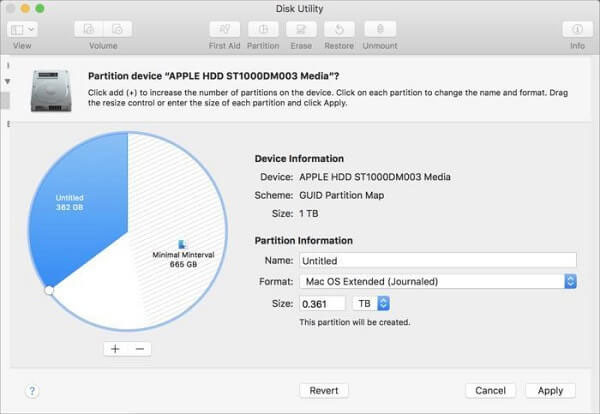
Step 2. Create a new partition. Open the Utilities -> Disk Utility on your Mac, and choose the hard disk called Macintosh HD that is the main OS partition. And then you can tap the Partition tab and click the "+" button to add a new partition. Now, you can customize the name (such as macOS 10.12 Sierra), Mac OS Extended format, and the space for the new partition. Once all settings are OK, please hit the Apply.
Step 3. Install the macOS Sierra on your new partition. Go to the Applications folder to double click the Install macOS 10.12 Sierra file. After that, you just need to follow the on-screen instruction to install the new Mac OS X system.
BTW, to use one of them, you have to restart your Mac computer to switch the operating system. Besides, you'd better to back up your Mac data as it may clean your startup disk while dual booting. iTunes, iCloud and MacX MediaTrans could help you do so.
Bypass iTunes Movies DRM Protection with A Mac Screen Recorder
Capturing the iTunes video playing screen may sounds ridiculous to remove DRM from iTunes purchased or rental movies, TV shows, music videos etc. But it works indeed. Macxvideo AI is a terrific Mac screen recorder allowing you to remove protection from iTunes videos by recording every DRM-protected movies and TV shows from Apple store. It helps you strip DRM from iTunes purchased M4V movies on Mac and save the iTunes M4V movies, TV shows, and rented M4V videos to unprotected format like MP4, AVI, FLV, MOV, WMV, etc with fast speed and high quality. Therefore, you can freely enjoy iTunes videos on your Mac or other devices like Samsung Galaxy, HTC 10, Surface Pro 4, Amazon Fire Phone, etc without any limitations or protection.

Secure Download

Secure Download
Guide: How to Remove DRM from iTunes by Screen Recording
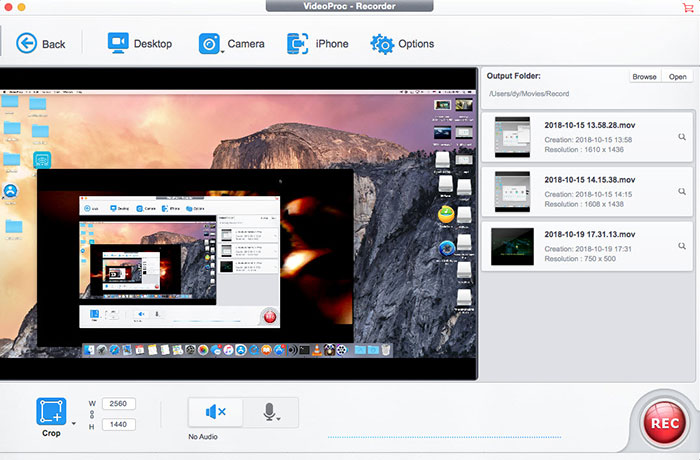
Step 1: Enter Recorder interface.
Free download the Mac screen recorder and launch it on Mac. Click "Recorder" button on the mian interface.
Step 2: Play iTunes Purchased or Rented Movies on Mac.
Open iTunes, then click "Movies" column in the upper-left corner. Click the "Rented" or "Purchased" tab at the top of the iTunes window.
Step 3: Adjust Capture Settings.
Click "Desktop" button on the top of the panel. And then you're able to customize the capture area by clicking "Crop" button and cropping the area of your iTunes playing screen on Mac. Besides, you can also choose audio and microphone device in this window.
Step 4: Choose the Destination Folder.
Click "Folder" button in output setting area and select a destination folder to save your recorded iTunes video on your Mac.
Step 5: Start Capturing iTunes Video and Removing DRM.
Click red "REC" button, this Mac DRM media converter will start capturing the screen within a few seconds. Once you finish the screen recording, the DRM will automatically removed from the iTunes video on your Mac. And you're free to watch these iTunes movies on more than 5 computers without Apple ID, or transfer iTunes purchases for playing on iPhone, iPad or non-Apple devices like Samsung Galaxy Note 9, Google Nexus, Huawei, HTC etc.
iTunes Tutorial: How to Strip DRM of Your iTunes Purchased AAC Music Files
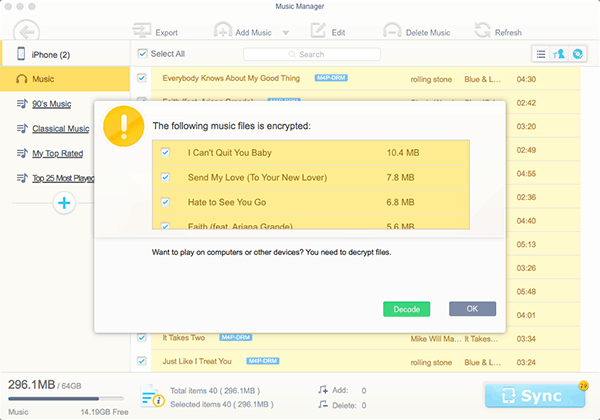
You know, not only iTunes movies and TV shows are DRM protected, files like music and audiobooks are also encrypted with Apple's FairPlay DRM. Apple has dropped DRM from iTunes songs since 2009. But on top of deleting DRM from iTunes video, you may also need to kill the DRM from iTunes music that was bought before the iTune DRM was removed. If so, here I will show you how to hassle-free Unlock protection from iTunes music in simple steps so that you can set it as a ringtone on your iPhone, play your iTunes purchased music on Android, music players, computers without Apple ID authoration. This DRM removal method only applies to DRM music, and is not suitable to get rid of DRM from iTunes movies/videos.
[Tutorial] Remove DRM from iTunes Purchased or Rented AAC Music on Mac for Free
Step 1: Navigate to iTunes in the menu bar and select Preferences.
Press the "Store" tab→"Show iTunes in the Cloud purchases" is checked→Preferences is closed.
Step 2: Make sure those protected iTunes music are ready for download.
Followed by a click of Cloud icon, and you are supposed to see a list of music that's ready to be downloaded with a cloud icon and an arrow pointed down. Prior to download these iTunes music, remove iTunes music DRM first.
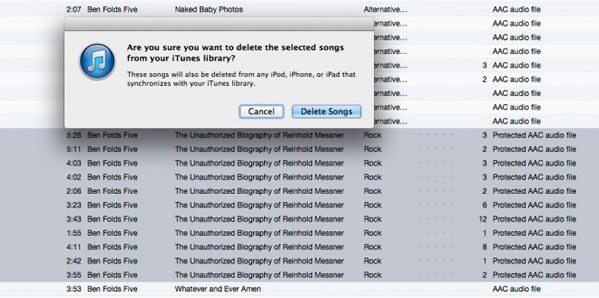
Step 3: Pick Out all the iTunes DRM music.
This is a process of selecting iTunes DRMed music. Click "Kind" to re-arrange the music order by the type of file it is. The file with no "Kind" option, click on "View" and select "show View Options" in the Menu bar. Under file, check "Kind".
Now scroll down to "Protected AAC audio file". That's the music you need to replace. Select it and ditch it.
Step 4: Download DRM-free iTunes Music.
Choose the cloud icon again and download iTunes music you just deleted by clicking on the cloud with the downward pointing arrow icon for each song.

 Convert iTunes M4V to MP4 losslessly and sync movies to Mac computer.