Home > How to > Holiday Tips > Transfer Photos from iPhone to Mac


Home > How to > Holiday Tips > Transfer Photos from iPhone to Mac
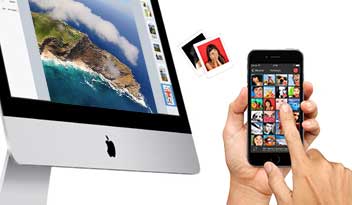
Using iTunes to sync pictures from iPhone to Mac? You must be kidding me. iTunes has no such function. How about applying iCloud to import iPhone photos to Mac? Well, it works, but remember it only 5GB free storage space for you, which can't save your a library of 1080p HD or 4K photos. Quite a pity!
Get it! E-mail is also helpful for iPhone photo transfer. Don't be silly. It only supports you to copy one or two images. OMG, is there any way to put photos from iPhone to Mac without annoying limitations? Yes! The below part will show you 3 simplest ways to move iPhone images with no hitch.
To download photos from iPhone to Mac via USB cable, you might think of iPhoto at the first thought. The truth is that this app has been discontinued since the release of OS X Yosemite and iOS 8. Thus, for users who own the latest MacBook iMac or iPhone with newly operating system, you are advised to transfer pictures from iPhone to Mac using USB cable with the help of a solid iPhone transfer tool - MacX MediaTrans.
Why you need it? Cuz it can aid you to copy photos from iPhone X/8/7/6s/Plus/SE/6 iOS 11 to Mac in batch (Select All or Option by Day/Month/Year) with world's quickest speed (5X faster than any iPhone transfer program) owing to its advanced Intel QSV hardware accleration tech. What's better, this iPhone photo backup software can also help you auto convert heic (HEIF) to jpg format during the process. Thus, you can play heic photos on your Windows or Android device.


To apply the app to move pictures from iPhone to Mac using USB cable, you need to check if your iPhone is iOS 7 or above version; Mac OS X 10.7 or higher and iTunes 12.3 or above. If not, please upgrade your iOS, Mac OS or iTunes first.
Step 1 Download and run the tool
Free download this top iOS transfer app and launch it on your Mac. Connect your iPhone to Mac; it will automatically recognize your iPhone and the device info will be shown and suggest you to adjust iTunes settings to prevent data erasing automatically
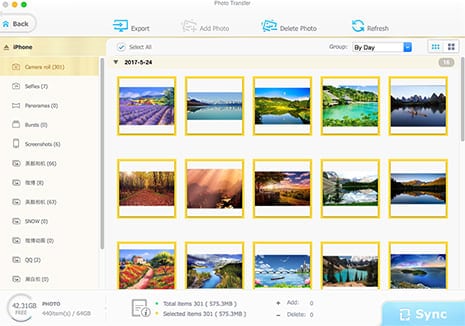
Step 2 Download Photos from iPhone (X) to MacBook or iMac Pro
Click the "Photo Transfer" button to get your pictures from Camera roll. Then choose the photos you would like to transfer from iPhone to Mac and drag it and drop on your Mac or hit the "Export" button to do the task, the picture will successfully moved to your Mac computer. You can also copy pictures in batch via "Shift" key or "Select All" option. And the tool for iPhone also supports to organize photos, delete any type of photos, including photos from camera roll.
|
iPad iPhone manager |
iPad iPhone Photo Transfer |
iPad iPhone Video Backup |
|
Support All iPhone iPad iPod |

Mount iPhone iPad as Flash Drive |

World's Fastest Speed |
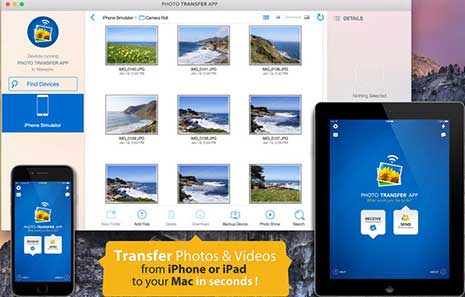
If you think using USB cable is too troublesome, you can consider using Wi-Fi to export iPhone 8 images. To ensure smooth wireless transfer, you're suggested to resort to a wi-fi supported iPhone transfer tool. Photo Transfer App for Mac cuts the buck as you wish.
Well-designed as the user friendly program, it enables you to free yet quick move photos between iPhone and Mac computer over your local Wi-Fi network. It also supports you to backup multiple photos from iPhone to Mac at one stroke and create new albums on your iDevice for photo management. As for the Apple iOS device compatibility issue, don't worry! It works seamlessly with iPhone iPad iPod iOS, as well as Android Samsung Sony devices.
1Check if your iPhone 8/7/Plus/6/6s and your Mac computer are connected to the same Wi-Fi.
2 Free download this photo transfer app on both your Mac and iPhone please. Then run them after downloading.
3 Touch the "Discover Devices" button on your Mac computer to detect your iOS iPhone.
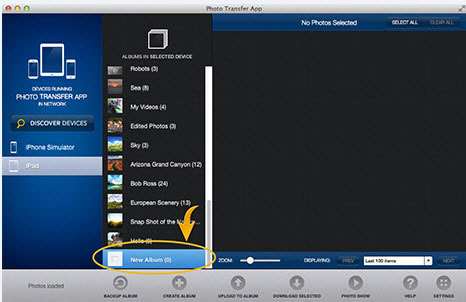
4Click on the desired iPhone you wanna move photos from.
5 Open camera roll on your iPhone and select the photos you plan to sync to Mac.
6 Click on the 'Download Selected' button to opt for a folder on your Mac to save the exported iPhone pictures.
Note: This free photo transfer app also lets you download iPhone photos to Mac via drag-drop simpler way.
The common ways are usually the USB cable or Wi-Fi network to do the iPhone transfer job. And the unusual way to fulfil the task is the widely-used Bluetooth, which are supposed to cooperate with your iPhone app named AirDrop. As long as the two conditions are prepared well, you turn on your Wi-Fi and then you can call your task begin.
AirDrop also serves as an iPhone file manager for specific purposes. Before you go: your iOS iPhone should be updated to iOS 7 or above; check if Mac OS X operating system is upgraded to Yosemite or higher version.
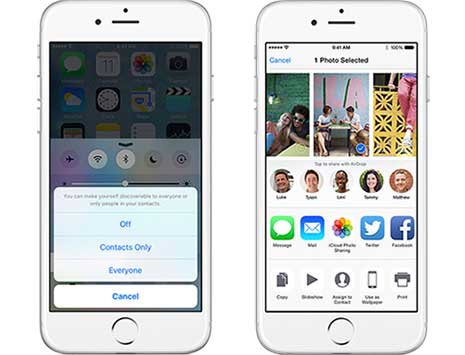
Step 1: Turn on Wi-Fi and Bluetooth on both your iPhone and Mac computer. AirDrop will still work even though both are using different Wi-Fi networks.
Step 2: Open AirDrop on your iPhone (Slide up to access Control Center > AirDrop > Choose Contacts Only or Everyone) and Mac (Finder > Menu Bar > Go > AirDrop > Click Allow me to be discovered by: > Select Contacts Only or Everyone).
Step 3: Access to your camera roll on iPhone. Select the pictures you wanna move and then tap "Share" icon - "Tap to share with AirDrop" appears on the screen. Afterwards, choose the detected MacBook Pro, Air or iMac to share pictures. Now, job's done.
 Author: Rico Rodriguez | Updated on Dec 10, 2025
Review on top five picture manager for iPhone iPad iPod iOS device to organize photos, add, delete, edit albums, sort photos by dates and transfer photos from iPhone iPad iPod to Mac/Windows, etc.

MacX MediaTrans is an all-in-one iOS iPod iPad iPhone transfer app to transfer photos from iPhone iPad iPod to Mac, as well as backup video music between iPhone iPad iOS and Mac with world's fastest speed!

 MacX MediaTrans - Transfer Photo from iPhone to Mac