The solutions from forums didn't help you out of iTunes movie import error? Don't be gloomy! Have a try on the smart approaches from this article. They will solve "iTunes won't add movies files to library" error with 100% success rate.
 By Abby Poole to iTunes Sync Error|Last updated on Jan 8, 2024
Why does everybody ask Apple to do us a favor to kill iTunes? Because iTunes exhausted you. When you make use of iTunes to sync music, you'll probably be greeted with "iTunes songs greyed out" or "iTunes won't sync non Apple music to iPhone" errors. You're too optimistic if the iTunes error you think only exists in music syncing. When you try adding movies to iTunes, you also get at least 70% chance to meet the "add movies to iTunes but nothing happens" error. If you are one of the 70% iTunes users with such issue, stay on this post and get the workarounds to fix this iTunes error.
Note: the movie source you plan to load to iTunes should come from the legal channels. And some movies that are encrypted by DRM protection can't be successfully loaded into iTunes unless you use other tools to decrypt them after you purchase these movies. When your movie source is identified as legal and non-protected files, you can try the below solutions to add them to iTunes.
Before you go, make sure your iTunes is the latest version. Upgrade iTunes if not. Then, let's cut to the chase.
The movie source that is added to iTunes is saved under Home Videos, instead of Movies subcategory since iMovie version 11. So you should open Home Videos to check if your movie file is located thereon. In case you wanna move your movies from Home Videos to Movies subcategory, it's damn easy to reach this goal with purely 4 steps:
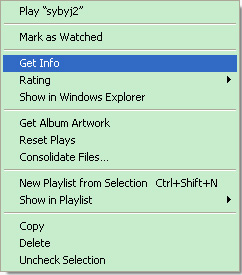
Step 1: Choose the specific movie you wanna re-locate.
Step 2: Right click the mouse (for Windows users) or press Ctrl & click the mouse (for Mac users) to activate the option menu.
Step 3: Select Get info from the pop-up menu.
Step 4: Click Options > opt for Movie under Media Kind > hit OK button. Then this movie will be moved to your Movies subcategory.
You can't relate QuickTime with this iTunes error. Yet, actually, QuickTime is responsible for this error to certain extent. If you feel suspicious about your QuickTime, do as follows:
Step 1: uninstall iTunes > reinstall iTunes on your desktop.
Step 2: Tap OK to install QuickTime player on the pop-up confirmation window during iTunes installation.
Step 3: Launch your iTunes after it's done > click "File" > tap "Add File to Library..." to import your movie source.
It's known to all that iTunes is compatible with files ended by .mov, .mp4 and .m4v file extension. However, what you probably don't know is that iTunes also places strict limits on video specifications. On one hand, it only accepts videos encoded by 540 kbit/s (minimum) MPEG-4 (H.264) video with AAC codec audio track at roughly 128 kbit/s or 1.5 Mbit/s (minimum) MPEG-4 (H.264) video with around 128 kbit/s (at least) in AAC audio track. Therefore, though your movie file ends with .mp4 file extension, you still have a big chance to meet "can't add MP4 to iTunes" error. On the other hand, iTunes has been upgraded to work with the latest HEVC (H265) codec video. But it's not fully compatible with this codec. You might have no problem to add HEVC movie to iTunes and playback thereon, but it won't let you sync HEVC movies to your iPhone iPad.

If your movie source doesn't meet the above requirements, the failure is doomed. To fix this iTunes error, you need to convert movies to iTunes supported formats first. Is your first response to this issue to find a video converter?
Don't be! You just need MacX MediaTrans, which combines 2 features into 1 to sync any movies to iPhone iPad with its built-in auto video conversion feature. Thus, you can transfer any movies (MKV, HEVC, AVI, FLV, SWF, MPEG, VP8/VP9...) from computer to iPhone iPad at one stroke without any 3rd party help. It also brings you with more surprises like:
* Transfer movies (iTunes encrypted movies incl.) from iPhone iPad to Mac/PC and help you remove DRM protection during sync for later legal personal playback without limits. The same applies to sync music (FLAC, OGG, DTS, AC3, WMA...) to iPhone iPad.
* Bi-directional way to sync files between iPhone iPad and computer e.g., movies, videos, TV shows, music, photos, ringtones, iBooks...
* Manage your iPhone files: delete movies/videos/songs/pics, edit/organize music songs, turn music into ringtone, encrypt pics/videos...


How to Use MacX MediaTrans to Sync Movies to iPhone
Step 1: Free download and install MacX MediaTrans on your desktop. Run it after the installation.
Step 2: Connect your iPhone or iPad to this iTunes alternative for Mac via USB cable. You'd better conduct this movie sync task on a computer with higher hardware configurations, for this would be helpful to maximumly accelerate your movie transfer speed up to 5X faster under the drive of GPU hardware accceleration techs activated by this software.
Step 3: Tap Video on its home screen and you'll be directed to the video sync window.
Step 4: Tap "Add Video" to import videos from computer to this application. Bulk transfer is supported. So load multiple video sources if necessary.
Note: As you can see from the below picture, the unsupported video files will be instantly detected and labelled with "Convert" icon.
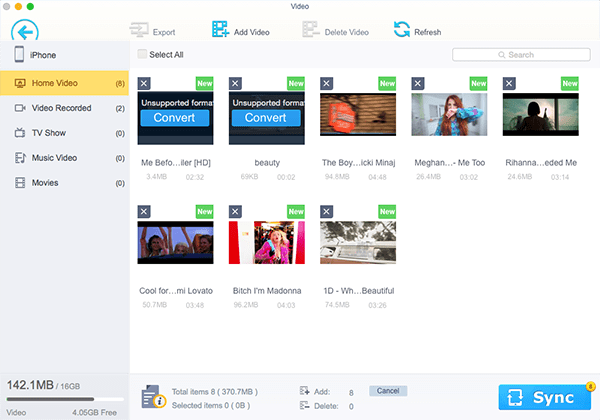
Step 5: Hit "Convert" > give the last click to "Sync" > MacX MediaTrans' format conversion engine and video transfer engine will go into action to convert & transfer GoPro video to iPhone, MKV/AVI/WMV to iPhone. It would take you a little bit more time since the video conversion is time-consuming. Give yourself a cup of coffee time and you will watch these movies on your iDevice afterwards.
There is another case you may miss out - the improper settings of your movie input property. Of course, this would only happen on Windows. Hence, you can check your movie source first and then give the below workaround a whirl if you're running on Windows.
Step 1: Right click on the movie > click on "Properties" > Uncheck "Read Only" at the attribute column.
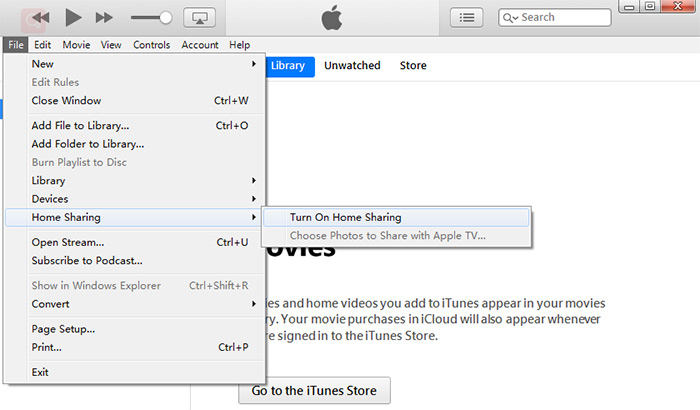
Step 2: Open iTunes > File > Home Sharing > Turn On Home Sharing.
Step 3: Now go back to your movie source again > right click & select "Open with" > choose iTunes as default.
Step 4: iTunes will automatically show up and your movie will begin to play around 10 seconds.
Step 5: Close your movie file. You will notice that your movie file has already existed in your iTunes.
Step 6: It's time to sync movies to your iPhone iPad using iTunes.

Digiarty Software, Inc. (MacXDVD) is a leader in delivering stable multimedia software applications for worldwide users since its establishment in 2006.
Home | About | Site Map | Privacy Policy | Terms and Conditions | License Agreement | Resource | News | Contact Us
Copyright © 2026 Digiarty Software, Inc (MacXDVD). All rights reserved
Apple, the Apple logo, Mac, iPhone, iPad, iPod and iTunes are trademarks of Apple Inc, registered in the U.S. and other countries.
Digiarty Software is not developed by or affiliated with Apple Inc.