
QuickTime player is the native media player for you to open and playback video audio files. As for the video footage with subtitles or captions embedded, QuickTime player is happy to help you access to the video content by viewing without sound by displaying the captions or subtitles on your screen during video playback. Certainly, if your video or movie file doesn't contain any caption or subtitle, QuickTime will not offer you an option to view them.
Regardless of what type of your video is, you can get helpful workarounds here. In terms of video with embedded subtitles, get the hang of turnning on captions in QuickTime here if needed. For those without built-in subtitles or captions, you're more needed to stay here to know how to add closed captions or subtitles in QuickTime.
Part 1. How to Turn on Captions/Subtitles in QuickTime Player
1.1 Turn on the Common Captions/Subtitles in QuickTime
The process of enabling captions or subtitles in QT is easy peasy, two steps are required only:
Step 1. Launch QuickTime Player app on your MacBook, iMac or Mac Mini.
Step 2. Open a movie or video footage that has subtitles or captions, then do as follows:
- Turn on subtitles: tap View > Subtitles > select a language. Alternatively, click Subtitles button in the playback controls (or press and hold the Subtitles button in the Touch Bar) to pop up a suite of available options.
- Turn on closed captions: hit View > Show Closed Captioning.
Now, the closed captions or soft subtitles display on your Mac screen to help viewers better understand the video content (esp. for foreign language films) even without sound.
1.2 Open Sidecar Caption Files in QuickTime
Unlike the first method to enable the ordinary captions, this one can open sidecar file captions in QuickTime without extra software. Just use an iPad as an iPad screen extension, for sidecar caption files enable you to use an iPad as an extension of your MacBook or iMac to display closed captions on a separate screen.
Certainly, this method places several pre-conditions.
- Both your iPad and Mac computer must be signed into the same iCloud account and the geographic distance between two devices should be less than 10 meters.
- Operating system: iPadOS 13 or higher; macOS Catalina or higher.
Now, embed sidecar caption files to video in QuickTime:
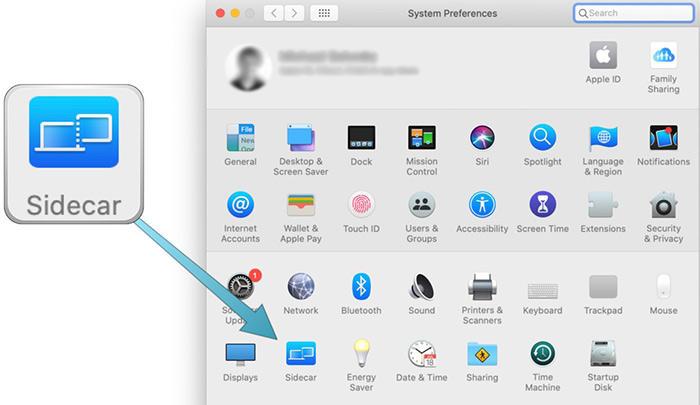
Step 1. Select Apple Menu > "System Preferences" on MacBook, iMac or Mac Mini.
Step 2. Click "Sidecar". Be noted that older Apple products might lack this feature. Do this on future-proof devices.
Step 3. Decide the specific places to show your closed captions, left or right, top or bottom.
Step 4. Click the Airplay icon on your Mac > follow the prompts to connect your iPad and Mac within the same Wi-Fi.
Now job is done. iPad should perform as an extension of your Mac, letting you move windows between the two screens.
Part 2. Can You Add SRT to QuickTime
For those who need to add external captions or subtitles in QuickTime check your subtitle/caption file format please. Unlike YouTube or Facebook that accepts SRT subtitle file, QuickTime player won't support SRT or SubRip files. You can't add SRT to quicktime directly.
Instead, QuickTime Player adopts a .QT file that is a custom text format with timestamps and text elements included. To be specific, your video or movie subtitles/closed captions display on your Mac screen only if they're embedded using the CEA-608 format (aka. Line 21 captions).
Well, where to create your own CEA-608 QT format subtitles or captions? 3Play Media is your best bet. You can easily make your specific subtitles or closed captions online and download them as CEA-608 without installing troublesome apps. Check:
Step 1. Upload your video for captioning. Access to 3Play Media webpage > log in with your account > tap Upload Media button and choose from Computer > Choose your video clip and follow the instructions to specify turnaround. An E-mail will be sent to inform you that your captions are ready.
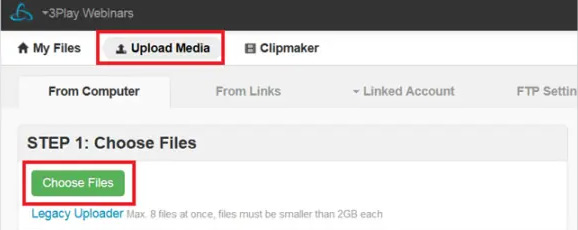
Note: batch uploading is limited to max 8 files at one stroke and your video size is supposed to be smaller than 2GB each.
Step 2. Download your soft subtitles or closed captions in .QT format. Click My Files on 3Play Media webpage > pick up the video file you uploaded for captioning > hit Download > select QT. A QT (.txt) file under the Web Captions section. Then your desired subtitles/captions will start to download to your MacBook, iMac or Mac Mini.
As far as the SRT subtitles you've already had, you can resort to caption converter to convert SRT to CEA-608 QT format.
Part 3. How to Add Closed Captions (sidecar file) in QuickTime
When everything is ready, Head to 3Player Media (professional subtitles/captions solution) to embed soft subtitles or closed captions (sidecar file) to videos in QuickTime. Check the how-to nitty-gritty:
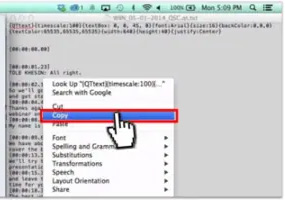
Step 1. Add closed captions sidecar file in QuickTime Pro. Open your video in QuickTime Pro > open your downloaded .QT CEA608 format file in QuickTime Pro.
To do this, find your .QT file in Finder > right-click the caption/subtitle file and choose Open with > QuickTime Pro. This will open a separate QuickTime window that shows just your closed captions, no video image. Copy the captions to the clipboard by tapping Edit, selecting All and opting for Edit > Copy.
Step 2. Click the QT window of your video. Make sure that the play head is at the beginning. This aims to guarantee your video and subtitle playback in sync, no out of sync trouble.
Step 3. Hit Edit > select Add to Movie to embed closed caption sidecar file to video in QuickTime Pro. Save your video file and your video footage gets optimized and polished by captions now.
If the above procedure is too complicated to you and you're buget-minded to pay for 3Player Media to add closed captions to video in QuickTime, forget about the compatibility unfriendly CEA-608 QT file format. Instead, consider to add SRT subtitle to video first and then play your video with QuickTime later. This would make task much easier and free of charge.
Macxvideo AI is highly recommended for you to complete this SRT subtitles to video embedding task. This all-in-one video toolkit helps you free add external SRT, SubRip subtitles to MP4, MOV, AVI, FLV, MKV, WMV, SWF, AVCHD, YouTube, Vimeo, Facebook video in any format and resolution. Plus, it can also automatically fix your video-subtitle desync issue, no manual adjustment. Video converting, screen record, video download, edit features are also accessible.
Check the detailed how-to guide if you're interested in.


Candice's particularly skilled in writing and sharing video-related contents. Her guides cover from deep-seated video/audio parameters, to media entertainment on different platforms. She also enjoys shooting and processing videos by herself for a more reliable basis of informative info with her articles, which are never at the expense of eliminating an entertaining read.


