
Born to be a Mac video player, QuickTime Player also lets you edit your movies clips, including trim, split, crop, rearrange, flip and rotate. Using the Trim function to trim out unwanted parts of a movie or clip, Split to split video into multiple segments, rearrange to change the order of clips in a video, flip or rotate to view videos in horizontal or portrait mode, etc. This guide mainly focuses on QuickTime trim video function to teach you how to trim out the spare parts in your videos on Mac, plus solutions to QuickTime can’t trim video such as "QuickTime trim greyed out" or "QuickTime trim video the operation could not be completed" problem.
QuickTime Can’t Trim Video? Turn to a More Powerful Video Trimmer
Problems occur occasionally when trimming videos with the built-in QuickTime Player app. QuickTime trim maybe greyed out when the file format is not supported to be edited, or error message "The operation could not be completed" when trying to save large (1GB+) videos after trimming. So, you are suggested to use Macxvideo AI with powerful trim feature to help trim videos.
Part 1. How to Trim Movie in QuickTime?
QuickTime is the most direct and easiest way to trim videos on Mac to remove the useless parts or decide the length of a video. The trim process is easy, but for beginners you still need some guides.
Step 1. On your Mac, launch QuickTime Player app. Then, drag and drop the movie you want to trim to QuickTime Player to open.
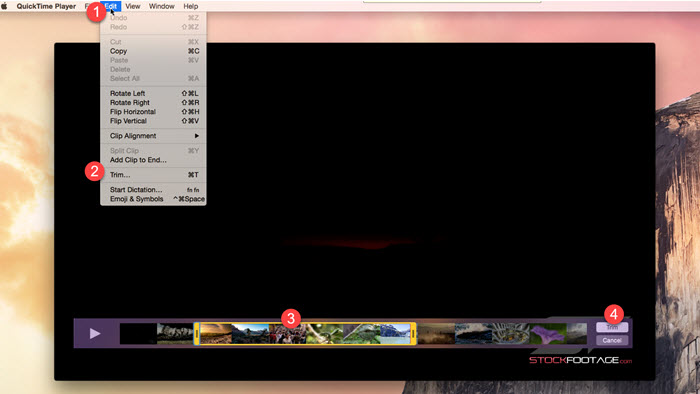
Step 2. On the menu bar, choose Edit > Trim.
Step 3. When the trimming bar shows, drag the yellow handles with cursor to adjust the beginning and end handles to isolate the unwanted parts. Everything inside the yellow bars will remain.
- * You can also move quickly through the part selected by swiping with two fingers on your trackpad.
- * Or use the QuickTime trim shortcuts to select the parts: Command + T on your keyboard.
Step 4. Click Trim button to let QuickTime trim your video clip. To undo the trim, simply choose Edit > Undo Trim on the menu bar.
Step 5. After trimming, QuickTime will display the trimmed video. You can preview the trimmed video using the playback controls to see if it is what you need.
Step 6. Save or export the trimmed video. After trimming video with QuickTime, click the top menu bar to choose Save or Export.
- * You can save the trimmed video in MOV format (2880x1800 pixels), and export to 1080p/720p/480p in MOV or M4V for iPhone 3/4/5.
Part 2. How to Trim Clip with QuickTime Player?
If you split your movie into clips, you can also trim the clips.
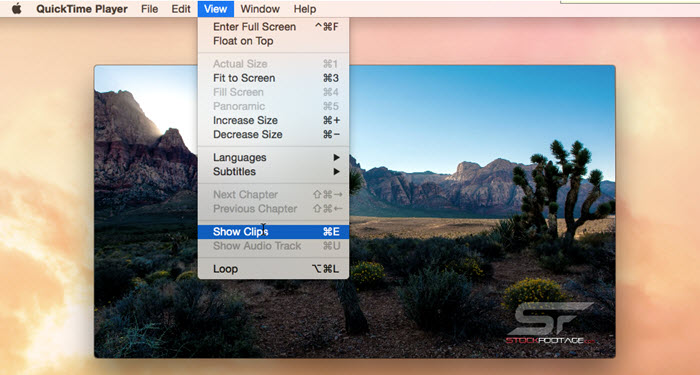
Step 1. After launching QuickTime on Mac, choose View > Show Clips on the top menu bar.
Step 2. Double-click the clip you want to trim.
Step 3. Drag the yellow handles in the trimming bar to select the portion of the clip that you want to keep.
Step 4. Click Trim to trim clip in QuickTime Player on Mac.
Part 3. How to Let QuickTime Trim Video in the Middle?
For macOS users, there is an even quicker yet easier way to get MOV converted into MP4. That is QuickTime Pro. And the whole process is easy peasy. Not buying? Read below:
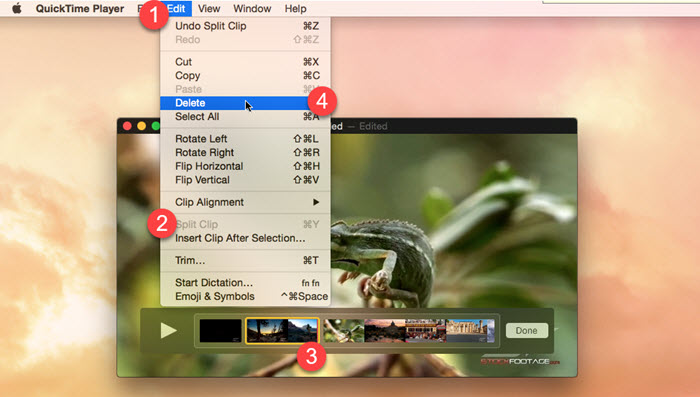
Step 1. Play the video with QuickTime Player and stop the playing at the start of the section you want to cut out.
Step 2. Go to the Edit menu and select Split Clip to break it into two parts.
Step 3. Drag the play position indicator (a thin red line) to the end of the section you want to trim.
Step 4. Go to the Edit menu and select Split Clip.
Step 5. There are now three parts. Click the part in the middle you want to trim out.
Step 6. Go to the Edit menu and select Delete to trim the video in the middle.
QuickTime Player is a media player with some basic editing features, but even the basic trim function is not perfect. Sometimes, you can’t trim a video in QuickTime, and sometimes the operation could not be completed when saving the trimmed video. Besides, if you want more advanced editings, QuickTime could not provide. BTW, QuickTime won’t support for video formats like WMV, VOB, FLV, MKV, etc., and it’s limited to certain resolutions. So, you need QuickTime editor alternative.
Part 4. How to Solve QuickTime Can’t Trim Video?
"I have a movie that i want to basically 'crop' so as to cut out much of the extra footage. I made a selection but when i go to 'edit' it won't let me 'trim to selection', 'cut', 'copy', or 'paste'. Those options are all gray instead of black meaning i can't select them." – Apple Community
"Error message ‘The operation could not be completed’ when trimming videos."
QuickTime player trim greyed out and QuickTime trim video operation could not be completed are the two most happened issues.
From some online suggestions, to solve the greyed out error, you can simply close the file in QuickTime and open a Finder window. Right-click on the offending file and look for the entry Encode Selected Video Files at the bottom. After a moment, a pop-up opens asking you to choose a setting. Hit continue and wait. Two new files will be generated during the encoding process. When that finishes, there is a new QuickTime movie with the same content and all menu functions are available again. Also, the problem may also be tackled with by updating the QuickTime Player and macOS.
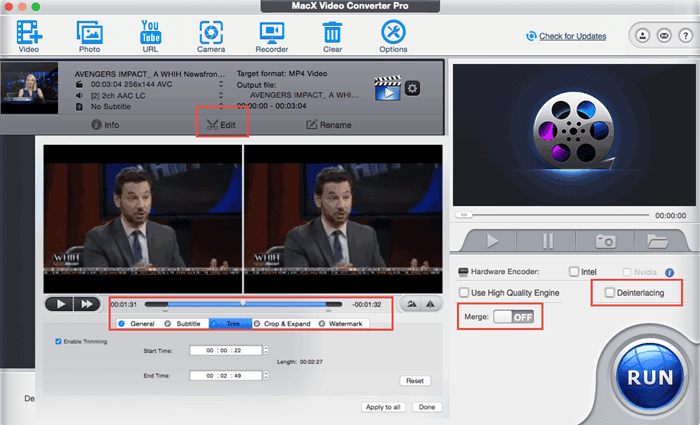
As for solving the error message "The operation could not be completed", you have to turn to QuickTime alternative as QuickTime has difficulty in saving large video files (1GB+) after trimming. To edit large-sized 4K videos in diverse formats including trim, crop, expand, add subtitles, etc., you can try Macxvideo AI.
Step 1. Download, install and launch Macxvideo AI on your Mac.
Step 2. Click the Video button on the top bar to add the video or clip you want to trim.
Step 3. Choose an output format when the Output Profile window pops up.
Step 4. Click Edit, switch to Trim and check Enable Trimming.
Step 5. Input the Start Time and End Time, or drag the play bar to determine where to start and end.
Step 6. After that, click Done.
Step 7. Click the Browse button to find a destination folder to save the trimmed video, and then hit RUN to start trimming.
With QuickTime Player, you can quickly remove a portion of the beginning or end of a movie to make it shorter or remove the unwanted contents. However, it is a basic tool which gives basic editing functions. For example, you can’t crop video with QuickTime if you don’t upgrade to QuickTime Player Pro. Don’t worry, you have Macxvideo AI. Besides video trimming function, you can also use it to crop, rotate, change volume, add watermark, add subtitles, etc. no matter your video is in whatever formats and resolutions.


Candice's particularly skilled in writing and sharing video-related contents. Her guides cover from deep-seated video/audio parameters, to media entertainment on different platforms. She also enjoys shooting and processing videos by herself for a more reliable basis of informative info with her articles, which are never at the expense of eliminating an entertaining read.


