Part 1. How to Crop Video in QuickTime Pro on Mac
Before you utilize QuickTime Pro to do the cropping stuff, you need to know that you'd better make a mask file using Photoshop to tell QuickTime Pro how it's supposed to crop your video footage. Install Photoshop on your macOS if it's not there. Then, follow the steps below to begin resizing your video frame to highlight your desired frame.
Step 1. Make a Snapchat of your Specific Video Frame
Capture a snapchat of your specific video frame via QuickTime Pro. Open QT Pro on your Mac > choose Edit at the top menu of your Mac desktop > select Copy to copy the image of your video frame.
Step 2. Create a Mask File
Launch Photoshop on your Mac > opt for File > New > paste the video image you've copied before.
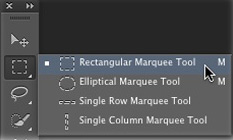
Afterwards, choose "Rectangular Marquee Tool" under marquee tool zone to select the frame area you want to keep > fill the selected area with black color and use opposite color - white color to fill the space outside the black box. Finally, save the file in GIF or TIFF format.
Step 3. Load the Mask File to QuickTime Pro
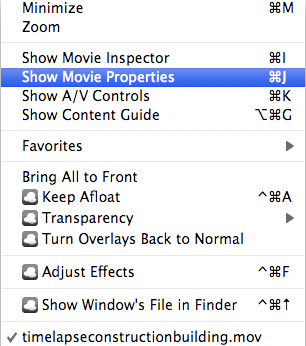
Run QuickTime Pro > locate to Windows > choose Show Movie Properties > Visual Settings. Then tap Choose button to load the mask file into QT Pro.
Step 4. Export Your Cropped Video Footage
Please note that only the selected area of your video image can show up after the loading. Head to File > select Export to save the cropped video file to the destination folder. Until now, your video cropping procedure is finished.
Part 2. How to Crop Video Dimensions on Mac Free of Charge
If you're bugdet-minded and sick of the above troublesome procedure, there are more simple ways for you to go.
Macxvideo AI
- Free crop any videos, inclu. QuickTime video, 4K camcorder AVCHD, YouTube video, MP4, MKV, AVI, FLV, WebM...
- Crop videos to 16:9, 4:3, 1:1, auto crop the letterbox, or keep your desired area for full screen TVs or other displays.
- 3 Simple clicks to free resize video frame without creating a mask file.
- More editing features, trim/cut video length, merge, rotate, add subtitle, adjust frame rate/resolution/aspect ratio...
- Convert and compress video to MP4, H.264, HEVC, MOV, 3GP, AVI, FLV, iPhone iPad Android with 420+ profiles.
How to Crop A Video (to Square) on Mac Easy as Pie
First of all, free download this video cropper software on your MacBook or iMac. It supports macOS 12 Monterey or older like Big Sur, Catalina, etc. Then let's go back on the truck on how to resize video frame:
Step 1: Click Add Video button to load your video file or add it by drag and drop.
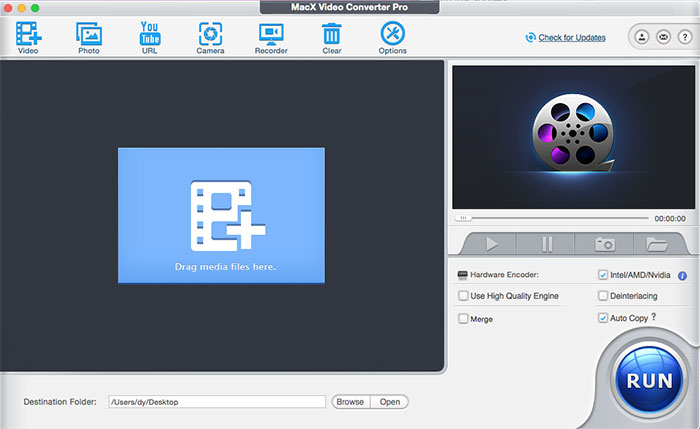
Step 2: Tap the scissor-shaped Edit icon next to the video info on the main interface after you choose the output file format. Then click "Crop & Expand" and check "Enable Crop" and start cropping video on Mac. Freely move the marquee box to highlight the video frame you want.
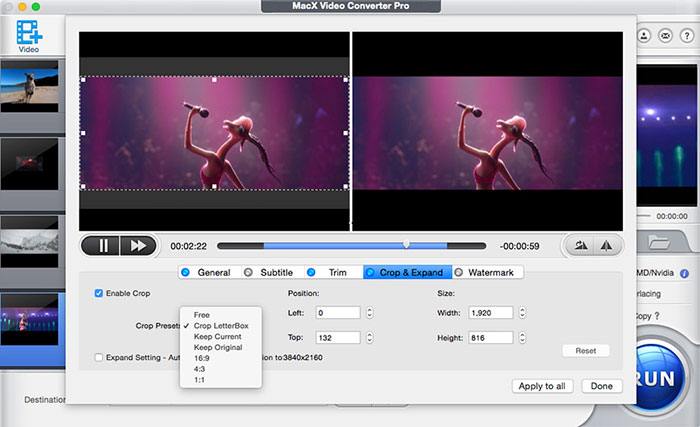
Note: there are built-in crop presets to automatically crop the letterbox, remove the black bars off of a recording, keep original aspect ratio, or crop video Mac from 4:3 or 16:9, 1:1 etc to fit different displays.
Step 3: Export the cropped video to desirable formats. This depends on how you want to use with the output video. Whether you want to play the video on iPhone, iPad, Samsung, Huawei, other mobiles, upload to social sites, save in cloud services, or stream to media servers, you can find a preset here. If you don't want to bother, MP4 is recommended.
Then click Run to export video clip at 5x faster speed guaranteed (GPU hardware acceleration tech).
Clideo
Beyond video resizer software, online video cropper website is also a nice option. Clideo, similar to MacX, also lets you free crop video dimensions in 3 approaches, including resize marquee box, preset aspect ratio and exact size number. Check how:
Step 1: Click Choose file (the blue button) to load your video file from local computer, Google Drive or Dropbox.
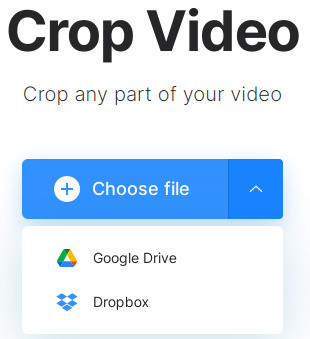
Note: the online video resizer tool has strict limits on input file size. You can't successfully import video to Clideo unless your video file is less than 100MB. Or you've to upgrade to Premium version for larger-sized (YouTube) video cropping.
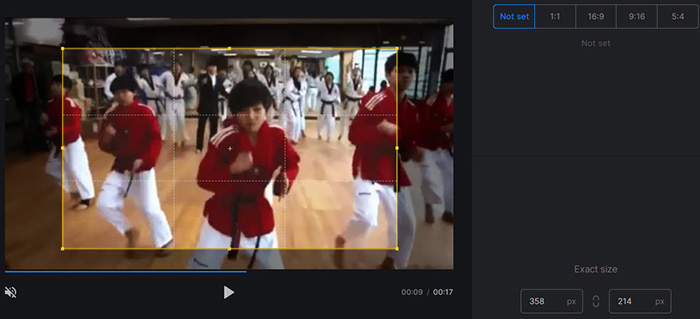
Step 2: Crop your video frame online with Clideo. Move the marquee box to get what you want, choose the preset aspect ratio 1:1, 16:9, 9:16 or 5:4, or manually insert the exact number.
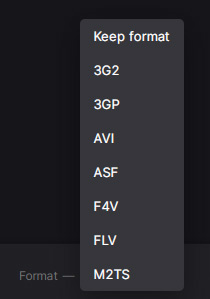
Step 3: Choose the output file format at the lower left corner of the webpage. Almost all the modern formats are supported here, like MP4, MKV, AVI, FLV, M2TS, etc. Afterwards, tap Export button at the lower right corner of the webpage to export your cropped video clip.