
You take screenshots to keep or share the contents on your computer display. Sometimes, you need to discard the unwanted areas, remove the sensitive parts, emphasize a particular part, cut down to a more favorable size, or whatever. For those purposes, you need to crop the screenshots. So, this guide focuses on how to crop a screenshot on Mac with the built-in tools and third-party tools to help you get a cropped screenshot.
Macxvideo AI – Best Screen Recorder and Cropper for Mac
Anybody who needs video screenshots and cropping the recording on Mac can use Macxvideo AI. It is a Mac screen recorder to let you record instructional videos, gameplays, streaming videos, and every movement on the Mac display. Also, it turns the recording to MOV, MP4, H.264, etc.
Part 1. How to Crop a Screenshot on Mac?
Actually, the Mac computer has many built-in tools to allow you to crop a screenshot and even edit the screenshot. So, we will find them out and show you the detailed steps to help you keep a portion of an image and discard the unwanted areas. BTW, if you are interested in a third-party Mac screenshot cropper, we will also introduce one to you.
Method 1. Crop a Screenshot on Mac with Hotkeys
* Screenshot types: Image screenshot (entire screenshot or cropped screenshot).
To take screenshots and crop the size on Mac as soon as possible, using a set of hotkeys is surely the first choice. You can use the hotkey combinations to capture the whole screen, get partial screenshots, or capture a window or menu. But this method is not suggested to whom have trouble remembering technical inputs.
Pros:
- Quick and convenient.
- Capture whole screen and partial screenshots.
- No need to install any app.
Cons:
- It is difficult to remember the exact hotkey combinations.
- Can’t edit screenshots.
How to use hotkeys to screenshot and crop on Mac?
Step 1. Show the contents on the display you want to screenshot and crop on Mac.
Step 2. Use the hotkey combinations.
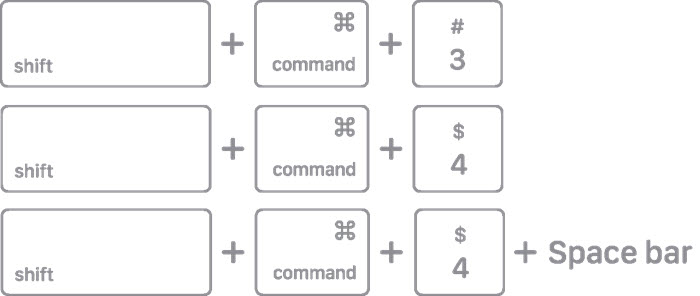
- Take a screenshot of the whole screen (Shift + Command + 3): Press Shift, Command, and 3 keys all at the same time. Then, the screenshot will appear in the corner of the Mac screen, and you can click on the screenshot to crop it.
- Capture part of the screen (Shift + Command + 4): Press Shift, Command, and 4 keys at the same time. Then, you can drag the crosshair to target the area you want to keep. When the screenshot appears in the corner of the Mac display, you can click on it to start cropping.
- Capture a window or menu (Shift + Command + 4 + Space bar): Press Shift, Command, 4, and spacebar keys at the same time, and you will see a camera icon. Just hover over the window you want to capture, and then click the screenshot in the corner to crop.
Method 2. Screenshot on Mac and Crop with Built-in Grab or Screenshot App
* Screenshot types: Image screenshots (entire screen, specific window, or cropped screenshot).
Without any installation, you can screenshot and crop on Mac through the built-in app. It is called Grab on earlier macOS, and it is replaced by a utility called Screenshot in macOS Mojave and later. This tool allows you to capture the whole screen, a specific window and a partial screen.
Pros:
- It is built-in, no need of installation.
- The app offers shortcut keys to make the process quicker.
- Take screenshots of different sizes and sections of the screen.
- Save screenshots in multiple formats, including JPG, PNG, PDF, GIF, and TIFF.
Cons:
- The screenshot is limited to the system resolution.
- Can’t edit screenshots.
How to crop screenshots with built-in app?
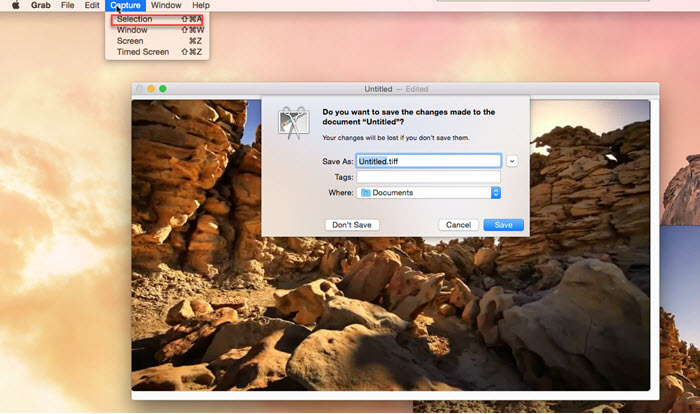
There are four options for you to take screenshots on Mac. If you want to crop a screenshot, you are suggested to choose "Selection" option.
Step 1. Click the app in Launchpad, or press the Shift, Command, and 5 keys at the same time to activate the app.
Step 2. Once the tool is opened, click the Capture button in the menu bar to choose "Selection" option.
Click Selection and drag over the portion of the screen you want to capture. Then, there is a screenshot and you can click the Save button to save it. This will give you a cropped screenshot on Mac.
If you are opening a window, like a media player playback window or a webpage, you are suggested to choose Window > click Choose Window button and then click the window you want to capture. Then click the Save button to save it.
If you are using Screenshot app on the newer macOS, you need to click the screenshot which is saved in the bottom-right corner of your screen. Then, press the Crop icon (top-right), select the area in your screenshot, and press Done to finish.
Method 3. Crop a Screenshot on Mac with Preview
* Crop and edit screenshots.
On Mac computer, we usually view images with Preview and it can also be used to crop a screenshot on Mac. Besides cropping the image to create a focus on the desired section or details that matter, it can also edit the images, like resizing, annotating, rotation, or adjusting the color.
Pros:
- It is pre-installed.
- Precise cropping and ease-of-use.
- It can edit screenshots.
Cons:
- Not working issue occurs occasionally.
- Can’t take a screenshot.
How to crop a screenshot through Preview?
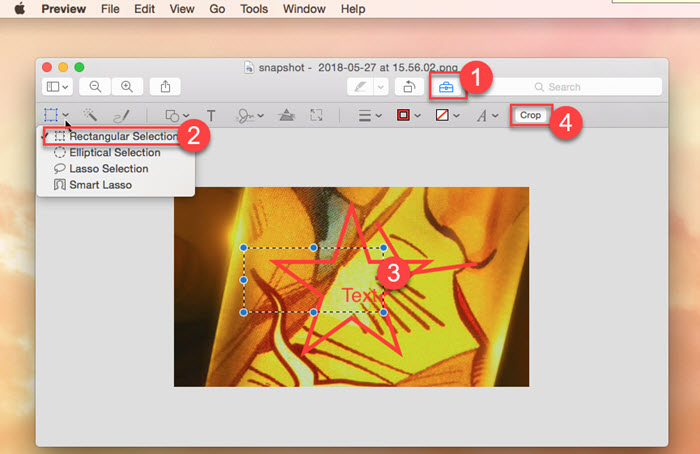
Step 1. Double-click the screenshot on your Mac to open with Preview app.
Step 2. Click the "Show Markup Toolbar" to open the edit menu bar.
Step 3. Click the Crop option, and choose the "Rectangular Selection" option. Then, drag to mark the area you want to keep, and click the "Crop" button to save.
Method 4. Crop a Screenshot on Mac with Photos App
* Take, crop and edit screenshots.
Photos app is better for advanced editing of your screenshots and images. When cropping a screenshot, it also performs very well. You can crop out the unwanted parts, change the screenshot’s angle or use the preset aspect ratio to keep a cropped screenshot in a click. Even better, you can directly share the cropped screenshot to iCloud Photo Sharing, Mail, Messages, etc.
Pros:
- It is pre-installed.
- The area to be edited can be chosen in multiple formats such as rectangular selection, elliptical selection, and smart lasso.
- You can draw, sketch, and add shapes to the screenshot.
- Own advanced editing options.
- Take a cropped screenshot on Mac.
Cons:
- It lacks undo steps during editing.
- Not the fastest option.
How to crop screenshot with Photos app?
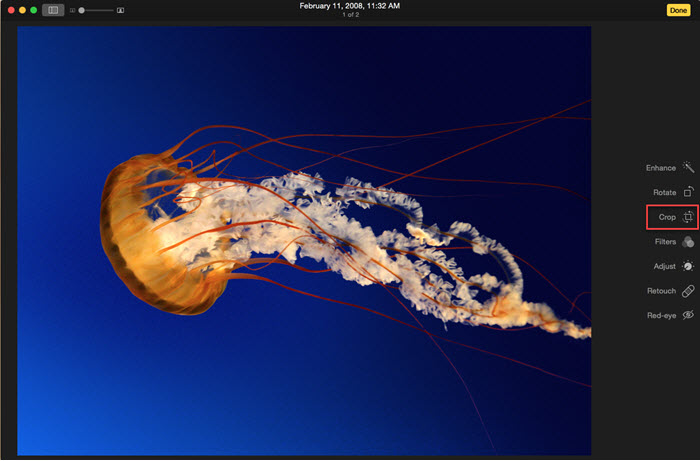
Step 1. Open the screenshot with Photos app.
Step 2. In the top-right corner, click the Edit button.
Step 3. In the new window, choose "Crop" option. Then, drag the edges of the cropped window to target the section you need.
FYI: You can use the preset aspect ratio on the side to choose the right ratio for your image quickly. And use the wheel on the side to adjust the rotation.
Step 4. Click on the Done button to save the cropped image.
BTW, Photos app also lets you take screenshots of your Mac screen. Just press the Command-Shift-3 keys on your keyboard, and it will add a file to your desktop called "Screenshot [date] at [time].png" and will be saved there.
In conclusion:
The built-in apps on Mac are enough to anybody who want to crop a screenshot on Mac. By grasping these methods, you can preserve what you are seeing on screen and crop out the unwanted or sensitive sections of a screenshot. You even don’t need to pay for an image editor as some of the built-in apps like Photos allow you to make more advanced changes to your screenshot.
Part 2. How to Video Screenshot and Crop on Mac?
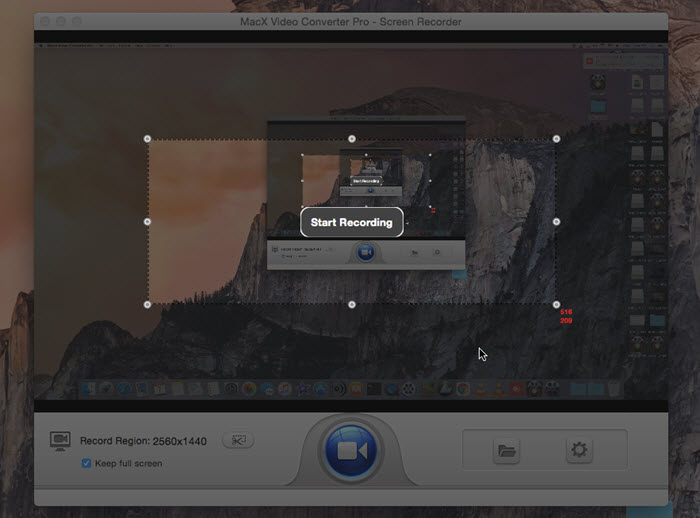
Cropping screenshots on Mac is not a difficult thing, but you need some help if you want to screen record a video and crop a video on Mac. Here, we introduce Macxvideo AI if you have such a need. It is 4K video converter with screen recording function that you can use to capture tutorial videos, YouTube streaming, gameplays, etc. through Mac’s built-in camera and externally connected webcam.
Step 1. Free download Macxvideo AI on Mac, install and launch it.
Step 2. On the main UI, click on Recorder button to access to the recording window.
Step 3. Click the blue record button to start if you want to record the whole screen. Click the "scissors" icon if you want to record part of the screen and hit Start Recording.
Step 4. After recording, click the red record button on the top bar menu to stop recording, and the recorded video will be opened by a Mac video player – 5KPlayer.
Part 3. Frequently Asked Questions
1. Why can’t I crop screenshots on Mac?
This happens when you use the built-in Screenshot app to crop a screenshot. After take a screenshot, you need to click on the thumbnail within a few seconds. Otherwise, it will go away and you won’t be able to use the tool to crop the screenshot.
2. How do you use the Snipping Tool on Mac?
To use the snipping tool on Mac, you can use the hotkey combinations to activate. Simply press the Shift+Command+5 keys. Then, you can capture the entire screen, a particular window, or just a portion of the screen.
3. How to crop a screenshot on MacBook Pro?
MacBook Pro lets users to use the Touch Bar itself to take screenshots with a single tap and crop. This only works on newer MacBook Pro models, but older Macs don't have the same functionality.
4. How to take screenshots on Mac?
Before cropping, you need to take screenshots first. So, you need to grasp the following hotkey combinations on Mac.
- Command-Shift-3: Take entire screenshot.
- Command-Shift-4: Capture some of your screens.
- Command-Shift-4-the Space bar: Captures a window or menu.
- Command-Shift-5: Open the screenshot toolbar to take screenshots.
5. How to edit a screenshot on Mac?
To edit a screenshot on Mac, like changing angle, rotation and changing color, you can use Preview or Photos app on Mac.


Candice's particularly skilled in writing and sharing video-related contents. Her guides cover from deep-seated video/audio parameters, to media entertainment on different platforms. She also enjoys shooting and processing videos by herself for a more reliable basis of informative info with her articles, which are never at the expense of eliminating an entertaining read.


