
If you need to record HEVC video in 4K Ultra HD or 1080p, you can easily realize this goal as long as the smartphone you're using is one of them, iPhone 7/Plus, iPhone 8/Plus, iPhone X, Samsung Galaxy S7/Note 7, Galaxy S8/Note 8, Sony Xperia XZ premium, Huawei Mate 9, Huawei Mate 10 or OnePlus 5. They all support you to record 4K HEVC video or 1080p H265 video. If your smartphone is out of this scope, sorry to inform you that you need an extra HEVC recorder to help you record onscreen video in h265 or capture daily amazing moment in 4K HEVC.
Well, that being said, where to pick out the very HEVC recorder that exactly satisfies your needs? Usually the H265 recorder is schmoozed by its marketing department so you believe the program has certain features that it clearly doesn't.
Macxvideo AI
Main Features
- 1:1 high quality record onscreen video in 4K UHD HEVC, 1080p H265 and record your daily life video in 4K H265, formatted in MP4 or MKV formats.
- Reduce HEVC file size: trim feature to shorten HEVC video length, lower bit rate, adjust H265 video resolution from 4K to 1080p, cut off video borders.
- 320+ video & 50+ audio codecs supported to convert video to 4K HEVC, 4K MP4, 2K MP4, H264, MOV, AVI, MKV, etc. 180+ video & 14+ audio formats.
- 350+ mobile profiles to convert any video to iPhone, iPads, Samsung, Sony, Huawei, Nokia, Microsoft, PS4, Xbox One, YouTube, FB.
- Pros: all-in-one HEVC video converter, HEVC recorder, video downloader, H265 video editor, x265 video compressor, etc.
- Cons: lack enough advanced HEVC video editing features after HEVC video recording.
- OS: Windows 98 - Windows 7/8/10 (32 bit & 64 bit); Mac OS X Leopard - macOS Big Sur
How to Record HEVC Video in 4K 1080p High Quality
Here we take two parts to tell you how to record HEVC H265 video with your built-in computer's camera or external webcam and how to record onscreen video in HEVC codec like record gameplay video for YouTube, Facebook uploading. Here we start with recording H265 video from MacBook/iMac.
1. How to Record HEVC Video from iMac/MacBook or External Webcam
Step 1: Launch this HEVC Video Recorder
Run this H265 video recording software on your Mac or PC after you free download this HEVC recorder on Mac or Windows.
Step 2: Tap Video Recorder
Click "Video Recorder" button and then the video recording window pops up.
Step 3: Click Settings
Hit settings icon ![]() at the lower right corner of the window > choose the video camera (FaceTime HD camera or external webcam), audio tool (Built-in Microphone or third-party audio system) and resolution (4K Ultra HD or 1080p). > tick "Auto add to convert list" for your latter HEVC video encoding.
at the lower right corner of the window > choose the video camera (FaceTime HD camera or external webcam), audio tool (Built-in Microphone or third-party audio system) and resolution (4K Ultra HD or 1080p). > tick "Auto add to convert list" for your latter HEVC video encoding.
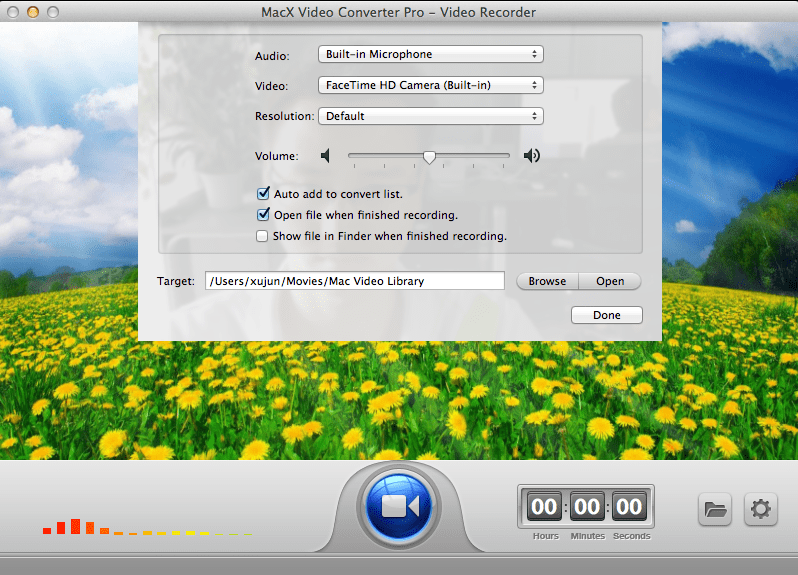
Step 4: Choose Output Folder
Hit "Browse" button to select the destination folder to save your output recorded HEVC x265 video file.
Step 5: Start to Record HEVC Video Now
Tap "Record" button and it will begin to record H265 video on your iMac, MacBook Pro/Air, Mac Mini or Windows PC. The recording duration is listed next to the record button. You can pause or stop your HEVC H265 video recording anytime you want. When the HEVC video recording is over, the recorded H265 file will be automatically added to the convert list, where you can selec "MP4 (HEVC)" or "MKV (HEVC)" as final output format in whatever resolution, 1080p or 4K Ultra HD. You decide all.
2. How to Record Onscreen Video in H265/HEVC
Step 1: Choose Screen Recorder
Tap "Screen Recorder" button on the main interface to activate this HEVC recorder's onscreen video recording ability.
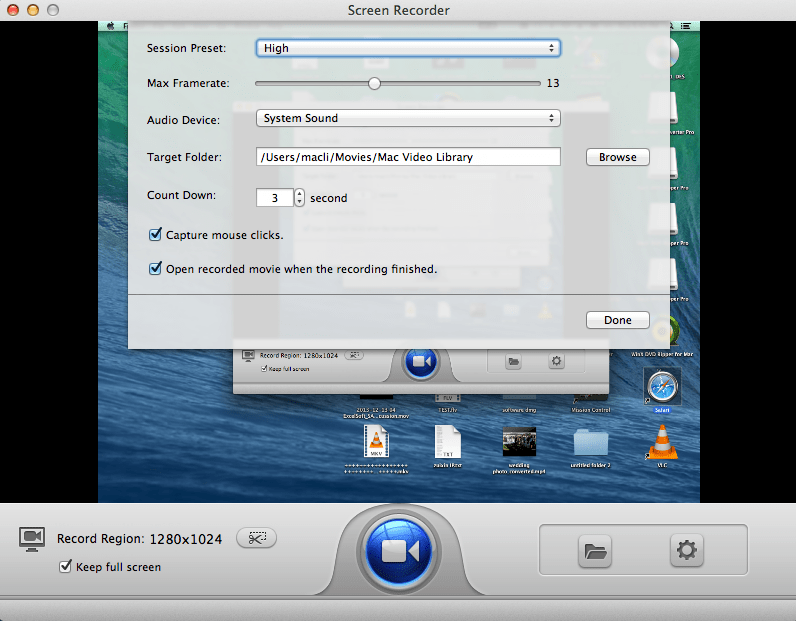
Step 2: Tweak HEVC Recording Settings
* Adjust session preset to High, change frame rate according to your demands on video fluency and choose the target folder, etc.
* Opt for the "Audio Device": System Sound or other 3rd-party audio recording plug-ins. For a proper sound recording, you are advised not to adjust any setting in System Sounds while recording. Otherwise, the suddenly increased volume may damage your hearing.
* Tick "Keep Full Screen" or utilize "Crop" feature to customize the HEVC capture area.
Step 3: Record HEVC Now
Click "Record" button, this X265 video recorder will start capturing the onscreen activity, gameplay process or walkthrough steps within a few seconds. Click "Stop Record button" to stop HEVC capturing. After the HEVC video recording process is finished, you can also load the HEVC video to this HEVC video converter for further edit or convert.
Tip: For a proper sound recording, you are advised not to adjust any setting in System Sounds while recording. Otherwise, the suddenly increased volume may threaten your hearing.
EVOLVEO Omega T2 DVB-T2 H.265/HEVC recorder
Main Features
- Record TV programmes in H265/HEVC codec and saved into a USB flash drive or hard drive.
- Play most video, music audio and photo in formats MKV, DivX, MPG, MP3, MOV or JPEG directly from a USB flash drive or an external hard drive.
- Support internal and external DivX/MKV subtitles.
- Pros: work stably to record TV programmes without crash or not working errors.
- Cons: complicated to operate, especially for newbies.
- OS: HDTV
How to Record TV Programmes in HEVC/H265
Honestly, this is much complicated than the first HEVC video recorder software. This is an HEVC video recorder hardware with multiple cables and several settings (channel, video/audio, preference, media center, etc.), and you need to manually adjust them before you begin to record TV programmes. So you'd better have more psychological preparations before you call it begin.
Step 1: Connect EVOLVEO HEVC Recorder to TV
There are multiple cables behind this Evolveo H265 recorder needed to connect to your TV. Please follow the below picture to do the connection.
Step 2: Connect your HEVC Video Recorder to a HiFi System
Connect your "COAXIAL" cable to your HiFi system.
Step 3: Install your x265 HEVC Recorder
On the Main Menu window, choose "Auto Search" or "Manual Search" > freely select the country you wanna search, Germany or North America. > turn on or turn off "Active Antenna". If you choose "Auto Search", the frequency, bandwidth, process, TV and radio will be automatically chosen. Instead, you need to select them all under "Manual Search".
Step 4: Change Channel
Use the CH + or CH- on your remote control unit to change channel. Under Channel Manager interface, you can delete unwanted channels, skip channels, lock some unnecessary channels and rename your beloved channels for easily searching.
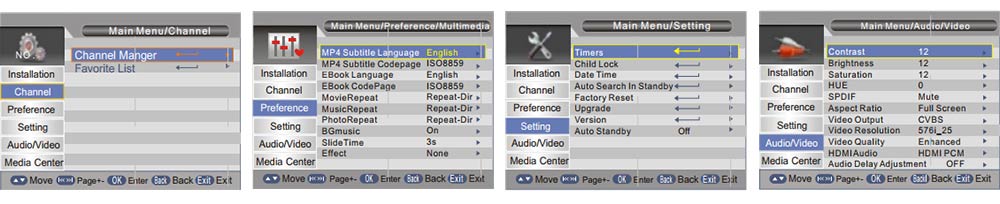
Step 5: Adjust Settings
Four subcategories are left for you to adjust: Preference, Setting, Audio/Video and Media Center.
- choose your primary HEVC video subtitles or turn off subtitles under Preference;
- decide Timers, child Lock, Auto Search in Standby, Factory Reset, Upgrade, etc. under Setting;
- adjust video Contrast, Brightness, Saturation, Aspect Ratio, Video Resolution, etc. under Audio/Video;
Step 6: Tap Enter
When everything is well prepared, tap "Enter" at the bottom of the window to begin to record TV programs in HEVC x265 codec.
MagicSoft Recorder
Main Features
- Mainly used for the broadcast and post production markets to record HEVC/H265 video with 4K UHD, 1080p at 23.98/25/29.97/30/50/60 fps.
- Record HEVC x265 8 bit or 10 bit video in .mp4, .mkv, .mov, .avi fomats.
- Pros: supports up to 8 video inputs and each input supports 2 simultaneous recordings.
- Cons: unable to record onscreen gameplay video, walkthrough video in HEVC or record TV programmes. More like deep processing video to HEVC codec.
- OS: Windows 7/8/10 (64 bit only)
How to Record HEVC x265 Video
Step 1: Load Input Video Files
Click input button to load your video files. Then it pops up a Window, where you can select your desired card, the type of connection, Auto-detect video mode, change aspect ratio 4:3 to 16:9 or vice versa and more.
Step 2: Check Mini Preview Window
On the main interface, check if the mini preview has a video picture thereon. If not, the mini preview will show "No Video Input" because of the problems with video mode or the type of connection.
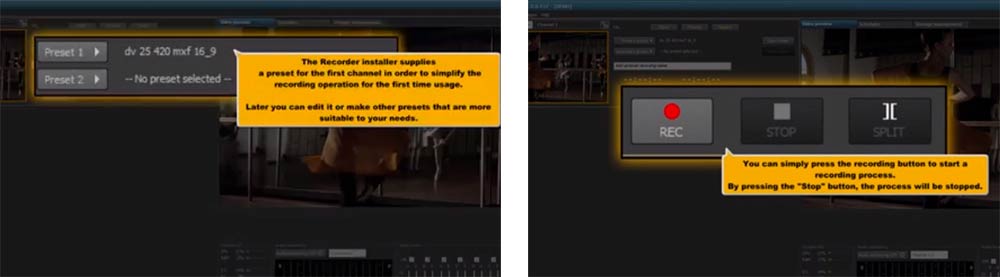
Step 3: Create or Choose Preset for Output HEVC
Here two presets are shown next to the mini preview window. The first channel is automatically selected. The Preset 2 has no preset selected, which means you need to select one or create a new preset for it.
Optional: Create New Preset
1). Click "Presets" button to make preset dialog pop up;2). The video auto-detected profile shows up. You can change to another profile including PAL, NTSC, HD 720p 50, HD 720p 59.94, HD 1080p 50, HD 1080p 59.94 and more.
3). Click "Create Preset" to proceed to next step after you pick out a profile.
4). Edit the properties of the preset on the pop-up dialog of "Preset Properties".
5). Name your preset, choose output path, make comments, adjust audio settings, etc.
6). Navigate to the preset list to check if your newly-created preset is displayed there.
Step 4: Press Recording Button
Tap "Recording" button and this HEVC video recorder software will begin to record HEVC/H265 4K video at two simultaneous recording. If you have a bunch of inputs files needed to be recorded as HEVC, you can add up to 8 inputs to record at one stroke.


Candice's particularly skilled in writing and sharing video-related contents. Her guides cover from deep-seated video/audio parameters, to media entertainment on different platforms. She also enjoys shooting and processing videos by herself for a more reliable basis of informative info with her articles, which are never at the expense of eliminating an entertaining read.


