
Part 1. How to Trim/Cut Video in QuickTime Player
Trimming video is essential if you need to shorten your video length for uploading to TikTok, Facebook, Instagram, Snapchat, YouTube, etc. QuickTime player helps you free cut off unwanted clips from video to shorten video duration.
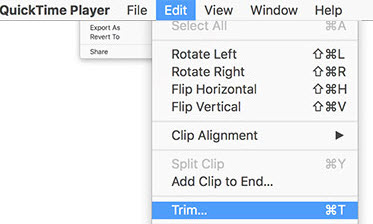
Step 1. Open QuickTime Player app on your Mac > load the video you wanna cut > tap Edit > Trim.
Step 2. Drag the yellow trim slide bar to cut off your video. To make more precise trimming, do as follows:
- Click the play button the play your selected clip so as to check individual frames of your clip.
- If you need more than one-time trimming, trim first > split the saved video into clips > trim the specific clip again.
- Audio track is still needed to be considered. Check if your video and audio are in sync. If not, sync video and audio before cutting video length.

Step 3. Click Trim. All video and audio fragments excluded by the trimming bar are deleted. To undo the trim, go back to Edit > Undo Trim.
Part 2. How to Split Video into Fragments in QuickTime Player
Splitting video to fragments can also be achieved in QuickTime player. Read the below instructions if needed:
Step 1. Open the video you're meant to split > opt for View at the top menu on Mac screen > Show Clips.
Step 2. Move the playhead (the red vertical line) to the location where you wanna split your video. Afterwards, tap Edit from the top bar > Split Clip. Repeat this procedure until you get your desired fragments.

Note: manually locate the place accompanied with unsubtle adjustment on place. In such case, press the left or right arrow key on your keyboard to move the playhead in small increments to the more accurate position you want. Better still, press and hold Option, then press the arrow keys to move the playhead directly jump to the beginning or the end.
Step 3. Click Done when splitting place is ensured. Then choose File > Save to save all your changes. Providing Save command is grey, turn to the red close button at the upper left > type information concerning the clip > hit Save. Job is done!
Part 3. How to Rotate Video 90/180/270 Degrees (Sideways) in QuickTime
For those videos that are upside down or sideways, video rotation is a must have. Luckily, QuickTime player still has the power to help you free rotate upside down video, sideways video by rotating 90/180/270 degrees to correct them.
Step 1. Load your video footage to QuickTime player.
Step 2. Tap View on the top menu bar > choose Show Clips > select the clip. The selected video clip is outlined in yellow.
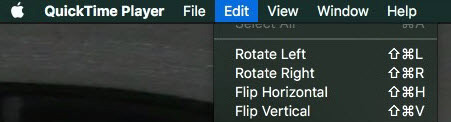
Step 3. Opt for rotate the clip left or right to correct video sideways, or flip it horizontally or vertically to rotate upside down video under Edit subcategory. Adjust its angles until your video comes back to the right position.
Step 4. Click Done when your rotation adjustment is done.
Part 4. How to Add or Remove Video Track in QuickTime Player
Video clips adding or removal is the most common scene in video editing. Mostly, you have the demand to add new footage to your original video to polish your recording. Here's how to add video (an entire video or a new clip).
Step 1. In the QuickTime Player app on your Mac, open the movie you want to add to, then choose View > Show Clips.
Step 2. Operate one of the below mentioned tips grounded on your specific needs:
- Tap Edit > select Add Clip to End to add a video at the end of your original video.
- Press Option > still go to Edit > Add Clip to Beginning to load the new video as your video beginning.
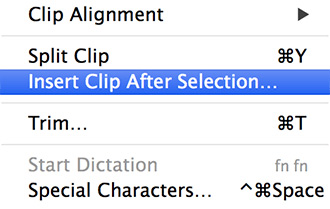
- Select a clip > Edit > opt for Insert Clip After Selection to embed video wherever you want.
Note: if instead, you're prone to add a fragment of video (not the entire video) to the original video, you need to use "copy & paste" feature in QuickTime.
- Load your video (needed to add to the original video with a fragment) to QT > choose View > Show Clips.
- Select the video fragment you wanna insert > Edit > Copy. Then the selected fragment is outlined in yellow color.
- Open your original video > View > Show Clips > Edit > Paste. Then the fragment video appears at the beginning of your video. Drag it to rearrange its position. Tap Done to call it end!
Step 3. Locate to and select the video you wanna add to your original video, then click "Choose media". Click Done.
As for removing video clips, it's easy peasy. Just load your video > Edit > choose Remove Audio or Remove Video to get rid of unwanted audio or video tracks to keep just audio file or video file without sound.
Part 5. How to Free Crop Video in QuickTime
Honestly speaking, QuickTime player doesn't deliver the power to crop video. You can upgrade to QuickTime Pro to crop video footages with $30 charged. Or try QuickTime alternative to free crop video dimensions, as well as trim, rotate, add subtitles, add watermarks, merge clips, record Mac screen video without sweat.
Macxvideo AI is what I'm talking about, with all video editing features you expect from QuickTime and more.
- Free crop any videos, inclu. QuickTime video, 4K camcorder AVCHD, GoPro/YouTube video, MP4, MKV, AVI, WebM...
- Crop videos to 16:9, 4:3, 1:1, auto crop the letterbox, or keep your desired area for full screen TVs or other displays.
- Trim video, merge, rotate sideways/upside down videos, add subtitle, sync A/V, adjust frame rate 120FPS to 60FPS, 60FPS to 30FPS, upscale 1080p to 4K, lower resolution 4K to 2K, change VBR to CBR or vice versa, 12bit to 10bit...
- Convert/compress video, download videos (1000+ sites), screen record Mac video, create photo slideshows...
How to Free Crop Video Frames with QuickTime Alternative
Step 1: Launch this feature-rich video editing software after downloading and installation. To crop video dimension on Mac, click Add Video button on ther top bar to load the video, or you can add it by drag and drop. Batch cropping is accessible, too.
Step 2: Select output format on the pop-up profile window. MP4 H264 or MP4 H265 is recommended if you don't have special requirments. Or tick "Auto Copy" mode if you don't wanna any change in video format or codec, no decoding/re-encoding.
Step 3: Then click the Crop icon on the bar below the video info. To resize the video on Mac computers, click "Crop & Expand" and check "Enable Crop" and start cropping videos on macOS.
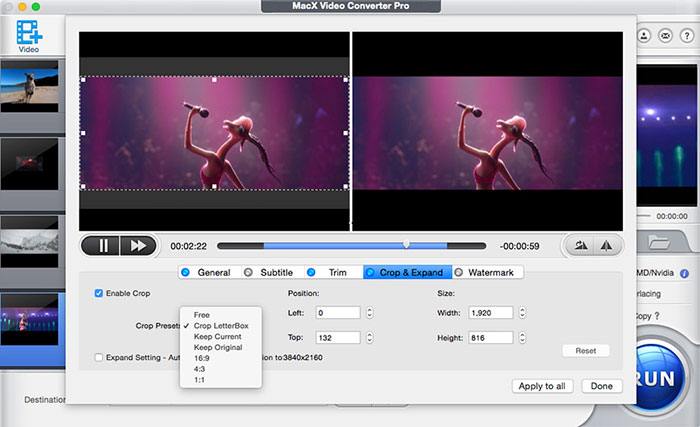
Note: a couple of options are available. Choose Crop Letterbox to automatically remove the black bars off of a recording, keep original aspect ratio, or crop video Mac from 4:3 or 16:9, 1:1 etc to fit different displays.
On top of Crop, you can still find trim, subtitle, watermark, general adjustment, merge (at the lower right corner of the UI). In terms of parameters adjustment, you need to tap the setting icon on the main interface next to video info.
Step 4: Tap Browse button to select a destination folder for output file storage. Then click RUN button.
Read the below related articles if you're still interested in how to trim video, merge video, add subtitles to video, rotate video using QuickTime alternative for free.


