
Vimeo is a great video sharing site, which professionals and hobbyists alike can upload, share and play videos. It offers basic account users 500MB of free storage space a week and features with SD and HD videos playback. But uploading unzipped videos to Vimeo could go terribly wrong, especially if you care much about video quality.
So no matter from the perspective of maximizing the storage space or playing video in high quality smoothly, you need compress video for Vimeo before uploading. In the article below, we will offer some tips and Vimeo video compression and guide you how to compress video on Mac and Windows for uploading to Vimeo.
Why You Need Shrink Video for Vimeo?
Video compression basically means reducing the video file size by encoding a video with a compression algorithm and allowing it to take up less storage space. To be precise, compressing video is not mandatory, but recommended for a couple of reasons:
1. Reduce video size. If you record a video at full quality, you will get a darn big file. For example, 1 minute of 1080p at 30FPS will take up about 150MB for H264. If you upload it directly to Vimeo, you can run out of the Vimeo free storage space quickly.
2. Reduce mobile data usage and save bandwidth. Bandwidth is the uploader's connection speed to the Internet. As you 're trying to upload a large video file, it will consume much bandwidth than a smaller video. Still, you need to make sure you have a good Internet connection when uploading video to Vimeo.
3. Video specs approved by Vimeo. Yes, Vimeo accepts a huge list of supported formats, codecs, resolutions etc., but if you just shot a video, you're foremost suggested to convert and transcode it to smaller size formats like WMV, MP4, FLV in SD or 720p resolution. According to the Vimeo compression guidelines, you'd better shrink your video on the basis of following specs.
- Format: All major video formats like MP4, 3GPP, AVI, FLV, MPEG-4, MOV, WebM, WMV etc.
- Codecs: Accept most major codecs, but for best results H.264, Apple ProRes 422 (HQ), H.265 (HEVC) are recommended.
- Frame rate: It's best to maintain the video's native frame rate when zipping video, but 23.98fps, 24fps, 29.97fps, 30fps, 60fps are commonly used.
- Bit rate: 2-5Mbps for SD, 5-10Mbps for 720p, 10-20Mbps for 1080p, 20-30Mbps for 2K, 30-60Mbps for 4K and 50-80Mbps for 8K.
- Resolution: A wide range of resolution supported, such as 640×480, 1280×720, 1920×1080, 2560×1440, 3840×2160, 4096×2160, 8192×4320 etc.
- Audio: Stereo channels, AAC-LC (Advanced Audio Codec) codec, 320 kbit/s data rate, 48kHz sample rate.
- Video Size: 500MB per week for Basic account, 5GB a week for Vimeo Plus members, and 50GB for Vimeo Pro account per week.
Best Video Shrinker to Optimize and Compress Video for Vimeo
reducing your video size to upload them according to the Vimeo compression Basics isn't as hard as you think, if you have an excellent video shrinker. Macxvideo AI is precisely what you're expecting to shrink Vimeo video to smaller size but almost original quality reserved. It offers a variety of methods to resize videos for Vimeo, being transcode video to H.264, H.265, convert video to smaller containers like MP4, MOV, FLV, change the video resolution to best fit the video aspect ratio, lower the bitrate, frame rate and even crop video dimension or trim the length of video.
The built-in multi-core utility, Hyper-threading tech, high quality engine and the Intel/Nvidia/AMD hardware acceleration technology together beat all competition in the Vimeo video compression at 5 times faster speed and top-notch quality.
Steps to Compress Video for Vimeo with Macxvideo AI
Step 1: Open the program and add video file.
Firstly, you have to free download Macxvideo AI or Windows version on PCs, bar none. Then install and launch it on your desktop and click + Video icon to add your video file to the program. You're allowed to add several video files at once for reducing video size in batch.
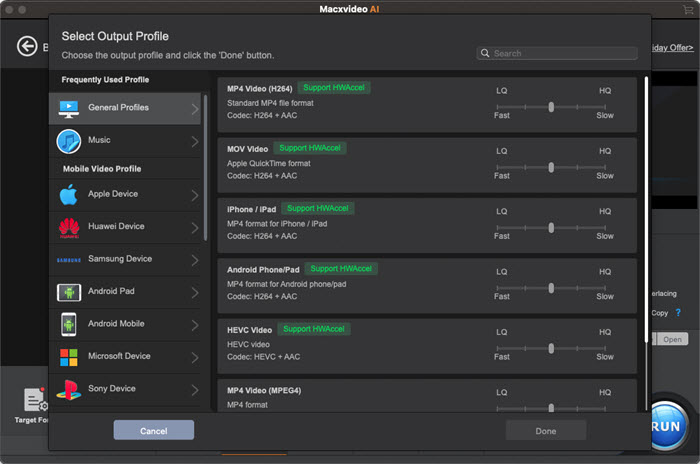
Step 2: Choose output format.
Scroll down the automatically popped up window to Web Video Profile, tap Vimeo Video to choose Vimeo (H264). Though Vimeo is accessible for a huge list of formats like MOV, MP4, AVI, WMV, SWF, MKV, MEPG etc, you're foremost advised to convert and transcode video to MP4 for wider compatibility and smaller size.
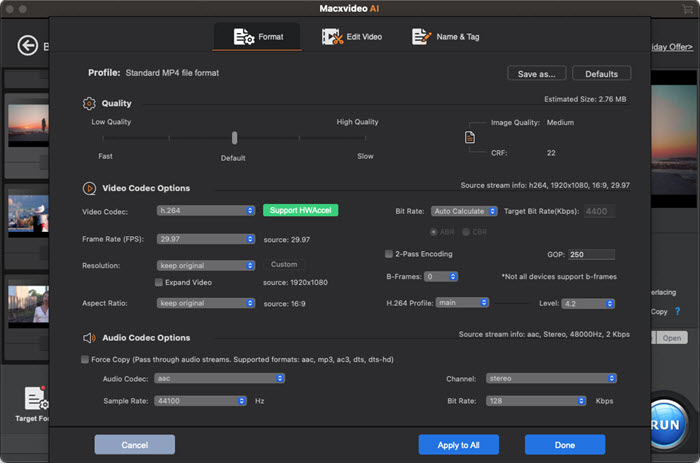
Step 3: Customize video parameters according to Vimeo requirements.
Click on the ![]() icon to get an access to adjust video resolution, aspect ratio, frame rate, bitrate, audio etc. As for the specific setting, it all depends on the video itself. Take a 720p video as an example, you're suggested to maintain the native video codec and frame rate, and adjust to 5-10Mbps bit rate, 16:9 aspect ratio, 1080 × 720 pixels resolution.
icon to get an access to adjust video resolution, aspect ratio, frame rate, bitrate, audio etc. As for the specific setting, it all depends on the video itself. Take a 720p video as an example, you're suggested to maintain the native video codec and frame rate, and adjust to 5-10Mbps bit rate, 16:9 aspect ratio, 1080 × 720 pixels resolution.
Step 4: Start to shrink videos for Vimeo now!
For the best quality and fastest speed, you can tick on the boxes of Use High Quality Engine and Deinterlacing together with the automatically ticked  box. Then tap Run icon and the program is set to work. A few minutes later (It depends on your video length indeed), you'll get a brand new Vimeo preferred video for uploading.


Candice's particularly skilled in writing and sharing video-related contents. Her guides cover from deep-seated video/audio parameters, to media entertainment on different platforms. She also enjoys shooting and processing videos by herself for a more reliable basis of informative info with her articles, which are never at the expense of eliminating an entertaining read.


