

When you import video to iMovie, you have high chance to meet "iMovie no enough disk space" error. You tackle this trouble and smoothly edit your video footage within iMovie. Yet, iMovie doesn't leave you alone. You encounter another iMovie error "iMovie audio out of sync" after exporting video from iMovie.
Life is not always a bed of roses. Problems always come one after another. What we can do is to face them. Now the audio video out of sync after exporting from iMovie is here. Well, we're gonna to correct it with the collective wisdom (some tested effective workarounds provided by iMovie users).
Hot search: iMovie export not compatible with QuickTime
Solution 1. Change Audio Sampling Rate
Sampling rate matters a lot in audio track. Generally, the sampling rate of your original audio track won't get changed within iMovie. But that's not the case when iMovie exports your video footage. It might automatically mess up your audio sampling rate. That would result in video audio desync error after iMovie exporting.
To make it right, you just need to resample your audio track. Load your iMovie exports to freeware VLC player and resample your sound track. Change the exports audio sampling rate to 48 KHz if it's 44.1 KHz. Afterwards, load it to iMovie and export from iMovie to test if it's fixed.

Solution 2. Convert Variable Frame Rate to Constant Frame Rate
The frame rate of your video is another major cause to induce this trouble. Especially, if you shoot on an iPhone of any sort, you'll get a video file at a variable frame rate. Notwithstanding you might select 24, 30 or 60 FPS, it won't go that way during shooting. Nor will it stay during iMovie editing.
Well it happens that the variable frame rate will be pretty close to constant FPS sometimes. Yet, luck won't last forever. Most time, the variable frame rate will vary extensively, resulting in audio out of sync with video after iMovie exporting. In such case, you need to use a frame rate converter to change variable frame rate to constant frame rate.
MacX Video Converter Pro is a solid video frame rate converter, NO input size limit per file or quantity limit each day.
- Default convert variable frame rate to constant one without manually adjusting.
- Support to convert frame rate of MP4, AVI, MOV, MKV, WMV, ProRes, camcorder AVCHD, MTS, GoPro/Drone footage.
- A frame rate increaser/reducer: convert 30FPS to 60FPS, 24FPS to 60FPS, 1080p 120 to 240FPS and vice versa.
- Change audio sampling rate from 44.1 KHz to 48KHz, bit rate (128/320kbps), audio channel, resolution, aspect ratio...
- Also a video converter, compressor, editor, downloader, Mac screen recorder and ringtone maker.
How to Free Change Variable Frame Rate to Constant One on Mac
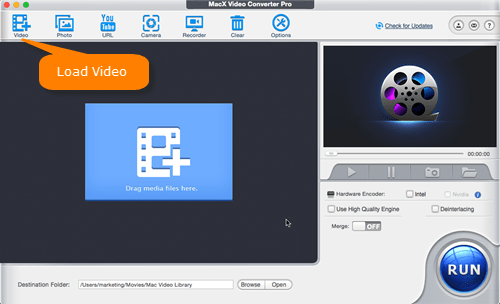
Step 1: Add source video file
Run the video frame rate converter if you've downloaded it for Mac or for Windows. Click Add Video button at the top left corner of the UI to load your iMovie export footages. You can also directly drag drop files to the window with 1GB, 5GB, 10GB, whatever file size. Batch conversion is available, too.
This fps converter software accepts whatever you feed it, be iMovie MOV, MP4, H.264, H.265, MPEG4, MOV, AVI, WMV, MKV, FLV, VOB, AVCHD, Apple ProRes, GoPro, DJI clips without video file size or quantity limit.
Step 2: Select frame rate
An Output Profile window will pop up when the source video is loaded successfully. You can choose transcoding video codec or format. Or just stay with your original video codec/format. Here choose iMovie (H264) under Apple Device as final format.
Click settings icon on the right of the video info, you'll see a window with Output Profile, Video Options and Audio options. Head to Video Options, locate to Frame Rate, and pick frame rate you want or choose "keep Original". Click "OK" then.
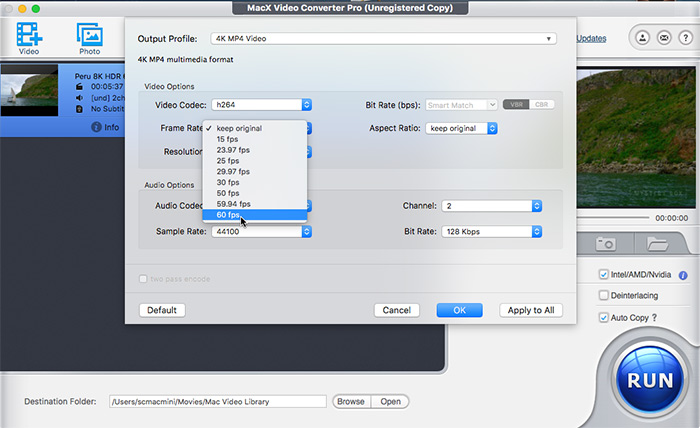
Note: it's needless to manually tick "Constant Frame Rate" option or something like that. Cuz the default setting of this toolkit is to convert variable frame rate to constant frame rate. Just pick up the specific FPS number you need.
Step 3: Start converting frame rate from variable to constant one
After you've all set, hit "RUN" button on the bottom right corner to start changing frame rate from variable to constant one.
The same also applies to change audio sample rate, audio channel, audio codec, bit rate, as well as other video settings like resolution, aspect ratio, bit rate (VBR, CBR), etc.
On top of this frame rate converter for Mac, you can also change video frame rate variable to constant with Handbrake.
Solution 3. Trim Audio Clip within iMovie
Some cases, if not all, would be video and audio tracks detached at the first place and then be merged later. Mostly, those video tracks and audio tracks originate from different device. All these factors together would jointly increase the chance of video audio desync error after iMovie editing and exporting. The issue can be fixable by extracting the audio from the project and re-adding it. To do so, 5 steps are inevitable.
Step 1: Launch iMovie on your Mac via Applications under Finder.
Step 2: Tap "File" > "Import Movies" > load your desired video footage > tap "Choose."
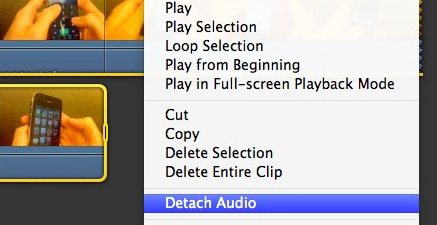
Step 3: Pitch on the iMovie file > select "Advanced" on the iMovie menu > opt for "Detach Audio" (in some versions of iMovie, it's named as "Extract Audio").
Step 4: Choose the audio file > hit "Edit" > "Trim to Selection" and trim the audio duration to sync up to the video clip.
Step 5: Choose "File" and click "Save" to re-combine video and audio tracks together.
Solution 4. Change Speed using iMovie Speed Editor
Audio matched with video at the start of a project gradually de-syncs, becoming apparent after a couple of minutes. And in case, unfortunately, the above workarounds don't help you out of this iMovie A/V desync trouble, try to change speed using iMovie speed editor.
- Play your video file in iMovie and remember the specific timing that the video and audio begin to desync.
- Watch the whole video and likewise remember the specific timing that the A/V desync stops.
- Place two key frames on these two timings (desync start & end timing).
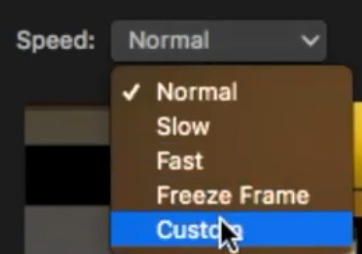
- Opt for the audio drifting part > right click on this video track and tap "Show Speed Editor" (shortcut is to type cmd-R).
- Change "Normal" to "Custom" under Speed category.
- Change the percentage (next to Speed) from 100% to 101%.
- Drag the audio timeline back until they sync at the end, and double check the beginning.

If the text guide is tedious to you, follow the guide with video tutorial:
Solution 5. Re-make Sound Track for Video
Give up your video if the audio and video are severely out of sync. Instead, re-make your sound track for your video and re-add it to video track after it's finished. As for those movies or TV shows downloaded from online sites, you can re-download audio track files from online sites after detaching the incorrect one from video.
Hope this troubleshooting post is helpful for you and you're welcomed to share with us your solutions if they don't show up in this post. We'll keep this post constantly updated. Good luck!


