How to Use iMovie to Edit Videos on Mac?
iMovie costs $14.99 on the Mac App Store for older Macs. For newer computers running on macOS 10.11.2 or later, iMovie is available for free download. Go to Mac App Store, download iMovie with Apple ID and launch it from the Applications folder. The free video editor version in this tutorial is iMovie 10.1.1. Note that the steps on how to edit videos on Mac vary slightly with later versions.
Step 1: Create New Project
Unlike other devices, you can't hook Gopro to computer and go transfer the videos. To import Gopro videos to computer, there are many ways to go, like Quik, Dropbox, AirDrop and Image Caputre. But to export the raw video shoots, you're suggested to use a SD adopter, which is also the most reliable way.
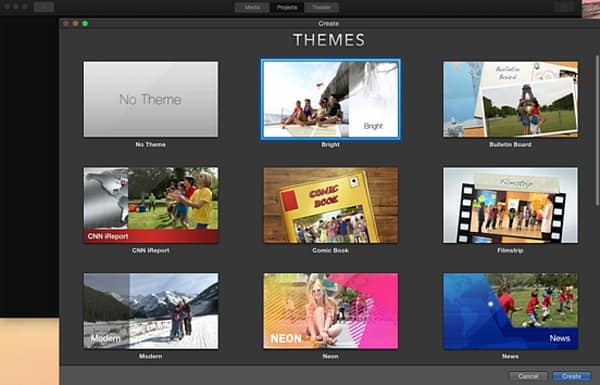
"plus" icon on the top bar or click File beside iMovie on Mac menu bar. Then you will be taken to a window asking you to choose a theme. By adding specific theme, it will automatically add respective animations and transitions. You can select your favorite, or if you don't want that, select No Theme. Then click Create and name the project.
Step 2: Import Media to iMovie
You can import videos, audio or photos from local computer, or from your devices. To do this, connect your iPhone, camera, other mobiles or recording devices via USB cable, or insert the SD card.
Then click the Import button with a Down Arrow icon on the top menu bar of iMovie (you can also click File > Import Media on the top Mac menu bar). Select the device that contains the video from the left column. Choose the clips you want to import (hold shift key to add multiple files) and then click Import Selected. You can use iMovie to edit 4K 60fps videos, any SD or HD clips.
Step 3: Learn iMovie Buttons
To make it easier to edit videos on iMovie, first let's learn the basic buttons on iMovie screen.
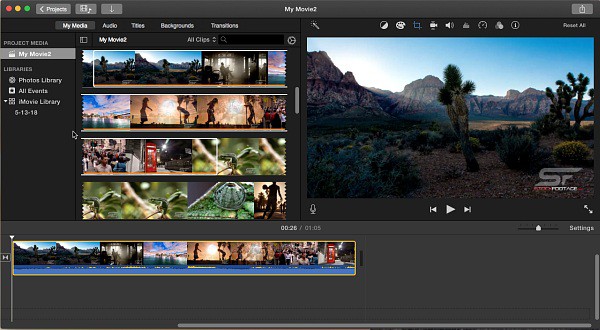
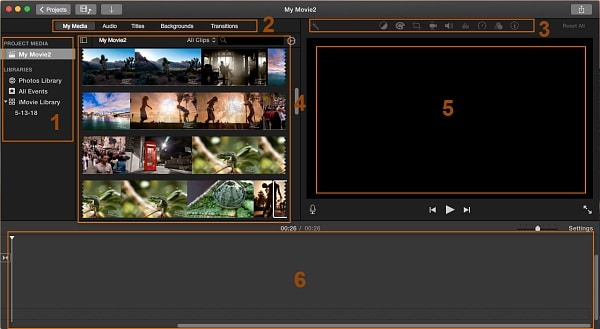
1. Libraries pane - on the left side of iMovie window is the library pane, where you can access contents from Photos Library, Events and Projects.
2. Media toolbar - this is where you add special media to the video. You can add audio, select titles, background and transitions from various different types.
3. Adjustment toolbar - there are options to adjust the clips. You can adjust the video screens and control the video colors, playback speed etc.
4. Browser pane - the selected media files will appear here.
* Individual clips have rounded borders. If a video is too long, it will appear in additional lines with each line ending with jagged edges.
* If you want to preview any point of the clip, hover the cursor over the clip and press spacebar.
5. Viewer pane - the viewer pane will play the file from the Browser or Project Timeline Pane to allow you to preview the video and audio.
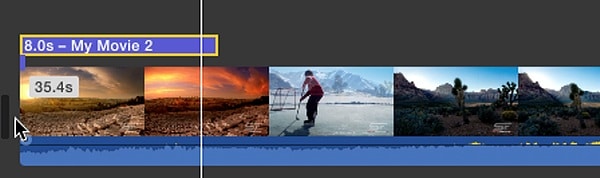
6. Project Timeline Pane - the Project Timeline Pane is where the editing is carried out in iMovie. The clips are assembled in the timeline into the final work in the sequence you want. You can drag videos, audio and other elements into the timeline, add effects, transitions and perform other editing to the clips.
Step 4: Add Media to Timeline
To start to edit video on Mac iMovie, you need to move the footage to the Timeline. Select a clip from the Browser pane. You can select the entire clip, or select a segment of the footage by clicking and dragging on it > then the selected part will be framed by yellow box, drag the border of the yellow box to decide part you'd like to use > drag the selected part to the timeline directly, or click the Plus (+) icon at the bottom right corner of the yellow box. In the Timeline, you can do the following:
* Select any portions any click the Delete Key to remove the segment.
* Drag the edge of the clip in the Timeline to trim the clip.
* To cut video free in iMovie from the middle, select the part using the yellow box and right click > select delete.
* Rearrange the clips in the timeline by dragging them to new places.
* Place the playhead to on the clip where you want to split > click Modify on Mac menu bar > click Split Clip to split the video.
Step 5: Add Media to iMovie Project
Next step is to add titles, backgrounds and transitions using the Media toolbar on the top left tab. We will show you how to add audio using iMovie in the audio editing section below.
Add titles
You can put a title at the beginning of the movie, at the end, or in the middle to provide extra info. To add subtitles in iMovie,
click the Title button > there are various titles available, browser through them by putting cursor on it, and then it will display in the Viewer pane > scroll down, many title effects are offered like Lens Flare, Pull Focus, Pixie Dust and more > drag and drop the title to the timeline, you can adjust the location by moving the title box to different places > type in the title and click the Viewer pane to save it.
Add backgrounds
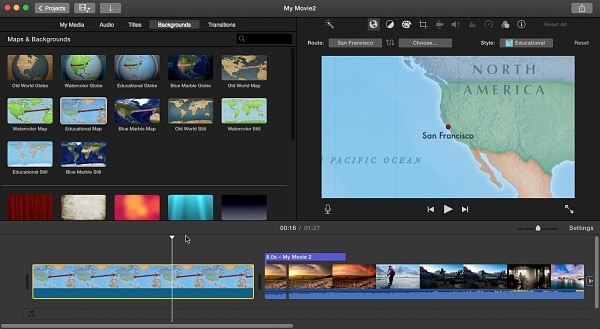
iMovie backgrounds are used to add some information or narrative to your movie. For example, by adding a map, you can tell audiences where this video begins.
Click Backgrounds button > preview each background in the Browser pane > to add the background to your movie, double click the map or background, or drag and drop to timeline.
To modify the background, double click the backgrounds in the timeline, then the control tools will display in the Viewer pane. You can locate a place, create a route, or adjust the color, crop the backgrounds.
Insert transitions
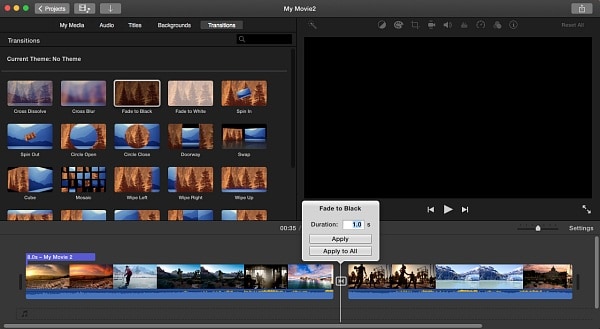
Transition is the way how you want one shot ends and the next starts. In iMovie, there are different types of transitions with various effects.
Click Transitions > browse through the transitions > then drag and drop the transition into the place between two clips. The transition will show in an icon . Double click the icon to adjust the timing of the transition.
Step 6: How to Edit Video on iMovie
How to edit videos on iMovie in this section involves the buttons in the Adjustment toolbar. Let's learn each button.

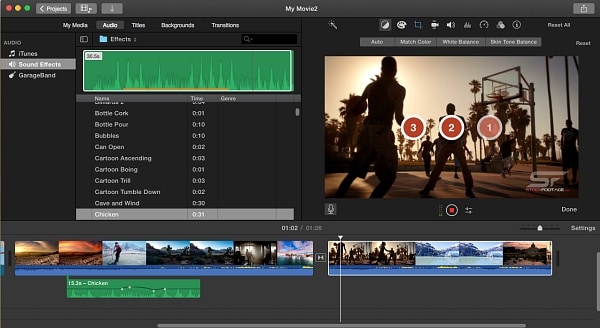
1. Enhancement - the Enhancement button will automatically improve the video and audio in one click. When clicking it, the color balance, color correction and audio volume icons are highlighted, indicating that automatic improvements are made in the three categories.
2. Color balance - make automatic color adjustment, or adjust the color based on another clip or a selected video frame.
3. Color correction - color correction helps to adjust the color manually. It allows you to make the clips lighter or darker, adjust the color saturation and temperature.
4. Crop - remove unwanted parts from the video or adjust the video to fit the aspect ratio. Here are four options: Fit: this will expand a small video to fit the right aspect ratio; Crop to Fill: select a portion of the video and fill the screen; Ken Burns: it's a panning and zooming effect that makes it appear as if the camera is sweeping across the video and gets closer or further; Rotate: rotate the clip in iMovie.
5. Stabilization - this feature helps stabilize a clip which may be recorded by hand. The footage can be smooth out if it's shaky.
6. Volume - raise or lower the audio volume.
7. Noise reduction and equalizer - reduce the background noise and enhance or attenuate the frequencies in an audio signal.
8. Speed - adjust the video playback speed.
9. Clip filter and audio effects - the clip filter gives you many options to add different effects like Vintage, Noir, and Aged Film etc. The audio effects can turn the sound into robot voice, shortwave radio, and other effects. Simply select the one you like or choose None if you don't want any.
10. Clip info.
Step 7: How to Edit Audio
Audio is an important part in editing and the right music can help you express your message more emotionally. Below we will show you how to use iMovie on Mac to edit audio. First, we start with how to add audio to iMovie projects.
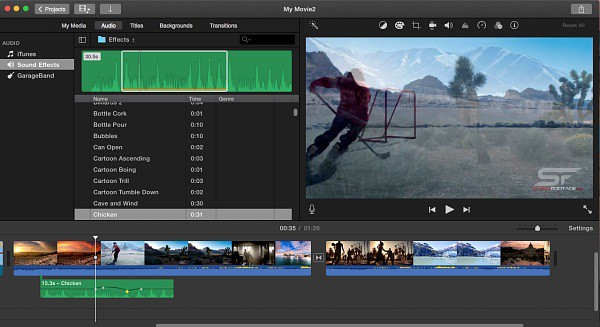
Add audio: Click Audio in the Toolbar > choose the audio files from your iTunes library, Sound Effects or GarageBand > similar to adding video to iMovie, select the part of audio with the yellow border > place the Playhead to where you want to insert the music, and drag the selected audio segment into the timeline > you can also drag and move it to anywhere you want in timeline.
Edit audio:
* Control volume - to change the sound volume, hover over the line with mouse until the line turns white > drag the line up or down to raise or lower the sound level. Note: if there is any yellow spikes, it indicates that the volume is a little bit high, but acceptable; but if there are red spikes, it means that the volume is too high and may cause distorted sound output.
* Precise editing - you can also select a segment of the audio in the timeline to edit. Hover over the line until it turns white > hit Option key to add dots and grab the dots up or down to adjust the sound level of different segments.
Step 8: Add Voice Over
If you want to add your own voice as the explanation or others, use the voice over function. On the Viewer pane, there is a microphone icon at the left button corner. How to use iMovie on Mac to record voice over:
Click the microphone button > click the icon next to the record button to set the recording device and volume level > place the Playhead to where you want to insert the Voice over in the timeline > click record button and a 3-second countdown will be given to get prepared.
Step 9: How to Export iMovie Video
How to edit video on iMovie comes to the final step - export the project. You can either click File > Share on the Mac toolbar, or the upload button.
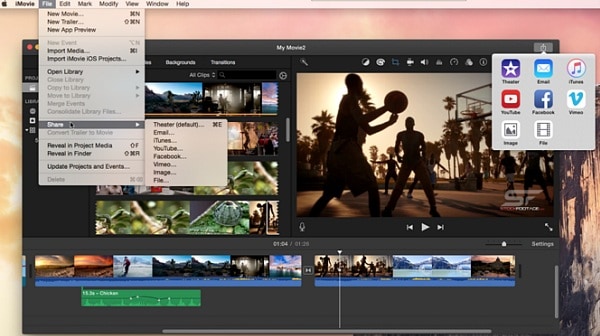
There are various output choices, you can export iMovie project to Theater, send via Email, upload to YouTube, FaceBook, Vimeo, or save on computer.
* Theater - by saving iMovie project in theater, you can access the edited video later in iMovie. By default, the edited videos saved in theater will be uploaded to iCloud directly for later playback on iDvieces, Mac or Apple TV.
* Email -
click the Email to send the iMovie project to Email directly. Select the quality from Small, Medium or Large; on the left side below the iMovie window, the respective sizes display here. Then the default Email application will open with the edited video attached. Fill the email to send it.
* iTunes - save the editing to iTunes library. Click iTunes > it will shows the resolution (SD, HD 720P, Full HD 1080P)> Similarly, select your wanted quality and sizes > click Share.
* YouTube, Facebook, Vimeo - to export iMovie videos to YouTube or others, you need to have an account. Click the option > there is a Sign in button at the left bottom corner > sign into your account > select the resolution (the highest resolution is 1920P) > select the quality you want and click Next.
* File - save iMovie project on computer. When you export iMovie editing to File, you can output to 540P, 720P or 1080p. iMovie will exports video as MPEG4. You can also save the audio only in AAC.

 For 4K users, free iMovie alternative to edit 4K fast & smoothly