

Your iPhone may contain many precious photos, videos, music or other files that you will want to have a safe copy on Mac before you update iPhone or upgrade from old iPhone to new iPhone. When it comes to make a backup of iPhone, iPhone upgrade or simply data protection, Apple users are left with only one way to go: iTunes. But that's not your only option as it's not user friendly and has too many iTunes errors. This post will show you how to backup iPhone to Mac in a way that is far easier than iTunes. Just one click, your iPhone data will be backed up instantly and safely on Mac.
Free download best iPhone backup software - MacX MediaTrans to preview and selectively backup data from iPhone to your Mac without iTunes/iCloud any data loss during backup. Bi-directional solution to sync and backup photos, music, videos, iBooks, podcast, iTunes purchases, ringtones from iPhone to Mac or vice versa. Bulk sync at 10X faster speed!
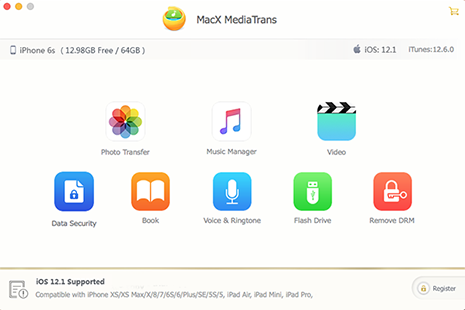
Part 1. One-click Backup iPhone to Mac with MacX MediaTrans
This iTunes alternative for Mac mainly focuses on simplifying the process of data backup between iPhone and Mac. With only one click, users can easily transfer videos, music, ringtone, encrypted iTunes purchases, photos, ebooks etc and make a backup of old iPhone to Mac without iTunes before you update - MacX MediaTrans:
- Preview and selectively backup data from iPhone to your Mac.
- No data loss on devices during the process of backup or restore.
- 2-Way transfer makes iPhone backup and restore to iPhone simple.
- Instant data backup, e.g., it takes 30s to backup 1000 pictures, 10x faster than other tools.
- Supported iPhone (incl. iPhone 15 Pro/Max), iPad, iPod that run iOS 17 or earlier.
- Fully compatible with macOS Ventura or earlier, and Windows 11/10 or earlier.
Guide on How to Backup Data from iPhone to Mac Effortlessly
![]() Free download MacX MediaTrans on MacBook Air/Pro, iMac, Mac Mini, etc.
Free download MacX MediaTrans on MacBook Air/Pro, iMac, Mac Mini, etc.
Step 1: Launch the program and connect your iPhone to Mac computer via USB cable. Select the data type to backup from iPhone to Mac.
Step 2: Here, we take backing up iPhone music to Mac as an example. Click "Music Manager" and it will load all your iPhone music. Scroll down to choose your whole or multiple songs.
Step 3: Hit "Export" on the top and the songs you select will be backed up to the folder you set on Mac, or do this by drag and drop.
Step 4: To restore the backups, simply select the files from computer, click Import and then you can sync data from Mac to iPhone.
Once you've finished iPhone to MacBook iMac backup, you may want to delete any backups you've made to iCloud (considering iCloud only gives you 5GB free storage space). To free up iCloud space after backup, do this on your Mac:
- Click the Apple icon at the top corner of your Mac system.
- Opt for "System Preferences" > "Internet Accounts" > "iCloud."
- Hit "Manage" button at the bottom right corner of the window and then pick up "Backups."
- Select a backup to delete > click on the minus icon at the lower left-hand of the window > "Delete." This conduct will both remove all your backups from iCloud to free up your iCloud space, and turn off any further backups.

1. According to the test, MacX MediaTrans maintains a very fast speed. Specifically: it takes 3s only to backup 20 songs from iPhone to Mac and 30s for 1000 4k-resolution pictures.
2. The above steps will also apply to other files backup from iPhone to Mac. With the 2-way transfer option, you can easily restore backups from Mac to iPhone, simply go the other way around. It's simple.
Part 2. How to Backup iPhone to Mac without iCloud using iTunes
iTunes can cope with various iPhone data backup to Mac. As the official solution, the free iOS data backup with iTunes is adpoted by a majority of iPhone users. Making a backup of your iPhone to Mac using iTunes is a great way to replace automatic iCloud backups. But you need to know that iTunes works on macOS earlier than Big Sur only since Apple officially ends iTunes since Big Sur. You can only access the iTunes backup of your iPhone on the iPhone's trusted Mac computer.
Note: Make sure you have closed iCloud before you backup data from iPhone since you can't backup iPhone to macOS using iTunes when iCloud is enabled. To close iCloud: Go to Settings > iCloud > Storage & Backup and turn off the iCloud Backup switch. Use the following steps to learn how to backup iPhone to Mac without iCloud in iTunes.
Step 1: To avoid any unnecessary errors, first download the latest version of iTunes on Mac.
Open iTunes and connect your iPhone to your Mac computer. A message may automatically pop out to ask for your devices passcode or trust this computer and you just need follow the instructions on the screen.
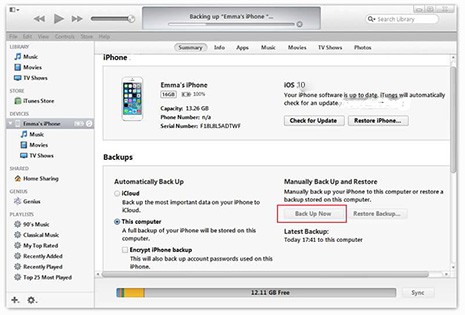
Step 2: Select your iPhone in the left panel, click the Summary tab below your iPhone. Then click "Back Up Now" button under Backups to start backing up iPhone to Mac. This creates a backup of everything on your iPhone to your Mac computer. The time it takes to back up iPhone to Mac without iCoud depends on the file size and computer performance. It's the same to backup iPad to Mac.
If you want to encrypt your iPhone backups on Mac, you can do it with iTunes. Just click on Encrypt iPhone backup and enter a password, then click Set Password.
1. When you use iTunes to backup and restore data to iPhone, you can only backup files like Contact, messages, settings, etc. Music, movies, ringtones, etc. are not supported.
2. There are many users Googling "Where does the backup of iPhone store on Mac computer using iTunes?" Well, the location is: Mac: ~/Library/Application Support/MobileSync/Backup/.
3. From users' feedbacks, iTunes may cause iTunes not working errors due to any improper operation. The iTunes errors are myriad: iTunes could not back up the iphone bacause there is not enough free space, the backup was corrupt, the iphone disconnected, an error occurred for no reason...
Part 3. How to Backup iPhone to Mac without iTunes via Finder
The old method provided by Apple to backup iPhone to Mac is iTunes. However, since macOS Big Sur, the iTunes app is gone. You can now use Finder to do the job, which is quite similiar with iTunes backup. The iPhone backup takes up storage space and you can delete unwanted backups manually. Here's how to backup iPhone to Mac without iTunes/iCoud via Finder. Make sure the hard drive has enough space for the iPhone backup.
Step 1: Connect your iPhone to the Mac computer using a compatible USB-C cable. When you connect your iPhone to your Mac computer, it will appear in a Finder window.
You'll be asked to pair your iPhone if it’s new to your Mac. When the message "to allow this computer to access information on this iPhone, click Pair" pops up, click Pair to allow the Mac computer to access your iPhone. You have to trust the Mac on your iPhone. Then, move to the next step.
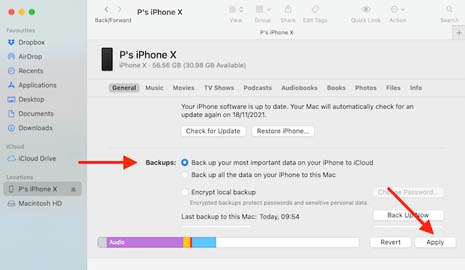
Step 2: Open Finder and find your device in the Locations section in the left column of the Finder window.

Step 3: You will see the information about your device in the right side of the window. Click on the General button near the top of the window if it's not already active.
Step 4: Under "Backups", select "Back up all of the data on this iPhone to this Mac". Then select Back Up Now.
Note: No matter you're using iTunes or Finder to backup iPhone data to MacBook iMac, you need to set a password if you mean to encrypt your backup for increased security. Check "Encrypt iPhone backup" (in iTunes) or "Encrypt local backup" (in Finder) and enter a password. Please take good care of your password and do NOT lose it; otherwise, you're unable to access to your iPhone data.
Part 4. How to Backup iPhone to Mac External Hard Drive
After you make iPhone backups to your Mac computer, you can move it to an external hard drive and backup iPhone to Mac external hard drive for more flexibility. Before start, make sure the external hard drive has enough storage space for the iPhone backups. Then follow the below guide to learn how to dig out the backup on Mac and backup iPhone to Mac external hard drive.
Step 1: Click the Spotlight search button or press Command + Shift + G to open the Finder window.
Step 2: Copy the following path, ~/Library/Application Support/MobileSync/Backup/ to find out your iPhone backups on Mac.
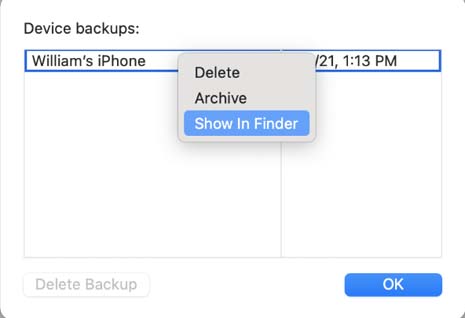
Step 3: Alternative way: Connect your iPhone to your Mac computer with a USB cable. Open Finder, click Manage Backups and you should get a list of backups. Right-click the backup files and select Show in Finder to open the place where the backups are saved.
Part 5. How to How to Backup iPhone to Mac without Cable Over Wifi
You can backup iPhone to Mac without cable over Wifi in Finder. To do so, you should keep your iPhone and your Mac on the same wireless network. Your Mac and your iPhone are required to be logged in with the same Apple ID. This method works on macOS Ventura or earlier. The iTunes backup for iPhone on Mac using Wifi without cable works in MacOS Mojave or earlier. You still need a USB cable at first to set it up. When you set all up, you can backup iPhone to Mac without cable over Wifi.
Step 1. Open up the Finder window on your Mac. Connect your iPhone on your Mac with a USB cable. Click on your phone’s name and select your device. You may be required to open your iPhone and enter your password, Touch ID, or Face ID. Trust your Mac computer on your iPhone if it is needed.
Step 2. Click on the General tab in the Finder window. Check the box. ‘Show this iPhone when on Wi-Fi’. You can also select ‘Show this iPhone when on Wi-Fi’ at the same time.
Step 3. Click Apply. Now, you’ve set up your iPhone to backup to Mac without a cable over Wifi.
The Wifi backup is much slower than backups with a cable. It might take a while to let the iPhone to show up on Wi-fi. Your Mac computer and iPhone must be on the same Wi-fi network. A USB cable is also required at the begging to set all up. So we don’t recommend you to backup iPhone to Mac without cable over Wifi.
MacX MediaTrans vs iTunes/Finder Backup
With iTunes/Finder, you are only allowed to create the current backup of your iPhone to Mac. You can't decide what to backup and what not to. Whenever you back up iPhone to Mac, the last backup will be overwritten and result in data loss. That's the benefit of backing up using the iTunes alternative. However, that's not where their differences end.
Below we have the iTunes alternative and Apple option compared in key aspects that users concern most. You can select the suitable solution when it comes to how to backup iPhone to Mac.
| Features | MacX MediaTrans | iTunes/Finder |
|---|---|---|
| Number of Backups | Unlimited | only one backup per device |
| Backup speed | Instant backup for even 4K/HD & pictures | Slow for large files or massive content |
| File type supported | Photos/music/ringtone/videos/iBooks/Podcast | Contacts/calendars/notes/messages/settings |
| DRM removal | Yes | No |
| Auto convert | Yes | No |
Bottom line:
Today's iPhone has become an important container of family photos, private information, personal data and various other crucial files, and that makes the iPhone data backup a must-do. Backing up iPhone to Mac let you face no space limitations and thus turn into the top way to protect your data. iTunes has a ready way to go, but its complexity appears daunting, especially for newbies. MacX MediaTrans stands as an easier version of iTunes, makes iPhone data to Mac backup very simple to operate.


Rico has been fascinated with mobile technology for as long as he can remember. He is keen to share his experiences to those who get stuck in data transfer for both iOS and Android users. Besides his regular passion related to mobile data management, he also enjoys reading books, playing games and occasionally watching Marvel inspired movies.


