Some users have trouble to sync the music stored on their iPhones to iTunes library, with many of them being afraid of losing data and having experienced iTunes syncing errors. This post shows two ways to transfer iPhone music to iTunes, with no deleting or erasing.
 By Rico Rodriguez to iPhone Troubleshooting Tips | Last Updated on Mar. 15, 2023
 Let's face it; Apple has made it really difficult to transfer music from iPhone to iTunes Libraries. Sometimes, when you try to sync with iTunes on another computer, the iTunes absolutely won't sync to your iPhone or you will be reminded with a message saying "Do you want to erase this iPhone and sync with this iTunes library?" Some other times, iTunes is keeping creaiting errors. So be careful when you do it, or you may lose all your iPhone music and run into a problem. In this tutorial, we will show you how to sync music from iPhone to iTunes on new computers without erasing or deleting data.
This is the most simple way to get the job done. What you need is your iPhone, a USB cable and iTunes. Note that iTunes library allows you to add music purchased via iTunes and App Stores only. You can't add non-purchased music or other item to iTunes library directly.
Step 1. To prevent auto sync, before you connect the iPhone go to the iTunes preferences and select "devices", then select "Prevent iPods, iPhones, and iPads from syncing automatically". Then plug your iPhone to your computer via USB cable.
Step 2. First, authorize the computer you're going to sync iPhone music to iTunes. Go to Store > Authorize this Computer. Enter your Apple ID and password and then it's done.
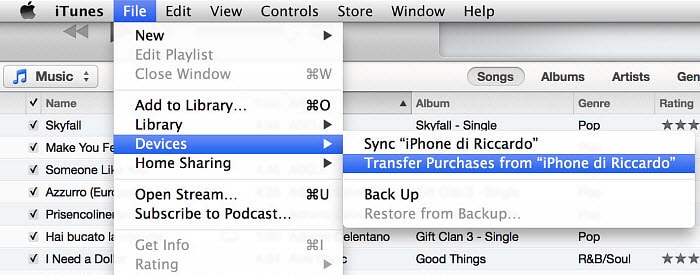
Step 3. Click the left sidebar and select "Transfer Purchases" from the drop-down menu. Then it will start to transfer iTunes-purchased music from iPhone to iTunes library. This also includes apps, videos, books, and other data from iTunes Store/App.
Step 4. When the transfer is complete, click "Recently Added" in the left panel of iTunes to check the newly imported songs. If you want to save them to the computer, choose the music and hit "Download". Also see how to transfer from iTunes to iPhone.

According to the user questions on Apple and other releated forums, syncing iPhone music using iTunes can sometimes bring troubles. Improper operation can easily end up in losing all their data on iPhone or deleting the entire iTunes library. In addition to other iTunes syncing problems, an iPhone user may meet following errors and limits:
1. iTunes not syncing music error 13014. You may find specific iPhone songs cannot be synced with error code 13014, 5000, 69, 13010 or others. Apple has provide official fixes and you may try them.
2. Songs get deleted after syncing to iTunes. iTunes will erase iPhone data when syncing iPhone music to a new iTunes library. An iPhone is allowed to be synced with one iTunes library only. In other words, songs not stored in the iTunes library will be erased. if a user want to sync music to a new computer, his music will be deleted.
3. iTunes create duplicate songs. The iTunes music library may get messed up with copied songs. This means that usres have to listen to the songs twice every time. This is a long existed iTunes error and there is no official fix or clue for the causes.
4. Songs not purchased from iTunes can't be synced. It is well known that iTunes only supports music purchased from Apple. iTunes won't sync iPhone songs that are purchased from other stores or services, ripped from CD, downloaded online and shared by friends.
To compeltely get rid of iTunes errors, you can sync music from iPhone to iTunes with an iTunes alternative.
When you don't want to bother with the iTunes errors or don't want to plug iPhone to the computer for too long waiting for the transfer, here is another way to complete the task: export iPhone music to computer and add them to iTunes library. In this way, we can ensure that you will transfer music from iPhone to iTunes safely without losing data and syncing errors.
Step 1: Transfer music from iPhone to computer
In this step, you will need the help of a third-party program. There are many choices online and you can do it with any program you like. Here we take MacX MediaTrans, which is claimed to be very fast, as an example.
1. Free download the program and install the program and plug iPhone to computer. Similarly, to avoid any accidental data sync, disable the auto iTunes syncing.
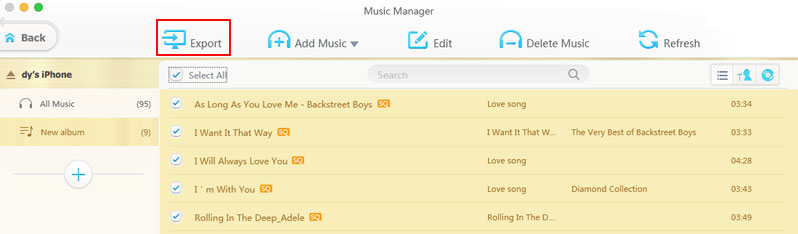
2. Run the program and click the "Music Manager" button. Then you will see all your iPhone songs displayed in the window. Scroll the list and check the songs you'd like to add to iTunes.
3. When all the songs are selected, click the "Export" button and all the selected songs will be saved to the folder you set in the program setting step.
Step 2: Add iPhone music to iTunes
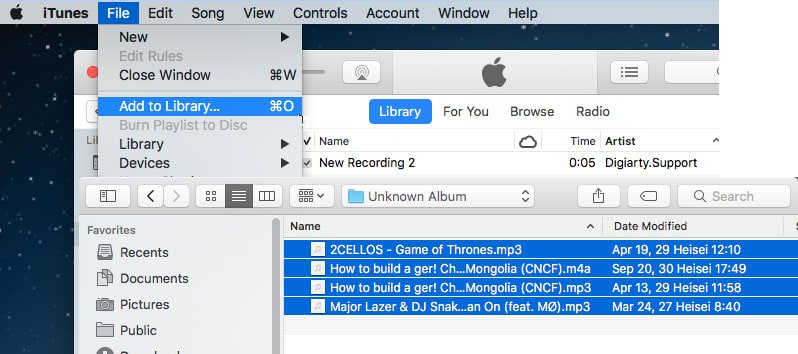
1. Open iTunes and choose Files > Add File to Library (single song) or Add Folder to Library on PC or Add to Library on Mac. Just click the option.
2. Locate the folder on your computer that contains the iPhone music you want to import into iTunes.
3. Now you should see the newly imported songs in the iTunes library.

Digiarty Software, Inc. (MacXDVD) is a leader in delivering stable multimedia software applications for worldwide users since its establishment in 2006.
Home | About | Site Map | Privacy Policy | Terms and Conditions | License Agreement | Resource | News | Contact Us
Copyright © 2026 Digiarty Software, Inc (MacXDVD). All rights reserved
Apple, the Apple logo, Mac, iPhone, iPad, iPod and iTunes are trademarks of Apple Inc, registered in the U.S. and other countries.
Digiarty Software is not developed by or affiliated with Apple Inc.


