


Home > MacX DVD Ripper Pro for Windows > User Guide
MacX DVD Ripper Pro for Windows – specially designed to make backup of both homemade and commercial DVD movies, rip DVD to FLV, MP4, MOV, AVI, MPEG, M4V, WMV, to name a few mainstream videos, as well as convert DVD directly to portable devices including iPhone 6S/6, iPod, iPad Air, iPad Mini with Retina, Android, HTC One, Samsung Galaxy S5, Galaxy Note 3, Surface Tab, Microsoft WP8 Mobile, PSP, PS4, and so on. It supports any copy-protected DVDs published by Disney, Warner Bros, Paramount, etc, including Thor 2: The Dark World, Gravity, The Wolf of Wall Street, Frozen, Man Of Steel, Despicable Me 2, The Wolverine, Pacific Rim, etc. This guide will show you how to use MacX DVD Ripper Pro for Windows to rip DVDs to general video and portable devices.
How to rip DVD to AVI, MP4, FLV, MOV, MP3, iPhone, iPad, HTC, Samsung, Xbox, WP8, PSP with this DVD ripper software
How to rip DVD to MP4, FLV, MOV, MPEG, AVI and other video formats, or convert DVD to iPhone, iPad, Samsumg, HTC, etc? The following will show you a step-by-step guide to complete the DVD ripping tasks on Windows. First, free download and install MacX DVD Ripper Pro for Windows
Step 1: Import DVD movies.
Run this DVD ripper. You can load DVD by clicking "DVD Disc", DVD ISO image by clicking "ISO Image", DVD folder by clicking "Folder".
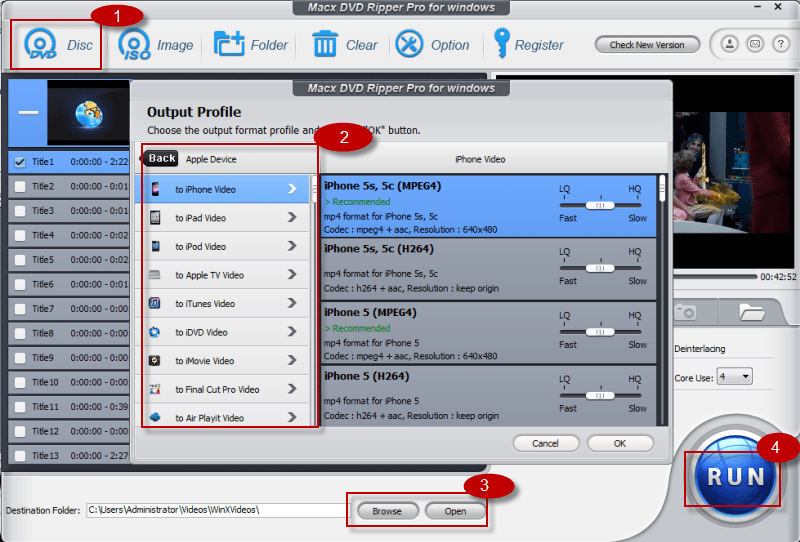
Step 2: Choose the Output Video/Devices.
Scroll down Output Profile to choose the output format as you wish. Here we take DVD to iPhone 5S for example. Do as the following: Apple Device -> to iPhone Video -> iPhone 5S (MPEG4). Then click "Ok" button.
Tips: you can also extract the background music as MP3, AAC, AC3 music file by selecting "to Music" button.
Step 3: Select Output Folder.
Specify an output folder on your computer to save the output files. Click the "Browse" button to choose the path where you want to save the output files in.
Step 4: Start Conversion.
After finish the above steps, click "RUN" button to start conversion, you could view the conversion progress and are able to cancel the converting process at anytime.
How to rip DVD with the latest DVD Copy Protection
The latest protected DVD by Disney, Paramount and Warner usually has 99 titles and the DVD movie size is larger than 40 GB. MacX DVD Ripper Pro for Windows can perfectly remove such DVD Copy Protection measures like CSS encryption, Sony ARccOS, RCE region protection, UOPs, as well as Disney new DVD copy protections and helps to choose the correct title for you before DVD ripping.
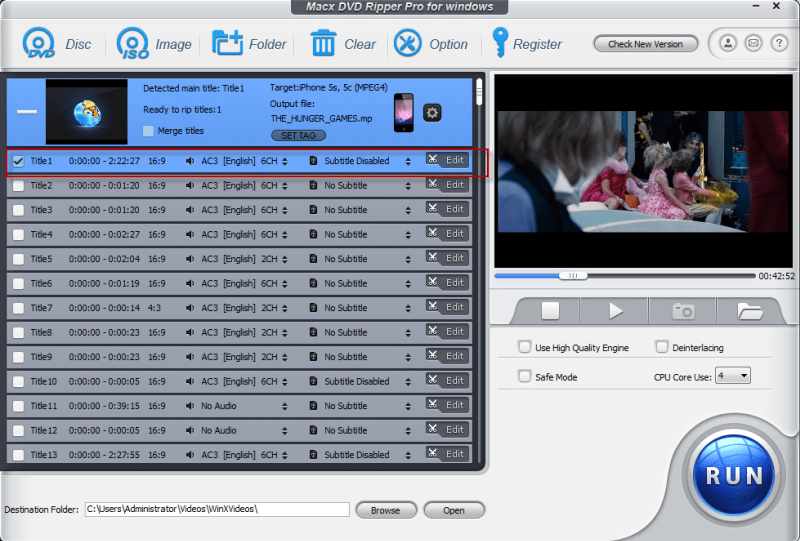
You can also choose DVD title manually (Optional).
1. Play the DVD movies first with DVD player software. When it comes to main content of the movie, please check the DVD title and record the title number.
2. Find the title number you record and tick it.
3. Select your targeted video/device and destination folder. You are good to go!
Tips: This DVD ripper can detect the correct title, so that you can rip DVD from the main movie content in correct order without choosing the DVD title manually. Just follow the 4 steps mentioned above if you want to rip protected DVD to MP4, MOV, FLV, iPhone, iTunes, iPad, HTC, Samsung, etc.
How to copy DVD with original Video, original 5.1 Channel AC3/DTS Dolby Audio
A: MacX DVD Ripper Pro for Windows supports two ways to back up DVD disc without any image quality loss, Main Title Content Copy and Full Title Copy. The best way we recommend to you is selecting copy DVD main title to a single MPEG2 file for backing up the whole content of DVD with original video, audio in few minutes. It will keep original video and original 5.1 channels Dolby AC3 or DTS audio; it will produce a single 3 GB size MPEG2 file. By copying the main movie title, you can get rid of watching advertisement that probably wastes several minutes in each movie.

Step 1: Import DVD Disc movie by clicking "DVD Disc", DVD ISO image by clicking "ISO Image", DVD folder by clicking "Folder".
Step 2: Choose "DVD Backup" -> "Full Title Copy" in Output Profile area. And click "Ok" button.
Step 3: Select destination folder to save ripped DVD video by clicking "Browse" button.
Step 4: Click "RUN". The backup process is in the works.
Other Useful Tips
There are also other useful tips for you to touch up your video like trimming, cropping, adding subtitle, merging titles. Also this section helps you get video conversion fast and leave your output video with high quality.
1. Select several title and click "Merge titles" to combine them into one.
2. Trim video segments by clicking “Edit” button after select the output format.
3. Crop the frame size of a movie image, cut off unwanted area of a video to feature a highlight, or crop DVD video to remove the black bars.
4. Select "Use High Quality Engine" or set "Deinterlacing" for better image quality.
5. Choose "CPU Core Use" to make full use of CPU and rip DVD with faster speed.
6. Choose "Safe Mode" to smooth the conversion process. But converting under Safe Mode takes a little more time than normal mode.
Bonus Features to Adjust Parameter Setting, Merge Several Titles, Edit File Name, Extract Picture
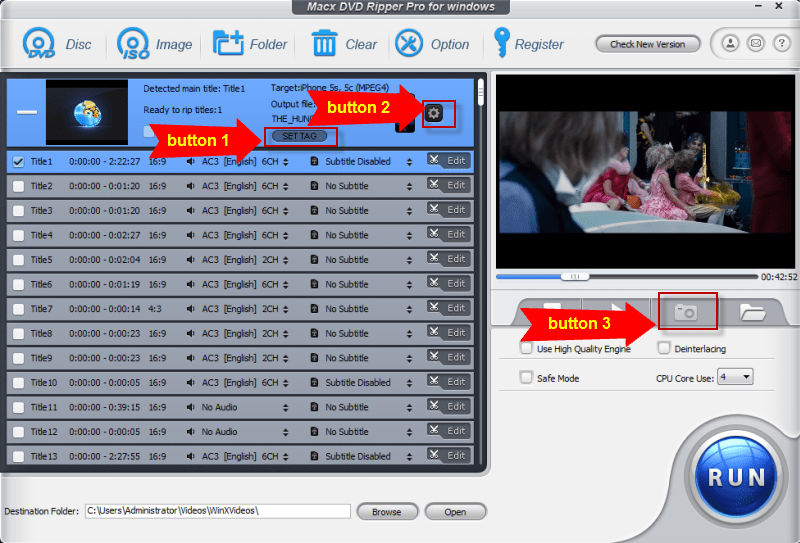
1. Button 1 "SET TAG" lets you edit the file name as you want.
2. Button 2 enables you to adjust frame rate, resolution, bite rate, audio channel, etc according to your advanced need.
3. Button 3 permits you to take picture appearing in the movie and store as PNG.
I had the problem of converting some format. E-mail:support@macxdvd.com
Home | About | Site Map | Privacy Policy | Terms and Conditions | License Agreement | Affiliate | News | Contact Us
Copyright © 2026 Digiarty Software, Inc (MacXDVD). All rights reserved
Apple, the Apple logo, Mac, iPhone, iPad, iPod and iTunes are trademarks of Apple Inc, registered in the U.S. and other countries.
Digiarty Software is not developed by or affiliated with Apple Inc.