
I have a new HF100 HD camcorder and uploaded my first .mp4 video to YouTube, that I filmed at 4:3. The video sometimes letterboxed in proper dimensions. But then, it showed it squished into 4:3. Never consistent. Can someone please tell me the best YouTube video settings to get video uploaded to YouTube so it shows properly inside YouTube's 16:9 box? - VideoHelp Forum
Google estimates 300 hours of new videos are uploaded to YouTube per minute. Bravo! Video uploading to YouTube is straightforward, as long as you adjust the video with settings suitable for YouTube uploads. But the complex settings, ranging from YouTube video format, resolution, file size to codec, makes video uploading a hard nut. For this reason, we share the post regarding to the best YouTube video quality settings for upload and show you how to use a solid YouTube video editor to convert and adjust the advanced settings for YouTube uploads optimally.
World's Easiest YouTube Uploading Settings Adjusting Tool
- No.1 fast to convert videos to YouTube, Facebook, Vimeo and more.
- Adjust advanced settings for YouTube like resolution, format, codec, frame rate, bit rate, aspect ratio, etc.
- Trim, crop, cut and merge videos, add subtitles to video to make video personalized before YouTube uploading.
- Download videos (4K UHD) from YouTube and change YouTube video settings for mobile, like iPhone, iPad, Android, etc.
[Recommendation] Best YouTube Upload Video Settings
YouTube recently changes its rules, which now easily accepts 8K and 4K resolutions and file sizes of 2GB, compared with 100MB in the past, and supports 8 video formats for uploading, covering MOV, MP4, AVI, WMV, FLV, 3GP, MPEGPS and WebM. Best of all, your videos can be optimized automatically by YouTube. Thus YouTube upload can be dead easier than before. Improper YouTube settings will lead to YouTube problems during uploading. So for the best YouTube uploading result, you may have a good understanding of YouTube upload limit and have to change some YouTube settings in advance. Here we list the YouTube recommended video settings, including bitrate, codecs, resolutions and more.
- Resolution and aspect ratio: Since YouTube now applies 16:9 aspect ratio players, so you'd better to encode video at these resolution settings for YouTube uploads by referring to the image below.
- Container: MP4
- Video audio codec: H.264 AAC-LC with sample rate at 96khz or 48khz. No compression on audio if possible (otherwise, MP3 audio 320kbps Stereo)
- File size and duration: You can upload a video up to 2GB within 15 minutes. See more YouTube file size for uploading. >>
- Frame rate: It's highly suggested not to change the frame rate and keep the encoded and uploaded content in the same frame rate it was recorded.
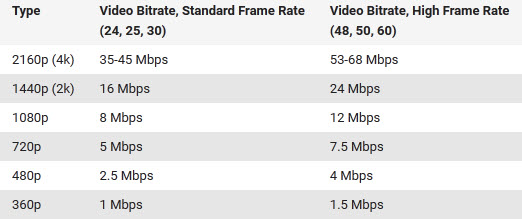
* Resolution and aspect ratio: Since YouTube now applies 16:9 aspect ratio players, so you'd better to encode video at these resolution settings for YouTube uploads as it shown on the right side:
See more tips on how to change aspect ratio to 16:9 >>
- 2160p: 3840x2160
- 1440p: 2560x1440
- 1080p: 1920x1080
- 720p: 1280x720
- 480p: 854x480
- 360p: 640x360

Other YouTube Video Settings for Diverse Needs
1. YouTube Video Quality Settings
Sometimes, you may notice your HD videos uploaded on YouTube look blurry. This is because YouTube adjusts video quality settings from HD to SD in order to give you the best viewing experience when you have a slow internet connection speed. If video quality is your number one concern, then follow the steps to change YouTube video settings HD as below:
Step 1. Go to your Settings page
Step 2. Select Always Play HD on fullscreen if available;
Step 3. Click the Save button.
2. YouTube Settings Unlisted
If you want to make a video uploaded on YouTube visible only to people who have the URL, you can simply change the YouTube video privacy settings from Public to Unlisted.
Step 1. Click on Video Manager;
Step 2. Click Edit -> Settings;
Step 3. Choose Unlisted and Save
How to Convert and Edit Videos for YouTube Uploading
It sounds reasonable to adjust the video resolution, codec, frame rate, bitrate and other video settings for YouTube for better uploading result, but it seems to be a little bit sophisticated to deal with the change. What if there is a tool to accomplish the YouTube video setting task in one click.
Macxvideo AI comes to be your life saver. Added with the preset profiles for YouTube and other web services, the tool enables to directly convert videos to YouTube supported formats like MP4, FLV, 3GP, etc with all video export settings ready to match with YouTube rules perfectly. That means you don't have to be a tech geeks to adjust resolution, codec, frame rate, bit rate, etc any more but leave the tool to do this. Still, you can use the tool to edit the video audio parameter settings for your specific needs at your disposal, for instance, in need for a high quality video uploading to YouTube.
Free download, install and run this all-in-one YouTube video converter and editor on your PC (Windows 10) and Mac (macOS Big Sur) and follow the 4 simple steps below to convert video to fit best YouTube advanced settings at the highest quality.
Step 1. Click "+ Video" button to load the video ready for upload.
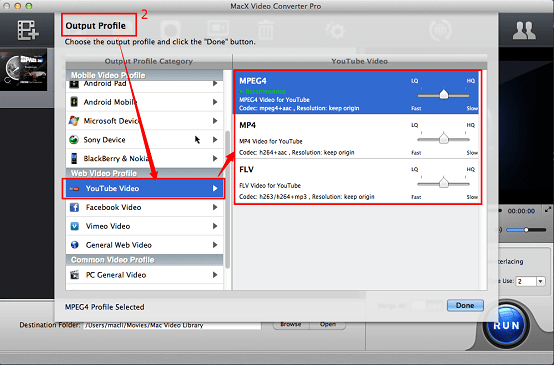
Step 2. Convert video to best video format for YouTube. Go and choose Output Profile -> Web Video Profile -> YouTube Video -> MP4. Hit Done button.
2. You can hit the Edit button on the main interface to cut off unwanted part of your video, crop the black bars of YouTube, crop the video size, merge multiple videos into one, add subtitles or watermark to the video before uploading to YouTube.
Step 3. Click "Browse" button to choose a target folder to save the converted video.
Step 4. Tap "RUN" to start converting videos with best settings for YouTube uploading.
Other Highlights Regarding to YouTube Video Settings
To be frank, Macxvideo AI is not merely good at converting videos for better uploading without changing YTB settings one by one, it is still versed at the following stunning features:
1. Convert among SD and HD videos, including 4K/8K UHD videos, such as MKV to MP4, 4K UHD to MP3, AVI to MP4, MP4 to MP3, etc.
2. 350+ readymade preset profiles for phones, tablets, media players, game consoles, video editors, online video services, such as iPhone 6S, iPad Pro, Samsung Galax S6, VLC, PS4, iMovie, Final Cut Pro, etc.
3. Download online videos from YouTube, Facebook, Vimeo, Vevo, and another 1000+ video sharing sites. That means it lets you get the best YouTube upload settings for mobile phones and tablets and enables you to play YouTube videos on iPhone iPad Android offline easily without changing any setting for YouTube one by one.


