

Apple now seems nonchalant to the removal of DVD drive for the sake of shrinking its computer size. Neither MacBook Air nor new MacBook Retina come with a drive. But movie buffs can't thoroughly ignore it, especially when they want to watch DVD movies on the new Macs. Follow the guide below and learn how to to rip a DVD on a Mac as a digital copy to save battery power and watch movies without carrying around discs or DVD drive.

How to Rip a Protected DVD on a Mac with/without Disc Drive
[Solution] Use MacX DVD Ripper Pro: Dealing with the hot Hollywood movies on Mac can be intricate as these DVDs are encrypted with copy protections that you cannot bypass using common free DVD ripper for Mac software. One feasible option is to circumvent the copy protection from a DVD and rip the unencrypted DVD on a Mac computer in a digital file format by taking advantages of MacX DVD Ripper Pro.
Specifically designed for Mac users, the DVD digitizer has the knack for tackling all DVD copy protections, say CSS, region code, Sony ARccOS, Disney X-project protection and enables to rip DVD to MP4/MOV/M4V that is readable by Mac as well as other mainstream formats like AVI, WMV, FLV, MKV, MPEG4, H264, MP3 and more with high quality reserved. But how to rip and digitize DVD on Macbook, MacBook Air Retina, MacBook Pro or iMac 5K in case there is no drive? Just follow the tutorial below.
Generally, tutorials on how to rip a DVD on a Mac scatter over the internet, but those with detailed parameter settings are rare, in case you need a fast ripping speed, high output video/audio quality, or device profile settings. Hence, here I will show you the step-by-step guide with MacX DVD Ripper Pro.
Get the Hardware before DVD Ripping
In case there is no DVD drive, please get an external DVD drive such as Apple's $80 model USB SuperDrive, or a drive as cheap as $30-$40 on Amazon. Plug the drive into a Mac with a USB cable, pop in a DVD you need to rip on a Mac. But if you have a Mac computer with the drive, please jump to the following steps to handle DVD conversion on macOS with the tool.
Copy Protection - Thwart You From Ripping DVDs on Mac
Commercial DVDs, especially the new movies on DVD and rental DVDs from Redbox, Netflix, CafeDVD, are encoded with copy protection measures. On the one hand, these are the announcement of MPAA and disc publishers that you are not allowed and may violate the copyright law if you copy or rip these DVDs for any commercial use. Frankly, you can actually manage your property for personal use and to rip a DVD you actually own to avoid any scratches or damages is OK, to some degree. On the other hand, these measures make ripping DVDs on Mac computer isn't just as easy as popping DVDs in and importing them. Problems involved in "non-standard DVD like adult DVD", "no valid source found", "only rip half of DVD", "rip only the first few minutes", the following guides will dwell on how to rip a protected DVD on a Mac with the DVD decoder.
1. Download Mac DVD Ripper Software
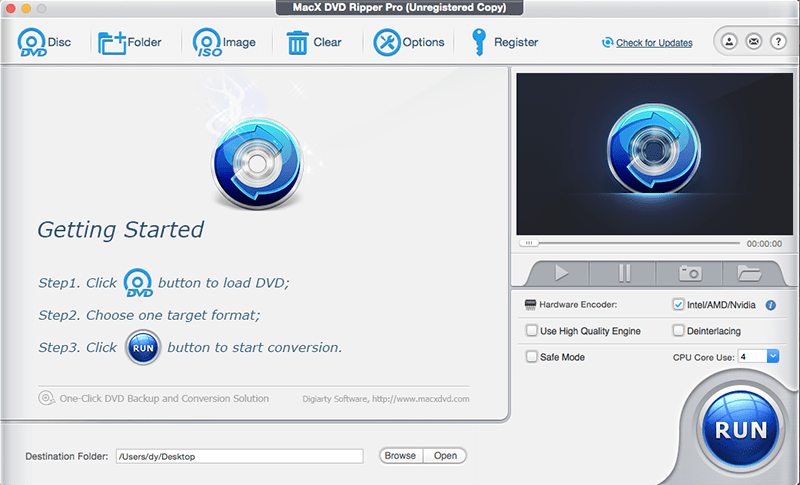
Go to MacX DVD Ripper Pro official page, Free Download it on Mac OS X. The dmg file is less than 37 mb and it takes less than 20 seconds to download it. It is updated to support the latest macOS High Sierra. After you launch it, you can see an intuitive interface, where you can load DVD disc, DVD folder or iOS image for further ripping on Mac. The program automatically analyzes the DVD, during which the SuperDrive may be noisy for a few seconds, because its buit-in advanced decryption and transcoding engine are going into action to decrypt DVD before ripping.
2. Choose the Output Format
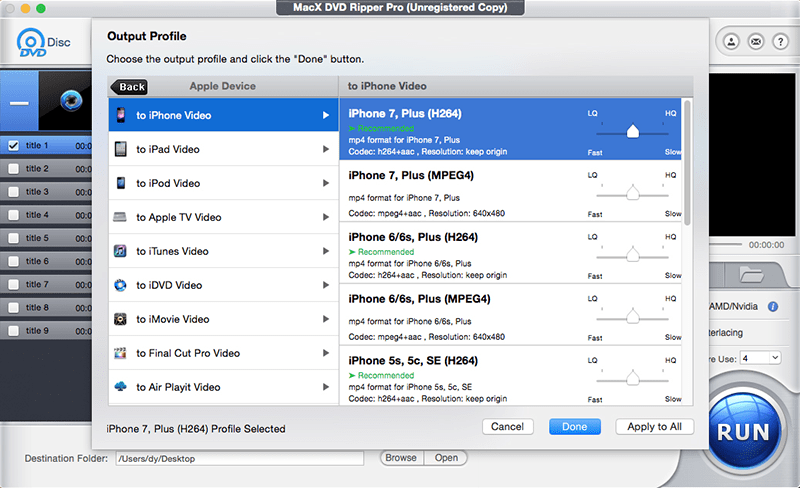
Then you will be presented with a pop-up window, where you can choose the output format as you please. Besides the ability to rip DVD on Mac QuickTime, iTunes, iMovie, iDVD, MP4, MOV, AVI, WMV, MKV, etc, the DVD ripper for Mac ships with a range of output profiles, covering popular iPhones, iPads, Android and Windows photos and tablets, Sony PS4, Google Chromecast and other mainstream devices.
3. Do Some Parameter Settings Tweak
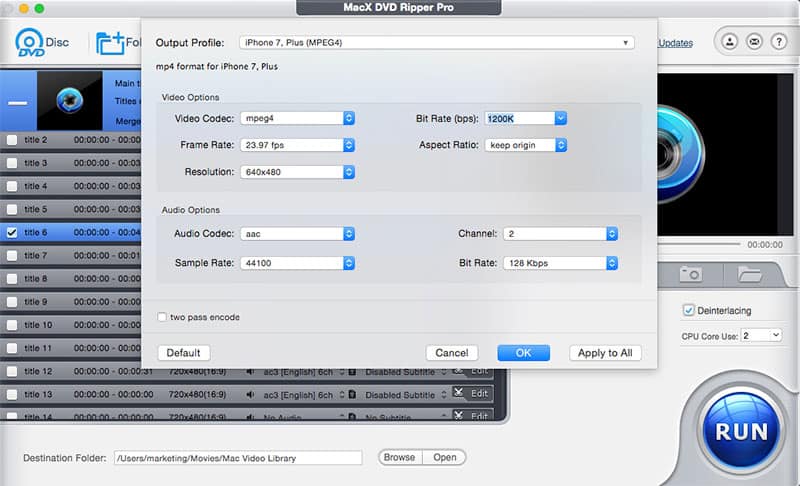
1. High Quality: Whichever preset you choose, use the slider and move to the right side for the highest video/audio quaility. Check the boxes of Use the High Quality Engine and Deinterlacing for high-quality ripping. Choose the settings, such as bit rate and video resolution. But please keep in mind that higher resolution and bit rate will result in big file size and slow speed.
2. Fast rip speed: Use the slider on the device profile window and move it to the left side to sacrifice a little video quality for a faster rip. Adjust the video codec, frame rate, resolution to lower to ensure a fast DVD conversion speed. Check the box CPU Core Use up to 8 as it supports the hyperthreading technology and multi-core CPU use. Note: the speed depands on your Mac configuration, your DVD drive speed and the DVD you are ripping. Generally, it takes less than 20 minutes to rip a 2-hour DVD to H.264 with AAC on a Core i5 MacBook.
3. Safe Mode: In most cases, users reporting issues with DVD conversion, for instance, they cannot rip newly released Disney DVDs, such as Beauty and Beast, Fast 8, Star Wars 7, etc, can opt for the Safe Mode to ensure a smooth DVD ripping for some troublesome files.
4. Edit DVD Movie before Ripping
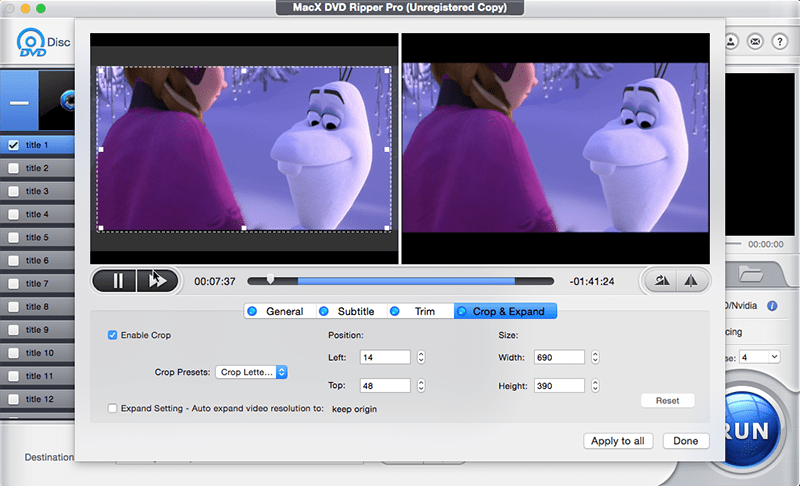
There are handy video editing options for you to do further creation. e.g. crop video files, cut off unwanted parts by setting its starting and ending times, add external subtitles or hardcode subtitles on the movie, etc.
5. Start Ripping
Choose the output folder to save the ripped DVD movie to Macbook by clicking the "Browse" button. Press the "RUN" button to start ripping a DVD on a Mac (macOS High Sierra included). Within a few minutes only, you will be able to play DVD on Mac mini/MacBook Pro, watch movies on a plane, in a coffee shop or wherever you go without lugging around an external drive.
After the DVD rip on Mac, you can transfer the converted movies to iPhone or iPad with iTunes or other file transfer software such as MacX MediaTrans, which offers two-way medai file transfer. It can also transfer videos from iPhone to Mac that iTunes cannot do. Music and other media files are also supported.
Notice: We only advocate copying and ripping DVDs under the concept of Fair Use and do not encourage any illegal reproduction or distribution of copyrighted content. Please abide by the local DVD copyright law before doing it. Click to see whether it is legal to rip DVDs.
How to Rip a Homemade DVD on a Mac for Free with/without Disc Drive
[Solution] Use Handbrake: Handbrake Mac is so far one of the most favorite open-source DVD converter for Mac and Windows. It offers a myriad of options and settings for mainstream devices. It is the optimal choice to rip a homemade DVD on both Mac and Windows. But how to use Handbrake to fulfilll the DVD ripping if there isn't a disc drive?
All you have to do is just insert a DVD to leave Handbrake analyzing it. This Mac DVD ripper software divides DVD into logical groups called Titles. You can hit the Preview Window button on the toolbar to check whether it is the right title. In many cases, Handbrake rips DVD that is only homemade or unprotected. So if you come across a newly released DVD, the title will be often chosen wrong or handbrake crashes time and time again.
Tips: in case your Mac is devoid of disc drive, please buy an external DVD drive as it is suggested above. Or you can set up a Mac to share DVD from a Mac with built-in or external optical drive as below.
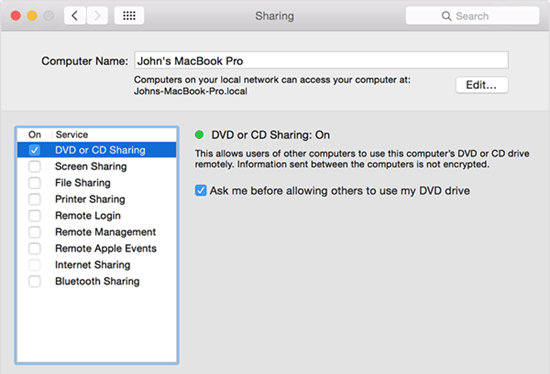
1. Choose Apple menu on a Mac that has an optical drive > Hit System Preferences.
2. Press Sharing icon in the System Preferences window > select the DVD or CD Sharing > Choose Ask me before allowing others to use my DVD drive.
3. Insert the disc into the optical drive.
4. On the computer with no drive, hit the Remote Disc under Devices into a Finder window sidebar. Double-click the computer's icon and click Connect to see the contents of the DVD available from that computer.
Note:
- The Computer with optical drive must have Mac OS X V 10.4.10 or later.
- Mac OS X El capitan is not supported by Handbrake
- You cannot share it using DVD Sharing in case the DVD is copy protected.
- Make sure both the Mac computers are on the same network.
With all the settings done, you can use Handbrake to rip DVD to Mac computer. And then store the movie you just ripped for the plane ride or share it with your friends with a flash drive. Please refer to other Mac software to rip episodes from DVD to AVI, MOV, FLV, WMV, M4V and more as Handbrake only supports ripping DVD to MP4 and MKV formats.
How to Rip a DVD on a Macbook (Pro)/Macbook Air/iMac
5-Star Solution: MacX DVD Ripper Pro
Bypassing all kinds of DVD copy protections, Region Code, CSS, Sony ARccOS, RCE, UOPs and Disney X-project protection, it rips a DVD effortlessly on Macbook Pro, Macbook Air, iMac etc. with fastet speed and no quality loss.
How to Copy a DVD on a Mac OS X
[Solution] Use Mac's Disk Utility application. Most of you may want to make DVD copies from any DVDs with no copy protection. But how to copy a DVD using Disk Utility? Follow the tips below to copy the information from the DVD to the hard drive and then burn the DVD disc image to a blank DVD you just insert.
1. Insert the DVD to you want to rip into a Mac.
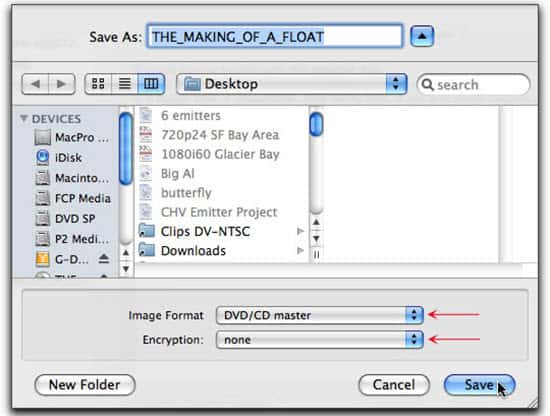
2. Open Disk Utility inside the Applications. Select DVD from the column list on the left, press the New Image icon at the top of the Disk Utility window.
3. Choose a name and a destination in the Save As box. Please make sure you have enough hard drive space to rip the DVD on your Mac. Hit the DVD/CD master in the Image Format drop-down menu > Choose "None" in the "Encryption" > Click Save.
4. Return to Disk Utility after copying DVD to your drive. Eject the original DVD on your Mac.
5. Insert a writable DVD into your Mac. Hit the new Disc Image on the left of the Disk Utility window. Click "Burn" in the main window. You can choose the burn speed here.
6. You can receive a conformation once the DVD is burned. Simply save your new Disk Image and you can make a copy on your Mac.


Bella has been working with DVD digitization for over 12 years. She writes articles about everything related to DVD, from disc drive, DVD copyright protection, physical structure, burning and backup tips. The unceasing passion of DVD movies helps her build a rich DVD library and ensure a practical solution to address almost all possible DVD issues. Bella is also a crazy fan for Apple products.


