
What is iMovie?
iMovie is a video editing software application created by Apple as part of their free of charge iLife suite of applications for Mac that allows users organize video files, throw together multiple video clips, apply some effects, adjust audio levels for video, etc. Generally, iMovie supports DV (standard definition), HDV (high definition), MPEG-2, MPEG-4, H.264, AVCHD and AIC video codecs as Apple declared to be supported on iMovie' 09/11. However, you must have difficulty in importing other mts to iMovie, especially those raw MTS files that iMovie just can't recognized their camcorders.
Then how to solve the problem between MTS and iMovie? You need a workaround to convert MTS to native formats iMovie supports with a wet finger. This can be achieved by the powerful and professional MTS video converter which will accomplish MTS to iMovie conversion smoothly, with ultra fast speed and maximum video quality preserved.
All-in-one Solution for Converting MTS to iMovie Format for Video Editing
Macxvideo AI is developed specifically for converting MTS files to iMovie supported video formats like MP4 MOV M4V. Meanwhile, built in 320+ video and 50+ audio codecs, it is capable of converting any video to over 180 video formats and 14 popular audio formats on Mac OS, including AVI to MP4, MKV to AVI, VOB to MP4, MOV to MP4etc. On top of that, you can also do some editing on the file you want to convert, like cropping unwanted frame from clips, trimming the length of the file, merging separate videos into a new one for your smooth editing.
Step 1: Add MTS video files
First of all, free download this top MTS video converter and then launch it. Hook up your AVCHD camcorder to Mac, copy the MTS files to your hard disk, and then add them to the video Converter through "+Video" button or drag-n-drop.
Or you can also grab the Windows version MTS video converter for your Windows PC.
Step 2: Select "to iMovie Video" as output format
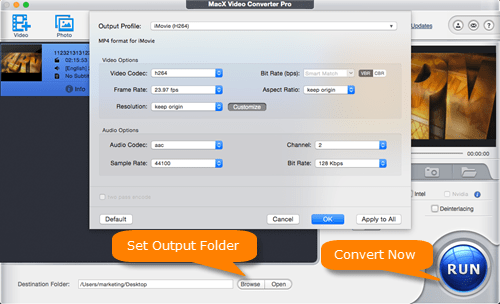
Select "Apple Device" -> then click "to iMovie video" as output to convert AVCHD to iMovie on Mac. The proper frame rate, bit rate, resolution and other settings will be set by default. If you like would like to edit MTS video before conversion, you are free to tune/customize the parameters based more on personal requirements.
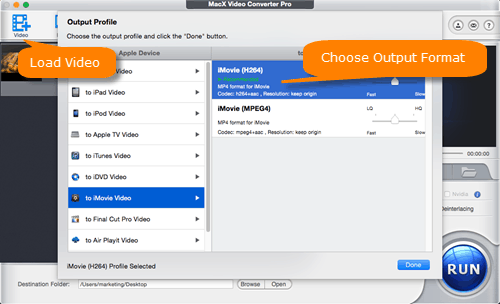
Step 3. Specify output directory where the converted iMovie video located
Click Browse beside open button to specify a location to store the converted iMovie file.
Step 4: Start MTS to iMovie conversion
Press "Run" button, it will perfectly start converting your camcorder MTS video to iMovie supported format. After conversion, the output video is completed compatible with iMovie, iMovie '09, iMovie '11, iMovie HD etc. Then you can import MTS files to iMovie easily.
Macxvideo AI, however, managed to reward the best video conversion solution, which is another indication of the versatility and dynamism in video recorder and photo slideshow maker. The built-in screen recorder helps to record screen activities happening one Mac. The slideshow making feature brings users a stunning experience to turn photo collection into vivid slideshow for sharing on web, facebook, blog and more.
Import a Converted Video to iMovie on Mac
After you have converted a MTS to your preferred iMovie compatible format following the steps above, and now transfer the converted file on to your Mac computer that has iMovie installed, you can follow the steps given below to import the file to iMovie:

Step 1: Open the iMovie on your Mac computer. Click the file menu on the top left conner and then tap "Import Movie" to select the converted file that you want to import to iMovie.
Step 2: Once selected, from the lower section of the box, click to select the Create new Event radio button. Then type a name for the new event in the available field,
Step 3: Ensure that the Copy files radio button is selected from the lower-left section of the box to make sure that the original file is not modified, and its copy is created when you edit the video.
Step 4: Click Import from the bottom of the box when done. And wait until the video file is imported to iMovie.


