
This tutorial centers on resolving streaming video capture on Mac issue like explained below:
"Can someone tell me how do you record any streaming video on the Mac. I know popular sites like YouTube allow download, but most other don't. May someone help me please?" - Seasurfer
The built-in streaming video capture software QuickTime is limited to full screen, which will increase the space of recorded videos, and also will record both the sound from Mac speaker and any background noise from your room. That’s why there is an increasing demand for easier ways to reach the goal of capturing streaming video on Mac. Accordingly, this tutorial will share top ways to help you out.
[Disclaimer] We do not endorse any practice of recording other people’s live streaming. This article is for those who want to record their own live streams to edit. Remember to comply with copyright laws and respect the content creator's rights when recording other's streaming videos.
Hot topic: Top 15 Best Video Converters for Mac [Free & Paid]
Best Streaming Video Capture Software Mac Free Download
Available to capture 2160p/1440p/1080p/720p videos in full screen, Macxvideo AI is hand-picked as a top-tier Mac video recorder to record live streamings from YouTube, Netflix, Disney+, etc. at 60fps up to 4K 2160p in high quality. Also, gameplay recording is accepted. Afterwards, you can also utilize it to trim, crop, merge your recording files, add external subtitle to streaming capture file or change its video format/codec to 420+ video format.
Macxvideo AI is for macOS, while Winxvideo AI (from our WinXDVD brand) is for PC.
Part 1. 10 Ways to Capture Streaming Video on Mac
1. Built-in Recorder (Hotkeys)
Best for: Quick capture with hotkeys.
The Mac computer has preset a tool for you to directly capture streaming videos on Mac. The hot keys exist in macOS Mojave (version 10.14) or later operating system and can be used to easily screen record live streaming video on MacBook Pro/Air, iMac or Mac Studio without any extra plug-in or add-on. Once you activate the hotkeys, the toolbar that appears lets you select a recording area you need or just the entire computer screen. With this method, you can also record a video on Mac with audio.
Pros:
- Easy to use, no need to install software.
- Records a video with audio.
Cons:
- Only available for macOS Mojave (version 10.14) or later.
- Only suitable for simple and basic use.
Tutorial: How to capture Mac streaming screen with the built-in recorder?
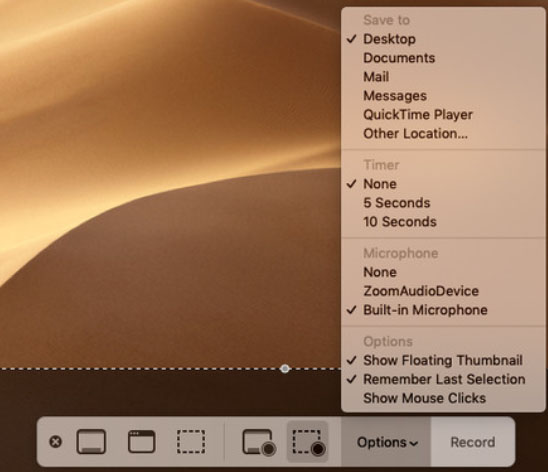
Step 1. Press Shift + Cmd + 5 on your keyboard. Then an onscreen menu will pop up, allowing you to choose from different recording options: capture a still image, a section of the screen, an entire screen, or a window.
- Capture Entire Screen: Click on the "Capture Entire Screen" button to record the entire screen.
- Capture Selected Portion: Click on the "Capture Selected Portion" button to select a specific portion of your screen to record. You can drag the crosshair cursor to choose the desired area.
- Record Touch Bar (if applicable): If you're using a MacBook Pro with a Touch Bar, you'll have an option to record the Touch Bar as well. Click on the "Record Touch Bar" button to include it in your recording.
- Show Floating Thumbnail: By default, macOS displays a thumbnail of your recording in the corner of your screen when you stop recording. You can choose to enable or disable this feature.
Step 2. Choose one recording mode: selected screen capture or entire screen recording. To record the audio as well, click Options and select Microphone.
Step 3. Tap Record button to begin capture live streaming on your Mac screen. To stop recording and automatically save the video to your desktop as a .mov file, you can click on it. Alternatively, press Ctrl + Cmd + Esc.
Step 4. Shift your attention to the lower right-hand corner of your screen, a thumbnail of the file will appear after you've finished recording. Move the screen capture file to the desired storage location where you can find or share it.
Now, you can edit the recordings and merge them with other files to create new videos as you please.
2. QuickTime Player (Default Video Capture Software on Mac)
QuickTime Player is a multimedia application that comes pre-installed on Mac computers. It offers various features, including the ability to record audio and video using your Mac's built-in microphone and camera. The record function in QuickTime Player allows you to capture your screen, record a video of yourself, or create audio recordings.
When capturing streaming video on Mac, QuickTime Player enables you to record your entire screen or a selected portion of it. This feature is helpful when you want to create video tutorials, demonstrate software usage, or capture any activity happening on your screen with audio up to 1440p@60fps. Also, the final video quality is very high. If you need a self-presentation through vlogs or personal messages, you can use your Mac's built-in camera through QuickTime Player.
Besides streaming video capture on Mac, this built-in software also allows you make audio recordings using your Mac's microphone or any external microphone connected to your computer. Thus, it is never easier to record voiceovers, interviews, podcasts, or any other audio content.
Pros:
- No need to download software for Mac.
- Versatile recording options: record screen, capture video using the built-in camera, and create audio recordings.
- Basic editing capabilities: trim, split, and adjust recorded media.
- QuickTime saves recordings in MOV, which can be easily shared, viewed, and edited on Mac and other platforms.
Cons:
- Only simple recordings without editing.
- Limited advanced features, like live annotations, webcam overlays, multi-track audio recording, frame rate or audio quality setting, etc.
- Lack of real-time editing.
- Limited export options: can't choose specific video formats, compression settings, or advanced exporting features.
Tutorial: How to capture streaming video on Mac with QuickTime Player?
Step 1. Launch QuickTime Player on your Mac.
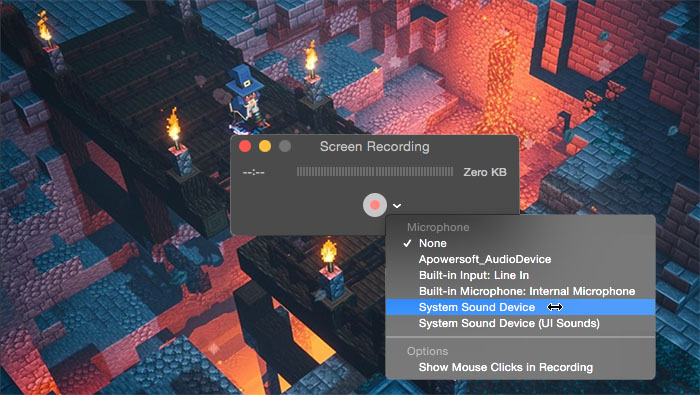
Step 2. Click on File on the menu bar on the left side of the screen, and select New Screen Recording from the drop-down menu.
Step 3. Click the caret next to the red record button to pick your audio options.
Step 4. Click on the red record button to begin capturing streaming video you are watching.
Step 5. After recording the section you need, just click the Stop button in the Menu bar on the right side of your Mac screen.
Notes:
- For full screen capture, you can click anywhere on your screen and then click the prompt. To record a part of the screen, just drag the cursor from one corner of the section to the other, and then click record when prompt.
- QuickTime records videos at 30fps by default. If you need 60fps recordings, you can click on Apple menu icon in the upper left corner of your Mac > select System Preferences > Display > Display tab > tick the Scaled option > select Larger Text > click OK.
3. Macxvideo AI
Another effective way to capture live streaming videos on Mac is with Macxvideo AI, a powerful video recording software that uses advanced audio AI to ensure crystal-clear sound while recording any screen activity. It flawlessly captures video from popular sites like YouTube, Dailymotion, Yahoo, Metacafe, as well as non-downloadable platforms like Hulu, ABC, and BBC, maintaining original high-definition video and audio quality without lag or slowdown.
Beyond recording, Macxvideo AI offers versatile editing features: you can crop videos to your preferred aspect ratio, trim unwanted sections, and merge multiple clips seamlessly—giving you full control to polish your recordings before saving in over 420 formats for any use.
Pros:
- Records streaming videos on Mac up to 2160p.
- Converts recorded videos to 420+ formats.
- Saves video/audio from 1,000+ sites. Upscale video to 4K with AI.
- Records streaming videos from Mac's built-in camera or webcam.
Cons:
- Limited advanced features, like live annotations, webcam overlays, multi-track audio recording, etc.
- Lack of real-time editing.
Macxvideo AI is for macOS, while Winxvideo AI (from our WinXDVD brand) is for PC.
Tutorial: How to use Macxvideo AI to capture streaming video on Mac?
Step 1: Click "Screen Recorder" Button.
Free download the screen recorder on Mac (Windows version is also available) and fire it up, hit the "Screen Recorder" button.
Step 2: Adjust Capture Settings.
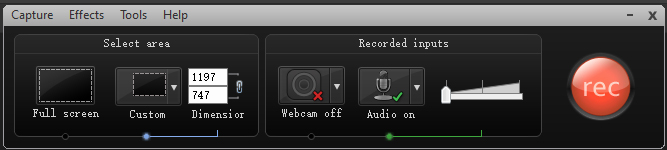
In this area, you can feel free to customize the screen recording area by choosing "Keep Full Screen" or "Record Region". What's more, before you record streaming video on Mac, you are allowed to choose the quality of video to be recorded, adjust the video frame rate, add sound effect to your video, and more.
Step 3: Choose the Destination Folder.
Click "Target Folder" button to select a destination folder and save your recorded video.
Step 4: Start Record.
Click "Start Record" button, the program will start capturing streaming video with HQ audio on the screen within a few seconds. You are free to record video game, gameplay footage, streaming movies, and much more.
FYI: Macxvideo AI integrates screen recorder, slideshow maker, YouTube downloader, video converter and editor in one tool, which means you can not only record streaming video on Mac but also convert the captured video to MP4, FLV, AVI, MPEG, MOV, etc for playback on iPhone, iPad, Android, etc with world's fastest speed due to the aids of Intel QSV hardware acceleration tech.
4. MacX YouTube Downloader (Video Downloader Software)
To capture live streams on Mac, you can also use the download way. MacX YouTube Downloader is a highly recommended YouTube downloader for Mac as it supports capturing online streaming videos to MacBook Pro/iMac/Air at thunder fast speed. It's 100% free and safe, and will help free download online videos from 1,000+ sites in HD/4K quality, no matter you're running on Safari, FireFox, Chrome, Internet Explorer, Opera or others. Also, you can choose any video format, resolution, codec, and size provided by the online site to download.
Pros:
- Captures videos from 1,000+ sites.
- Supports downloading of 4K/8K videos in MP4, MOV, H.264, HEVC, etc.
Cons:
- The copyright contents are not supported for download.
- Lack of editing feature.
Tutorial: How to Download Streaming Videos on Mac via MacX YouTube Downloader?
Step 1: Download this video capture software for Mac and get it launched.
Step 2: Click on the link button on the menu bar.
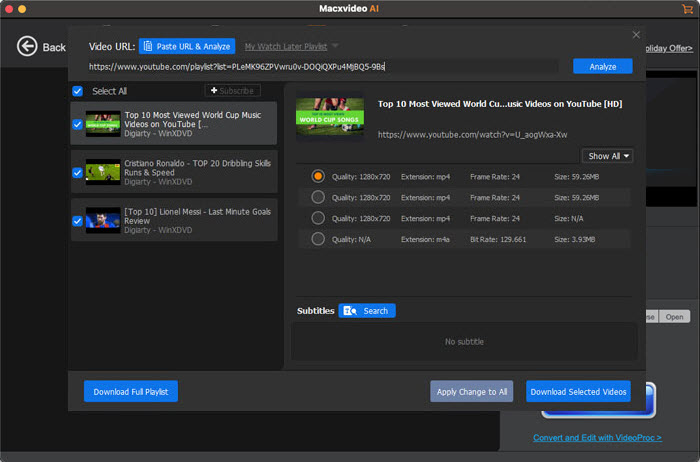
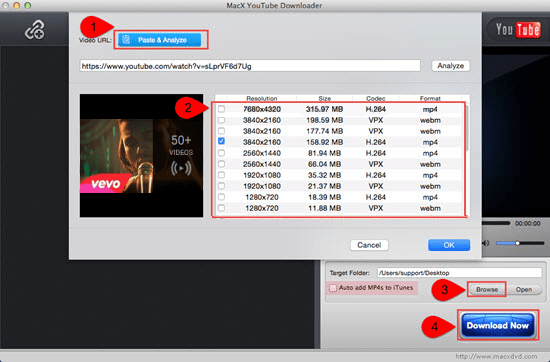
Step 3: Find the online video to download, copy and paste the URL and click "Analyze" to load the video details. Or you can simply click "Paste & Analyze" button to auto detect the video opened in browse.
Step 4: Choose video format like MP4, FLV, WebM, resolution and file size you desire. Then, click "OK" to continue.
Step 5: Choose a folder to save the downloaded file by clicking on the "Browse" button. Then, hit the "RUN" button to start capturing videos on Mac.
5. VLC Media Player (Media Player Software)
VLC is a free media player but also a streaming video capture software. Seldom did user notice that it also features screen and streaming video recording knack. Some users are afraid of the operation sequence and parameter settings. Actually, VLC is not so complicated as you imagined. If you're not an expert to VLC media player, just keep its default settings and do as following steps to give it a whirl.
Pros:
- Open-source and free.
- Captures audio and video from computer screens or external devices.
- Plays videos directly after recording.
- Customizable settings: choosing audio and video codecs, adjusting quality and resolution, and selecting specific audio and video devices.
- Provides keyboard shortcuts for starting and stopping recordings.
Cons:
- Lack of editing feature.
- Recording high-quality video or audio content can consume system resources.
- Ocasioanlly crashes or freezes during recording sessions.
Tutorial: How to record streaming video on Mac with VLC Media Player?
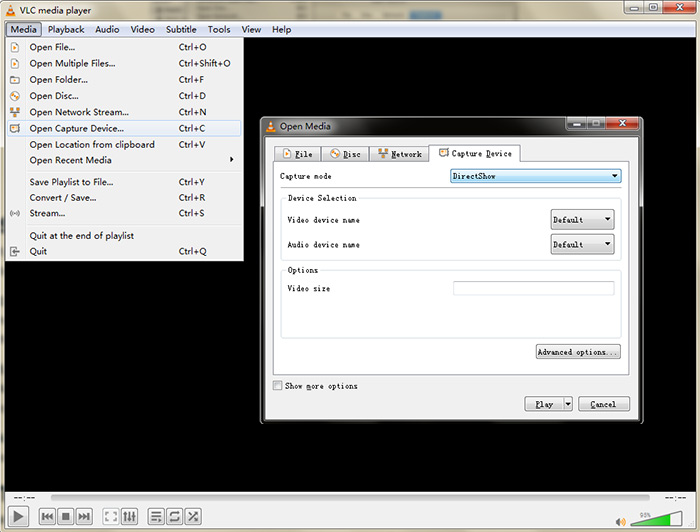
Step 1: Open Capture Device
After downloading and installation, launch VLC on your macOS and click "Open Capture Device" under Media at the top banner of VLC interface.
Step 2: Choose Capture Mode
DirectShow is the default capture mode. If you don't have any other better capture mode, keep this default mode. The same also applies to the below device selection (video & audio).
Optional:
"Advanced options" is available for experienced users to adjust picture aspect ratio, video input frame rate, chroma format, tuner frequency, video standard (PAL, NTSC...), etc. Leave it alone if you don't need them.
Step 3: Tap Play drop down button and select Convert option.
Step 4: Click Start button.
Opt for the destination file and name it. Select profile setting for "Video + MP3" for video and audio recording and click Start button to begin capturing streaming video on Mac with VLC.
6. Screencastify (Chrome extension)
Mac streaming video capture software and extensions abound in the Mac market. Among them, the convenient extension is a must mention, since you don't have to download any software on your MacBook, iMac or Mac Studio. Here one Chrome extension called Screencastify is strongly recommended to you.
Screencastify is a popular screen recording and video creation tool that allows users to capture their computer screens, along with audio and webcam footage. It is a browser extension available for Google Chrome, making it accessible and easy to use. Users can record themselves via their computer's webcam simultaneously with the screen capture with audio. After recording, users can also have some simple editing and then save the recording to Google Drive automatically.
No matter you want to make software tutorials, educational videos, presentations, or demonstrations, this streaming video capture tool is an ideal helper. Also, you can use it to add voice narration, explanations, or commentary to these videos.
Pros:
- Web-based, no need for additional software installations.
- Several recording modes: record entire screen, a specific browser tab, or a custom-selected region on the screen.
- Records system audio, microphone audio, or a combination of both.
- Provides basic video editing capabilities: trim, merge, crop, add annotations, add captions, etc.
- Integrates with Google Classroom.
- Can directly save recordings to Google Drive, YouTube, or other platforms.
Cons:
- May gather and sell your data to the highest bidder.
- Limited editing features.
- Requires an internet connection.
- Can't record offline content.
- The free version has a recording time limit of 5 miuntes per video.
Tutorial: How to Free Capture Live Stream on Mac with Screencastify?
Step 1: Open your Chrome browser > click "Extensions" from more tools option under the low-profile 3-dots icon at the upper right-hand corner of your Chrome browser.
Step 2: Search "Screencastify" on extensions window and then install it to your Chrome > enable it.
Step 3: Create a screencastify account and sign in. Then select your capture settings and what to capture.
Step 4: Tap Screen button to record live streaming video on your Mac screen.
Step 5: Tap Stop Recording to end the streaming capture. Afterwards, you can download therecorded file to your local drive for storage or further editing.
7. Soundflower (Open-source Kernel Extension for macOS)
Soundflower, as its name supplies, is especially designed to capture audio (2 channel & 64 channel) on Mac. Meanwhile, it can also jointly work with QuickTime to capture Mac screen live streaming with better audio quality. Yet, installing Soundflower successfully is quite a challenging process, since it will ask for your admin password and, depending on which Mac operating system you are using, this password might fail when the first time you run the installer.
Moreover, when you eventually install it on your Mac successfully and use it to capture live streaming, Soundflower might route other audio sound you don't want to keep if your Mac makes any sound — not only the audio you're trying to capture but also notifications and alerts. However, don't decide to ditch away it so quick. Its another good side is that Soundflower runs with very low latency and CPU usage. Thus, you don't have to exit other programs while screen recording.
Pros:
- Free and open-source.
Cons:
- No longer officially supported.
- The setup is complex.
- Potential stability issues exsit.
- Lacks a user-friendly graphical interface.

Tutorial: How to record streaming video on Mac with Soundflower?
Step 1: Download and install Soundflower on your Mac with its latest version v 2.0.b2 (last updated on Sep.13, 2021).
Step 2: Launch it and then go to System Preferences > Sound > Output > select Soundflower (2ch) as your audio output.
Step 3: Make a new screen recording through Quicktime (keep in mind to select Soundflower (2ch) as the audio source under Quicktime's recording settings).
Step 4: Select a recording area of your Mac screen to begin capturing live streaming video with this software.
8. Camtasia (Video Recorder & Editor Software)
Camtasia wins itself a respectable showing as a professional video editing software. Meanwhile, it also helps you free capture streaming video on Mac with audio sound. Unlike the above Soundflower, this screen capture software doesn't require you for admin password for security verification, or for any complicated settings configuration. It's really nice to green hands.
The recorded file will be saved as "camrec" format, which needs to be imported into Camtasia for latter video exporting or further editing. You can seperate audio track from the recorded camrec file if you don't want the audio in your file. Then export your recording as MP4 with whatever resolution, frame rate you need, high quality reserved.
Pros:
- Various modes: capture entire desktop, specific application windows, or custom-selected regions.
- Supports Webcam recording.
- Records audio from various sources simultaneously.
- Provides basic editing capabilities: trim, cut, adding captions, applying transitions, adding annotations, etc.
- Integrates with Camtasia Studio for easier post production.
Cons:
- Time-consuming learning curve to understand the functionalities and capabilities.
- It is a commercial software that requires a license to use.
Tutorial: How to record live stream on Mac with Camtasia?
Step 1: Download and install Camtasia on your Mac. Register it with full license. Or choose its trial version.
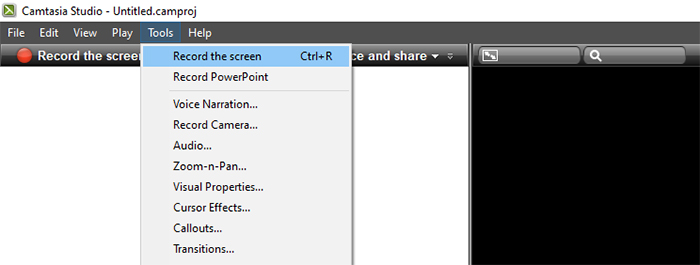
Step 2: Launch it and go to Tools > click "Record the screen".
Step 3: Choose the recording area you want, partially record or the whole screen record.
Step 4: Tap the red button "Record" to begin capturing streaming video on Mac with audio.
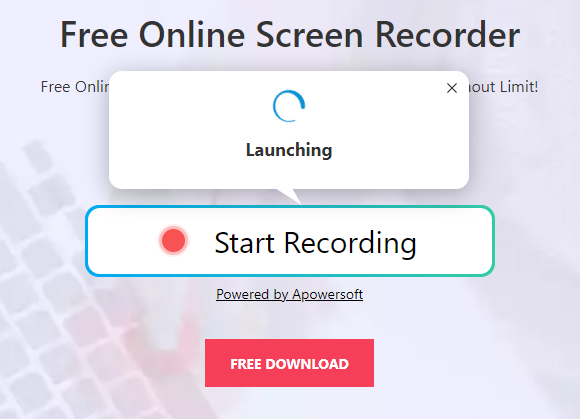
9. AceThinker Online Screen Recorder (Online Tool)
AceThinker enriches the market with its screen recorder software for desktop, as well as an online screen recorder service. For those who are reluctant to download program on Mac, this online streaming capture service is the very one they need. AceThinker online screen recorder is damn convenient, without program installation.
This streaming recorder can record live videos up to 1080p in quality. It lets you record your entire screen, a portion of the screen, the webcam’s view, and around your mouse. You can also use the Task Scheduler to automatically record videos at predetermined times, and this tool also allows you to annotate your video with graphics such as lines, text, and shapes. When you’re done recording, you can convert your file to popular formats such as AVI, MOV, WMV, FLV, MP4. The price is currently $42.95 for a personal lifetime subscription.
Pros:
- Online service, no need to install any application.
- Various modes: record entire screen, specific application windows, or custom-selected regions.
- Audio recording system audio and microphone input.
- Provides annotation tools: draw, add text, highlight, or emphasize specific areas.
- Supports cloud storage and sharing.
Cons:
- The free version has limitations on recording time and video quality.
- Requires a stable internet connection.
- Lacks editing capabilities.
- The free version will add a watermark to the recorded videos.
Tutorial: How to capture streaming video on Mac with this online tool?
Step 1: Open your browser > head to https://www.acethinker.com/free-screen-recorder webpage.
Step 2: Tap the obvious "Start Recording" button and then you'll be asked to download its launcher.
Step 3: Install this launcher on your Mac. Afterwards, run it and then go back to the online webpage.
Step 4: Tap "Start Recording" button again to activate its online screen capture feature.
Step 5: Confirm the recording settings and begin to record what you need.
Step 6: Stop and save the recording to computer or directly upload it online.
10. OBS Studio (Open Broadcaster Software)
OBS Studio, short for Open Broadcaster Software Studio, is a popular open-source software used for live streaming and recording video content. It provides a range of powerful features for capturing and broadcasting video and audio from various sources, such as webcams, microphones, and computer screens.
One of the primary functions of OBS Studio is its recording capability. With OBS Studio, you can easily record your screen, gameplay, or any other content you want to capture. The record function allows you to create high-quality recordings in various formats, including MP4, FLV, MKV, and MOV.
If interested: How to solve OBS not capturing game >>
Pros:
- Free and open-source.
- Supports capturing video and audio from various sources.
- Supports third-party plugins.
- Simple editing options: trim, split, add effects, etc.
Cons:
- Steeper learning curve.
- Limited advanced editing features.
- Lacks official technical support.
Tutorial: How to record streaming video on Mac with OBS Studio?
Step 1: Download and install OBS Studio on your Mac from the official OBS website (https://obsproject.com/). Then, open it.
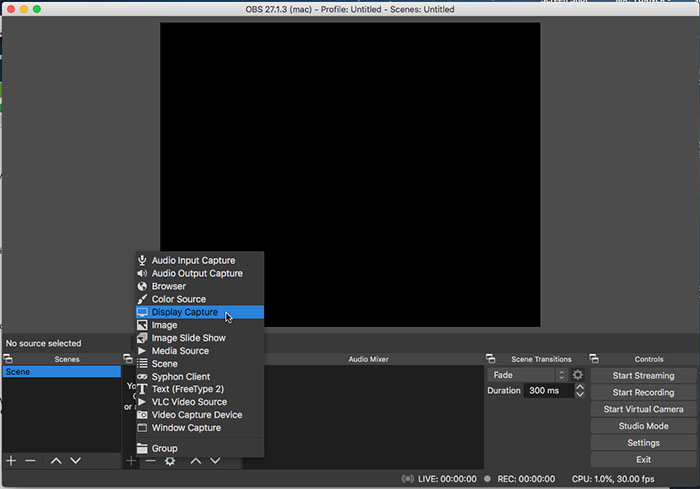
Step 2: In OBS Studio, a scene represents the arrangement of sources (e.g., video, audio) you want to capture. Click on the "+" button under the "Scenes" section to create a new scene. You can name it according to your preference.
Step 3: Click on the "+" button under the "Sources" section. Choose "Display Capture" from the menu. Give it a name and click "OK". A settings window will appear. Select the display you want to record from the dropdown menu. If you have multiple displays connected, choose the appropriate one. Click "OK" to confirm.
Step 4: If you want to record the system audio along with the video, click on the "+" button under the "Sources" section again. Choose "Audio Output Capture" from the menu. Give it a name and click "OK". In the settings window, select the audio device you want to capture, such as speakers or headphones. Click "OK" to confirm.
Step 5: Go to the "Settings" tab in the lower-right corner of the OBS Studio interface. Under the "Output" section, click on "Recording". Set the recording path where you want the recorded video to be saved. Choose the desired recording format (e.g., MP4, FLV). Adjust other settings like video bitrate, resolution, and frame rate according to your preferences. Click "OK" to save the changes.
Step 7: Once you've configured the scene and recording settings, click on the "Start Recording" button located in the lower-right section of the OBS Studio interface. OBS Studio will begin recording the streaming video on Mac for you.
Step 8: To stop the recording, click on the "Stop Recording" button. OBS Studio will finalize the recording and save it to the specified recording path.
To sum up:
After reviewing the 10 streaming video capture software, you can see each tool has its strengths and weaknesses, and the choice depends on the specific requirements of you. Built-in options like Mac's hotkeys and QuickTime Player are suitable for basic recording needs, while dedicated software like Camtasia and OBS Studio offer more advanced features for professional use. Put succintly, you should consider factors such as ease of use, desired features, editing capabilities, and compatibility when selecting the appropriate screen recording tool to capture streaming video on Mac.
Part 2. Frequently Asked Questions
1. What is the best way to record a live stream on Mac?
To record a live stream on Mac, you'll need a dedicated screen capture tool. If you're also looking to edit, compress, or convert your recording afterward, Macxvideo AI is a powerful choice. It supports real-time HD/4K recording with no lag, built-in audio AI for voice optimization, and format conversion to MP4, HEVC, and more.
2. How do I record live streaming video on Mac with QuickTime?
You can use QuickTime Player to record streaming video on Mac. Here’s how:
- Step 1. Open QuickTime Player.
- Step 2. From the menu bar, go to File > New Screen Recording.
- Step 3. Click the arrow next to the record button to select the microphone or audio input.
- Step 4. Click the red record button and start playing the video you want to capture.
- Step 5. When finished, click the Stop button in the menu bar.
Note: QuickTime doesn’t support system audio by default, so if you need internal audio, consider alternatives like Macxvideo AI.
3. How do I record a video from my browser on Mac?
To record a video directly from your browser, you can use online tools like AceThinker Online Screen Recorder or Chrome extensions like Screencastify. However, for better quality, especially when capturing gameplay or streaming videos, a desktop recorder like Macxvideo AI offers screen + audio capture, GPU acceleration, and export to YouTube-ready formats.


Candice's particularly skilled in writing and sharing video-related contents. Her guides cover from deep-seated video/audio parameters, to media entertainment on different platforms. She also enjoys shooting and processing videos by herself for a more reliable basis of informative info with her articles, which are never at the expense of eliminating an entertaining read.


