

Now people would like to rip DVD movies on Mac or Windows computers instead of taking DVDs in and out of DVD players repeatedly. This can protect DVDs against wear and tear and enjoy movies freely on iPhone, iPad, Apple TV, etc. If you need to rip a DVD, the free media player VLC can help. In this post, we will show you how to rip DVDs with VLC on Mac/Windows and handle protected DVDs with a professional yet 100% free DVD ripper for Mac.
VLC Fails to Rip DVDs? Try Best VLC Alternative DVD Ripper
VLC can't rip protected DVDs. When VLC doesn't rip the entire DVD, the output has no audio, or other technical issues, it means VLC fails to rip a copy-protected DVD. In this case, try:
MacX DVD Ripper Free [FREE & safe] - the free VLC alternative to rip DVDs protected by CSS, region code, UOP, RCE, Sony ARccOS, etc. Easily copy DVDs on Mac to ISO image, MKV, MPG with 100% original quality and rip a DVD to MP4, MOV, H264, HEVC, etc. The hyper-threading tech & multi-core CPU utility help rip a full DVD within 10 minutes, an ISO image 5 minutes. There is no VLC DVD ripping errors such as CPU high usage/overheating, "rip DVD only one title/first chapter", or no video/audio errors.
Part 1. How to Rip DVDs with VLC on Mac?
Although VLC is more famous for playing DVDs and videos, but the version after 0.9.6 can rip movie from DVD on Mac and PC as well. Here we take converting DVD to MP4 on Mac with VLC as an example.
Preparation Work:
- Go to VLC official site and free download VLC for Mac latest version. The latest version of VLC media player (V3.0.21) requires Mac OS X 10.7.5 or later. It runs on any Mac with a 64-bit Intel processor or an Apple Silicon chip.
- Make sure your computer has a disc drive. If your Mac doesn't contain a built-in disc drive, get an external DVD drive before we start.
- VLC can't rip protected DVDs on Mac, though it's able to open DVDs with DRMs. But here is a workaround: play the protected DVD in a DVD player and remember the correct DVD title. Then tell VLC which title to rip. But this doesn't work with all protected DVDs.
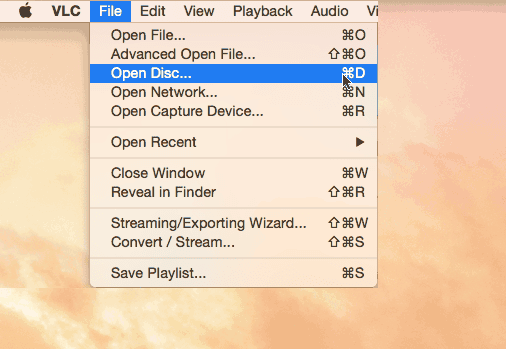
Step 1. Insert the DVD you want to rip onto your Mac and launch VLC media player. Then click on "File" at the top left corner of the main window, then choose "Open Disc..." button. Choose the DVD you'd like to rip with VLC and load it.
Step 2. Click Disable DVD menus. This button is located on the upper right-hand of the window. For Windows, it's called "No disc menus". Why tap Disable DVD menus? VLC would occasionally crap out when it tries to convert a looping menu. So clicking this option will avoid such issues.
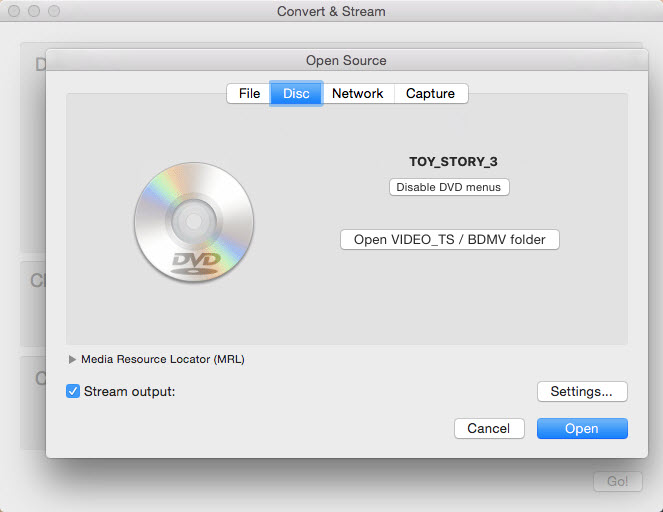
Tips: VLC has libdvdcss to decode DVDs protected by DRM during the playback. But it can't read the correct title when you use VLC to rip a protected DVD. Now remember the correct title you just marked down. After you click "Disable DVD menus", you can manually select the title and chapters of a protected DVD. You can also rip a DVD into individual episodes and save them as single files by means of these two options.
If this doesn't work, see how to rip protected DVDs here.
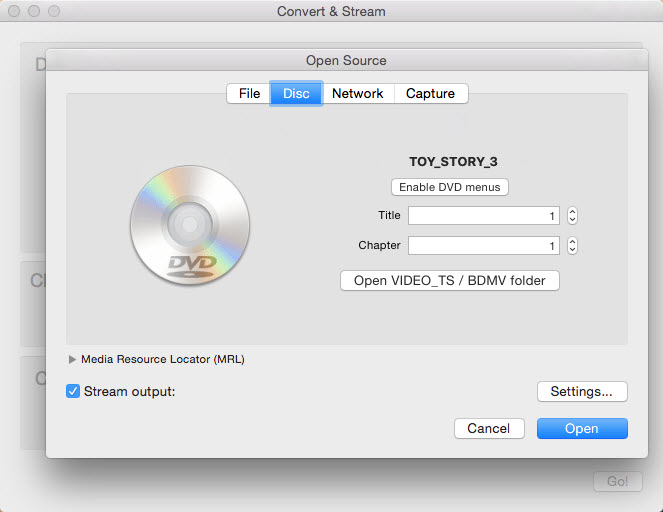
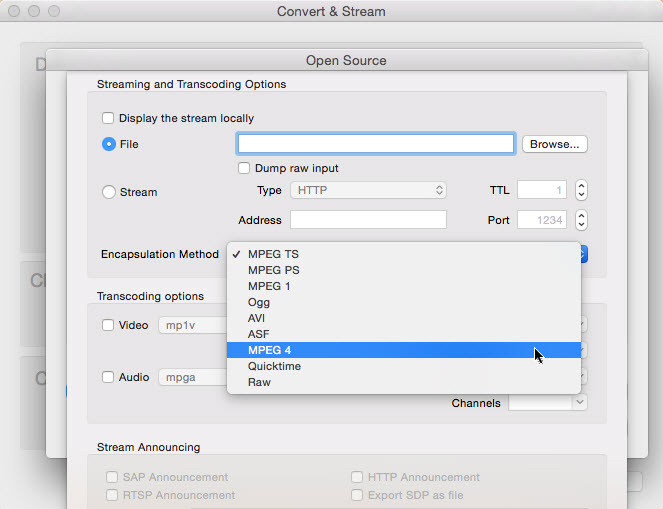
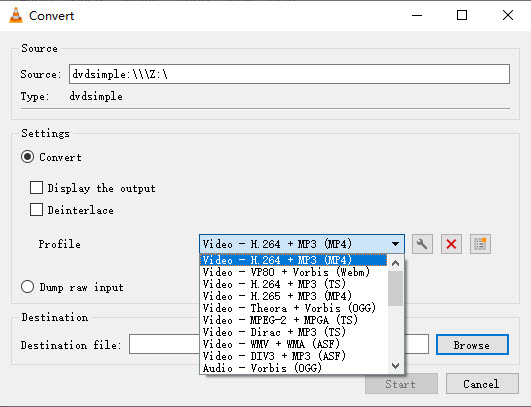
Step 3. Open the DVD ripping options window. In the lower-left corner, check the Stream output box. Next, click the Setting button to open the ripping setting window.
Best VLC DVD ripping settings:
- Video: H264 is at the top of your priority list. The supported video codec list is not ended here. AVI, MPEG-4, MPEG-1, MPEG-TS, OGG, and QuickTime are also included.
- Bit rate: it enables you to choose a bit rate from 16kbps to 3072kbps. You can freely adjust it at your disposal.
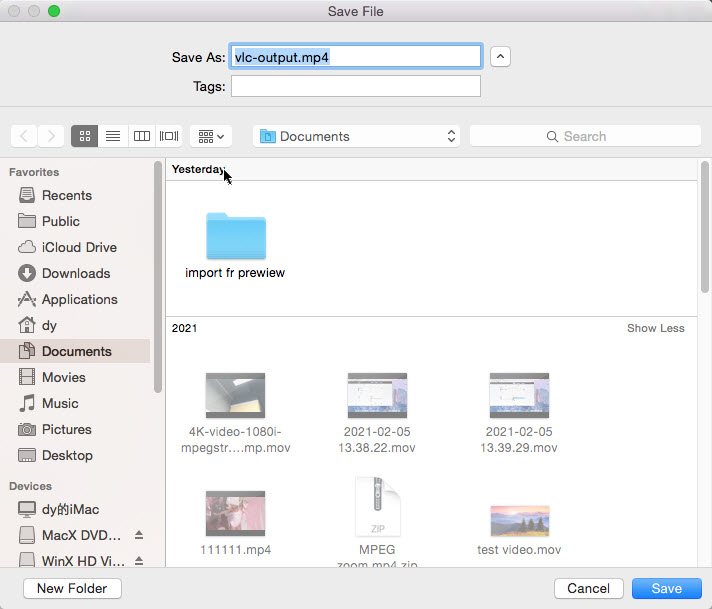
Step 4. Set an output folder. Click Browse…. on the upper-right side of the VLC window. Then you can choose where you would like to save the ripped output video on Mac and give it a name. Then click Save.
Step 5. Select an output format. VLC can rip DVDs on Mac into MP4, AVI, MPEG, OGG, Quicktime, and several more. Open the dropdown menu of the Encapsulation Method to select the output format you want.
Normally, MP4 is the best choice for its wider compatibility. AVI delivers high quality and supports multiple subtitles/audio tracks. OGG has high compression efficiency. MPEG1 overshadows others for its remarkably high quality. Hence, to keep as high quality as possible, consider AVI and MPEG1. In case output video uploading is the target, OGG sounds great.
You can further adjust the video/audio codecs, bit rate, etc. in the transcoding options.
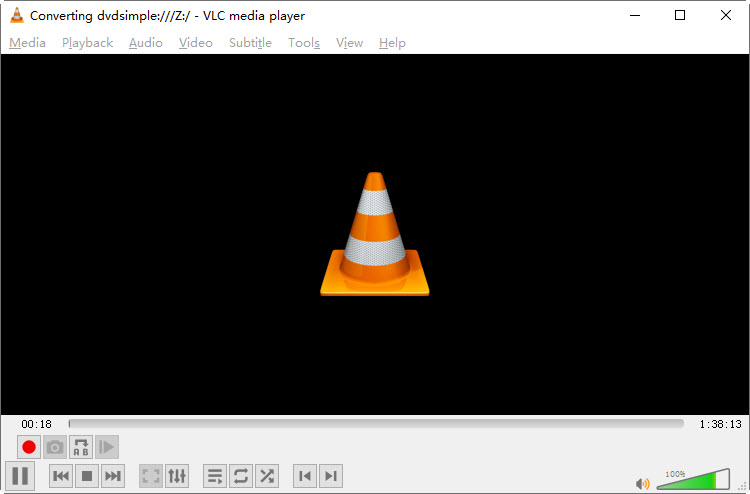
Step 6. Finally, click Open to start ripping DVD with Mac VLC player. After a few minutes, you can get the converted file and play it on your mobile devices.
Also have Handbrake installed on your Mac? Learn how to rip DVD with Handbrake.
VLC Advanced Settings for DVD Ripping
VLC offers several advanced settings that allow you to fine-tune your DVD ripping process for better quality, speed, and size control. By exploring these settings, you can optimize the output based on your needs, whether you’re aiming for faster conversion, higher quality, or smaller file sizes.
1. Video Deinterlace
By default, VLC has "Video Deinterlace" set to off, which is fine for many types of content. However, if you're ripping DVDs that have interlaced video (such as older TV shows), you might want to enable deinterlacing to improve the output quality. To do this:
- Go to "Preferences" > "Video" tab
- Manually change the "Deinterlace" setting to "On", You can also choose from various deinterlace modes such as:
- "Discard"
- "Blend"
- "Mean"
- "Linear"
- "Film NTSC (IVTC)"
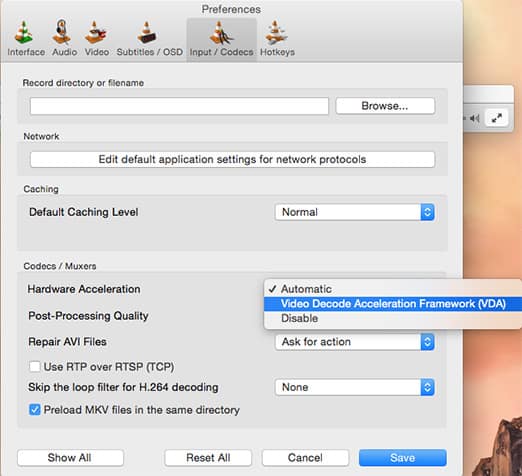
2. Hardware Acceleration
VLC supports hardware decoding with the "Video Decode Acceleration Framework (VDA)", which can speed up the ripping process, though it has a limited impact on the quality of the output. By default, VLC is set to "Automatic", but for DVD ripping, it's better to manually configure it to use hardware acceleration for faster conversion.
- Go to "Preferences" > "Input / Codecs" tab
- Set "Hardware-accelerated decoding" to "Video Decode Acceleration (VDA)"
While it may not drastically improve the output quality, this setting can improve the overall speed of the DVD ripping process, particularly for high-definition DVDs or older discs.
3. Audio and Subtitle Settings
If you want to preserve or adjust the audio tracks and subtitles in your DVD rips, you can adjust these settings in VLC as well. Here's how:
- Go to "Preferences" > "Input / Codecs" > "Demuxers" > "DVD".
- Check the "Force DVD subtitles" option to make sure the subtitles are embedded in the final file.
- For audio, you can select the preferred audio track or codec under "Audio" in the "Preferences" menu.
- If the default audio track doesn't work well, manually set it to the track that you prefer (e.g., "English" or "2.0 Stereo").
Keep in mind that sometimes DVD subtitles are stored in separate streams and may not show up properly unless you enable the correct subtitle settings during conversion.
4. Video Resolution and Scaling
If you're concerned about the resolution of the DVD rip, you can scale or adjust the output resolution. This setting is particularly useful if you want to shrink the file size while maintaining acceptable quality. To adjust resolution:
- Go to "Preferences" > "Video" > "Output" and select your preferred video output module (e.g., "DirectX", "OpenGL", "X11", etc.).
- Next, under "Video Scaling", set the "Resolution" to your desired dimensions (e.g., 720p, 1080p, etc.).
Be cautious with downscaling, as this can lead to loss of fine details in the video. If you're targeting a certain file size, a balance between resolution and bitrate should be considered.
5. Bitrate and Encoding Settings
To control the file size and overall quality of the rip, you can adjust the bitrate and encoding settings. In the "Preferences" menu:
- Go to "Input / Codecs" > "FFmpeg" > "Video Codec" and select your desired codec (e.g., H.264 for smaller file sizes, or H.265 for higher compression with better quality).
- Set the "Bitrate" under the encoding options. A higher bitrate (e.g., 5000 kbps) will give better quality but increase the file size, while a lower bitrate (e.g., 1500 kbps) will reduce the file size but may lose some visual detail.
6. Frame Rate Adjustment
Sometimes, DVDs might have a non-standard frame rate, which can cause choppy playback. You can adjust the frame rate setting in VLC to standardize the playback:
- Go to "Preferences" > "Video" > "Output" and choose the appropriate frame rate (e.g., 29.97 fps or 25 fps for PAL DVDs).
- Under "Advanced" settings, you can also set the frame rate to "Automatic" to ensure smooth conversion if you're unsure of the exact rate.
Changing the frame rate to match the DVD’s original frame rate can prevent issues with speed or video quality in the final rip.
Part 2. How to Rip DVDs with VLC on Windows?
Though the steps to rip DVDs with VLC on Windows PC are similar to these on macOS, there are some differences in detail. Below are the detailed guide on how to rip DVDs with VLC on Windows PC.
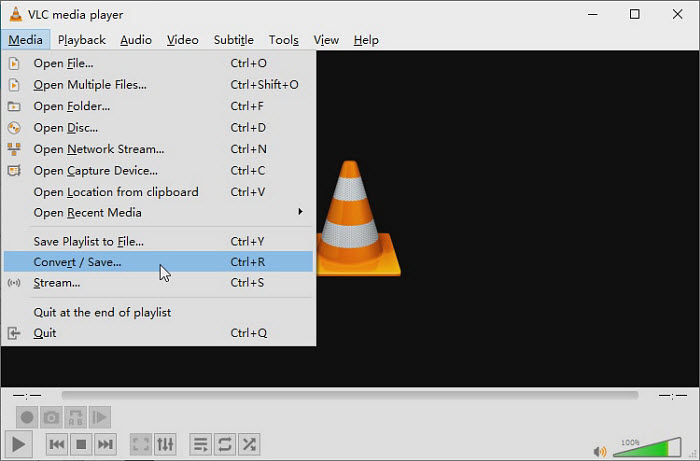
Step 1. Insert the DVD into your PC's optical drive and launch VLC media player. Click on the "Media" tab in the top left corner of the window and then select "Convert/Save" from the drop-down menu.
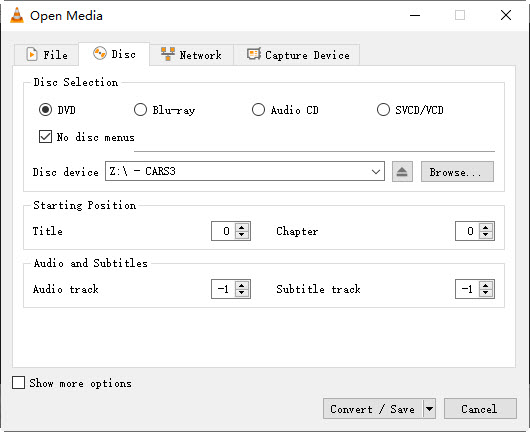
Step 2. Load the source DVD to VLC. Next, in the "Open Media" window, click on the "Disc" tab. In the "Disc Device" field, navigate to and select the DVD drive you just insert.
In this window, here are some VLC DVD ripping settings you need to set:
- Enable "No disc menus" to skip any DVD menus and avoid ripping errors.
- If you want to rip a certain DVD title with VLC, or contain an audio or subtitle track, you can adjust the options as you need. However, you may need to play the DVD in advance to make sure you choose the correct DVD title or audio/subtitle track number.
Step 3. Choose an output format. After the above settings, click on "Convert/Save" at the bottom of the window. In the "Convert" window, select an output format for the ripped DVD file. You can use VLC to rip DVDs to MP4, WMV, or others on Mac and Windows. You can also click on the "Settings" icon next to the format to choose more output formats and adjust any additional settings.
After the converting settings, select the destination folder and give the file a name and then click Start.
Step 4. VLC starts to rip the DVD. VLC will start the ripping process immediately. However, ripping DVDs using VLC doesn't work like other DVD rippers. Instead, VLC will record the DVD video and save the streams in a digital format. That means it will take quite a long time to rip DVDs with VLC on Windows or Mac.
Part 3. VLC Not Ripping DVDs on Mac & Windows? Check How to Fix
VLC is not a professional DVD ripper. As a result, errors occur frequently when using VLC to rip a DVD on a Mac or Windows PC. Some of the most frequently reported errors with VLC DVD ripping on Mac are listed below.
1. VLC is unable to open the MRL xxx
VLC pops up an error message saying "Your input can't be opened" and it's unable to open the MRL 'dvdnav:xx'. Why does this error happen? When VLC won't open the DVD on Mac with this error, it often indicates that there is an overprotective firewall or the input DVD (DVD folder) is damaged. You will need to uninstall your antivirus on your Mac or PC or reinstalll the VLC Media Player.
2. VLC crashes or stops working when ripping DVDs on Mac or PC.
Sometimes VLC crashes immediately when ripping a DVD, and restarting it gives the "VLC Crash Reporting" popup. In fact, this error happens for different reasons. It can be a wrong preset, unsupported copy protection, DVD menus, etc. To let VLC rip DVDs on Mac/PC properly, you can try to use the MPEG-2 preset, disable the DVD menus, try another VLC version, disable hardware-accelerated decoding, and update the video card or driver.
3. VLC rips DVD video but not sound.
After VLC rips the DVD on Mac or Windows, you find that the VLC ripped DVD video has no sound. What to do if there is no audio after DVD rip in VLC on a Mac? In fact, the VLC DVD rip no audio issues are often caused by incorrect frame rate settings or audio codecs. For example, MP4 doesn't support PCM audio. So you can try to:
- Set the sample rate to 48000 and choose audio AAC codec.
- Go to Preferences > Show settings > select All. Type strickt and choose FFmpeg. Then set the Strict standard compliance to -2.
- Make sure you have checked the Audio stream under the Audio codec tab.
- You can also try a different audio track. If there are multiple audio tracks, try the code string :no-sout-all :audio-track=0 :sub-track=0 :disc-caching=300
4. VLC eats up your CPU usage up to 96% or even higher.
The CPU on your Mac/PC may jump to 90%~100% and the DVD ripping speed also lags. That's not the end. It would also ruin your CPU processor since the temperature has been driven to 75 °C or even higher. VLC doesn't support GPU encoding. So it relies on the CPU for DVD ripping, which is quite a burden for the Mac. You should know that VLC is actually streaming the video from the DVD in the rip. That means it will take as long as the movie length to finish the rip.
5. Can't get subtitles when ripping DVDs using VLC.
When users try to rip a DVD with VLC on Mac or Windows, there are no subtitles in the converted DVD video. No matter which subtitle track they specify, no subtitles are exported with the DVD movie. How to fix VLC DVD ripping no subtitles issues?
- Try selecting the subtitle via the DVD menu for your language. The default subtitle track is -1 and that may result in no subtitle in the output VLC DVD rip.
- Make sure you have activated the subtitles on the convert/transcode options in VLC DVD ripping settings.
6. Audio sync issues with VLC DVD rip.
Sometimes, the VLC ripped DVD audio gets out of sync with the video after a few minutes. The video seems to be much faster than the sound or vice versa. This may be caused by a recent protection scheme that VLC fails to rip.
- In this case, you can fix the audio video out of sync issues using VLC itself. Click Tools > choose Track Synchronization tab and enter a numerical value under the Audio/Video option.
- Meanwhile, MKV is a video format that can produce audio out of sync issues easily. Try to rip DVD to MP4 in VLC instead of MKV.
7. VLC is not ripping full DVD on Mac.
Errors like VLC rips one title only or VLC stops ripping an entire DVD early also happen frequently. This can be caused by a damaged DVD. But in most cases, the error occurs because of a copy protection such as the bad sector. As VLC doesn't support DVD protections, it stops encoding when there is a DRM. You can try another professional DVD ripper to do the DVD rip.
8. Ripping DVD in VLC is too slow.
Many users are complaining that VLC is too slow to rip a DVD, taking several hours to rip a DVD to MP4 format. VLC may take a long time to rip a DVD if the DVD is copy-protected or if the computer's hardware or software is not optimized for video processing. Ripping a DVD can be a resource-intensive task, especially when ripping DVD to MP4 or H.265 in VLC. After all, VLC is not the best program to rip a DVD on Mac or PC. If it takes too long than you can stand, try a DVD ripper software.
Part 4. How to Rip DVDs with VLC Alternative | Free & ZERO Issue
In fact, it's not a good idea to rip DVD with VLC on macOS. VLC can't automatically determine the right DVD title. Even when ripping a homemade DVD, VLC seemingly takes forever to rip a DVD on macOS, eating up to 96% CPU usage and causing CPU overheating problems. Simply try the best VLC alternative for Mac:
MacX DVD Ripper Free [100% free and safe] - it's able to rip DVDs protected by CSS, region code, UOP, RCE, Sony ARccOS. You can rip DVDs to MP4, H.264, MOV, HEVC, iTunes, and more. It rips DVDs 5x faster than VLC with support to hyper-threading tech & multiple-CPU core (up to 8) utility. Below is the detailed guide on how to rip DVD on Mac with VLC alternative freely.
Step 1: Load the Source DVD Movie.
Free download DVD ripper for Mac, click "DVD Disc" to import the DVD movie you want to rip.
Step 2: Choose Output Video Format.
Select the output format as you desire from the pop-down box. Compared with VLC, the DVD ripper for Mac provides you with direct output formats. You can choose to convert DVDs to MP4, MOV, iTunes, etc.
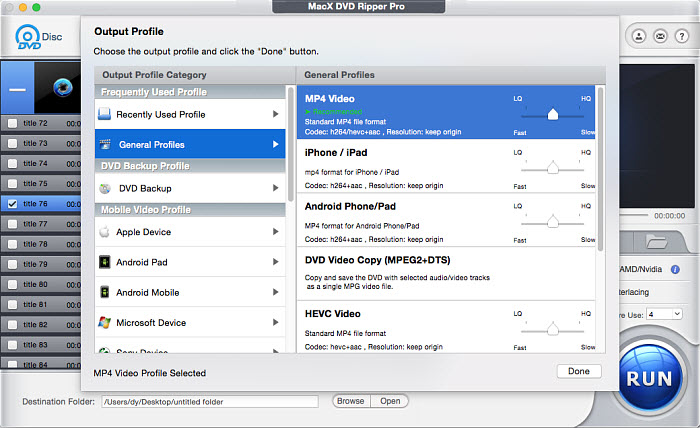
Note: to relieve CPU burden from compute-intensive tasks, hyper-threading tech and multi-core CPU utility can render help, which are located at the lower right corner of the interface and auto ticked at most based on your CPU processor configuration.
Step 3: Press the "RUN" Button.
Click "RUN" to start ripping DVD on your Mac computer.
Tips: If you need to rip all copy-protected DVDs from Disney, Sony, or other publishers and even deal with some knotty discs, MacX DVD Ripper Pro is an excellent DVD decrypter, which is able to decrypt and copy DVDs without manually choosing the full content of DVD movie. It easily strips CSS, Disney copy protection, Sony ARccOS protection, etc. off DVDs and rips movies from copy protected DVDs, including new movies on DVD with 99 titles on Mac, damaged DVDs, workout DVDs, Japanese DVDs easily.
Notice: We only advocate copying and ripping DVDs under the concept of Fair Use and don't encourage any illegal reproduction or distribution of copyrighted content. Please abide by the local DVD copyright law before doing it.
Part 5. FAQ about VLC DVD Ripping on Mac/Windows
1. Can VLC rip protected DVDs on Mac/Windows?
No. VLC can't rip any DVD that is protected. However, VLC is packed with the libdvdcss library to help it require the raw access to the DVD drive to crack the encryption key and decode encrypted DVDs. The workaround to rip a protected is using VLC and Handbrake: play the protected DVD with VLC and note down the correct DVD title, then tell Handbrake which title to rip.
2. How long does it take to rip a DVD with VLC?
It depends. Generally, VLC can rip a DVD faster on a computer with higher configurations. As VLC is not a DVD ripper, it doesn't include any feature that can accelerate the DVD ripping. For example, Handbrake supports Intel, AMD, and Nvidia hardware encoders, and MacX DVD Ripper Free packs multi-core CPU support, super encode engine and hyper-threading technology. They will run much faster than VLC when ripping DVDs on the same Mac or PC.
3. Can VLC rip DVD to MP4?
Yes. VLC can rip a DVD to MP4 encoded in H.264. Besides, you can also use VLC to convert DVDs to AVI, WebM, OGG, TS, ASF, and several other formats as long as the DVD doesn't contain any protections.
4. How to rip TV shows DVDs with VLC on Mac/Windows?
The steps are similar to rip multiple episodes from a DVD using VLC on Mac/Windows. Once the TV shows DVD is loaded, you need to enter the specific title and chapter that you want to rip.
5. How to use VLC to rip DVDs with subtitles?
VLC allows you to select the subtitle track in the DVD ripping settings. In the Convert windows, click on the "Edit selected profile" button, and go to the "Subtitle codec" tab. Check the "Subtitles" option and choose the language of the subtitles you want to include. Then VLC will rip DVDs on Mac/Windows with subtitles.


Bella has been working with DVD digitization for over 12 years. She writes articles about everything related to DVD, from disc drive, DVD copyright protection, physical structure, burning and backup tips. The unceasing passion of DVD movies helps her build a rich DVD library and ensure a practical solution to address almost all possible DVD issues. Bella is also a crazy fan for Apple products.


Digiarty Software, Inc. (MacXDVD) is a leader in delivering stable multimedia software applications for worldwide users since its establishment in 2006.
Hot Products
Tips and Tricks
