

What's the best way to copy my DVDs to my hard drive so that I can just click to open & play. I don't want to make DVD disk copies, I just want to get my library of DVD movies onto my hard drive in preparation for AppleTV. - Apple Discussion
Piles of DVD discs not only take up too much room space but also make it hard to watch without a DVD drive. However, if you take advantage of a DVD ripper, you can copy DVDs to Mac's hard drive, external hard drives, and other storage media like NAS, SSD, USB flash drive, and even cloud services. Then you can freely play the movie anywhere you want.
As long as the DVD does not contain DRM, Mac's built-in Disk Utility can assist in ripping DVDs to the hard drive. To copy a protected DVD, we also share some useful methods here. Check out how to copy DVDs to your hard drive on a Macbook Pro, a Macbook Air, as well as PCs.
Rip Copy-protected DVDs to Mac Hard Drive with Original Quality
Tired of struggling with copy copy-protected DVDs to hard drive? MacX DVD Ripper is your solution. Quickly and easily copy DVDs to Mac hard drives in popular formats like MP4, MOV, MKV, and more without losing quality. Key benefits:
- Effortless ripping: Bypass region codes, UOPs, and other protections with ease. No more struggling with complicated software or technical jargon.
- Lightning-fast speeds: Enjoy DVD-to-digital conversions within 5 minutes for saving in SSD, HDD, NAS, USB etc.
- Superior quality: Preserve original video and audio fidelity. Experience your DVDs in stunning HD or 4K resolution, just like they were meant to be seen.
- Wide compatibility: Works seamlessly with all Mac models, including M1, M2 and M3 chips, and even Windows PCs.
Ready to start copying DVD to hard drive? Download MacX DVD Ripper Now!
Can I Copy My DVD to the Mac's Hard Drive Directly?
Yes, if the DVD doesn't contain DRM or other copy protection measures, you can copy the DVD content to hard drives on Mac/PCs by drag and drop.
Step 1. Insert the DVD into the optical drive of your Mac. Double-click the DVD drive on your Mac to open it.
Step 2. Find and copy the VIDEO_TS folder or ISO image file of the DVD. Then paste the DVD contents to the Mac's hard drive or an external hard drive. You can also do it by holding ALT and dragging the DVD from the Mac to your hard drive.
Step 3. Now open the VIDEO_TS folder and you will see some BUP, IFO, and VOB files. Copy and store the VOB files to your hard drive, as they contain the DVD movie. However, VOB files are not supported by QuickTime or other Mac applications. You can try tools like VLC, 5KPlayer, etc. to open them.
However, in most cases, when you try to play the VOB files in a DVD Video_TS folder, you may find the file is empty or can't play normally. Or even worse, you can't copy the DVD content to the hard drive of your Mac at all. This is all because of DVD copy protection. Encrypted DVDs can be a real headache, preventing direct transfers to your Mac's hard drive.
Want to know how to bypass these restrictions and successfully copy protected DVDs to hard drive on Mac?
For Protected DVDs: Copy DVDs to Mac Hard Drive with MacX DVD Ripper
It's quite simple to copy a homemade DVD to hard drives on Mac. But many movie or TV show DVDs you want to transfer to a Mac hard drive might be copy-protected by CSS, UOPs, region code, RCE, Sony ARccOS, or something else. In this case, you need a professional DVD ripper that can bypass these DVD copy protection schemes.
MacX DVD Ripper is a great program for the task. It is DVD ripping software designed specifically for the iMac, MacBook Pro, Mac Pro, MacBook Air, and Mac mini, and PCs to rip DVDs to hard drives in original quality.
- 98% high quality with small size - Copy DVDs to the hard drive of Mac in MP4, MOV, HEVC, H.264, M4V, MPEG4, etc. for a safe backup.
- 100% original quality - Copy DVDs 1:1 to Mac's hard drive in ISO image, MPEG2, and MKV for future burning.
- Easily transfer any protected DVD to hard drive, with support for region-codes, CSS, RCE, UOPs, multiple or 99 titles, oversized 75GB DVDs, bad sectors, playlist obfuscation, etc. as well as AV discs, homemade DVDs, foreign DVDs, scratched or unreadable DVDs.
- Copy a full DVD to hard drive with 5x faster speed thanks to Hyper-threading, multi-core CPU and the unique Intel/Nvidia GPU acceleration tech.
How to Copy Protected DVDs to Mac Hard Drive in Clicks?
Now we'll walk you through the steps of copying DVDs to the hard drive on a Mac/Windows with MacX DVD Ripper Pro. To get started, you need to:
- Free download the DVD copy software on your Mac or PC computer. It is fully compatible with all the latest macOS Sonoma and Windows 11/10.
- If you want to copy the full DVD contents to the hard drive on Mac in a fomart like ISO image or MKV, make sure your hard drive has enough free space.
- If your MacBook Pro/Air, Mac mini, or iMac doesn't contain an internal optical drive, get an external drive for the task.
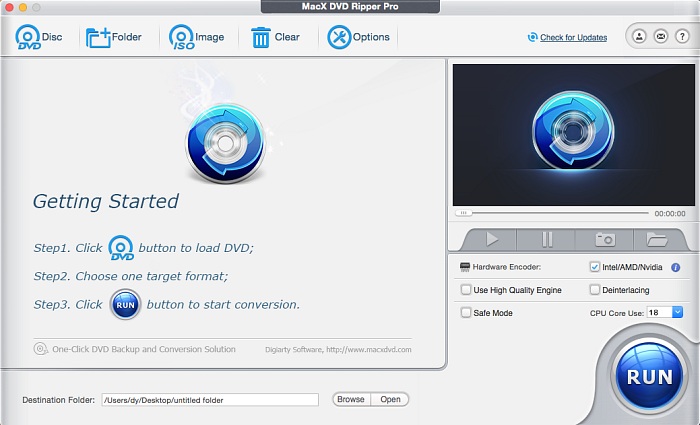
Step 1: Load and Scan the DVD
Open the DVD copy software and insert the DVD disc you want to rip to a hard drive into your Mac's DVD-ROM drive, whether internal or external. Then, load your DVD by clicking the "DVD Disc" button on MacX DVD Ripper Pro.
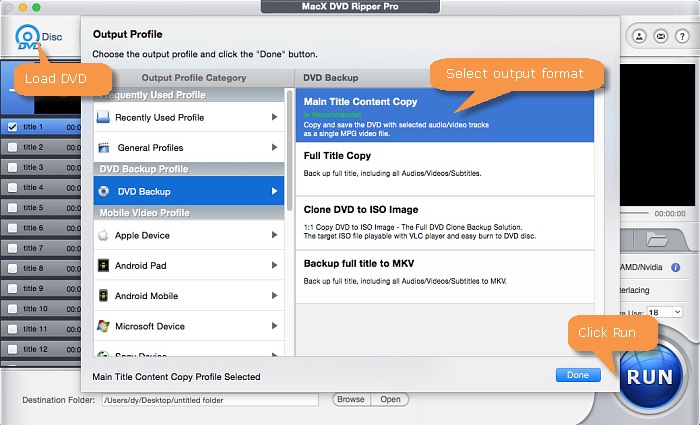
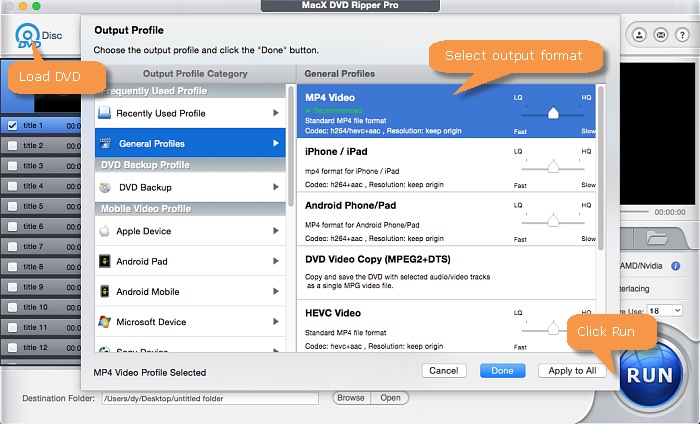
Step 2: Choose an Output Format
It will take several seconds to remove the copy protection, analyze the DVD data, and load the contents. Then an output format will pop up and you need to choose a format that you would like to save the DVD on your hard drive.
• If you want to losslessly save DVD discs to Mac's hard drive for a safe backup, click DVD Backup and you can choose to make a 1:1 copy of a DVD on Mac's hard drive in an ISO image, or back up the full title to MKV, MPEG2. It will automatically demux and remux the movie content with all/selected subtitles, video and audio tracks, without re-encoding.
• If you want to copy DVDs to a hard drive on Mac or PC for later playback on TV, iPhone, iPad, or other devices, click General Profiles and you can rip DVDs to any widely used format like MP4 and MOV. MP4 H.264 is highly recommended for the best compatibility with mobile devices and storage media.
Step 3: Select an Output Folder on Mac's Hard Drive
After you select a format to copy the DVD, click Done. Then back on the main interface, click the "Browse" button to choose a folder on your Mac hard drive to save the copied DVD files.
Step 4: Copy DVDs to Hard Drives on Mac/PC
Click on the "RUN" button, and this DVD ripper's encoding engine goes into action. Minutes later, you will get a copied DVD movie on your Mac's hard drive in the format you set. If you want to transfer the DVD movie to an external hard drive, you can plug it to your Mac and transfer the video to it.
FYI: When we copy the DVD Frozen to MKV format, it takes less than 10 minutes. If you have a higher computer hardware configuration, it will take about 5-10 minutes to rip the whole DVD to Mac hard drive.

>> MacX DVD Ripper Pro Review: Is It Still Worth Using?
[Video] How to Rip DVD to Hard Drive on Mac with MacX DVD Ripper

How to Copy DVD to Hard Drive with Mac's Disk Utility
Disk Utility is a very useful tool built into Mac OS X and macOS systems. It can perform many tasks related to hard disks and storage devices, including the creation of disk images. So you can simply use Mac's Disk Utility to rip the DVD to Mac's hard drive in an image file for backup.
Pros:
- Disk Utility is a default app on Mac and users don't need to download extra tools.
- Disk Utilty can copy DVD to Mac with original quality and data.
Cons:
- Disk Utility is only workable for unprotected DVDs. If you want to copy commercial DVDs to your Mac's hard drive, try the DVD ripper in the first method to remove the DVD copy protections.
- Disk Utility can only copy unprotected DVDs to Mac hard drive in ISO image, which is incompatible with many devices.

Steps to Copy DVD to Hard Drive on Mac 1:1 with Disk Utility
Now let's show you how to copy DVDs to a hard drive with Disk Utility on Macs. First, make sure the hard drive on your Mac has at least 4GB, as Disk Utility can only copy DVD to Mac's hard drive in ISO Image, which is quite large in size.
Step 1. Insert the target DVD into your Mac's built-in DVD-ROM drive or an external one.
Step 2. Launch Disk Utility. Where is Disk Utility? Open a Finder window, click on Applications in the left window, scroll down, and click on the Utilities folder. Then you'll find Disk Utility.
Step 3. The name of your DVD drive will appear in the left panel of Disk Utility. Click on it.
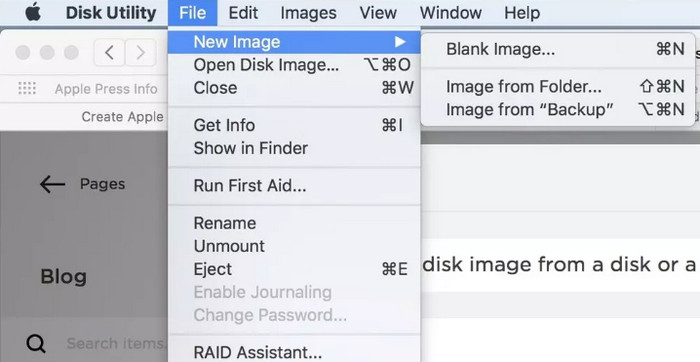
Step 4. Click the File button on the top menu bar, select New Image, and choose Image from the "DVD name".
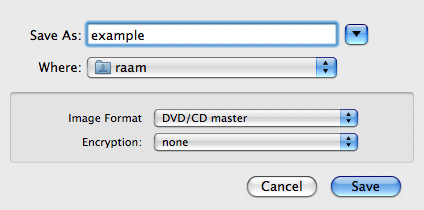
Step 5. From the pop-up window, you should specify the file name, save path (choose a folder on your hard drive), format (which you should choose DVD/CD master), and encryption (which you should set to None). Then click Save. Now Disk Utility will start creating an image file from your DVD. Once done, you'll see a confirmation message. The resulting image file will end with .CDR file extension.
Note: If you want to playback the DVD copies created using the Disk Utility, you may need to transcode the ISO Image files to video formats like MP4. You can do it with the free transcoder Handbrake, or directly rip the DVD to MP4 on Mac hard drive using a professional DVD ripper.
How to Rip DVDs to Hard Drive on Mac using Handbrake?
Handbrake will assist you in converting the DVD to a hard drive on Mac or PC so that you can watch it on TV, mobile, or other devices. It is able to rip DVDs on Mac hard drive in MKV, MP4, or WebM. There is a wide range of settings to customize the copied files. For example, you can adjust the video settings, edit, set the quality, tweak the subtitles/audio tracks, and more. Handbrake can also rip DVDs with GPU encoders, which makes it a good choice if you need to transfer multiple DVDs to Mac's hard drive.
But it cannot make an exact copy of a DVD to Mac hard drive in an ISO image or Video_TS folder. It's not able to copy protected DVD to hard drive on Mac/PC unless libdvdcss is installed.
Pros:
- Handbrake is free and open-source.
- Handbrake is fast and reliable in copying DVD to Mac hard drive.
- Handbrake offers many options to customize the rippping process.
Cons:
- Handbrake needs libdvdcss to rip protected DVDs. However, downloading libdvdcss is a little bit complicated, especially for novice users.
- Handbrake can't store an exact DVD copy on hard drive as it outputs MKV and MP4 only.
- Handbrake is more complicated than other DVD ripper options.
Steps to Copy DVD to Hard Drive on Mac with Handbrake
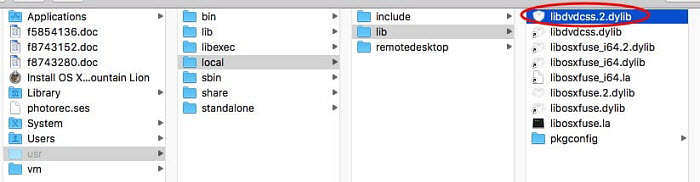
Step 1: Free download Handbrake from its official site. To copy protected DVDs to hard drive using Handbrake, you need to download libdvdcss on Mac via Homebrew. If you don't know how to get libdvdcss, learn detailed steps with pictures to free download libdvdcss for Handbrake. Once libdvdcss is installed on your Mac/Windows, you can copy a protected DVD to hard drive now.
Step 2: Insert the source DVD into Mac's optical drive. Open Handbrake and select your DVD from the Source Selection menu. Handbrake will use libdvdcss in the background to scan the correct title of a protected DVD.
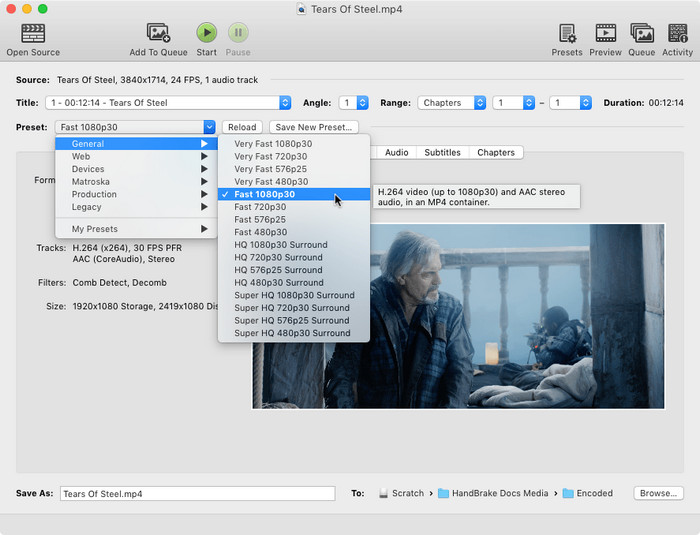
Step 3: Once it finishes scanning, it will open the Settings window. First, open the Preset drop-down menu and select a 480p or 576p setting.
Step 4: Next, under Summary, you can decide whether you want to rip the DVD to Mac hard drive in MP4, MKV, or WebM. Under the Video tab, you can further adjust the video encoder, quality, bitrate, etc.
Step 5: Click Save as and select the hard drive of your Mac or PC to store the ripped DVD video. Then click Start to begin the ripping DVD to hard drive on MacBook Pro/Air, iMac, Mac mini, etc.
How to Copy DVDs to Mac Hard Drive with MakeMKV?
MakeMKV is a perfect tool to copy protected DVDs to the hard drive on Mac or PC. It supports DVD copy protections such as structure protection, AACS and BD+. You can save an exact DVD copy on Mac hard drive in MKV format, which will save the original DVD video/audio tracks, menus, subtitles, chapters, and extras without transcoding. As it will copy the content from a DVD to Mac's hard drive without transcoding, the whole process is very fast. In addition, it also helps to copy Blu-ray discs to your hard drive.
MakeMKV is a reliable DVD ripper, but it's essential to download it from trusted sources and verify its integrity to avoid malware. While it generally works well on Mac, compatibility issues may arise with older versions or specific DVD formats. If you encounter problems, updating MakeMKV or seeking troubleshooting help can often resolve them. Although it produces high-quality MKV files, there might be rare cases where DVDs don't play correctly after ripping. Trying a different media player or adjusting playback settings can usually address these issues.
Pros:
- A free tool that is able to copy DVDs to hard drive for a wide range of users.
- Can bypass common DVD copy protections like structure protection, AACS, and BD+.
- MakeMKV offers fast ripping speeds due to its direct copying approach without transcoding.
- Creates high-quality MKV files that preserve original video/audio tracks, menus, subtitles, chapters, and extras.
Cons:
- Only outputs MKV files, limiting compatibility with certain devices or media players.
- Doesn't provide options for editing or customizing the ripped content.
- May encounter difficulties with older Mac versions or specific DVD formats.
- Downloading from untrusted sources can expose you to malware risks.
Steps to Copy Protected DVD to Hard Drive on Mac with MakeMKV
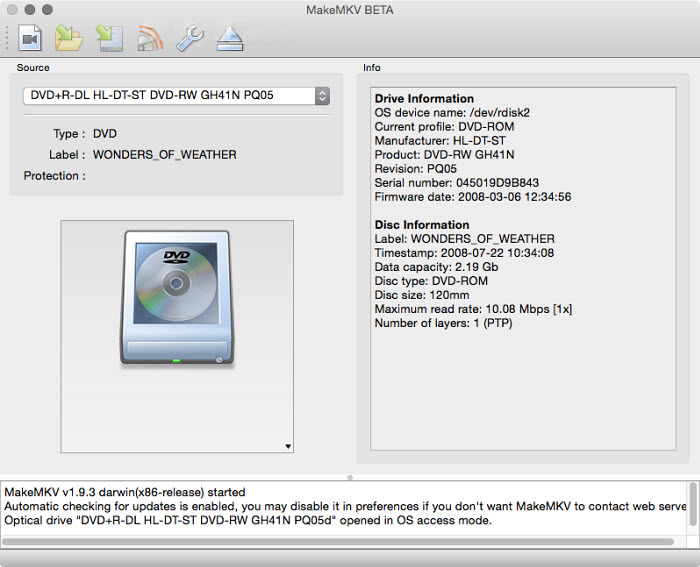
Step 1: Insert the source DVD into your Mac's disc drive. Then download MakeMKV and open it. MakeMKV should be able to load the DVD automatically. It will take some time to analyze and then display the basic DVD information. Click the big DVD drive icon.
Tips: MakeMKV is free in its beta. If your MakeMKV beta key is expired after 60 days, you can re-download the latest version and restart the reset the expiration date.
Step 2: After MakeMKV removes the copy protections from the DVD and detects the DVD data, it will display all the DVD titles. By default, MakeMKV will copy all the DVD titles to hard drive, but you can also select one or multiple titles you'd like to copy.
Step 3: Under the Output folder, set the hard drive on your Mac/PC as the destination for the copied DVD video. Then click the Make MKV button to start.

How to Copy DVDs to Mac Hard Drive with VLC?
VLC is a popular free media player. It contains the capability to copy videos from DVDs to Mac's hard drive. You can choose to copy DVDs to Mac hard drive in MP4, MOV, MKV, TS, WebM, OGG, FLV, WMV, and several more. If you're on a tight budget and don't require advanced ripping options, VLC can serve as a decent solution for basic DVD ripping needs.
However, VLC is not as efficient or feature-rich as other programs. It takes longer time to copy a DVD to the hard drive on Mac. This can be a significant downside for users who need to transfer multiple DVDs to Mac hard drive. You can't use it to copy any protected DVD to hard drives. Overall, if you frequently rip DVDs or require more advanced functionality, it's advisable to consider dedicated DVD ripping software.
Pros:
- VLC is free and open-source.
- It's easy to use VLC to copy DVDs to Mac hard drive.
- It can help copy DVD to hard drive in several formats.
Cons:
- VLC can't copy protected DVDs.
- VLC takes too long to copy a DVD.
- VLC is not as user-friendly or intuitive as dedicated DVD ripping software.
Steps to Rip DVD to Hard Drive on Mac with VLC
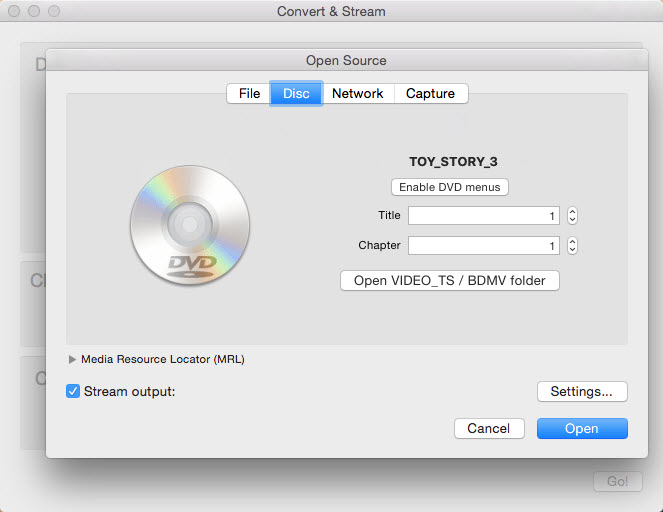
Step 1. Download VLC on your MacBook Pro/Air, iMac, Mac mini if you haven't installed it. Insert the source DVD and open VLC. Click on File on the top menu bar, select Open Disc and choose your DVD.
Step 2. When the DVD is loaded, you need to disable the DVD menus. This is to avoid errors like VLC ripping the menus part repeatly. If it's a protected DVD, you can play the DVD in a DVD player first, mark down the real DVD title, then enter the number in the Title/Chapter box. Then enable Stream output and click Settings.
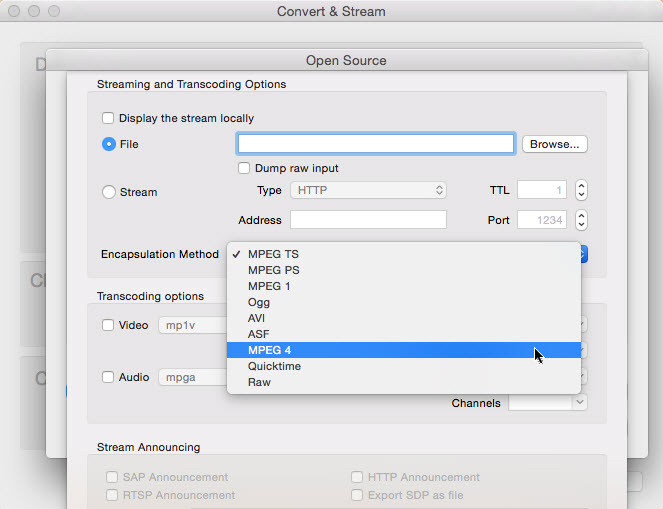
Step 3. Choose where you want to save the output file on your Mac. If you need to transfer the DVD to an external hard drive on Mac, you'd better save the output file locally and then copy the file to the hard drive.
Step 4. Choose an output format you need. Then click OK. VLC will start to copy the DVD to the Mac hard drive you just set.
Which is the Best Way to Copy DVD to Hard Drive on Mac?
To help you determine the best method for downloading a DVD to your Mac's hard drive, we have compared five different options in details.
| Features | MacX DVD Ripper | Disk Utility | Handbrake | MakeMKV | VLC |
|---|---|---|---|---|---|
| Copy protected DVDs to hard drive | Yes CSS, UOPs, APS, Sony ArccOS, Disney X-project, RCE, region codes, and almost all protections. |
No | Yes region codes and CSS with libdvdcss installed. |
Yes protected DVDs and Blu-ray discs. |
No |
| Output formats | MOV, MP4, MKV, ISO image, AVI, 350+ formats | ISO image | MP4 or MKV | MKV | MP4, H.264, MOV, MKV, several otheres |
| Speed | Fast, about 5x faster than others. | Slow | Slow | Fast | Slow |
| Quality | Original quality | Original quality | Good quality | Original quality | Good quality |
| Other features | Edit, adjust parameters, merge titles, add subtitles, crop, trim, etc. | No | Adjust quality, encoder, crop, trim, add subtitles, and more. | No | Adjust video parameters |
| Easy to use | Yes | Yes | No | Yes | Yes |
Summary
To copy a DVD to a hard drive on a Mac, all the above options have the job done. In terms of the better way, it depends on your specific needs and preferences. Disk Utility is a free and simple option but lacks advanced features. Handbrake and MakeMKV are free options with more customization options but may require some technical knowledge. VLC is a versatile media player that can also rip DVDs, but it may not be as user-friendly or versatile compared to dedicated software. Overall, MacX DVD Ripper offers a more user-friendly experience with advanced features. It also shows better performance in copying protected DVDs to hard drive, output quality, and copying speed.
Click the download button below to download the best Mac DVD ripper for ripping your DVD collection to hard drive on Mac.
How to Copy DVDs on Mac to an External Hard Drive to Watch on TV?
If you're copying the DVD movies to a hard drive on Mac for later playback on TVs, you'd better copy the DVD to a format support by your TV. You may choose to rip the DVD to MP4, which is supported by most TVs, or check the user manual of your TV model. After you rip the DVD to an external hard drive on Mac/Windows, you can play the movies from the hard drive on the TV. To play movies from a hard drive on a TV, there are two methods.
1. Stream DVD Movies on Hard drive to TV from Plex
Once all the DVDs are ripped on an external hard drive, you can set up your Plex. Download Plex and set it up. Login/create your account and name the server. Then create a library and add your movies. If your streaming player works with the Plex app, you can access your movie library and watch the DVD movies on the TV. Note that Plex doesn't support DVD formats such as ISO image and Video_TS folder.
2. Connect the Hard Drive to the TV
Check the manual of your TV to see if it supports HDD or USB input. If yes, simply connect the external hard drive to the TV and you can watch the movies on it. But you need to make sure that: the converted DVD movie on the hard drive is in a codec supported by the TV.
In addition, you need to ensure that the format of the hard drive is supported by your TV. Most TVs use the NTFS standard (However, macOS only supports FAT32 and exFAT formats). If the external hard drive you use to save the DVD copy is in HFS+ format, you need to format it to the NTFS format.
FAQ about DVD to Hard Drive
1. Can I directly copy the VOB, IFO, and BUP files from DVDs to the Mac hard drive?
Yes, as long as the DVDs are not encrypted or protected. If the DVD is properly made by yourself without copy protections, you can open the DVD and find a folder called Video_TS. In the folder, there are multiple files like VIDEO_TS.BUP, VIDEO_TS.IFO, Video_TS.VOB, VTS_01._0.BUP, VTS_01._0.IFO… The actual video is stored in.VOB files. You can either copy the entire Video_TS folder from the DVD to your Mac hard drive or external hard drive, and play the Video_TS folder with the Apple DVD Player app, or copy the .VOB files from the DVD to your Mac hard drive to play the individual VOB videos.
But for protected DVDs, you can't simply copy the content because the DVD copyright protections are designed to prevent DVDs from being copied directly.
2. Any other tools to copy DVD to Mac hard drive?
- VLC - free rip unprotected DVDs on Mac hard drive in MKV, MP4, WebM, AVI, MOV, and various other formats.
- iSuper DVD Ripper - rip home-made DVD to hard drive on Mac in MP4, AVI, WMV, etc. It doesn't support protected discs.
- MacTheRipper - MTR V2.6.6 is a free choice to save DVDs in VIDEO_TS folder on Mac hard drive. Macrovision and CSS protections are supported.
- Mac DVDRipper Pro - Copy DVDs to Mac hard drive in ISO image or dvdmedia, and also rip DVDs to .m4v/.mp4/.mkv for iDevices and Apple TV. The first 5 rips are free.
3. How to copy DVDs from Mac to an external hard drive?
If you need to transfer DVDs to an external hard drive on Mac, you'd better convert DVD to digital video, save it on your local Mac's hard drive, then transfer the DVD video from Mac to an external hard drive. It's always not a good idea to set an external hard drive as the destination folder during ripping.
Here is how to do it: Connect the external hard drive to your Mac > open the Finder app and select the DVD video > press Command-N to open a second Finder window and choose the external hard drive under the Devices >drag and drop DVD video from your Mac's Finder into the external hard drive.
4. What is the best format to rip DVDs onto a hard drive?
It all depends on what you want to do with the copied DVD video. Below are some examples:
- If you want to transfer the DVD collections to a hard drive to keep a safe copy, then quality will be what you care about most. In this case, consider ISO image, Video_TS folder, MPEG-2 VOB files, or MKV. They will keep 100% of the original DVD quality, but these formats are not accepted by many players.
- If you want to copy DVDs to a hard drive on Mac in order to play them easily without using an optical drive any more, MP4 is good for you. It's widely supported by most mobiles, TVs, players, and devices.
- If the hard drive doesn't offer a very large storage for your DVD collection, try to convert the DVDs to MP4 HEVC. It's able to compress a DVD from 7.5 GB to less than 1 GB without quality loss.
5. How many DVDs can you store on 1tb hard drive?
It depends on what format you use to copy the DVD. For example, if you copy the DVD to a hard drive in ISO image or Video_TS folder in order to keep the best quality, the copied DVD video will be as large as the source DVD, namely, 4.7GB. Then you can store about 200 DVD movies on a 1TB hard drive. However, if you choose to copy the DVD on a Mac hard drive in a more efficient format, such as MP4, the size of the copied DVD will be largely reduced. Then you can transfer more DVD movies on the hard drive.
6. How do I copy a Blu-ray DVD to my Mac hard drive?
To rip a Blu-ray DVD to a hard drive, you will need a program to decrypt and copy the Blu-ray discs. For that, it's highly recommended to use MakeMKV, which supports encrypted Blu-ray DVDs. Here are the steps:
- Visit the official MakeMKV website and download the appropriate version for your Mac. Then insert the Blu-ray DVD you want to copy into your optical drive.
- Open MakeMKV on your Mac and it should be able to load the Blu-ray disc automatically. If not, click on the "File" menu and select "Open Disc." MakeMKV will detect the Blu-ray disc in your drive and display its contents.
- MakeMKV will display a list of titles and chapters found on the Blu-ray disc. Select the main movie or the specific content you want to copy. Uncheck any unwanted titles or chapters.
- At the top of the MakeMKV window, choose where you want to save the copied Blu-ray content on your Mac. Make sure you have enough free space on your hard drive for the output file.
- Click on the "Make MKV" button to start the copying process. MakeMKV will extract the selected content from the Blu-ray disc and save it as an MKV file on your computer.
- Once the copying process is finished, you will have an MKV file with the same content as the original Blu-ray DVD on your Mac's hard drive.
7. How long does it take to copy a DVD to hard drive on MacBook Pro/Air, iMac, Mac mini?
The time it takes to copy a DVD to a hard drive on Mac can vary depending on several factors, including the speed of your Mac's DVD drive, the size of the DVD, the performance of your Mac, and the DVD copy software or method you use.
On average, copying a standard DVD (with a capacity of 4.7 GB) using typical DVD copying software can take anywhere from 10 to 30 minutes. However, if you're copying a dual-layer DVD (with a capacity of 8.5 GB) or a DVD with additional content like special features, the copying process may take longer.
8. Is it legal to copy DVD to hard drives on Mac/PC?
It is widely considered legal to copy your legally purchased DVD to a hard drive for backup or easier playback purposes. However, it is important to note that this practice should only be done for personal use and not for illegal distribution of copyrighted content. We advocate for transferring a DVD to your computer's hard drive under the concept of Fair Use and do not encourage any illegal reproduction or distribution of copyrighted content. It is important to abide by the local DVD copyright laws before engaging in such activities.
If you have any problem on how to copy and rip DVD to internal/external hard drive on your macOS, just email us >>


Bella has been working with DVD digitization for over 12 years. She writes articles about everything related to DVD, from disc drive, DVD copyright protection, physical structure, burning and backup tips. The unceasing passion of DVD movies helps her build a rich DVD library and ensure a practical solution to address almost all possible DVD issues. Bella is also a crazy fan for Apple products.


