

DVD discs are becoming less reliable over time due to scratches, aging, and even drive compatibility issues, while most users have already shifted toward streaming and digital access. This is why more people are choosing DVD to NAS setups to digitize DVD collection and build a home media server. In simple terms, DVD to NAS means ripping DVDs into digital files like MKV or MP4, storing them on a NAS, and streaming them through tools such as Plex or Jellyfin across TV, phone, or tablet anytime. In this post, we'll introduce a DVD ripper that can help you digitalize a DVD to NAS in minutes with original quality.
Part 1. Download the Right DVD to NAS Ripper
The "right" means good output quality, fast DVD ripping speed, and the ability to bypass DVD encryption which really matters most since almost all DVDs you rent or bought come with DRM protection. Anyway, you won't go wrong with MacX DVD Ripper Pro, a top-rated DVD ripper recommended by tech giants like Macworld.
With MacX DVD Ripper Pro, you can do the following things.
- 1:1 copy DVD to ISO and VIDEO_TS folder with full DVD content preserved - no quality loss.
- Digitize DVD to NAS-friendly MP4 H.264, MOV, HEVC for playback on Plex, Jellyfin, mobiles, TV, or game consoles.
- Convert DVD at 5x faster thanks to the support for level-3 hardware acceleration.
- Bypass any copy-protection schemes, such as Disney DRM, CSS, Region Code (1-6), Sony ArccOS and UOPs.
- Edit and compress DVD, trim, crop, add subtitles/watermark, adjust DVD video audio parameters.
Download the DVD to NAS ripper and start to learn the guide below on how to rip DVD to NAS drive.
Part 2. How to Rip DVD to NAS Drive with High Quality
Step 1: Free download the DVD ripper according to your OS platform. Then run it. Insert DVD, click "DVD Disc" icon at the top-left corner and select DVD to be converted.
Step 2: Select an output format and click "Done".
You are offered a wide range of preset profiles for iPhone, Android, TV, gaming console, as well as digital video formats covering MP4, AVI, MOV, MKV, together with 4 DVD backup modes - main title/full title copy, backup DVD to MKV, copy DVD to ISO image.
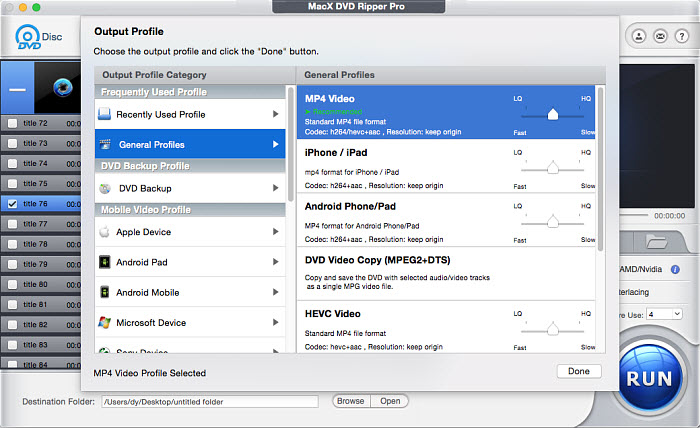
Step 3: Click "RUN" to begin DVD ripping. The speed will depend on your personal computer hardware, like GPU, CPU, RAM, DVD-ROM reading speed, HDD write speed etc.
Tips: Best Format for Ripping Movies on DVDs to NAS Drive
• If your priority is a full 1:1 DVD backup with no concern for file size, ISO is the closest option when storing DVD movies on a NAS. It preserves the entire disc structure, including menus, chapters, multiple audio tracks, and subtitles, with no quality loss.
• If you care most about maintaining original video quality for streaming, MKV is often the preferred format for DVD to NAS setups. It delivers near-lossless playback quality and works well with most media servers such as Plex and Jellyfin, though it requires more storage space.
• If you want a balance between quality, file size, and compatibility, MP4 (H.264) is the most practical choice. It compresses efficiently while remaining widely compatible with TVs, smartphones, computers, and game consoles, making NAS streaming smooth across devices.
Part 3. Transfer DVDs to NAS for Easy Streaming and Backup
Once your DVDs are converted into digital files on your computer, the next step is to move them to your NAS for centralized storage and streaming. Most NAS systems, such as Synology, provide built-in file management tools that make this process straightforward, allowing you to upload files directly from your local drive.
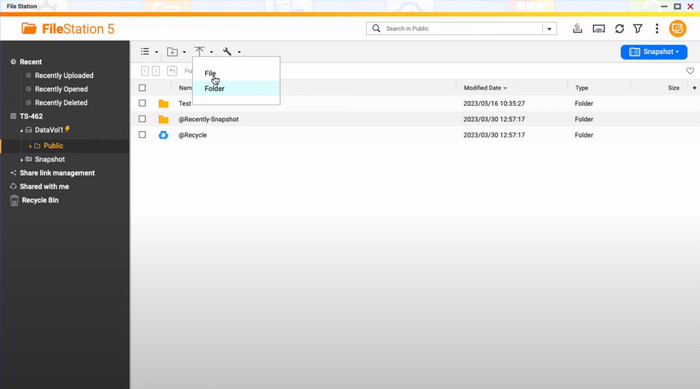
Step 1: Open File Station on your Synology NAS.
Step 2: Select a shared folder where you want to store your DVD library. Keeping a clear folder structure helps media servers like Plex or Jellyfin organize your collection properly.
Step 3: Upload your DVD files by clicking the Upload option and selecting either individual files or entire folders from your computer. Once completed, the movies will be available on your NAS for streaming and backup.
FYI, there are still some other NAS devices such as Synology, Western Digital MyCloud, Seagate, Asustor and more. Click to see more NAS drives for Mac >>
Part 4. Pros and Cons of Ripping DVDs to NAS vs USB, Cloud, Hard Drive
Compared with copying DVDs to USB drives, external hard drives, or cloud storage, a DVD to NAS setup offers a more centralized way to manage and stream your movie collection across multiple devices.
Unlike USB drives or external hard disks, you don’t need to physically plug anything in every time you want to watch a movie. Everything is stored in one central library that can be accessed from multiple devices.
Compared to cloud storage, NAS avoids monthly subscription fees and gives you full control over your DVD collection without relying on third-party services or upload limits.
With a home media server like Plex or Jellyfin, your DVD library can be streamed directly to TVs, phones, tablets, and game consoles anytime, just like a personal streaming platform.
NAS devices usually require a higher upfront cost compared to USB drives or external hard disks, and the initial setup can feel complex for beginners.
Playback performance may depend on file format and hardware. Poorly optimized formats can cause buffering or force transcoding during streaming.
Managing a large DVD library on NAS also requires some organization, especially when integrating with media servers like Plex or Jellyfin for proper metadata and folder structure.
Note: This guide is intended for personal backup and fair use purposes only. Please follow local copyright regulations before ripping DVDs.


Bella has been working with DVD digitization for over 12 years. She writes articles about everything related to DVD, from disc drive, DVD copyright protection, physical structure, burning and backup tips. The unceasing passion of DVD movies helps her build a rich DVD library and ensure a practical solution to address almost all possible DVD issues. Bella is also a crazy fan for Apple products.


