

"I'm trying to copy my wedding DVD to my iCloud drive so I can play it back using my phone as well as ensure it is saved on the cloud for future. Can anyone help with step by step instructions for someone that isn't too tech savvy." -Apple Community
Compared to discs, iCloud is a more secure storage option. With a maximum of 12TB of storage, you can almost transfer all your DVD collections to iCloud. Then you can watch your movies on iPhone, iPad, and Mac without using the discs and an optical drive. However, you can't upload a DVD to iCloud directly. You need to convert DVDs to iCloud supported formats and then store the DVD movies on Apple iCloud. Below we will show you how to do it in details.
Best Tool to Convert DVDs to iCloud for Easy Upload
To upload DVDs to iCloud, you need to convert DVDs to iCloud supported video formats: MOV, MP4, M4V.
MacX DVD Ripper Pro makes it easy to put DVDs to iCloud, Dropbox, Google Drive, Dropbox, OneDrive, Amazon Cloud , hard drive, USB, etc.
It's able to digitize DVDs into iCloud formats such as MP4, HEVC, MOV, M4V, as well as MKV, Video_TS folder, ISO image, AVI, WMV, and 350+ formats. It can compress a DVD from 7.5GB to less than 1GB in high quality so as to save the iCloud space and reduce the uploading time. You homemade DVDs and store-bought DVDs that are protected by region codes, CSS, RCE, Sony ARccOS, Analog Protection System, Disney X-Project (99-title), etc. are all supported. 5x faster to convert DVDs to iCloud MP4 than others!
Note: This guide is to help DVD owners to copy DVDs to iCloud for easier playback and storage. You're not allowed to decrypt any disc for illegal use. Please consult the law in your area before you convert any commercial DVD.
4 Benefits: Why Store DVD Movies on iCloud
1. You no longer need to slide the disc into a DVD drive each time you want to play the movie.
2. After you upload DVD movies to iCloud, you free up space for physical hard drive that houses the movie files.
3. Once converting your movie library to digital files and store DVD movies onto iCloud, you can safe keep your DVD collection and avoid disc scratches, damage or loss.
4. By digitizing DVD into iCloud formats, you can choose to watch DVD movies freely on Mac, iPhone, iPad, Apple TV via iCloud drive, without taking around DVD discs or optical drives.
Step 1: How to Convert DVD to iCloud on Mac and Windows
MacX DVD Ripper Pro offers an easy way for more feasible storage, organization and management of your DVD discs. It makes it possible to save your whole DVD library on iCloud by digitizing DVDs into MP4, MOV or other common formats. Below are the step-by-step guide.
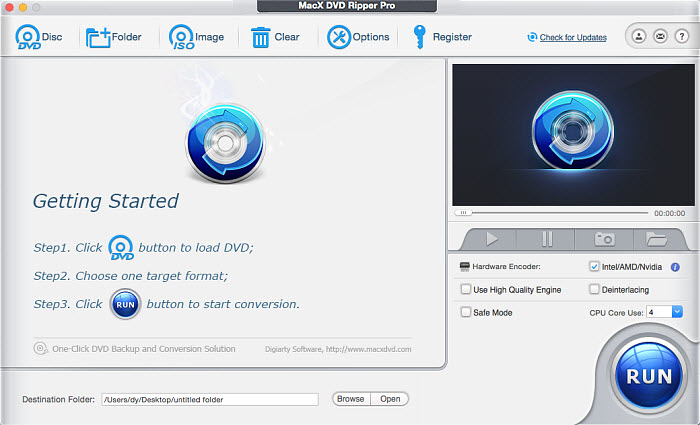
Step 1: Free download the DVD to iCloud converter on your computer, install and run it. Load the DVD movie by hitting the DVD Disc on the main interface. It also supports converting DVD ISO image or DVD Folder to iCloud supported formats.
![]() Free download DVD to iCloud converter on Mac >>
Free download DVD to iCloud converter on Mac >>
![]() Free download DVD to iCloud converter on Windows >>
Free download DVD to iCloud converter on Windows >>
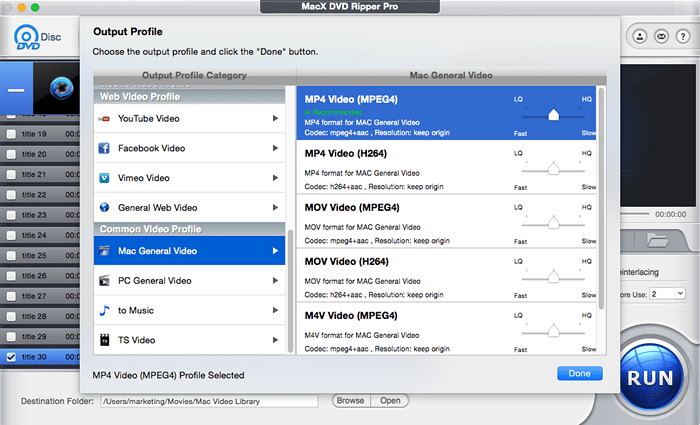
Step 2: Choose output format. To store DVDs on iCloud, you need to convert DVDs to MP4, MOV (H.264/HEVC), or M4V. To strike a perfect balance between file size and quality, we suggest choosing MP4 H.264 as the output format, which is also recognizable by Apple TV, iPad, iPhone, iMovie and other Apple devices and apps.
Scroll down the list on the left column, select Mac General Video, and choose MP4 Video.
Step 3: Click Browse to choose the location where you want to save the DVD movie on your Mac.
Step 4: Click RUN button to start ripping the movie content off DVD into an iCloud file format. A few minutes later, you can get a video file of the DVD movies for your iCloud.
Note: generally, a 4.7GB DVD is converted to a file under 1GB. But iCloud only has 5GB of free storage. The program is able to compress a DVD to smaller video so that you can store more DVD movies on iCloud.
Step 2: How to Put and Upload the Converted DVD to iCloud
Once you've converted the DVDs to an iCloud video file, you can store your movie library to the cloud service for streaming later. Here is the guide on how to sync and upload converted DVDs to iCloud.
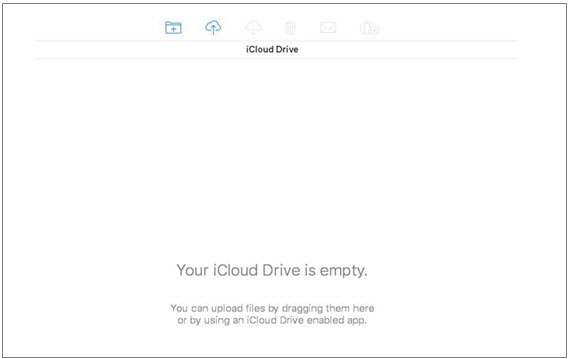
Step 1: Start you iCloud on your computer browser and log in your account.
Step 2: Click on iCloud Drive icon. Then click on "Upload" and go to the folder that you store the DVD file.
Step 3: Select the converted DVD file you want upload to iCloud Drive, and click "Apply". You can also upload DVD videos to iCloud by drag and drop. Just wait till the movie sync finishes, you can enjoy the converted DVD movie on any Apple device once you log in your iCloud account.
External reading:
What's iCloud: iCloud is a cloud storage service developed by Apple on October 12, 2011. It is used for storing data like movies, photos, music, documents, etc on remote servers so that Apple users can download them to iPhone, iPad, Apple TV, Mac or Windows.
Still have any problem on how to rip and upload DVD library to iCloud, just email us >>


Bella has been working with DVD digitization for over 12 years. She writes articles about everything related to DVD, from disc drive, DVD copyright protection, physical structure, burning and backup tips. The unceasing passion of DVD movies helps her build a rich DVD library and ensure a practical solution to address almost all possible DVD issues. Bella is also a crazy fan for Apple products.


