There are two kinds of iPhone users, those who lost data and those who will. Unfortunately, many users haven't started backing up data until they lost the important files. There is enough emphasis on the necessity of data backup and today we're not going to continue the topic. Today we will show you the full steps on how to backup iPhone to iTunes correctly as the reason that users don't back up is because that they don't want to mess things up, especially when using iTunes backup.
How to Backup iPhone Data to iTunes?
What Does iTunes Backup Include?
Before we start, you may want to know if iTunes does contain the data you want to store. There are still users on Google asking does iTunes backup iPhone photos, contacts, messages, etc. Let's be clear, iTunes will backup almost all your iPhone data and settings, except the following (from Apple):
* Content from the iTunes and App Stores, or PDFs downloaded directly to Apple Books
* Content synced from iTunes, like imported MP3s or CDs, videos, books, and photos
* My Photo Stream
* Face ID or Touch ID settings
* Apple Pay information and settings
* Activity, Health, and Keychain data (Encrypted Backup will backup this data)
Step 1: Enable iTunes Backup
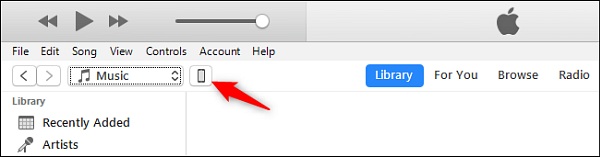
1. Launch iTunes and connect iPhone to the computer. After that click Continue button in iTunes and also authorize the computer on iPhone.
2. Click the device icon next to the left drop-down menu and then click the Summary button from the left sidebar. Scroll down and find Backups section.
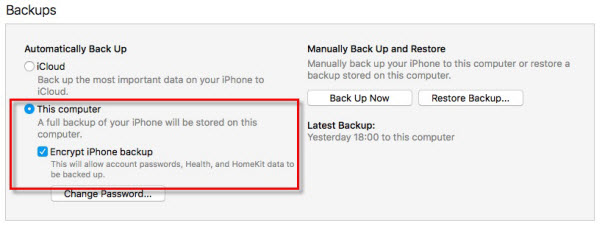
3. Check the box This computer below iCloud. You can also encrypt the backup, which will back up more data of iPhone, including your account passwords, health, and HomeKit data. Check Encrypt iPhone backup box and it will ask you to set a password. Remember, if you forget your password, you're not able to restore the password-encrypted iTunes backups.
Step 2: Back up iPhone to iTunes
After you set the password, iTunes will start to backup iPhone to iTunes automatically. Then you only need to wait for the process to finish. If you have set the password before and start to backup data from this step, it's very easy: connect iPhone to the computer > open iTunes > click device icon next to the left drop-down menu and then Summary > click Back Up Now under Manually Back Up and Restore section > click Done.
If iTunes backup is so easy, why are so many users daunted by iTunes?
Although the steps to backup iPhone data to iTunes seem to be simple, it is, in fact, a process full of pitfalls. For example, you may be familiar with following iTunes not working cases with a prompt of kinds of iTunes error codes like error 14/9006 (iTunes won't restore issue) , error 54 (iTunes not syncing to iPhone problem)
* iTunes could not backup the iPhone because an error occurred. A message comes up telling you that iTunes won't back up your device because of an error but without identifying what the error is. This is really annoying.
* iTunes could not backup because an error occurred while reading from or writing to the iPhone.
* iTunes won't recognize iPhone. "When I connect my iPhone to my computer, iTunes doesn't recognize it, help!"
* iTunes backup is corrupted or incompatible and therefore you can't restore the data you backed up to your device.
* iTunes backup won't complete or get stuck.
Possible solutions:
1. Check the USB connection and try another USB port.
2. Make sure there are enough space on your computer. You may need to delete old backups from the folder that store the iTunes backups. The iTunes backup location is:
* On Mac: ~/Library/Application Support/MobileSync/Backup/
* On Windows (10/8/7): \Users\(username)\AppData\Roaming\Apple Computer\MobileSync\Backup\
3. Go to the iTunes backup location and rename the old iTunes backup folder to force iTunes to create new backups.
4. Check, update or disable the security system.
5. Check for software updates of iPhone, computer and iTunes.
6. Shut down iTunes and enable backups in Run by entering "%ProgramFiles%\iTunes\iTunes.exe" /setPrefInt DeviceBackupsDisabled 0" (Windows)
7. Set the settings: Background App Refresh off, Airplane Mode on, and Low Power Mode on
8. If all these steps or tricks won't let your iTunes work, try the third-party iPhone backup tool below.
If you're prompted with other iTunes error codes, such as iTunes error 9, error 3259, error 17 etc., you can check the fixes of full iTunes errors here >>
How to Backup iPhone to Computer without iTunes
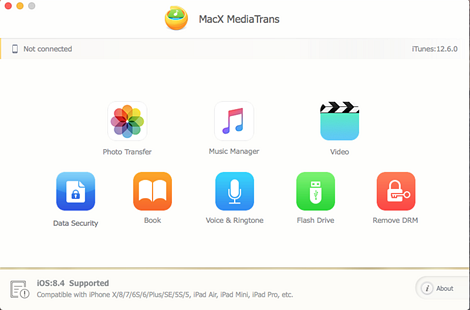
This part is for those who have trouble to backup iPhone using iTunes and who need to protect their music, photos, videos, etc. in an easier way. The tool you need is MacX MediaTrans, which is able to backup videos, photos, songs, playlists, ringtones, books, iTunes purchases, audio, other data from iPhone to computer as an alternative of iTunes. The data backup speed is super fast (far faster than iTunes) and the whole process is stable without issues.
 Free download Mac version
Free download Windows version
Step 1: Connect iPhone to the computer via a USB cable and run the app. From the main interface, select the data type you want to backup like Photo Transfer.
Step 2: In the popup window you can see all your photos listed here with the album categories showing on the left sidebar. To backup all the photos from iPhone to computer, check the Select All box on the top toolbar. Or click Ctrl button and select multiple photos you'd like to backup.
Step 3: Then hit Export on the top toolbar and the photos will be saved to the folder you set on the computer. If you want to encrypt your backup, click Export with Encryption and set a password, then it will automatically backup the photos encrypted. Check detailed guide on how to backup iPhone without iTunes
Note: If you want to restore your backups, simply click the Import and add the media to your device.
Still have any problem on iPhone backup using iTunes, just email us >>
Related Articles


 By Rico Rodriguez to iPhone Tips, iTunes|Last updated on Sep 13, 2023