

With the arrival of new iPhone, the internet is inundated with numerous tutorials about how to set up new iPhone, but many of which focus merely on iPhone activation guide while ignore the preparation before iPhone setup such as data backup and underestimates the troubleshooting to iPhone problems and performance enhancing tips after iPhone updating, such as data loss, movie and music transfer, and so on. Don't rush. Below is all you want to get started with your new iPhone or iPad, be you are a greener or iOS Pro. Just check the to-do list when you activate iPhone.
Part 1. Make sure you backup your old iPhone first
Backing up old iPhone is considered as a must-to-do before you set up iPhone , though it is not actually part of iPhone activation. If data means a lot to you, follow the tutorial to back up iPhone using iTunes and iCloud before you get started with iPhone setup. But if you do need the actual new iPhone setup tutorial, just jump to part 2.
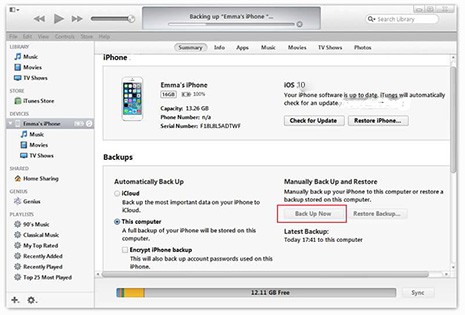
Option 1. How to Back up your new iPhone with iTunes: Update iTunes to the latest version > Connect your iPhone to computer > Open iTunes if it doesn't open automatically > Select the device > Press Sync button.
Note: iTunes sync comes with a lot of problems, e.g. data loss, won't detect iPhone or computer, etc. If you have encountered any of these iTunes errors, you need an iTunes alternative for a smooth backup for a successful setting up iPhone.
Click to see more iPhone 11 update tips >>
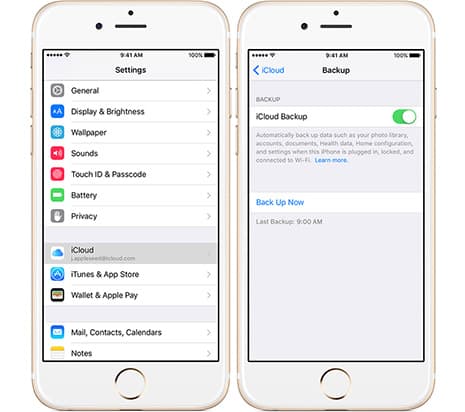
Option 2. How to Back up your iPhone with iCloud: Tap on Settings > iCloud > Backup > Turn on iCloud Backup > Back Up Now. See also: How to fix iCloud backup not working error >>
Note: Please make sure you have enough iCloud storage space. If not, please free up space on iCloud before doing so. Then you can go on setting up iPhone.
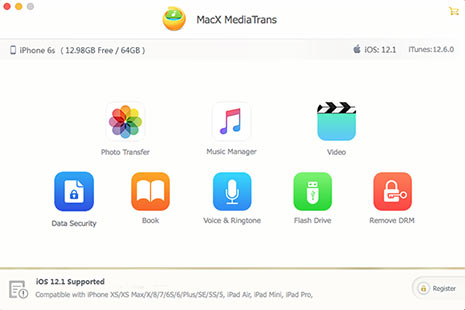
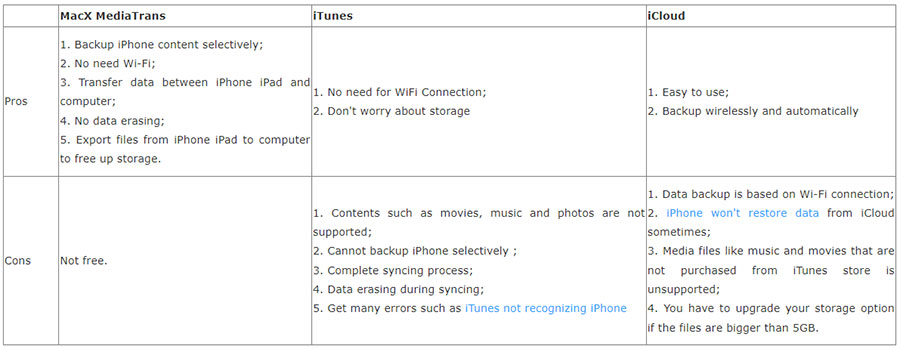
Option 3. How to Back up iPhone with data transfer software: The contents to be backed up via iTunes or iCloud are limited to photos, messages, ringtones, contacts, etc and you cannot back up data selectively. For photos, songs, videos, books synched from computer, etc, the two services are helpless, let along transferring data from iOS to computer. If these are what you concern most, you can try other tool, such as MacX MediaTrans, which is able to selectively back up important data, e.g. music, ringtones, photos, videos, movies, TV shows, books, voice memos, podcast, etc on iPhone iPad and iPod within 3 steps.
Step 1:After you ![]() free download and run the iPhone iPad manager on computer, connect your iPhone to computer with a USB cable. This is must preferred especially when your iPhone won't connect WiFi.
free download and run the iPhone iPad manager on computer, connect your iPhone to computer with a USB cable. This is must preferred especially when your iPhone won't connect WiFi.
Note: We strongly suggest you disabling iTunes Auto Sync to prevent any data erasing before you backup your data on iPhone.
Step 2: This tool offers 7 modules in the center and you can hit one selectively based on your own needs. For instance, if you need to backup photos from iPhone, just go to the tap Photo transfer and select the target photos.
Step 3: Hit Export button to copy files from iPhone iPad to computer.
Part 2. How to Set up New iPhone
With all your data backed up, you can move to the next sector and learn how to set up iPhone.
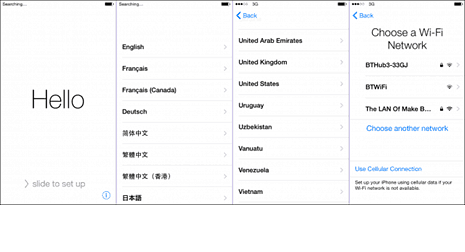
Step 1: Turn on your new iPhone. Slide to right to begin set up after you see Hello in many languages.
Step 2: Choose the language, country or region, which has impact on how the information looks on your iOS device.
Step 3: Connect to a Wi-Fi network, cellular network, or iTunes to activate iPhone and continue setup. SIM Card is needed if you set up iPhone 11 with WiFi and Celluar. Decide on Location Services.
Step 4: Set up Touch ID. Use your fingerprint to unlock your iPhone. Then create a six-digit passcode to protect your data.
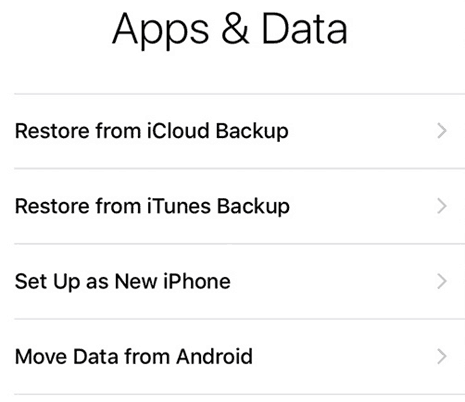
Step 5: Restore iCloud backup to new iPhone 14 or restore data from iTunes to iPhone. If there isn't any backup, just select Set Up as New iPhone.
Step 6: Enter your Apple ID and password or skip the process and create an Apple ID or set it up later. Accept the iOS terms andconditions.

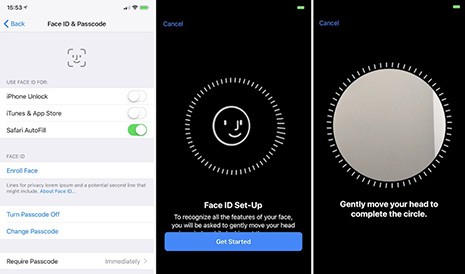
If you purchase an iPhone 14, skip Step 6 and set up Face ID on your iPhone.
- Navigate to "Settings" > choose "Face ID & Passcode" on your iPhone.
- Choose to set Face ID for iPhone Unblock, iTunes & App Store, Apply Pay and Safari Autofill.
- Tap Encroll Face to begin setting up Face ID by moving your face, front and side face.
- Click "Continue" if the Face ID scanning process is over.
Step 7: Choose and set up Siri. Sometimes, speaking some phrases is necessary in order that Siri gets to know your voice.
Step 8: Setting up iPhone home button responds while pressing it > tap Next.
Step 9: Decide whether to share information with app developer and choose teh display resolution.
resolution. Then finish up.
Part 3. Restore your new iPhone from iCloud/iTunes backup
To activate iPhone smoothly, take a look at the below iPhone tips and tricks about how to restore iTunes/iCloud backup during iPhone setup.
Option 1. How to restore from iTunes backup: Connect iPhone to computer using a USB cable, select Restore from iTune Backup > Next > Enter your Apple ID and Password, select the desired backup from pop-up menu, then begin the setup process.
What if iPhone cannot be restored with error 3004? Fix it here >>
Option 2. How to Restore from iCloud backup: Select Restore from iCloud backup > Next > Enter your Apple ID and Password > Agree to the iCloud terms and condition then pick up the backup and begin restoring. Learn more about how to restore iPhone from iCloud backup.
Part 4. How to Transfer Data to your First-Ever iPhone after Setup
If moving all the data to your new iPhone is lengthy and you are fed up with the constant data erasing or unselectable restoring, you can alter to choose to transfer important items selectively and safely by taking advantages of some professional data transfer app such as MacX MediaTrans. It distinguishes from iTunes and iCloud with the following features:
- Put music onto iPhone without wiping, and transfer songs, playlists, albums and ringtones from iPhone back to computer.
- Get photos off iPhone to computer and vice versa, along with abilities to delete, organize, and sort photos.
- Import/export iTunes movies, tv shows, videos between iPhone iPad and computer while reducing file size up to 50%. Remove DRM from iTunes with ease.
- Transfer other data such as books, audiobooks, iTunes U, Podcast, etc to iPhone or to computer.
- Ultra fast data transfer speed.
Check the detailed comparison among iTunes, iCloud and MacX MediaTrans before you may a decision for iPhone management.
Part 5. Problems with iPhone Setup along with Solutions
1. Cannot activate iPhone
When you try to activate your new iPhone, an alert message indicating your iPhone cannot be activated because of the unavailable activation server, unsupported SIM card or incomplete activation, you can follow the steps below to get your iPhone set up worked:
- Make sure you have a SIM card that is not damaged or locked.
- Find the list on the system status page. If the box near iOS device activation is not green, wait a few seconds and activate your new iPhone later.
- Enter a password as it asked for you and then restart your iPhone.
- Connect to a reliable Wi-Fi. Or else, make sure to update iTunes to the latest version and connect to iTunes.
2. iPhone got frozen when you set up iPhone
Some users report that iPhone is frozen with a white display and shows the slide button Actualization. This is a special problem for iOS 17 users. You can follow the steps below to get iPhone right setup: hold down the home button along with the sleep/wake button till the screen goes black and the Apple appears again.
3. Cannot restore from iCloud backup
When you get the error "could not connect to iCloud", follow the steps to ensure you are able to set up iPhone from iCloud backup.
- Enable iCloud backup and keep your iPhone connected to a reliable Wi-Fi network.
- Make sure you have enough iCloud storage. If a message showing you not enough icloud storage, you have to upgrade your storage to keep backing up your iPhone daily.


Rico has been fascinated with mobile technology for as long as he can remember. He is keen to share his experiences to those who get stuck in data transfer for both iOS and Android users. Besides his regular passion related to mobile data management, he also enjoys reading books, playing games and occasionally watching Marvel inspired movies.


