
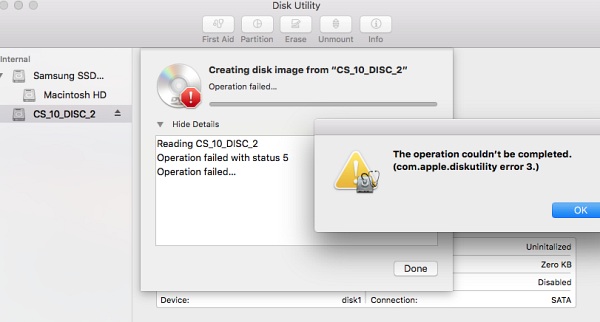
"I am trying to copy a DVD using Disk Utility. I do all the steps: open Disk Utility > Choose DVD > New Image From Name of Disc, Save, all that. But every time it copies, it inevitably fails, giving the same error message 'The operation couldn't be completed. (com.apple.diskutility error 3.)'."
This is a user on Apple Communities who can't copy a DVD with Disk Utility. In fact, besides com apple diskutility error 3, there are many other errors like operation failed with status 5, error status 27, "cannot copy - input/output error", stuck screen loading disks with a spinner graphic, etc. that prevent Disk Utility to copy a DVD on Mac successfully. In this post, we're going to solve all these Disk Utility DVD copy errors and let you copy protected DVDs on Mac without trouble.
Understand the Limitations of Disk Utility
Before we start to fix Disk Utility DVD copy errors, there are some limits that you should know. Make sure they are not the reasons to "Disk Utility will not copy DVD" issues.
- Apple products including iDVD, DVD Studio Pro, Disk Copy, and Disk Utility can't copy DVDs with protections. So if you're trying a commercial disc, it may give your problems like cannot copy - input/output error. If you want to copy protected DVD to Mac, you will the help from a third-party helper.
- You can't burn DVD using Disk Utility anymore if you're running OS X 10.11 or later as Apple has removed the burning functionality since El Capitan.
- You should know that Disk Utility is a great tool to create disk image of a DVD, portable drive or desktop drive. The CDR image is a DVD/CD Master file used to create DVD copies, not a playable video format or the like.
When Disk Utility will Not Copy DVD, You May Try:
1. Kill the FSCK process
Killing the FSCK process has solved many Disk Utility DVD copy errors, especially errors like Disk Utility won't load discs...
in terminal
ps -ef | grep fsck
- $ ps -ef|grep fs
- 0 55 1 0 3:39PM ?? 0:03.45 /System/Library/Frameworks/CoreServices.framework/Versions/A/Frameworks/FSEvent s.framework/Versions/A/Support/fseventsd
- 0 110 1 0 3:39PM ?? 0:00.02 autofsd
- 0 126 1 0 3:39PM ?? 0:01.44 /usr/sbin/cfprefsd daemon
- 501 326 1 0 3:39PM ?? 0:01.47 /usr/sbin/cfprefsd agent
- 0 14893 86 0 4:45PM ?? 1:41.64 /System/Library/Filesystems/hfs.fs/Contents/Resources/./fsck_hfs -y /dev/disk2s2
- 501 18726 3828 0 5:02PM ttys000 0:00.00 grep fs
Then sudo kill the fsck process. Once the fsck process is killed, the Disk Utility should restart and copy the DVD as expected.
2. Reset PRAM/NVRAM or SMC
Resetting the PRAM/SMC is a way to clear corrupted files related to stuff like RAM disk, Disk cache, Startup disk, etc. It can also help solve many DVD playback and copy problems on Mac like Mac DVD player not responding. Also there are users reported that they successfully solved Disk Utility DVD copy errors by resetting them.
Reset the SMC: shut down the Mac > press and hold the power button for 10s and restart > press and hold the right Shift, Option and left Control key for 10s > keep holding the keys and then press and hold the Power button for 10s > then release and wait for seconds > restart.
Reset the NVRAM/PRAM: shut down the Mac > press the Power button > before you see a grey screen, press the Command, Option, P and R keys at the same time until you see a grey screen > keep holding the keys until the Mac restarts and hear a second startup chime > release.
3. Restart the computer in Safe Mode
Restart the computer in Safe Mode: restart your Mac, press and hold the Shift key when it lights up > release it when you see the login screen. Then restart again and check if it solves com apple diskutility error 3 DVD/status 5 or the like.
If this doesn't help, then boot to the Recovery Mode: Restart the computer and press and hold down the COMMAND and R keys once you hear the startup chime. Keep holding the keys until the Apple logo appears. After several minutes, the Utilities menu screen appears.
4. Copy DVD from folder
If Disk Utility will not copy DVD to disk image, as reported by a user on Apple Communities, you can copy all the contents of the DVD to, for example VIDEO_TS folder or ISO image (but since El Capitan, you can no longer just drag disk images from the Finder into Disk Utilities; instead, you must choose the relevant image using the File > Open Disk menu). Then use Disk Utility > click New Image > Create new image from folder.
If Disk Utility will Not Copy DVD, Try MacX (Any DVD Supported)
The above are the methods that are reported to be efficient to fix part of Disk Utility DVD copy errors like com apple diskutility error 3, status 5, etc. Trying the above fixes may cost you a lot of time and energy as some of them are quite complicated. Most importantly, they won't fix all the "Disk utility won't copy DVD" issues. If you can't fix it or want to bypass the limits of Disk Utility (Disk Utility won't copy protected DVDs, limited output formats), use MacX DVD Ripper Pro to copy DVDs.
- Four DVD copy modes: clone DVD to ISO image in 1:1 ratio, copy the main title/full title to MPG, backup DVD to MKV.
- Create digital copies of DVDs in any formats: MP4, HEVC, MOV, AVI, WMV, MP3, other video/audio formats and Mac, PC, iPhone, iPad, TVs, 350+ other devices.
- Support DVDs of any types: discs protected with Region, RCE, CSS, Disney-X project, Sony ARccOS, UOPs, etc. as well as scratched DVDs, latest titles, workout DVDs, etc.
- Unique Level-3 Hardware Acceleration enables 47x real-time faster to convert DVD to MP4!
- Safe Mode and special title check mechanism bypass any errors with Disk Utility when you copy DVD.
Step 1. Insert the DVD that Disk utility will not copy into the computer. Run the program and click the Disc button to load the DVD.
Step 2. Once loaded, it will automatically detect the correct title of the DVD and then pop up a window asking you to select and output format.
- To copy a DVD to DVD: select DVD Backup > copy DVD to ISO Image. You will get a 1:1 image copy and then you can burn it to a blank disc using Finder.
- To simply copy a DVD to Mac: select Backup > Main Title/Full title will do. These options are faster than ISO image and will contain the main content of the DVD.
- To copy a DVD for eaier playback on other devices: select General Profiles > choose MP4 or other video formats. Or you can find the exact profile for your device.
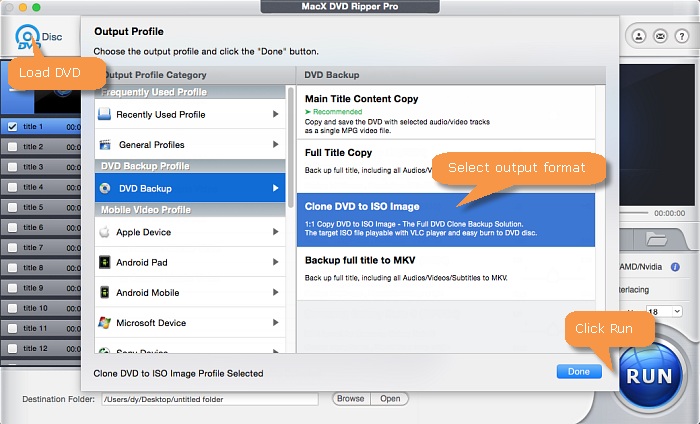
Step 3. Click Run to start the DVD copy.
Disclaimer: This post is to help users whose Disk Utility will not copy DVD or get com apple diskutility error 3 status 5, input/output error, or the like. It does not in any way advocate copying a DVD for any commercial or other illegal use. Please consult the law in your country before you copy any disc.


Bella has been working with DVD digitization for over 12 years. She writes articles about everything related to DVD, from disc drive, DVD copyright protection, physical structure, burning and backup tips. The unceasing passion of DVD movies helps her build a rich DVD library and ensure a practical solution to address almost all possible DVD issues. Bella is also a crazy fan for Apple products.


